Main technical characteristics of penoplex
Penoplex can be used as a mono-insulation material or in combination with heating pipes.
The optimal technology in modern construction is the insulation of surfaces using penoplex. This synthetic insulation has a number of advantages compared to similar materials:
- Withstands intense loads well.
- It is heat and moisture resistant.
- Environmentally friendly material, since no formaldehyde is used in its production.
- High degree of sound insulation.
- Laying with penoplex is one of the most economical options, since no additional costs are required.
The material is made in the form of plates. Its structure consists of air cells, thanks to which the slab is light, but at the same time it does not lose its rigidity. Penoplex is most often used on the following surfaces:
- warm floor;
- priming;
- concrete floors.
One of the disadvantages of insulation is its deformation when exposed to ultraviolet rays.
Penoplex thickness
When laying penoplex on the ground, its thickness should be greater.
Before starting work, one often comes up with density parameters and thickness indicators. It depends on the heat loss that passes through the surface. For a floor on the ground and a concrete slab in a multi-story building, the indicators will be different, even if both objects are located in the same region.
The thickness of the slab will depend on where they plan to make the screed and for what purpose it will be used. If we are talking about laying penoplex under a water-heated floor, the thickness should be maximum. This way it will be possible to reduce heat loss and heating costs will be lower.
Recommended insulation thickness values for screed:
- For a concrete floor in a heated room - from 20 to 40 mm. If the goal is to simultaneously achieve sound insulation, it is better to choose slabs with a thickness of 50 mm.
- Slabs of 100 mm or more are laid on a concrete base on the ground in an unheated room from below.
If a screed is made under a warm floor, another 20 mm is added to the thickness.
Penoplex under floor screed - general information
Due to its high strength, penoplex is a universal material - it is suitable for thermal insulation of absolutely any surface. The big advantage in this regard is its ideal flatness, which makes it easy to clean the external floors.
It is important to know ! If you are choosing which penoplex to use for the floor screed, it does not matter - you just need to have enough thickness for the required level of thermal insulation. And the main thing here is the waterproofing layer.
The sheets themselves are stacked at a short distance from each other. Subsequently, the resulting void seams are eliminated. For this purpose, special construction foam is used, and sometimes adhesive tape is used.
Foaming voids with polyurethane foam Source sdelaysam-svoimirukami.ru
Methods of laying heating systems
Warm floors can be equipped with or without a concrete screed. Which method is better to choose depends on the technical features of the room.
Into a concrete screed
For a concrete screed, the building must have reliable floors.
The construction of a concrete system assumes that all heating elements are located under the screed layer. This technology is used for water and electric floors. In the latter case, only a separate heating cable can be covered with a layer of screed. Do not place a layer of concrete on heating mats. They can only be covered with ceramic tiles.
Concrete floors, due to their thickness, cannot be used in buildings with weak floors. The base should be a rough covering or monolithic slabs.
Advantages of concrete screed:
- Possibility of uniform heat distribution over the entire surface. Thanks to this, the room will warm up more efficiently.
- The concrete layer warms up slowly, but at the same time cools down slowly.
The disadvantages of the system are the complexity of the installation work. The concrete structure is made in layers:
- base;
- waterproofing;
- insulation;
- reflective foil;
- reinforcing mesh;
- heated floor pipe;
- pipe-cable.
Finishing materials are laid out as the top layer.
The heated floor screed is floating, so it must be separated from the walls by a gasket. If a semi-dry screed is used, panels with “barrels” are used to secure the pipes.
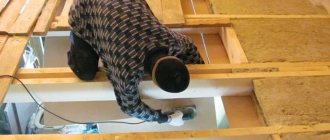
Into heat distribution plates without the use of concrete screed
Heat distribution plates in penoplex
When it is impossible to make a concrete screed due to its weight, heat distribution plates will help. They are made from aluminum or galvanized. Installed directly on the thermal insulation layer. The structures are equipped with gutters into which pipes are inserted. The plates make it possible to create warm floors in buildings with any ceilings. They perfectly reflect heat and distribute it evenly over the entire surface of the floor covering.
Unlike concrete screed, the plates heat up instantly. After turning off the heat supply, they remain warm for a long time.
Use of thermal insulation materials
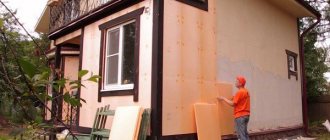
If the insulation of the floor of your loggia is carried out with heat-insulating materials (penoplex, mineral wool and others), then it would be correct to make a full-fledged thermal insulation layer, i.e. you will have to insulate not only the floor, but also other surfaces of the loggia - walls, parapet and ceiling. It is worth noting that penoplex insulation is somewhat popular due to its versatility. If at least one part is not insulated, then there will be little point in carrying out the entire complex of work.
Step-by-step instructions for laying thermal insulation materials on the loggia floor almost always involve installing wooden sheathing or laying joists.
After creating the sheathing, cells of certain sizes will be formed, into which the thermal insulation material chosen by the consumer is installed. Thermal insulation boards can be attached using any suitable adhesive. In addition, the step-by-step instructions also provide for the installation of a waterproofing layer - a polyethylene film should be laid under the insulation to protect it from moisture from lower neighbors.
Finally, the finishing coating is laid on the previously installed sheathing with your own hands.
For example, you can first trim the sheathing with plywood sheets or MDF; dense types of chipboard give excellent results. After which you can lay the finishing floor covering on them (laminate, linoleum, wooden boards, etc.). If you intend to do just this, then it is better to choose a small step between the elements of the sheathing so that there are no significant voids.
Method of insulating the base under heated floors
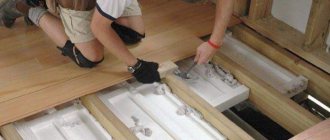
Penoplex slabs have protrusions that connect to each other like a lock. This eliminates the possibility of cold bridges appearing. The laying rules are as follows:
- To better retain heat, it is recommended to lay the slabs in two layers. The total must be no less than the calculated one.
- Before laying the penoplex on the floor under the screed, a damper tape is run around the perimeter.
- The first layer should be laid in such a way that the seams in the row do not move and there are no intersections in the shape of a cross. The first row starts with a solid slab, the second with a half-cut slab.
- The joints of the first layer slabs can be secured together with tape. But this is an optional measure, since the fixation is quite strong.
The technology of laying penoplex on the floor under the screed is done with offset seams. The slabs of the second layer should not coincide at the seams with the first.
Briefly about the main thing
Penoplex is characterized by two properties. The first is its low thermal conductivity, due to which it has good thermal insulation. Secondly, the slabs are not susceptible to mold and mildew; they create a good soundproofing layer, while rejecting moisture.
Another advantage is that penoplex is universal in use - it can be used regardless of the base flooring. But here it is important to understand what thickness of penoplex to use for the floor under the screed. The further load on the surface (purpose of the room) has a huge impact. If this is, for example, a warehouse or a garage where a car will be stored, it is better to choose denser slabs.
The type of finishing does not matter. It all depends on the preferences of the owner of the premises. You can choose laminate, tile, plywood or parquet.
Another mandatory point is waterproofing. If this layer is skipped or installed incorrectly, spilled water may accumulate under the finish coat. Penoplex does not absorb moisture, and it will be quite difficult to dry it.
Ratings 0
Warm floor on penoplex
To carry out thermal insulation, penoplex must be laid on a prepared, even and dry surface. A vapor barrier is acceptable; it is placed on the base or between two layers of insulation.
Electric floor
An electric heated floor on penoplex does not differ from a water one in the method of installing the insulation.
A heated floor on penoplex can be laid directly on the slabs. This method is possible if the heating is electric. It is not difficult to attach the mounting tape to the insulation. Subsequently, the cable is laid on the tape. After this, a screed 5 cm thick is formed.
During installation, it is important to take into account that the screed will expand due to heating. In this regard, foam strips should be installed along the walls. They will be used to compensate for the expansion. At the end of the installation work, the finishing coating is laid. It will be possible to turn on the electric heated floor only after a month. During this time, the screed should be completely formed.
Water floor
In construction, there are several ways to arrange thermal insulation with penoplex. One of them is insulation of water-heated floors. It is most in demand in the construction of private houses, since they most often do not have central heating, and water is supplied through a pumping station.
Installation of water floors is no different from electric ones. The only difference is that the slabs are covered with reinforcing mesh, then heating pipes are attached to it. They should be at a distance of 7 cm from the wall. Before filling, you need to test the system. To do this, water is released through the tubes under pressure. The pressure should exceed the working pressure by 1.5 times. After testing, the screed is poured, but the supply of water under operating pressure does not stop.
Laying on penoplex can be done using aluminum plates. They are used to distribute heat. In the plates, tubes with water are placed in special grooves. Installation is carried out directly on the foam layer, then the finishing coating is applied without screed. This system is one of the most expensive, but very easy to install.
How to insulate a floor with penoplex?
It is best to insulate a water-heated floor with penoplex on a concrete or sand-gravel base. Installation on boards is also allowed. Each method is different, so you need to consider everything to choose the best option.
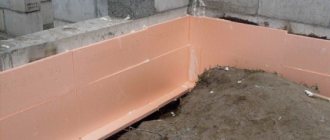
Soil foundation
Before starting work, you must prepare the following materials:
- Small crushed stone;
- Cement mixture and sand;
- Rule and laser level;
- Metal mesh for reinforcement;
- Scotch tape (you need metallized one!);
- Material for waterproofing work;
- Alabaster;
- Insulation boards;
- Metal beacons.
The soil is lowered 50 cm from the floor covering; voids are not allowed - their presence threatens to destroy the floor surface during shrinkage.
Sequence of work on the ground
- The soil is leveled and compacted, dried if there is excessive moisture;
- Crushed stone is poured at 30...40 cm, trampled down and leveled;
- 10 cm of sand is poured, compacted and leveled;
- Penoplex is placed on the sand, the plates are fastened with grooves in the direction from the doors, each stack is glued with tape;
Each row of slabs is laid with an offset of half the previous one!
- The slabs are covered with polyethylene film entirely or in overlapping pieces. The joints are taped to prevent the concrete mixture from penetrating into the thermal insulation layer. The film is applied to the walls by 15 cm;
- A galvanized mesh is placed on the insulation, 2 cm gaps are left near the walls, and after 0.3 m pieces of plastic are placed on it as a backing. There should be 2.5 cm from the mesh to the base;
- Beacons are placed at a distance of 1.8 m, retreated from the wall by 20 cm. The beacon is placed on the alabaster mixture strictly horizontally, the level is controlled especially carefully;
- A solution of cement and sand (1:3) is mixed, water is added until it reaches the consistency of a paste. The solution is poured between the beacons and leveled using the rule. The screed can be only 5 cm thick. Once the mixture has dried, you can apply the finishing touches.
Floor slabs
For the work you will need a primer and putty with polymers, polyurethane glue, waterproofing film, a level, insulation and a self-leveling compound for the screed. Further work is carried out as follows:
- Defects and cracks in floor slabs are eliminated. If necessary, level with a cement mixture and remove debris and dust;
- If there is no basement or soil under the ceiling, then the penoplex can be placed directly on the ceiling with a primer. Otherwise, it is necessary to lay a waterproofing film, and only then insulation. All joints are taped;
- Glue is applied to the underside of the penoplex slab, the slab is applied to the floor and pressed. The level is checked for horizontal evenness, the next row is made offset so that the seams do not coincide;
- A film for waterproofing is placed on top of the insulation;
- A cement screed or self-leveling compound is poured on top of all. After drying, you can finish the floors.
How to insulate the base under a heated floor?
A warm floor with an insulated base is done in the following sequence:
- The concrete base is cleaned of dust and debris and primed;
- Zero level marks are made on the walls for finishing;
- If necessary, the base is leveled with cement; if the surface is flat, the concrete floor is insulated without additional screed;
- Penoplex is coated from the inside with glue, placed on the base and pressed. The seams also should not coincide; for this, the slabs are laid offset by half the length;
- Lay a moisture barrier film and seal the joints with tape. Damper tape is glued along the perimeter near the walls;
- The outline of the heated floor is placed on the film and the screed is filled to zero level. After the surface of the subfloor has dried, it is finished with a finishing floor covering.
Wooden base
Penoplex can be placed on boards if they are in good condition. To get started, you need to find a screwdriver and hammer, self-tapping screws, a grinder, an antiseptic primer, chipboard and plywood.
Sequence of work:
- The floor and baseboard trim is removed. The logs are checked - just remove a few boards to assess their condition. Mold and wood damage is cleaned up or boards are replaced. The remaining boards are checked for strength and leveled;
- The board base is leveled with a grinding machine, the cracks are filled with putty;
- Treat with antiseptics and leave to dry;
- Penoplex is laid on glue, with the seams offset. The gaps are foamed during the process (the foam must be without toluene!);
- A vapor barrier is installed with an overlap of 10 cm on the walls;
- A layer of plywood or chipboards is installed, staggered so that the seams do not match. During the process, the horizontal level is checked according to the building level;
- The final finishing of the floors is being installed.
Differences between foam plastic and penoplex
For owners embarking on home renovations, the quality of the material and its cost are sometimes of decisive importance. Inexpensive foam plastic differs from high-quality insulation called Penoplex. Where to choose, where price and quality compete.
There are opinions that penoplex is just a beautifully designed foam plastic, and there is no practical difference. However, practical application confirms the positive results.
The new insulator slowly absorbs water (5 times slower), respectively, the foam absorbs moisture faster. For example, Penoplex is immersed in water for 24 hours, the moisture absorption rate is close to zero.
In terms of thermal conductivity, comparing these building materials, polystyrene foam is significantly inferior to modern penoplex by 33%.
Penoplex shows high sound insulation qualities. Therefore, it is preferable to use such material in floor devices and wall partitions. The numerical values of the difference reach up to 41 dB.
We recommend: How to install heated floors in a bathroom under tiles?
In terms of compression ratio, the record was set in favor of penoplex, where the parameter is three times higher than that of foam plastic.
The service life of the improved insulation reaches 50 years. This means that it will last 5 times longer than cheap foam.
If you check the advantages by the size of the insulation used, then with penoplex the result is half as much.
The numbers eloquently emphasize the merits of modern achievements of engineers in the field of improvement and renewal of construction resources.
Therefore, when planning serious measures to improve your home, you should opt for extruded polystyrene foam with the best and most effective performance.
- Related Posts
- How to make a dry heated floor?
- How to make a warm floor from central heating?
- What characteristics does Shtein underfloor heating have?
- How to connect a heated floor from a stove?
- Which plasticizer to choose for heated floors?
- Is it possible to use underfloor heating as the main heating?
Penoplex is an excellent solution for heated floors!
Often the floor temperature can differ greatly from the air temperature in a particular room. This causes discomfort, irritability and, as a result, cold feet. To prevent all this when installing the floor, you can use a heated floor system. And in order to concentrate the direction of the warm air flow, experts recommend laying heated floors on penoplex.
Penoplex is extruded polystyrene foam. It is a thermal insulation material that prevents heat from dissipating in different directions. Thanks to this, energy savings are achieved.
Refusal of Penoplex may result in you heating your neighbors’ ceiling or basement.
Therefore, to install heated floors, experts recommend using extruded polystyrene foam.
Advantages of penoplex
This type of insulation is produced in slabs of different thicknesses. The most common width is 600 mm, with lengths of 1200 and 2400 mm. Thickness starts from 20 mm and ends at 100 mm. One package contains from 4 to 20 sheets, depending on their thickness.
The most important advantages include the following:
- does not absorb moisture at all;
- low thermal conductivity and vapor permeability;
- does not emit harmful substances;
- not afraid of microorganisms;
- high strength characteristics.