When the approach of cold winter is already felt in the air, we can’t help thinking about how to better insulate our home. Penoplex is a very popular option, optimal in price and quality. In use, the material will not take much effort and time from the builder, but it will definitely be necessary to protect the insulation from mechanical and weather influences. How to do this will be discussed in this article.
Penoplex is often used as insulation of buildings from the outside or inside. Working with it is made easier by the consistent physical characteristics and dimensions of the slabs. The strength of penoplex is not enough to prevent the slabs from collapsing from pinpoint impacts and other physical impacts (dents cannot be avoided in any case). Therefore, it is necessary to protect the material from the adverse effects of ultraviolet radiation, humidity, etc. And visually, a wall insulated with slabs still seems unfinished and requires additional finishing. The use of penoplex implies, in addition to insulation, also additional finishing.
Facade plaster using penoplex
A simple and inexpensive method of finishing surfaces after insulation is plaster. This type of construction work is appropriate when the slabs are attached to the surface by gluing. Penoplex can be installed in another way: in a supporting frame, in the cells of the sheathing. With this option, the facing of the plane will be done either with panels, or clapboard, or something else.
The plane of the penoplex must be prepared
We check if there are any gaps between the plates. Almost no one succeeds in laying insulation perfectly the first time. We seal the joints if this point was missed during installation. Pay attention to the curvature of the entire plane, because the adhesive solution is then applied in a thin layer. It will not be possible to level out unevenness due to the specific composition. To close the gaps between the foam boards, you can foam the gaps with foam for insulation systems (or usually mounting foam), for example, Ceresit CT-84. For one can (850 ml) you will need to pay approximately 600 rubles.
Insulation of the facade with penoplex
Penoplex prices
Penoplex
Results
Extruded polystyrene foam is a really good polymer insulation, the characteristics of which are higher than those of its predecessor, foam plastic. At the same time, for a wooden house it is important that the insulation allows steam to pass through, for example, like mineral wool. The low vapor permeability of EPS in this case will be a negative factor. Theoretically, Penoplex can be used to insulate roofs, floors and attic floors, although in reality this is unprofitable.
EPS is not suitable for log and beam walls. The main purpose of this material is thermal insulation of underground structural elements, such as a foundation, plinth or blind area. Also, if the soil under the house is very wet, you can use extruded polystyrene foam to insulate the ground.
Making a plaster solution
Do not use a standard cement-based mortar with sand, as it will not give a good quality plaster composition. The store is full of mixtures with a composition suitable for laying on penoplex.
Experienced finishers advise using:
- "Stolit"
- "Ceresit"
- "Ecomix".
When mixing, strictly follow the instructions left by the manufacturer on the packaging. Experienced craftsmen make a mixture that is similar in thickness to sour cream. To glue fiberglass mesh, the consistency of the mixture should be slightly thinner than required by the manufacturer. In the case of a leveling layer, the solution should be so liquid that it flows freely from the spatula. Hence the different consumption of the composition: gluing the mesh will require 4 kg per 1 sq. meter, for a leveling layer - 6 kg of mixture per square meter. meter.
Preparation of plaster mortar
The compositions of different manufacturers, despite being very similar, have different components. Therefore, it is better to use products from the same manufacturer at the same facility to avoid unnecessary problems.
Use formulations that are universal in application, and you won’t have to think about additional nuances associated with limitations in the scope of application.
Prices for popular types of plaster
Plaster
Required tools and materials
Before plastering penoplex, you need to prepare the following tools:
- set of metal spatulas;
- trowel;
- masking tape;
- grater;
- sandpaper;
- construction mixer;
- rule;
- knife for construction work;
- priming rollers;
- brushes;
- roulette;
- containers;
- rags, etc.
The list of required materials includes plaster composition (with a margin of up to 20%), primer, mounting foam, reinforcing mesh, plastic corners, mounting foam, water, base profile, fasteners.
Primary layer sketch
Penoplex is prepared for plastering by laying the primary layer. For this purpose, alkali-resistant PVC mesh should be used. By using PVC, you will insure yourself against the aggressive influence of cement on the exposed mesh. Cement is known to react with many materials.
Cut strips the length of which should be slightly greater than the height of the wall. Please note that installation is done from top to bottom. Apply the strip to the fiberglass with one hand, and apply the solution to the mesh exclusively along the top edge with the other. Thus, the mesh is, as it were, “welded” to the penoplex. As a result, the primary layer should be up to 5 mm thick.
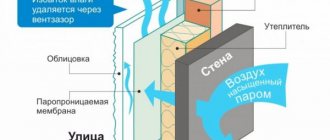
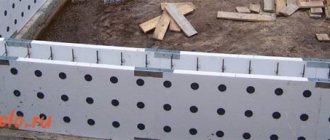
Penoplex insulation scheme: 1 - penoplex slabs, 2 - glue, 3 - dowels, 4 - reinforcing mesh, 5 - primer, 6 - plaster coating
When the top edge is fixed to the plane, apply the solution to the mesh so that it is evenly distributed across the entire width. Every movement comes from top to bottom. Be sure to leave a vertical “tape” clean of the plaster mixture on the right side, because each subsequent strip will overlap the edge of the previous one by almost 1 cm.
As a result, it turns out that the wall will be strip by strip covered over the entire surface with a mesh. Look at all the places on the wall where the geometry of the plane changes (door openings, slopes, window openings) - this is where you should first start laying the mesh.
Reinforcing mesh for foam plastic
Prices for reinforcing mesh for foam plastic
Reinforcing mesh for foam plastic
Advantages of using penoplex for insulating a frame house
Increasingly, when thinking about individual housing construction, people opt for frame houses. A frame house is an affordable housing option that you can build with your own hands.
Penoplex is a well-known company producing thermal insulation materials.
One of the main questions that arises during construction is how to properly insulate a frame house for comfortable living in cold winter conditions. Penoplex is most often used as a thermal insulation material.
Penoplex usually means insulation based on extruded polystyrene foam. The name penoplex was assigned to the material due to the name of the company specializing in its production.
The peculiarity of this material is that it is processed at high temperatures. As a result, it acquires a number of qualities that distinguish it favorably from other types of insulation:
- increased strength;
- steam and waterproofing;
- low thermal conductivity coefficient;
- resistance to many chemicals.
Another important advantage of penoplex is the simplicity and accessibility of installation. Insulating a frame house with penoplex can be done independently - it does not require much effort.
Finishing mixture
The second layer is necessary to complete the alignment of the wall and hide all auxiliary elements, such as reinforcement. The third layer is possible if the quality of the second for some reason does not please the master. But this is only a “rough” finishing before the final stage - the final surface design. The last stage is usually performed using decorative plaster. If the surface was made uneven, then normal installation of the “decoration” is out of the question.
Facade plaster using penoplex
Table. Necessary tools and materials.
| № | Name |
| 1 | Vessel for preparing the mixture |
| 2 | Water container |
| 3 | Spatulas of various sizes |
| 4 | PVC mesh for making a reinforced layer |
| 5 | Oil brush |
| 6 | Paint roller |
| 7 | Penoplex trowel |
| 8 | The plaster composition is either “Ceresit”, or “Ecomix”, or “Stolit” |
| 9 | Polyurethane foam Ceresit CT-84 (850ml) |
| 10 | Primer "Betonkontakt" |
| 11 | Glue CeresitCT 83, or KREISEL 210, or Glims KF, etc. |
How is installation carried out?
When the outer walls of the frame house are erected, you can begin insulating them with penoplex. The process is so simple that it can even be described schematically. There are no special tricks here:
- First, the space inside the frame cells is cleaned.
- Next, the slab fragments, cut to cell size, are placed in their places. They should fit into the cells as tightly as possible. If there are cracks or gaps between the penoplex and the frame posts, they are filled with polyurethane foam.
- From the outside, the frame is sheathed with OSB slabs.
- From the inside, the entire structure is covered with a vapor barrier film.
- A sheathing is placed on top of the vapor barrier and the finishing interior is installed with a ventilation gap to remove moist air.
If external insulation is carried out, then everything will be even simpler. Plates of material are cut into elements of the required size and simply glued to the walls. At the same time, there is one nuance - the parts with glue applied to them are applied at a distance of a couple of centimeters from their final position and, after pressing, they are moved to the desired place. After the slab is glued, it is additionally secured with plastic “umbrellas”. The consumption of plastic dowels is four pieces per square meter of area. At corners you can use up to eight pieces per meter.
Step-by-step instructions for plastering penoplex
To plaster the foam yourself, you need to do a series of preparatory steps, one after the other in a strict order.
First step. Ensure good adhesion by treating the surface with a deeply penetrating primer “Betonkontakt” (from manufacturers such as VIOLUX, Ceresit, Feidal). Price 700-1000 rub. for 15 l. A large brush or paint roller is suitable for the job. Before application, you need to shake the composition and pour some part into a suitable plane. Dip the brush into the liquid and apply an even layer of primer to the surface. Liquid should not leak or accumulate in certain areas. The surface is treated with a primer one more time after the first layer has dried.
Betonokontakt KNAUF
Second step. Attach the base profile to the wall. You will need a measuring tool (for example, a ruler or tape measure) to mark the points on the wall where you will make holes with a drill. It’s better to take a hammer drill for this - you’ll waste less time.
Types of base profile
Fastening the plinth profile
Third step. To glue foam boards to the wall, mix the adhesive solution. To simplify the process and reduce work time, select a container that fits the entire bag of mixture. It is most convenient to knead with an electric mixer with a collapsible attachment.
Fourth step. As soon as the prepared solution is on the facade, glue the foam boards to it. But it will be more convenient and economical to apply glue to one side of the slab, distributing it evenly along the entire perimeter. And in the middle it’s enough to throw a few “cakes”. Place the insulation against the wall carefully along the pre-set load-bearing supports. It is recommended to slam the stove several times. Use a spatula to remove excess solution.
Insulating the facade with 5 cm penoplex and framing the corners with 2 cm penoplex
Fifth step. Each penoplex plate must be rigidly fixed using a dowel umbrella. This operation is carried out using a drill. 4–6 holes are made throughout the entire area, into which dowel umbrellas are placed. Cover the dowel caps along with all the recesses in the penoplex.
Facade dowel umbrella for thermal insulation
Sixth step. A reinforcing layer is made from perforated corners and fiberglass mesh. Aluminum corners are glued to the outer corners. The same glue is used for the corners and mesh: either Ceresit ST 83, or KREISEL 210, or Glims KF. Price 350-600 rub. for 25 kg. It is necessary to cut out a reinforced fiberglass mesh. It should be taken into account that the canvases should overlap each other no more than 10 cm when they are glued to the slabs. Also leave a distance of almost 10 cm for turning the corners. Apply the adhesive composition approximately 3 mm thick - it is more convenient to do this from top to bottom in small areas at a time. Its thickness should be slightly less than indicated on the packaging by the manufacturer. Compliance with these points ensures that the glue does not have time to set before the completion of the reinforcing layer. Then use a putty knife to glue the fiberglass to the wall.
Advice! If the fiberglass mesh does not have sufficient flexibility and the corners cannot be bent normally, apply liquid glue at the bends to make the fabric more elastic.
Corner with reinforcing mesh for building corners
Seventh step. The adhesive solution is applied to the reinforcing layer. An ordinary spatula will help you apply a layer of glue evenly. In essence, it looks like rough plaster.
Eighth step. A finishing layer (or two) of primer is distributed over the thermal insulation cake. This is done using a wide brush.
Facade facing brick
A description of the types and installation of facing bricks for the facade can be found in this article. We also recommend reading about decorative polystyrene foam elements for facades.
Ninth step. Plastering and painting of the facade is carried out at the final stage of work using a plaster falcon and a paint roller. The primer must dry before doing this. After drying, the finishing is completed with decorative plaster. It is rubbed over after the applied layer begins to set. When the plaster dries, the surface is painted with special facade paint. For these purposes, water-dispersed compositions are used.
Finishing the facade with decorative plaster
At the ninth step, work on insulating and protecting walls from freezing can be considered completed. When insulation is carried out inside a building, instead of plaster, putty is applied to the reinforced layer, followed by decorative finishing (wallpapering or painting). It should be noted that staining is not necessary in all cases. To the question of when to paint and when not to paint, you can find the answer on the packaging of the putty you are using.
Insulating a house with penoplex from the inside
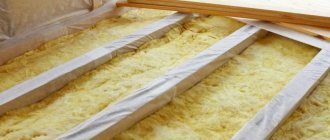
Expanded polystyrene is also used to insulate walls from the inside. The technology for performing the work is in many ways similar to external insulation:
- surface preparation, priming;
- installation of a vapor barrier layer;
- fastening foam boards using glue and dowels;
- plasterboard finishing.
Penoplex is also suitable for additional insulation of the floor inside a frame house. Work order:
- laying rough covering;
- creation of a moisture-proof layer;
- laying insulation boards and fixing them with self-tapping screws;
- coating with vapor barrier film;
- fine coating and external decorative finishing.
Penoplex is a material with excellent thermal insulation characteristics. It is perfect for both external insulation work and for creating additional protection from the cold inside the house. At the same time, it is quite easy to use and will allow you to independently carry out all the necessary work on its installation.
649
Recommendations for laying thermal insulation
In most cases, external insulation is practiced in private houses, which, when carried out correctly and with accurate calculations, provides effective thermal protection of the entire structure. External thermal insulation allows you to move the dew point towards the insulation, and thereby protect the walls from the formation of condensation.
In addition, penoplex has low vapor permeability, which is why it is not recommended for use inside the house. Negative consequences can be mitigated by installing a high-quality ventilation system.
Thermal insulation of walls outside and inside the house
Over time, the fastening weakens, as a result of which the slabs and finishing sheathing can settle, which will lead to the formation of cold bridges and loss of appearance.
The same thing can happen with the frame finishing option. Therefore, many people have a question: how to attach penoplex to a vertical surface? Experts say that you cannot limit yourself to just gluing or laying insulation into the cells of the frame. In both cases, it is also necessary to secure the heat insulator with special mushroom fasteners with wide lids.
In frame houses, penoplex is placed inside the frame, where it is glued and additionally secured with dowels.
Insulating a log house from the outside can be done in both ways. For thermal insulation of a house made of 150x150 timber and internal structures, it is better to choose a frame option. There should be a small space between the insulation and the walls of the house, in this case the air will circulate freely and prevent the wood from moistening.
Scheme of insulation of external walls of a house
Due to the roundness of the logs, log walls have gaps where air can penetrate; the surface of a log house is flat, which makes natural ventilation impossible.
For the sheathing, timber with a cross section of 25x50 or 50x50 mm is used. The installation of the frame must be done in such a way that it forms squares, into which the insulation boards will then be laid.
To give greater rigidity to the insulated structure and prevent cold from entering the house, it is better to lay penoplex in two layers. Sheets are installed offset or in perpendicular directions. In the second case, a counter-lattice is made to lay the top layer; the slats are positioned perpendicular to the guides of the main frame.
Penoplex - advantages and disadvantages, technical characteristics
In recent years, penoplex has become increasingly used in construction. All thanks to the special properties and unique manufacturing technology.
This is an inexpensive, synthetic thermal insulation material that is much easier to install than, for example, glass wool.
The standard dimensions of a penoplex sheet are length 1.2 m, width 60 cm. Only its thickness can be different, from 2-10 cm.
From a technical point of view, penoplex has the following characteristics:
- Thermal conductivity according to GOST. the standard should be 0.03 W/m*C;
- Vapor permeability should not exceed 0.008 mg/m*hour/*Pa;
- Sound insulation at 41dB;
- Moisture resistance no more than 0.6%;
- The density of the material varies between 28-45 kg/m 3 ;
- The maximum pressure when compressing the sheet between the plates should be no more than 0.18 MPa;
- Temperature difference range from –100 to +55 C 0 .
When choosing a material for better thermal insulation, focus on these characteristics. This guarantees you high-quality insulation of the facade of a brick house with a low rate of liquid absorption.
Like any building material, penoplex has a number of advantages and disadvantages.
Advantages:
- The best thermal insulation performance in comparison with other insulation materials;
- High protection against vapor formation due to the unusual structure of the material;
- Good moisture protection, so the material can be used to insulate baths and saunas;
- The material is durable, withstands heavy loads both in compression and in rupture;
- Excellent soundproofing characteristics;
- The material is treated with special solutions at the production stage, therefore it is resistant to fire;
- Protected from the development of fungal parasitic organisms;
- Easy to carry out installation work without additional assistance;
- Processing of penoplex can be carried out using improvised means without additional purchase of special devices, for example, for cutting sheets;
- The material is very light;
- Long service life - up to 50 years while maintaining the basic properties of the material.