Chimney laying
There is no fundamental difference between the laying of the solid furnace and chimneys. It is carried out on clay-sand mortar using the same tools - a furnace hammer-pick, trowel and plumb line. However, elements such as fluff and otter are laid out using a large number of brick parts measuring 1/8, 1/4, 1/2 and 3/4 of the whole.
To avoid chopping and cleaving, which are accompanied by clouds of brick dust and rarely give the desired result, you should use a grinder with a diamond wheel for ceramics. This guarantees the accuracy of the work, eliminates tedious work and a lot of useless brickwork.
Solution
For masonry up to the roof level, a mixture of sand and clay is used, since it has a coefficient of linear expansion similar to brick, which is a certain guarantee against the appearance of cracks.
Pure clay used as a binder can be either oily or lean. In some places there are deposits where the proportional ratio of the amount of clay to sand is optimal by nature: one to three or four.
When the volumetric part of the clay increases, the solution cracks after drying, and when it decreases, it crumbles. To determine the optimal ratio of volumetric parts, you need to knead the finished solution in your fingers. It should not be noticeably slippery or rough like sandpaper.
The excavated clay is soaked in an iron container for 3–4 days. The result should be a homogeneous clay pulp without stones, similar in consistency to liquid sour cream.
The sand taken from the floodplains of streams and rivers is very fine and dusty. It is not suitable for masonry. It is better to use one that consists of grains of 0.8–1 mm. It feels rough to the touch.
Clay and sand are mixed in volumetric parts in a ratio of one to three or four. Water is added gradually, in small portions. The finished solution should leave marks on the trowel (but not stick to it) and should not drain from it.
To avoid errors in proportions, it is better to buy a ready-made dry clay-sand masonry mixture
Please note that those marked “fireproof” are not suitable for masonry.
Brick
Red solid burnt brick is used.
Its edges should be smooth, without cracks, and the sound produced when it is lightly struck with a furnace hammer should be clear.
The standard size used for masonry is length 250, width 125 and height 75 mm.
Laying the internal chimney
It begins immediately after the damper is installed and the furnace roof is completed. The masonry techniques are the same - applying a layer of mortar, laying the brick, “shaking” it with your hand and lightly tapping it with a pick. Verticality and horizontality are checked after laying each row. They finish it four brick heights before the ceiling.
Laying fluff
The expansion of the thickness of the chimney walls is carried out to comply with the requirement that combustible structures be located at a distance of 250 mm “from the smoke”. The usual thickness of the chimney walls is 125 mm. To double it, you need to fold four rows, each of which moves outward by 1/8 of the width of the brick relative to the bottom one - just the amount that allows the brick to lie without flipping over. The principle of masonry for all three sizes is the same:
- The inner surface (toward the smoke) of the first row is laid out in 1/8 sections. The gaps between the outer bricks are filled in 1/4 sections.
- In the second row, the parts increase, respectively, to 1/4 and 1/2.
- The third row uses 1/2 and 3/4 pieces.
- The outer belt of the fourth row of fluff is laid out with whole bricks.
Having reached the ceiling, it is placed, observing the dressing of the seams, another two or three rows higher. A gap of 2–3 cm is left between the ceiling and it to eliminate pressure from the structure on the masonry. It is covered with mineral wool slabs. Laying up to the roof is carried out in the usual manner - with ligation of vertical seams and control of verticality.
Otter clutch
It begins after the edge of the chimney brick has risen above the roof. It is carried out outside, in compliance with all safety measures when working at height. You can use cement mortar. They start it from the edge that is lower along the slope. The distance from the smoke on each row is equal to 1/8 of the width of the brick. There should be a total of six rows in the otter. After it they put a neck - the usual continuation of the chimney. The gaps between the roof and the chimney are covered with a “collar” made of sheet roofing steel.
Head masonry
This is a chimney deflector that prevents smoke from clogging into the chimney due to air turbulence.
It is laid out in two rows, moving the first from the smoke by 1/8 of the brick, and the second by 1/2.
Its protrusions can be used to hook the clamps of the metal cap, which prevents precipitation from entering the pipe.
Sandwich chimney
This type of chimney consists of composite sections ranging from 0.5 m to 1 m in length, which are made from a pair of separate pipes inserted into each other with an additional layer of thermal insulation material. Its advantages:
The multilayer design provides additional insulation of the chimney duct. This, in turn, protects the pipe from condensation.
Such chimneys are not afraid of chemically aggressive substances formed during the combustion of various fuels.
Sandwich chimneys are considered the most reliable in terms of fire safety.
Designs of this type are suitable for buildings made of any materials. They are easy to use and compatible with all types of heating systems.
Sandwich chimney designs are easy to use and compatible with all types of heating systems.
Smoke exhaust ducts of various diameters are always available (90, 115, 150, 200 and 280 mm).
Installing a chimney yourself is not so difficult if you take into account all the nuances described in the article. If you doubt that you can design and assemble a chimney yourself, contact professional installers. Our tips and recommendations will help you evaluate the results of their work.
Parts for prefabricated chimney
The sandwich pipe can be installed both on a house under construction and in an existing building. Often new heating is installed when renovating a house or when a brick oven fails. The convenience of a stainless steel pipe is that it can be installed anywhere.
Note! Upon purchase, you will receive a product passport, which should indicate the steel grade (the corresponding markings should be on the parts themselves), pipe wall thickness, diameter, other quality characteristics, and purpose.
To install the chimney you will need the following parts:
- The pipe segments that are connected into a socket have different lengths, but not more than 1 m.
- Elbows (45 and 90 degree bends) for installing chimney bends.
- Gate - a furnace damper for adjusting the draft and shutting off the pipe when the furnace is stopped.
- Transition adapter – for mounting the transition from a single section to a sandwich pipe.
- Inspection (tee) to clean the pipe from condensation and possible internal deposits.
- Head (deflector) on the top of the pipe.
- Crimp clamps to strengthen connections.
- Brackets for attaching the pipe to the wall if installation is not carried out through the roof.
- Galvanized sheet or stainless steel for installation of insulating boxes.
- Thermal insulating materials: mineral (basalt) wool, asbestos sheets.
- Heat-resistant sealant for processing joints.
- Support brackets for installing and fixing the chimney.
We recommend that you read: Installation of PVC pipes for hot and cold adhesive joints
Additionally, you can purchase ready-made parts for installing passages through the ceiling and roof, and flanges for external waterproofing of the chimney outlet to the roof.
Assembling the smoke exhaust structure begins from below, from the stove. According to the design, the segments are connected sequentially, strengthening the connections with crimp clamps. To prevent air from being sucked in from the outside, all seams are coated with heat-resistant sealant.
Materials and tools
A brick chimney is operated under conditions of significant temperature changes, so it should be built from the highest quality bricks. Compliance with this rule will determine how safe the structure will be: if the brick does not crack, it means that poisonous gases and sparks that can cause a fire will not enter the room.
Types of bricks
The pipe is erected from solid ceramic bricks with fire-resistant properties of grades from M150 to M200. Depending on the quality, this material is divided into three grades.
First grade
When making such bricks, the temperature and holding time during firing ideally correspond to the type of clay. You can recognize it by the following signs:
- the blocks are bright red, with a possible yellowish tint;
- the body of the brick has no pores or inclusions visible to the eye;
- all edges are even and smooth, there are no crumbled areas on the edges;
- Tapping with a light hammer or other metal object produces a loud and clear sound.
It is recommended to choose a brick depending on its properties
Second grade
Such a brick is unburned. Here are the signs that characterize it:
- the blocks have a pale orange, slightly saturated color;
- numerous pores are visible on the surface;
- the sound when tapped is dull and short;
- There may be defects on the edges and edges in the form of burrs and crumbled areas.
Brick of the 2nd grade is characterized by low heat capacity, frost resistance and density.
Third grade
Bricks of this category are burnt. They are recognized by the following characteristics:
- the blocks have a deep dark red color, some are almost brown;
- when tapped, the sound is too loud;
- edges and edges contain defects in the form of chips and burrs;
- the structure is porous.
Such bricks do not have frost resistance, do not retain heat and are too fragile.
The chimney should be built from first grade brick. Second-grade should not be used at all, but third-grade can be used to make foundations for free-standing pipes.
What solution is needed
The quality requirements for mortar are as high as for brick. Under any temperature, weather and mechanical influences, it must ensure the tightness of the masonry throughout its entire service life. Since individual sections of the chimney operate under different conditions, different solutions are used when laying it.
This diagram will help you choose the right mortar for laying bricks
If the pipe being erected is a root pipe, then its first two rows (zone No. 3), located under the floor, should be laid on a cement-sand mortar (3-4 parts of sand for 1 part of cement). To make the mixture more plastic, you can add 0.5 parts of lime to it.
The higher-lying sections of the chimney, up to and including the fluff, have an internal temperature of 355 to 400 degrees, so when constructing them, a clay-sand mortar is used. If the fluff ends under the ceiling (zone No. 8), and the cutting is made of bulk material (zone No. 9), then the use of this mixture also extends to the rows in the cutting.
The riser, otter and neck of the chimney (zone No. 10), which do not get very hot, but are subject to wind loads, should be laid using lime mortar. The same composition can be used when constructing the head (zone No. 11), but a regular cement-sand mixture is also suitable for this area.
The composition of the solution depends on what part of the chimney is being built
The clay for the solution should be medium fat. It should not have a strong odor, as this is a sign of the presence of organic impurities that cause cracks in the solution.
In addition to the specified materials, you will need special purchased elements - a cleaning door, a valve and a cap. The gaps between the brickwork and the metal products mounted in it are sealed using asbestos cord or basalt cardboard.
The most common tools will be used:
- Master OK;
- hammer-pick;
- plumb line
You can’t do without a building level.
Fire safety technology
It is allowed to install a chimney in accordance with the requirements:
SNiP 2.04.05–91U.
DBN B 2.5-20–200.
NAPB A.01.001–2004.
Installation should only be carried out by professionals. The cross-section of the chimney must correspond to the value specified by the manufacturer in the instructions supplied with the boiler.
The required chimney height is usually recommended by the manufacturer, or it must exceed 5 meters.
If there is a horizontal section, its length should not exceed one meter.
The design must provide for the possibility of draining condensate, as well as cleaning the smoke exhaust channel.
How to connect a chimney
All connections of parts to the nozzle of a solid fuel boiler are made with a heat-resistant sealant that can withstand temperatures in the range of 1250-1500 degrees.
When the diameter of the chimney does not match the size of the chimney outlet, an adapter is installed to create a tight joint.
How the parts are assembled
Any single-walled, as well as sandwich, with insulation, are assembled in only one option: “pipe is inserted into pipe.” The connection points of the chimney parts do not require the installation of additional clamps.
If the structure is made of special stainless steel, assembly is carried out only using condensate. In this case, condensate, as well as the resulting tar deposits, will never get out; they will flow along the walls of the pipe directly into the condensate drain.
If a revision is used in the chimney and tees are installed, all parts are assembled “according to the smoke.” The assembly of vertical parts extending from the tee is carried out “using condensate”.
If it is necessary to line the channel, the gap formed between the pipe and the channel must be more than 4 cm. It is necessary when the metal expands when heated.
To ensure that the chimney sandwich parts have a more rigid fastening, rivets are installed or screws are screwed in.
Fixing the chimney
The pipe is attached to the wall only with special materials.
The single-wall structure must be fastened with a fastening step of 1.5 meters on all vertical sections of the pipe.
If the sandwich chimney does not have a supporting structure, it is necessary to secure each element.
If the system uses a 45–87 degree tee or a 45–90 degree elbow, installation is carried out in such a way that the load on the rotating parts of these parts is completely eliminated.
If installation requires additional support, use a floor stand installed under the inspection.
When the chimney pipe is raised above the roof by more than 1.5 meters, a bracket must be installed under the brace.
Passage through floors
To make a passage through the wall of a house or its ceiling, it is necessary to use the building codes that are in force in Ukraine today.
If a sandwich chimney with insulation passes through wooden walls, a liner must be installed and another layer of thermal insulation is applied.
When a chimney pipe is installed through the roof, builders must install a special additional pipe part, the so-called “roof”. Another additional layer is created, consisting of fireproof insulating materials.
The final stage of construction
When a brick chimney is lined, its upper part is covered with an additional part - the end.
Usually the top of the pipe is covered with a baffle or a beautiful fungus.
If the building's roof covering is made of a fire-hazardous material, such as bitumen shingles, a special spark arrestor is mounted on the top of the chimney.
If a gas boiler is installed in the house, installing a deflector is strictly prohibited. According to current regulations, the upper part of the gas device pipe is always kept open.
Starting the chimney
Check again that there are no flammable or flammable objects near the chimney to prevent a fire.
The protective film is removed from the parts.
The gate that regulates the traction force opens.
Installation of chimney passages
The most difficult and critical areas when installing a chimney in a private house are passages through the ceiling, roof or wall. If the house has several floors, then a passage through the interfloor ceilings is added. The rules for installing chimney passages through flammable materials provide for a minimum distance between the pipe and building elements.
Installation of a passage through the attic, interfloor ceilings
A ceiling-passage unit for installing a chimney through wooden ceilings can be purchased ready-made or made independently. The finished unit is a pipe with thermal insulation, which is put on the pipe. The homemade one looks like a square box, the dimensions of which depend on the diameter of the chimney. A hole is cut out in the center of the box into which the pipe is inserted directly.
Note! A single segment of pipe must pass through the ceiling penetration assembly. All chimney joints are located below or above the interfloor ceiling.
Transition box arrangement:
- a box of such a size is mounted from asbestos-cement or iron sheets that the pipe does not reach 40 cm from the walls;
- a round hole is cut in the center into which the pipe is led;
- the space of the box is filled with mineral wool with heat resistance characteristics of 700 degrees;
- the floor of the upper floor (attic) and the ceiling below are equipped with special metal flanges-overlays, which perform an aesthetic and thermal protective function.
Note! If the attic space is used, it is mandatory to install an additional protective casing with ventilation holes on the chimney.
Installation of a wall crossing
When the chimney is exited through a wooden wall, a transition box similar to the interfloor one is also installed in it. The difference is that the horizontal outlet is easier to install and is a priori protected from moisture.
We recommend that you read: How to choose and install a hood for a gas water heater?
Installation of a chimney in a brick private house through a wall does not require thermal insulation. A hole is made in the wall for the pipe, a metal sleeve is inserted into it and the chimney is led into it. The chimney elbow at the exit from the building through the wall requires the installation of additional support. Most often, a corner bracket is used for this.
If the stove is located in a corner, then the adjacent wall should also be protected from possible heating. To do this, install a protective screen made of non-flammable material with a heat-insulating layer at the height of the structure’s exit.
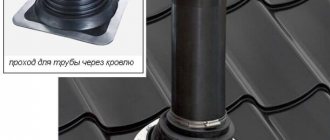
Installation of outlet through the roof
This passage can be called the most critical in the entire structure. Here it is important not only to install high-quality thermal insulation, but also to mount protection against the penetration of atmospheric precipitation. Installing waterproofing on a sandwich chimney is not particularly difficult, since all components are sold ready-made.
Thermal insulation looks the same as the transition through the attic floor, adjusted for the slope of the roof. The passage box here has the shape of a rectangle, although its projection remains square.
Particular attention should be paid to the roofing. If this is a flammable material, then a metal sheet will be required to install a larger external trim (10-15 cm on each side). Accordingly, a large area of roofing is removed. The sheet is placed under the roofing material in its upper part, the side and bottom edges are placed on top.
The final stage is installation of waterproofing and installation of the top cap. This is an elastic or metal conical roof that is installed on top of the cutting sheet. All seams are treated with sealant.
Device, classification and requirements
A chimney or chimney is a special channel used in various buildings to remove volatile combustion products of solid fuels. It is usually a straight pipe of round cross-section, as this allows for maximum draft and minimal accumulation of soot on the walls of the chimney pipe.
Various requirements apply to the gas exhaust system, such as:
- Good traction;
- Availability of thermal insulation;
- Easy installation and maintenance;
- Long service life;
- Corrosion resistance;
- Smoothness of the inner walls;
- Fire safety;
- Aesthetic appeal;
When choosing a chimney for a solid fuel boiler, you should take into account the temperature of the combustion products. Depending on this parameter, you should select the material of the chimney pipe
Modern manufacturers produce modular chimneys from materials such as:
- stainless steel;
- ceramics;
- plastic;
- glass;
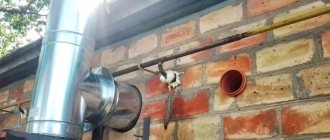
Photo 1: External installation of a chimney in a country house
The temperature of the flue gases at the outlet of the TT boiler can reach 600 degrees Celsius. Therefore, a steel and ceramic chimney is quite suitable for use in conjunction with a ZOTA solid fuel heating boiler. The use of glass and plastic chimneys is not allowed, since these materials are designed for significantly lower gas temperatures.
Separately, it is worth noting the classic brick chimney. The aggressive environment that arises inside such a structure quickly renders it unusable. That is why they give way to more modern devices.
Most often, stainless steel is used as the material for the manufacture of chimney pipes. The use of steel gives such a device a number of undeniable advantages:
- has low weight compared to brick;
- easy to install and assemble;
- does not require foundation construction;
Photo 2: Installation of a ceramic chimney in a country house
Stainless steel chimneys according to the type of construction are divided into the following types:
Single wall
Such chimneys are a regular steel pipe. The advantage of this design is its low cost. The main disadvantage is the formation of condensation on the inner surface and, as a consequence, its freezing at sub-zero temperatures.
Double-walled (or double-circuit)
The design of such a chimney is a “pipe-in-pipe” design. A smaller diameter pipe is placed inside the main pipe, and the space between them is filled with heat-insulating material. The advantage of this design is the presence of thermal insulation that protects the chimney from the formation of condensation, but the disadvantage is that the price of such devices is much higher.
The chimney design in the form of a sandwich pipe has recently gained particular popularity. This design is a chimney assembled from individual meter-long pipes, the joints of which are equipped with heat-insulating material.
Photo 3: Stainless steel chimney sandwich design
Special requirements are placed on the wall thickness of a steel chimney. When used in conjunction with TT boilers, the wall thickness of the chimney should be 1 mm or more.
Ceramic chimneys are also used to remove combustion products from a solid fuel boiler. Like steel, they are resistant to high temperatures and aggressive environments. The thickness of their walls is much greater (1.5 cm), and therefore they are much heavier and require installation on a foundation. Also, ceramic chimneys must be strictly vertical. The presence of various bends is excluded. This feature in some cases makes the installation and installation of such a chimney impossible.
Improvement measures
Increasingly, when reconstructing crumbling brick chimneys, reliable steel pipes are used, simply inserting them into the existing channel. The remaining gap is filled with basalt non-combustible insulation. It is recommended to carry out such a replacement if a transition from solid fuel to its gaseous counterpart is predicted.
Chimney Collar
To prevent the brick shaft from receiving harmful effects from condensation, it is recommended to insulate it from the outside with one hundred millimeter slabs of basalt wool. If the channel is located inside the wall, the part passing through the space of the unheated attic, as well as above the roof, is insulated. If the smoke shaft is attached to the house, then its outer planes are completely lined with thermal insulation, supplemented with an outer layer of galvanized metal having a thickness of 0.5 mm.
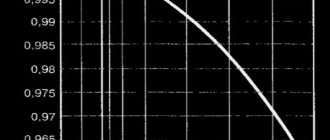
In the process of arranging the chimney, its optimal height must be observed, on which the reliable operation of the boiler depends. The basic requirements for this indicator are almost the same for all types of pipes.
Dependence of the gravity draft on the temperature of the flue gases and the height of the chimney
To prevent the chimney outlet from falling into the wind pressure sector, where the draft is very weak, it is necessary to draw a line from the highest point of the ridge of the house at an angle of 45° to the ground. This will be a disadvantaged area.
Smoke channel height
If the height of the chimney is such that its outlet falls within this gap, measures should be taken to increase it by half a meter above the designated line. According to the standards, an angle of 10° must be maintained so that the height of the chimney pipe fully provides the necessary draft, allowing the solid fuel boiler to function effectively.
How to calculate chimney sections
When choosing, you need to first measure the existing cross-section of the pipe. It should have the same dimensions. It is desirable that the sizes match. If the diameter is larger, a drop in pressure will occur and the traction force will decrease.
It is prohibited to operate two solid fuel boilers with one chimney. Each must be equipped with a separate pipe. With the correct selection of diameter, as well as competent installation, there will always be good traction.
The cross-sectional size (sq. m) is determined by the formula:
volume of fuel consumed (m3/s) / gas velocity.
The chimney can have different cross-sectional shapes:
- Circle.
- Rectangle.
For normal operation, you can use any option, but a round section is still much preferable. When smoke moves inside the pipe, it spirals. Any foreign part in the pipe creates resistance to the movement of the gas flow.
If the inner surface of the pipe is rough, the gas velocity will decrease. When smoke, during circular movements, collides with a right angle, a sharp change in trajectory occurs, and mixing occurs. As a result, soot settles in the corners.
Constant, thorough cleaning will be required.
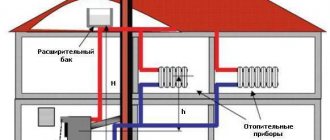
How the chimney works
The traditional brick chimney differs in design from modern chimneys, which are assembled from ready-made factory-made elements.
Any chimney has a vertical box, a head, valves, hatches for cleaning, and sometimes a foundation.
A typical brick chimney has the following parts:
- If necessary, a foundation.
- The neck is used to connect to the furnace firebox.
- Riser (box) with valves.
- When retrofitting, a stainless steel liner is often inserted into the brick frame.
- Slope.
- Otter - expansion of brick walls above the roof, covering the gap in the roof from precipitation and leaves; A galvanized steel molding is often attached to the otter.
- At the point of passage through the roof structure there is a neck.
- Headband.
- In recent decades, the top of the structure has been covered with a metal cap.
A chimney made of asbestos cement and steel consists of pipes, adapters for connecting to the firebox, a cap, insulation, and sometimes an outer lining made of galvanized sheet.
The most modern and promising types of chimneys are made from three-layer sandwich pipes and prefabricated ceramic ones. These types of pipelines are assembled from ready-made factory-made elements; a wide range of elements allows you to quickly install structures of any configuration.
The main parts of ceramic and sandwich pipes are straight and rotary elements (elbows), tees, elements with inspection hatches for cleaning, elements with a container for collecting condensate; transition elements for connecting the heating unit, cone, deflector.
Sandwich pipes consist of two layers of metal and insulation between them. Ceramic chimneys are assembled from an external expanded clay concrete frame, an internal prefabricated ceramic duct and a layer of insulation between them.
Modern chimneys are not installed without deflectors - they increase draft and protect the smoke channel from precipitation.
For boilers with an open combustion chamber
For gas boilers with an atmospheric burner, a smoke channel is required that provides good draft - the removal of combustion products occurs due to the movement of air through the pipe. Therefore, it is made as straight as possible, preferably with smooth walls. There are two options:
- Bring it horizontally through the wall, then along the outer wall up to the required height. This option is also called an external chimney.
- Lead the pipe up from the boiler, go through all the floors, the roof, and lead it above the roofing material. If necessary, you can move the pipe further away from the wall by making two 45° elbows. It is better not to make 90° bends with this design.
Which option is better? An external chimney is easier to implement - with an outlet through the wall
It is only important to pass through the wall correctly (maintain a fire gap if the walls are flammable). But this option requires good insulation and high-quality fastening to the walls
And even under such conditions there is usually a lot of condensation. Therefore, the installation of a tee and a condensate collector at the outlet is mandatory.
Option for passing through the ceiling and insulation
In the case of a chimney outlet through the roof, there are at least two difficult points - passage through the first floor ceiling and through the roof. In these places, special passage units are installed. They provide the proper degree of fire safety.
Features of metal pipe assembly
If sandwich pipes or single-wall metal pipes are used, then the external chimney for a gas boiler is collected “by condensate”. That is, inserting the upper pipe inside the lower one. This is possible due to the presence of a corrugated edge on one side.
When assembling a chimney inside a building, the structure is assembled “according to the smoke.” In this case, it is more important that gases do not enter the room. Therefore, they unfold the pipes so that the upper element fits onto the already installed one.
Types of chimney assembly made of metal and sandwich pipes
There is a third option - to assemble two circuits in different ways: the external one for smoke, the internal one for condensate. For such an assembly, it is imperative to use sandwiches, since they are the only ones with two circuits. This is the best option, since the protection is complete, but the assembly is complicated.
Smoke pipes in the shaft (box)
To prevent communications from spoiling the interior, they are often “packed” into a shaft - a specially constructed box. Inside there are, as a rule, a chimney (or chimneys, if several devices are working), ventilation ducts, and there may be risers for water supply, heating, and sewerage. In any case, it is better to cover the chimney pipe with thermal insulation. If insulation can still not be used in a heated room, then in the attic (especially if it is cold), insulation must be mandatory. Use basalt wool with an operating temperature of at least 300°C.
The chimney can be hidden in the shaft
Insulation will have a positive effect on the temperature inside the chimneys, which will increase draft and reduce the amount of condensate. But do not forget that we are talking specifically about gas boilers, and their combustion products have a low temperature.
Installation of vertical pipes
Under the exposed pipe, to the wall from the outside, we fix the holding bracket and install the turning angle.
Next, we install vertical pipes with fixation to the wall at least every two meters. But there is one very important rule that must be followed in order for the chimney to last longer:
The first segment is placed ON the corner, and all subsequent segments, on the contrary, are inserted inside the previous segment.
This sequence is important for the unhindered passage of smoke and the removal of condensate inside the chimney.
At the final stage, we put an umbrella cover on the pipe to prevent precipitation from getting inside the chimney.
Make it yourself or order it
You can only make a brick chimney yourself or a structure from an insulated single-layer steel pipe. But laying smooth and beautiful walls of a brick pipe is more difficult than laying just a brick wall, and you must have the skills of an experienced mason. Single-layer pipes will have to be insulated; the quality of self-insulation is much worse than that of ready-made factory-made pipes.
You can independently install a chimney made of ceramics and sandwich pipes. It is impossible to manufacture elements of such chimneys on your own, but the industry produces many modules that allow you to assemble a pipeline of any design.
The question of whether to install a pipe yourself or hire a team of professionals is quite complicated. Installing a chimney is quite a complex job, and it is worth thinking about and carefully assessing your capabilities: is it possible to take prefabricated scaffolding or scaffolding of the appropriate height, will you have assistants, do you have the skills to install building structures, how do you react to height.
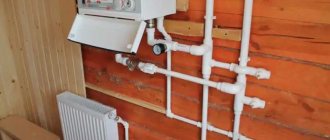
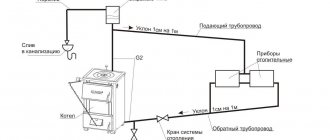
Chimney assembly
If you decide to implement the question of how to make a sandwich chimney correctly with your own hands, you need to once again make sure of the quality of the system and check the availability of the passport before starting the installation. This document must be handed over upon purchase and it indicates a possible assembly diagram, as well as some technical parameters of the composition of the chimney.
When the heating device is already installed, you need to insulate the wall with calcium silicate or mineralite. This must be done immediately, since after installing the chimney there will be no access to the wall. Also, you immediately need to mark and drill holes for the bracket for connecting the mono-pipe and pipe.
Elements of a sandwich chimney assembly Source pandia.ru
When starting assembly work, you need to coat the parts of the outlet of the heating device with sealant. After this, a tee is connected to the boiler or furnace pipe, which contains a plug and a device for collecting condensate.
On the opposite side, a mono pipe is connected to the tee. After the tee is firmly seated on the pipe, it is pushed in all the way and tightened tightly with a clamp. After screeding, you need to apply a building level and if everything is normal, then you can secure the first element with a support bracket to the wall.
Next, the pipes are connected to each other in the chosen way: “through smoke” or “through condensate.” All joints between parts are fixed with heat-resistant sealant. To apply it you need to use a spatula. After application, the composition is distributed in an even layer over the entire surface of the edge of the element.
Support bracket Source topijar.ru
The sequence and list of necessary parts depends on how the chimney will be located. When the installation is carried out indoors and in a vertical position, it is advisable to install a tank for heating water or a specialized mesh heater.
If you place the sandwich elements at once, then exposure to high temperatures may cause the thermal insulating mineral wool layer to sinter, which will cease to perform its functions. The steel can subsequently burn out quickly.
If the question arises of how to assemble a chimney from sandwich pipes into a bathhouse and the system must be taken outside, then first a pipe is installed, and after it a section is immediately placed in a horizontal plane. The passage section must not be installed in a completely horizontal position or with a slope towards the premises, as accumulating condensate can get inside the heating device, which can lead to its deformation.
Chimney indoors Source dizajninterer.ru
Building regulations
Chimneys are designed and installed in accordance with SP 60.13330.2012 “SNiP 41-01-2003. Heating, ventilation and air conditioning.”
Chimneys must meet the following requirements:
- The height from the mouth to the grate must be at least 5 meters.
- The internal channel should not have narrowed areas.
- The height above the flat roof is at least 0.5 m (preferably 1 m).
- Head height for pitched roof:
- At a distance of less than 1.5 m from the ridge (parapet) - no lower than 0.5 m from the ridge.
- If the distance to the ridge is from 1.5-3 m - not lower than the level of the ridge.
- If the distance to the ridge is more than 3 m, the height should not be below a line drawn from the ridge at an angle of 10° to the horizontal (down from the horizontal).
- When calculating, you should take into account not only the height of the ridge closest to the chimney, but also the height of the highest ridge of the building (or the highest part of the building).
Pipes may have inclined sections at an angle of at least 30° to the vertical, with a horizontal pipe displacement of no more than 1 m. The cross-sectional area of inclined sections should not be less than the cross-sectional area of horizontal sections.
Fire safety requirements for chimneys
The distance between the outer surface of brick or any other chimneys (with insulation) and the structures of walls and roof slabs must be at least 130 mm. The distance from the structures to the wooden wall must be at least 260 mm.
If the chimney in the area of the roof overhang passes close to rafters, sheathing and other combustible materials, the passage must be insulated with non-combustible materials.
The chimney of solid fuel, wood and peat heating devices must necessarily have a mesh spark arrestor with a mesh size of no more than 5x5 mm if the roof is covered with flammable materials (bitumen tiles, roofing felt, ondulin) or leaves fall on it. When installing a chimney in a wooden house, be sure to install a spark arrester.
Traction and height
The height of the hog is the main parameter that determines the traction force.
Other factors affecting traction force:
- Sufficient insulation of the pipeline.
- Smoothness of the walls of the chimney channel.
- The thickness of the soot layer on the walls.
- The presence of a head or deflector (which does not interfere with the free exit of smoke).
- Air supply to the firebox.
- Closing the canal with valves, condensate or ice frozen at the mouth.
- Correctly selected internal cross-section.
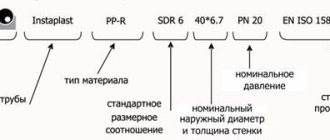
How to choose a diameter
The diameter of the internal chimney channel must necessarily coincide with the diameter of the boiler outlet pipe (information from the heat generator’s passport).
In SP 7.13130.2013 “Heating, ventilation and air conditioning. Fire Safety Requirements" shows the cross-sectional dimensions of the internal channel depending on the power of the heat generator:
- Up to 3.6 kW – 140×140 mm (diameter not less than 158 mm).
- 3.5-5.2 kW – 140×200 mm (diameter not less than 189 mm).
- 5.2-7.0 kW – 140×270 mm (diameter not less than 219 mm).
Chimney outlet methods
The main task of a chimney is to remove smoke outside the house, which can be organized in several ways. The choice of pipe insertion location depends on the location of the heating device, free space and type of chimney. The following pipe placement options are used:
- External. External placement in Russia is still used quite rarely; it is used if a heating device is installed in a private house, which was not provided for during the design. The construction of an external chimney consists of leading a pipe outside through a wall adjacent to the heating device. From the outlet, the pipe rises up to the height of the ridge or higher to ensure good traction. It is correct to place the external pipe at least 0.5 m from the edge of the roof to prevent fire. The advantage of this option is that it saves space in the house by moving communications outside of it.
Internal and external view of the bathhouse chimney - Internal . A chimney on the roof is a sure sign of an internal chimney. Its device has a perfect vertical appearance, rising to the roof directly above the heating device. If the chimney is made of a material with high thermal conductivity, then placement inside the house reduces heat loss and reduces fuel consumption to maintain the optimal temperature. The complexity of the internal placement is that during its installation it is necessary to perform labor-intensive insertion, first into the interfloor ceiling, and then into the roof. In addition, this option is considered more fire hazardous.
External placement is well suited for the bulky design of a brick chimney, and if a metal pipe is routed through the wall, you will have to take care of additional insulation or use special sandwich pipes.
Not every brick is suitable for a pipe
Not every brick is suitable for arranging an exhaust pipe. High-quality material should not crack due to temperature changes in the external environment and be destroyed by adverse atmospheric influences. It should be able to resist high heat well and withstand harsh chemicals.
Brick quality level illustration
For the construction of a chimney, experts recommend using first-grade brick. Second grade building material should not be used for the reason that it does not meet the technical specifications. The foundation and superstructure can be made of third-grade brick. It is also possible to equip a metal stove with a brick chimney.
What is a sandwich pipe
Sandwich - this type of pipe received this name for its layering by analogy with the named product. The inner and outer layers of such pipes are represented by metal cylinders, and the middle one is a layer of thermal insulation.
Metal for chimneys began to be used quite a long time ago. A simple example is the pipe of an ordinary potbelly stove. However, soon after commissioning it became clear that metal pipes have a number of disadvantages. The problem was that metals, having good thermal conductivity, quickly heat up and give off heat to the environment, and there is always a danger of ignition.
The solution turned out to be simple - the metal pipe was wrapped in a layer of thermal protective material. However, such material does not tolerate environmental conditions well and is not very attractive from an aesthetic point of view.
Sandwich pipes are the next solution in the evolution of metal chimneys. Another metal pipe is placed on top of the thermal insulation layer, which protects the inner two layers from external influences and does not spoil the appearance of the building.
It is important! Sandwich pipes can be purchased ready-made, but you can make them yourself by selecting the materials with the required parameters. It is worth remembering that the inner pipe should be more expensive and better quality than the outer one, but smaller in diameter, and the thicker the thermal insulation layer is, the higher the combustion temperature of the fuel in the heating device.
The inner cylinder is made of stainless steel. This material is less susceptible to corrosion by combustion products. The steel must be high quality and high-tech. Preference is given to those options whose seams are welded using the TIG method - the most reliable and wear-resistant, but also the most expensive.
We recommend that you read: The height of ventilation ducts above the roof: 5 factors influencing the calculation
The middle layer provides thermal insulation and protection of surrounding surfaces from heat. For these purposes, mineral wool is used, the density of which is at least 120 kg/m3. The thickness of this layer depends on the temperature inside the chimney. This parameter should be selected individually.
The outer cylinder is also made of steel. It is worth giving preference to stainless material, but to save money you can choose galvanized steel. The durability of the chimney will depend on its quality to a lesser extent than on the quality of the internal cylinder. In addition, sandwich pipes with decorative outer cylinders are available.
Types of chimneys by material and design
Depending on the type of fuel used, the temperature of combustion products inside the chimney of a solid fuel boiler can reach +5000C. This is the main indicator when choosing material for a chimney pipe.
As a rule, such designs are performed:
- made of refractory brick;
- metal - usually stainless;
- ceramic products;
- glass;
- asbestos cement pipes.
Brick chimneys
Brick chimneys are most popular as traditional structures. The brick itself can withstand fairly high temperatures, reaching up to +8000C. However, it is not recommended for use when the efficiency of the heating boiler is low. After all, a lot of heat will go into warming up the walls of the chimney pipe in order to get good draft.
Diameter diagram
Also, brick, as a porous material, accumulates deposits in the form of soot on its surface. And the condensate falling from the flue gases is detrimental to the strength of the brickwork.
In addition, few homeowners will be able to make a correct and high-quality brick chimney with their own hands - this is quite difficult. In addition, brick smoke exhaust structures are expensive and troublesome to operate, as they require periodic cleaning.
Steel chimneys
Metal chimney pipes are more convenient to clean, since a minimum of soot and deposits accumulate on their smooth internal surfaces, and they are quite easy to clean. But structures made of ferrous metal will not last long, as they quickly rust. Therefore, when choosing a chimney, it is better to give preference to stainless steel products.
Options differing in height
Such chimneys can easily withstand temperatures up to +7000C, they are easier to install, and they are cheaper than brick structures. But it is necessary to take into account their mandatory thermal insulation, since the metal heats up to high temperatures, which creates a risk of fire.
Ceramic chimneys
Ceramic chimney pipes, among others, are characterized by a long service life and fire safety. This material is obtained by firing at high temperatures, and it withstands them perfectly. Ceramics are not subject to combustion, and also do not contribute to the ignition of accumulated soot. After all, smooth internal walls prevent the formation of a large number of deposits.
Model Effe2 Domus
Similar structures are produced in the form of a shell with the necessary insulation in the middle layer and all the attributes for connection to a solid fuel boiler. The length of individual blocks is 33 cm, which makes their installation, even with your own hands, quick and easy. In addition, the elements of the chimney pipe are already equipped with inspection doors for cleaning soot and soot, as well as devices for removing condensate moisture.
The most important thing is that ceramics is an environmentally friendly material. Ceramic chimneys can withstand temperatures up to +12000C, exposure to toxic gases and condensate.
Glass chimneys
This type of smoke exhaust structures made of fire-resistant glass is not yet widely in demand on the domestic market, as in European or Asian countries. This is explained by low public awareness of these devices and the high cost of such products. However, in terms of quality characteristics, they bypass all other designs.
Main settings
Glass can withstand fairly high temperatures, soot deposits do not form on its smooth surface, and it is not subject to corrosion. And if destroyed, the chimney for a solid fuel boiler, made of fire-resistant glass, does not form sharp fragments, which eliminates the risk of injury.
The disadvantage of such chimney models is their high cost and installation complexity, which you will no longer be able to cope with yourself. Here you need the help of a specialist.
Type of chimney placement
If you are interested in how to assemble a chimney from sandwich pipes, you need to carefully analyze the place where you plan to install it. Depending on the area of the room, the location of the furniture, the level of humidity and other factors, it is necessary to choose the type of placement of the sandwich chimney. Installation is possible indoors or outdoors.
Outdoor installation
A chimney that is assembled from the street side significantly saves space inside the house or bathhouse. Having studied how to install a chimney in a bathhouse from sandwich pipes, you can assemble such a structure with your own hands. There is no need to make a decorative box for it, which significantly saves money.
Main types of chimney assembly Source otopleniehouse.ru
The system consists of assembled elements of the required length, which are connected to a structure located indoors with a special through pipe. To ensure good traction, it is necessary to follow the rules when the length of the passage section should not be more than 100 cm.
During installation, a technological slope of 3 degrees must be observed so that condensate does not accumulate in the boiler or furnace. In this placement, the roof must be more than 50 cm from the edge of the steel outer pipe. The best answer to the question of how to properly install a sandwich pipe in a bathhouse, outside or inside, would be installation from the street side.
Important! If continuous use is not planned in winter, it is advisable to insulate the chimney to avoid freezing and deformation from temperature changes.
External installation of a sandwich chimney Source fluesystems.ru
See also: Catalog of companies that specialize in the installation of stoves, fireplaces, grills and barbecues.
Indoor installation
The chimney, which is installed in the room, consists of an internal part of the system, located perpendicular to the floor, and an external part, discharged through the roof. The structural parts must be joined together in open areas so that inspection can be carried out. A joint located in the interfloor ceiling does not provide such an opportunity and is considered a potential fire hazard, since if the seal is broken, the wooden floors, floor materials of the second floor and ceiling of the first will overheat.
The placement in a completely vertical position gives a good level of draft, and in addition, such a chimney is easy to maintain. If during installation it turns out that when installed vertically, the chimney rests on the ceiling or rafter, then in order not to interfere with the structural part of the house, it is better to bend the pipe using special connecting elbows.