Ventilation and communications
To create an optimal microclimate in the basement of the garage, a natural ventilation system must be provided. It is best to use two different ventilation ducts, which will be mounted in different corners of the cellar; this will allow you to quickly ventilate the basement due to intensive air exchange. If you need to create good draft, then install one of the ventilation pipes 1 meter higher than the garage roof, and install the second pipe at the bottom near one of the walls.
Scheme of ventilation of the cellar in the garage
Due to the difference in heights, good natural traction will be provided. Even if the cellar in the garage is heated, with natural ventilation all the hot air will simply rise up to the ceiling, and the floor and the space above it will remain cold.
Recommendation! Installing special fans allows you to increase air circulation in the cellar.
Communications (electricity, heating, water) must be securely installed before work on insulating the cellar begins. Electrical wiring must be carried out in a protective corrugation; wire switching points must be in an easily accessible place using cross-connect boxes. Also, all joints of heating or water pipes must be accessible for maintenance.
Recommendation! It is best to use a safe voltage for cellar lighting of 12 or 24 Volts.
Ventilation
In order to maintain a normal balance between temperature and humidity, ventilation is required in every basement. The garage cellar is no exception. The ventilation system can be different, it is important that it exists and works effectively. It is advisable to install ventilation while the garage and basement are just being built, but this can be done later.
For a garage, ventilation is necessary not only because of the creation of a microclimate, but also because of the presence of exhaust gases and toxic substances, which, in the absence of an exhaust hood, will accumulate in the room, including in the garage basement.
Ventilation can be natural or forced. When installing natural ventilation, two pipes are required, which are at different heights. Sometimes it is enough to simply make holes in the basement to ensure sufficient ventilation.
For forced ventilation equipment, additional mechanisms will be required, which must be assembled strictly according to the manufacturer’s instructions. This complex includes fans that help draw air out of the room. In addition, immediately before the crop storage season begins, regardless of the availability of ventilation, you need to ventilate the garage, open the external doors and the cellar lid.
Choosing insulation
We decided to insulate the cellar, but we don’t know how to do it, and most importantly, what material to use.
Let's look at how to insulate a cellar in a garage using modern materials that experts use to insulate basements:
- polystyrene foam or extruded polystyrene foam;
- mineral wool;
- “warm” plaster;
- glass wool;
- reflective thermal insulation.
Insulating a cellar in a garage with the materials described above allows you to achieve good thermal insulation properties and prevent the appearance of fungus in the room, but each material has its own advantages and disadvantages.
Extruded polystyrene foam or polystyrene foam
Advantages:
- simple installation;
- environmental friendliness;
- you can use extruded polystyrene foam for floor insulation;
- service life up to 40 years or more;
- excellent water resistance;
- low cost;
- perfectly tolerates sudden temperature changes.
Flaws:
- is flammable;
- does not allow air to pass through.
Helpful information! Extruded polystyrene foam differs from polystyrene foam in its increased density and strength. Thus, the thermal conductivity coefficient of extruded polystyrene foam will be higher than that of polystyrene foam with the same thickness of the material. In addition, only extruded polystyrene foam is used to insulate the floor covering.
| Characteristics | Expanded polystyrene PSB-30 | Foam plastic PSB-35 |
| Density (kg/m3) | 30−32 | 27−29 |
| Thermal conductivity coefficient (W/mK) | 0,032 | 0,038 |
| Compressive Strength (MPA) | 0,25 | 0,08 |
Important! When using polystyrene foam or extruded polystyrene foam as thermal insulation, it will be necessary to treat all surfaces with a primer before starting work and, upon completion, additionally plaster the walls using reinforced plaster, and make a screed of cement and sand on the floor.
Mineral wool
Advantages:
- allows air to pass through, allowing the room to “breathe”;
- excellent sound insulation;
- excellent thermal insulation;
- affordable price;
- long service life of 30 years or more.
Flaws:
- an additional frame for installation is required;
- allows moisture to pass through;
- work is performed in special clothing and gloves.
Important! If mineral wool is chosen as insulation, then it will be necessary to additionally make a vapor barrier in the basement to prevent moisture absorption by the wool itself and deterioration of its thermal insulation properties.
"Warm" plaster
Advantages:
- excellent thermal insulation;
- affordable price;
- excellent sound insulation.
Flaws:
- it is necessary to apply a thick layer for good thermal insulation;
- difficulty in installation.
Recommendation! It is optimal to use “warm” plaster to cover surfaces together with other thermal insulation materials in order to achieve good thermal insulation.
Glass wool
Advantages:
- low cost;
- good thermal insulation properties;
- good sound insulation properties.
Flaws:
- work is performed in special clothing and gloves;
- an additional frame for installation is required;
- allows moisture to pass through;
- If exposed to moisture, it may emit an unpleasant odor.
Important! If mineral wool is chosen as insulation, then it will be necessary to additionally make a vapor barrier in the basement to prevent moisture absorption by the wool itself and deterioration of its thermal insulation properties. In addition to the vapor barrier material, it is necessary to use film or foil to insulate glass wool.
Reflective Thermal Insulation
Advantages:
- high thermal insulation properties;
- material thickness is only from 2 to 5 mm;
- simple installation;
- possibility to use facing material.
Flaws:
- price;
- possible heat loss
Important! Reflective thermal insulation is quite thin and, like a mirror, will reflect infrared heat when reflected. As a result, it is not efficient enough at convection or induction of reflected heat, which leads to heat loss.
Choosing a material for insulating a basement in a garage
How to insulate a cellar in a garage will be the first question about completing the work. The right approach to choosing material for insulation is the key to long-term operation of the room.
Materials must meet the requirements of steam-waterproofing and insulation. The most economical method of insulation will be sawdust:
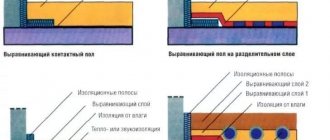
Insulation scheme
- A covering layer of polyethylene film is placed on the base of the floor
- The material must be well fixed and have allowances
- Floor insulation with hot bitumen
- Sawdust pad device
- Finish the floor
When choosing these materials, it is worth noting the disadvantages: the main material is sawdust, and they, as you know, are not durable.
Attention: High-quality and reliable thermal insulation of the basement in the garage will be treated with polyurea and polyurethane foam. These materials will cope with both insulation and waterproofing of the subfloor. Polyurethane foam and polyurea are the most durable, despite the cost.
The huge advantage of the materials is:
- Versatility - these materials are suitable for processing both outside and inside.
- Polyurea provides good insulation
- Does not require special surface preparation
- Lightweight and also warm material, will not bear load on the base
- The materials are easy to work with; anyone can perform insulation, even without skills.
- The durability of polyurethane foam and polyurea is 20 years.
There are other materials for insulating the underground floor in the garage:
- Expanded clay in relation to bitumen or concrete is a good insulation material for floors
- Resin and peat will serve as cheap insulation.
- Basalt fiber and charcoal are also the key to underfloor heating.
Polystyrene foam as wall insulation
An economical option for wall insulation can be polystyrene foam. The material has high qualities of low thermal conductivity and is also lightweight.
Polystyrene foam has not only advantages, but also disadvantages. The sheets of material are quite light and after installation they crumble and require some cutting.
Technology of wall insulation with foam plastic
The technology itself is not that complicated. It is quite possible to do it yourself. Then the price of the work will be significantly lower. The main thing here is to follow the sequence and properly prepare the surface.
We carry out insulation with foam plastic
Attention: The base plane must first of all be dry and cleared of everything unnecessary. Before work, you should treat the surface with an antiseptic, then you will avoid the formation of fungus on the surface.
So:
- Treatment with septic tanks or lining with roofing felt
- Installation of wooden sheathing made of 50*50 mm timber on the subfloor walls. The thickness of the beam is selected depending on the sheets of insulation material;
- We cut the sheet foam according to the dimensions of the already installed sheathing and place it tightly in the cells. For this, it is best to use polyurethane foam. It will attach the sheet and promote a better fit;
- We fix it with construction fungi. To do this, we first make a hole using a hammer drill and then make a connection using plastic mushrooms;
- We fill the resulting gaps and joints with polyurethane foam;
- We cover the resulting sandwich with a mounting mesh and plaster the surface;
- Using polystyrene foam, for complete sealing, we tape the entrance structures.
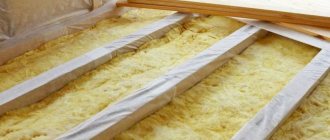
Insulation with mineral wool and fiberglass
Now let's look at how to insulate a cellar in a garage with this material. Mineral wool and fiberglass sheets are ideal for insulating rooms. Environmentally friendly materials, easy to install and have low thermal conductivity.
We carry out insulation with mineral wool
Attention: Having chosen this material as the basis for insulation, pay special attention to waterproofing. Mineral wool materials do not tolerate moisture, as a result of which they can settle and begin to rot. With this choice, you should take a serious approach to solving the tightness of the room (see the article How to remove moisture in the cellar: drastic ways).
Fastening the material is done in the same way as foam. Here, though, it will be easier for you to make the joints airtight. After all, the material is soft and can be laid in any way you like.
We insulate the ceiling of the cellar
Before starting insulation work, we check the entire surface of the ceiling in the basement for cracks, potholes, etc. We carefully clean all these defects and seal them with a solution or carefully blow them out with foam. After this, we treat the entire surface of the ceiling with antifungal solutions (quicklime or copper sulfate).
There are a lot of options for insulating a basement ceiling in a garage - from polystyrene foam to reflective insulation.
The ceiling can be insulated with any of the materials described above; for insulation with mineral wool or glass wool, a special frame will be required, which is then sheathed with HA sheets, plastic, plywood, etc. Installation of polystyrene foam or expanded polystyrene can be carried out on parachutes with the preliminary application of a special solution, then the mesh is applied and plastered surface and painted, you can also use facing material (decorative tiles, panels, etc.). Decorative cladding material can also be used for reflective thermal insulation.
Recommendation! Before insulating the ceiling, all electrical wiring for lighting should be done, and the wires should be laid in non-flammable corrugation.
How to properly insulate a cellar built in a garage
Equipping a cellar in the garage is a great idea for those who need a place to store crops and preparations. The only problems you will have to face are high humidity and cold, which are natural for an underground room. In order to avoid this and prevent food spoilage, it is necessary to carry out additional insulation of the cellar. Before starting construction, you should understand the peculiarities of the functioning of a vegetable storage facility and how to properly insulate a cellar in a garage.
Insulating the hatch cover
The cellar lid, like the ceiling, should also be insulated, since there will be a large leakage of heat through it and the possibility of moisture getting from the main garage into the basement.
DIY cellar lid insulated with foam plastic
It is best to use polystyrene foam to insulate the hatch cover; it is better to choose the highest density of 100 or 150 kg/m³. We pre-treat the lid with antifungal solutions (quicklime or copper sulfate). We cut a piece of polystyrene foam to the size of the lid and fix it with special glue or foam. To make a decorative surface for an insulated cover, you can use plywood, which is fixed with self-tapping screws to the hatch cover itself. You can first make a wooden frame around the perimeter of the lid to cover the visible parts of the polystyrene foam. After fixing the plywood, it can be painted to protect it from moisture.
Insulation of an old basement
Incorrect drainage system or ventilation design, all these factors may not have a beneficial effect on the insulation of the basement. As a result, you will have to resort to unplanned repair costs. So:
- In an already used room, dismantling the old insulation is possible, but very labor-intensive. If it was not there, then we simply prepare the surface. We remove the previous coating and then apply an antiseptic. We are waiting for complete drying;
- The first step in dismantling is to completely clean the walls of damaged materials. A mandatory requirement will be the complete drying of the room; accordingly, this type of work must be carried out in the summer. Perform waterproofing regardless of the selected material.
- One of the fastest and most effective methods will be treatment with polyurethane foam and polyurea. In just a few hours you can easily treat the surfaces you need and forget about mold, mildew and damp odors in the underground space. Environmentally friendly materials and made with the times, technically convenient and durable polyurea and polyurethane foam.
- Polyurea will protect your foundation, as well as your walls, from unnecessary moisture and condensation. It will serve as excellent protection against rot and fungus for many years. Polyurethane foam will provide high thermal insulation properties and will also serve as waterproofing.
- Polyurethane foam and polyurea materials can be easily applied to any surface, quickly harden and after 12 hours, you will be able to use the basement for its intended purpose.
Insulation based on polyurethane foam
Polyurethane-based materials have proven themselves to be one of the highest quality insulation materials. The composition includes polyurethane foam, which is known to have high thermal insulation and waterproofing properties. So:
- When applied, it creates an even coating without seams. It does not flow down when applied, thereby facilitating insulation work.
- Polyurethane foam has a cellular structure, thanks to this quality it quickly increases in volume and quickly hardens. It has high heat and waterproofing functions.
- Polyurethane foam is widely used both in medicine and in construction. In construction, this material is used for insulation of industrial buildings, as well as residential buildings.
- The insulation made on the basis of polyurethane foam is environmentally friendly, which means it will not cause irreparable harm to the health of the environment. Polyurethane foam is odorless; this material can be used in food storage areas.
You can now do the insulation of the cellar in the garage correctly. The main thing is to choose the right materials. Take your time and do everything thoughtfully. Then dampness will not bother you for a long time.
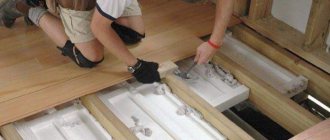
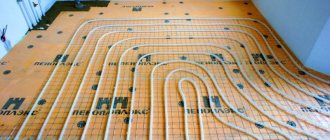
We insulate the floor in the cellar
Answering the question of how to insulate a basement in a garage, we go directly to the insulation process and start with insulating the floor covering.
Rigid polystyrene foam is effective for thermal insulation of floors
To insulate the floor, you will need to perform preparatory operations:
- we deepen the floor, digging a hole about 30 centimeters deep around the entire perimeter, and level the entire surface of the floor;
- we add fine crushed stone about 10 centimeters deep along the entire perimeter of the floor;
- Next, apply a layer of sand approximately 5 centimeters thick (this will avoid the formation of moisture on the floor);
- apply a layer of insulation - it is best to choose extruded polystyrene foam, at least 5 centimeters thick;
- We reinforce the floor with mesh and fill it with concrete screed.
Recommendation! You should not use sawdust or wooden platforms made from boards to insulate the floor, as wood tends to absorb moisture. Within a short time, an unpleasant odor will appear and the wood will begin to rot, which will require replacement of the floor covering, and as a result, additional costs.
What materials exist
The choice of consumables depends on the degree of soil freezing, the type of structure and the depth of groundwater flow.
Naturally, insulation materials must meet important requirements: maintain water resistance, heat and protect against fungal infection. Thermal insulators are different for walls, ceilings and floors.
Mineral wool
Mineral wool is an excellent thermal insulation material that, in addition to everything, allows air to pass through. To insulate walls and ceilings indoors, you can use slabs of medium and soft hardness. This material does not burn and is easily attached to the surface.
Basalt wool, which has higher thermal conductivity and noise insulation properties, has proven itself especially well. It is important to remember that additional vapor barrier protection will be required to prevent moisture accumulation.
Expanded polystyrene
This is a high quality thermal insulation material that is perfect for a basement. It has high resistance to mold and the spread of rot.
Its important characteristic is almost absolute waterproofness. In addition, the material has a long service life.
Styrofoam
Often used for cellar insulation. It differs from expanded polystyrene in its manufacturing technology and higher vapor permeability. Has the following distinctive characteristics:
- does not allow moisture to pass through and does not change shape under its influence;
- weighs little and does not create additional load;
- affordable.
Reflective Thermal Insulator
New materials include reflective insulation.
In its production, special rolls are used, which, on the one hand, are made of foamed polyurethane foam, and on the other, of polished foil.
This insulation effectively saves room space, since its thickness is 3-5 mm.
Glass wool
Glass wool is used less and less today. But it has one undeniable advantage. It's cheap.
When working with such material, it is worth stocking up on protective gloves, and you also need to protect your eyes. It is necessary to additionally insulate with film or foil.
Warm plaster
This material performs both decorative and heat-insulating functions.
Plaster can be used as an independent raw material, or can be combined with other thermal insulators. In any case, it must be applied in a very thick layer.
Expanded clay
The floor in the basement can be insulated with expanded clay. This is an inexpensive option, very easy to use and effective. The thickness of the expanded clay layer depends on the expected load.
It is recommended to choose two types of expanded clay with fractions of 5-20 mm, this will protect the floor from subsidence. The size of the bulk layer should not be less than 10 cm.
Sand and crushed stone
The construction of sand, crushed stone and screed is also quite effective.
First we deepen and level the floor. The first layer is crushed stone, 10 cm thick, then sand, 5 cm thick. After thorough compaction, fill it with hot bitumen and make a reinforced concrete screed. This is a traditional and inexpensive option.
We insulate the walls
Regardless of what material the walls will be insulated with, all seams and cracks must first be carefully sealed and all walls must be treated with antifungal solutions (quicklime or copper sulfate).
To insulate walls with mineral wool or glass wool, a special frame made of wall profiles is used. This is done so that the wool does not “flow” down under its weight, but is firmly fixed along the entire perimeter of the wall. After this, the frame can be covered with HA sheets, plywood, etc. with subsequent finishing.
An economical solution - insulating basement walls with foam plastic
To fix polystyrene foam or expanded polystyrene to the wall, a special solution and “parachutes” (dowels with a wide cap) are used. All joints between sheets of foam plastic must be carefully blown out with foam. After this, a special mesh is applied to the entire surface of the wall and plastered. After plastering, the walls can be painted.
Important! Before installing foam sheets, it is advisable to level all the walls and remove all protruding parts. This is done to ensure that the foam sheets fit tightly to each other and to the wall, providing good thermal insulation.
Reflective thermal insulation is installed quite simply; it is glued to the wall surface along the entire perimeter. On the wall side the base of the material is polyurethane foam, on the outside there is polished foil. A decorative or cladding coating can be applied on top of the reflective insulation.
Recommendation! Depending on the type of insulation you choose, carefully study the installation process, as some materials may require additional wall treatment.
Step-by-step instructions for insulation
Most experts recommend using polystyrene foam as a heat insulator. To insulate a cellar in a garage, you should choose a material with a thickness of 40-50 mm. Such insulation will maintain a stable temperature for a very long time.
Foamed sheets have a cellular structure, due to which they have lightness and low thermal conductivity. You can do the installation work yourself.
Selecting installation tools
When insulating, you need to stock up on numerous construction tools:
- level;
- hammer;
- trowel;
- spatulas;
- glue;
- dowels;
- plaster mortar;
- primer and putty;
- brush for applying primer.
Preparing the premises
Before installation work, we clean the basement from dirt. If the surfaces are uneven, then we perform putty and primer. Moreover, the latter procedure effectively protects against fungus. We moisten the surface and polystyrene. This can be done using a garden sprayer.
You can also create a ventilation layer between the wall and the material. To do this, we attach a special frame to the wall, and then mount the slabs on it. Ventilation can be installed after laying the sheets, but you will have to use drywall.
There are two ways to attach the material to the surface: adhesive and fungal.
Fastening with adhesive method
The first method is mounting using an adhesive solution. This is a great option as the glue has excellent adhesion. We dilute the solution in a plastic container and mix well with an electric drill. After moistening the surface, apply the glue in the form of spots with a distance of 20 cm from each other.
Using a trowel, apply another layer of glue to the resulting stains. It can also be applied to the end parts, this will make it easier to join the slabs. Press the sheet against the wall and tap it well with your palm. The slabs should be laid from top to bottom, that is, from the ceiling to the floor.
Mushroom fastening
For the second method you will need dowels. These are small screws with a head. For this material, it is better to select disc-shaped screws, which can be metal or plastic. It is better to choose plastic products: they are not subject to corrosion and will not allow cold to pass through.
Using a drill, we make through holes in the wall and material for dowels. In the corners we leave indentations of 10-15 cm. When choosing the length of the screws, you should take into account the thickness of the polystyrene foam, plus 4-5 cm.
Eliminating cracks
After 5 days, when the glue has completely hardened, we seal the cracks with polyurethane foam using a construction gun.
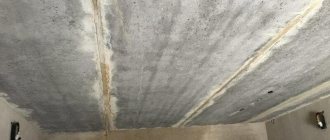
Ceiling
Concrete ceiling slabs in the cellar are subject to the greatest freezing. You can ensure a dry and warm atmosphere by using moisture-proofing substances to treat the ceiling.
After drying, foam sheets are glued on top of the dry concrete and additionally secured with dowels. It is also possible to stuff the slats and then lay insulation in them.
After this, it is necessary to seal all the seams of the structure with polyurethane foam. Then the mounting mesh and layer of plaster are adjusted.
Selection of modern insulation materials
The correct choice of insulation for non-residential premises is not an idle question. When purchasing, you need to consider your region of residence. The effectiveness of a particular material depends on operating conditions. For northern regions, denser insulation is required. For areas with mild climates, a thinner variety is sufficient.
Temperature conditions in residential non-residential premises are different. Therefore, it is important to use high-quality insulation with a reasonable price. For this purpose, you can use both modern and classic insulating materials.
Basement insulation, features
The basement is insulated in different ways, but its external insulation creates the best effect, since with this method of thermal insulation the walls are well protected from freezing.
Thermal insulation scheme
Attention: After insulating the basement from the inside, condensation appears at the joints of the wall and the insulation, which can ruin the coating. For this reason, good waterproofing of the entire wall surface is necessary.
The material for thermal insulation must be selected with good moisture resistance. Therefore, polystyrene foam is considered the most suitable type of thermal insulation material for the basement. Of course, it is worthwhile to insulate the basement, if possible, during the construction of the house. After all, then it is possible to simultaneously install a drainage system and waterproofing.
Preparing to insulate the basement
All work is performed in the following sequence:
- The first thing you need to do before insulating the basement walls is to level them to perfect condition.
- After this, it is worth treating with antiseptic and antifungal impregnation. There is a possibility that the humidity in the basement will increase after insulation, so you need to take care of ventilation, drainage and drainage in advance.
- To equip the basement with ventilation, holes are made in the base of the building, the distance between which should be approximately 5 m. Such holes are closed only during severe frosts.
- To create a drainage system, drainage membranes are installed, drainage pipes are made, or expanded clay filler is installed.
- Then, from the outside, it is necessary to excavate a part of the foundation that is in the ground, cover it with a net or cover it with hollow bricks. Sometimes drainage backfill is also made along the wall. After the soil has been poured into place, material may still be visible, then it should be covered with tiles or brickwork.
- It would be nice to make a blind area of asphalt or concrete along the perimeter of the building; it will drain melt and rain water, thereby protecting the basement. When creating a blind area, it is necessary to very carefully check the joints with the wall of the building so that they are securely closed. The “clay castle” also protects well from groundwater.
Insulation of floors between the basement and first floor
Basement insulation work is divided into the following types: insulation of walls, floors and ceilings. Thermal insulation of floors is necessary only in cases where the air temperature in the basement is significantly lower than in the entire house. So:
- To begin with, you should carefully seal all the cracks, cracks and joints.
- If metal nails and pins were used, they must be covered with insulation from the basement side, because these metal components serve as a kind of cold bridges and heat flows through them from the room to the basement. On the first floor, insulation is laid between the floor and the basement and secured.
- After this, the height of the basement may decrease slightly, but the room will always have a warm floor. By insulating the floors, it is worth preventing condensation from falling out, because water vapor will move through the floor coverings. This point is worth thinking through carefully. A good solution would be to install a vapor barrier on both sides of the insulation; in this way, the thermal insulation material is protected from mold, getting wet and rotting.
- The insulation on the basement side can be protected using external finishing in the form of plaster, panels or paints.
Basement floor insulation
The need to insulate the floor in the basement arises only in cases where it is planned to equip a room there for some purpose, because in this part of the building the temperature is always lower and the humidity is higher. And by installing heated floors, you can make it more comfortable and cozy. So:
- First, the concrete base is leveled and waterproofing is installed. This type of work should not be missed, since in the spring, when due to abundant melting of snow, groundwater often rises even to the level of the ground surface.
- Waterproofing is installed along the walls and horizontal plane. For this purpose, you can take any sheet bitumen material, for example, roofing felt.
- It doesn’t matter whether the basement is insulated from the inside or the outside; the insulation of the floor in the basement should retain its functions for decades. To achieve this result, you can use extruded foam with closed pores, it is almost 100% impenetrable.
Insulation of basement walls
Basement walls must be insulated in cases where you want to arrange a living space or billiard room in the basement. Having chosen foam plastic as a thermal insulation material, it is better to familiarize yourself with its advantages and disadvantages in advance so that you can use it most effectively in your work.
| Advantages | The advantages of polystyrene foam include the following:
|
| Flaws |
|
Taking into account all the listed features of polystyrene foam, in each individual case a decision is made whether it is possible to use it, as well as how to use it to insulate the inside of the basement. Do not forget that polystyrene foam is only suitable for rooms that have high fire safety.
- The basement walls are insulated with 25-density polystyrene foam; quarters along the edges help improve the joining of sheets, especially in cases where minimal fastening is done. It is better to make the first layer insulating by installing the material on the prepared surface. The insulation sheets are secured using an adhesive.
- Having covered the entire surface with polystyrene foam, it is also necessary to apply a cement screed on top with a thickness of approximately 50 mm, using M 100 cement. For the strength of the screed, reinforcement is made with a mesh with 5 mm cells. By resting the screed on the walls, you can reduce the soil pressure on the insulation.
- Upon completion of the above work, you can make another waterproofing layer, because the basement is always damp. To do this, the finished surface is tiled. The type of tile will depend on the purpose of the basement.
- In houses with a multi-layer foundation, the basement is sometimes insulated using additional mineral wool, but it must be protected from damage. When using any material for thermal insulation of a basement, the joints should be sealed very carefully to prevent the formation of cold bridges.
You already know how to insulate a cellar in a garage. Just choose the right material. When working, you shouldn’t rush, you need to do everything efficiently. Make a quality connection of the material and everything will be fine.
Floor
The floor plays an important role in ensuring optimal temperature and a favorable indoor climate. For reliability and durability, flooring requires hydro and thermal insulation, which is achieved in several ways.
Insulation using expanded clay occurs in several stages, namely:
- the base is leveled, after which it is covered with roofing felt, onto which a waterproofing agent is glued;
- expanded clay is poured, its layer should be 10-25 cm;
- A concrete screed with reinforcement is poured onto the expanded clay.
Stages of floor insulation using sand and crushed stone:
- the prepared surface is covered with 15-20 cm of crushed stone, then with a 5-10 cm layer of sand;
- the surface is covered with roofing felt or construction film for reliable waterproofing;
- installation of a reinforced belt and pouring concrete.
Floor insulation with foam plastic:
- preparing a gravel or sand cushion, subsequently covered with a waterproofing agent;
- laying foam on the surface;
- filling the screed.
It is worth remembering that the features of insulation largely depend on the location of the cellar, be it a garage, barn or a separate building. In any case, the general recommendations presented in the article can be safely applied in practice.
Methods for insulating walls and ceilings
For insulation, it is better to use moisture-proof materials. The following types are suitable:
- Styrofoam;
- Foamed polyethylene;
- Penoplex;
- Liquid polyurethane foam.
More often foam is installed. It is lightweight, does not interact with moisture, and holds the shape of the sheets well.
A little more expensive, but much more effective than penoplex. It is easy to cut and has sufficient rigidity.
Common installation method:
- A sheathing is installed on the surface, the thickness of the slats is equal to the size of the heat insulator. The pitch of the planks exactly matches the width of the sheets.
- Sheets of insulation are tightly inserted between the bars. All cracks are immediately filled with polyurethane foam.
- After installing the insulator, check its tightness and cover the surface with chipboard, OSB or plywood.
- Apply a finishing coat with lime or paint with antiseptic properties.
Foamed polyethylene is a rolled material, so it is installed in overlapping rows. All connections are taped. Slats are nailed on top, then sheathing made of sheet materials (chipboard, OSB, etc.) is installed.
Liquid polyurethane foam is applied by spraying. Because of this, a continuous sealed canvas appears that does not require finishing. Disadvantages of this method:
- Difficulty of application;
- You have to use special equipment;
- High price of material.
The ceiling is insulated in the same way. It is better to use penoplex. Working with it is easier, and the insulation result is much higher.
Ceiling insulation
Particular attention should be paid to insulating the ceiling surface in the basement of a garage. If the room is filled with cold air, this will provoke the formation of condensation, mold, and mildew. If the basement ceiling is a reinforced concrete structure, you will need to create a false ceiling and insulate it.
Perform the work as follows:
- pipes with a diameter of 2.5 cm are fixed on the wall surface 15 cm lower than the reinforced concrete slab. The pipe fastening pitch will be 60 cm;
- using reinforcing rods with a diameter of 0.08-0.10 cm, an enclosing mesh is made on the ceiling;
- the structure is carefully painted with a waterproof composition;
- the gap between the surface of the ceilings and the structure of rods and pipes is filled with many plastic bags with chopped straw or natural moss. This layer is necessary to improve the thermal insulation qualities of garage ceilings from the inside. The packages must be laid out in rows, pressed tightly against each other to avoid the appearance of cracks;
- Insulating material is attached to the metal sheathing and plastered.
Conducting communications
It is better to conduct pipelines, power cables, and other communications into the basement before insulation.
The cables must be pulled into a protective corrugated sleeve. Ventilation pipes are fixed to the walls or ceiling slab, ensuring the tightness of the passage areas.
After fixing the heat insulator, it is not recommended to lay communications.
Features of insulation
Condensation on the walls and ceiling contributes to the occurrence of dampness.
The process of insulating a garage basement is practically no different from similar work in other rooms. However, there are a number of nuances that can significantly affect the final result. The fact is that high humidity occurs in all underground rooms. This fact is due to the fact that the walls of basements or cellars have direct contact with the ground. In practice, the soil contains a large amount of moisture, which easily penetrates inside through the basement walls.
Waterproofing the cellar from the inside
Therefore, the main task when arranging a cellar will be to ensure sufficient waterproofing of its walls and floor. The most effective option for such protection of the walls of an underground room is considered to be the application of waterproofing to the outer part of the cellar walls. This is a rather labor-intensive process that requires digging a deep trench around the perimeter of the basement, which is impossible when several garages are located in one module. In this case, you can lay waterproofing on the internal walls of the cellar.
Insulation technology depending on the type of cellar
An approach to thermal insulation taking into account the structure of the structure.
Insulation of a ground cellar
With this design, the main emphasis is on insulating the walls and roof. This means that it is best to carry out external work and use polystyrene foam or polystyrene foam. Insulation work is carried out outdoors, according to the technology for installing these materials. The roof is insulated from the inside. For these works, soft or hard insulation can be used.
Insulation of a deep cellar
The walls of such a cellar are half located in the ground. Therefore, there is a risk of flooding. To level it, you need to free (dig up) the buried part of the outer wall from the soil, treat it with any waterproofing solution (mastic) or wrap it with roofing felt. Then lay down rigid insulation or polyurethane foam, re-wrap it with roofing felt (this will protect the sheet from deformation) and cover it with soil. To minimize the influence of water, it is better to equip a drainage system.
Insulation of bulk cellar (underground)
Performed both externally and internally. Below are detailed recommendations and tips for step-by-step thermal insulation of a structure for storing agricultural products in the country.
How to insulate a cellar with your own hands
Different insulation technologies in the form of step-by-step instructions.
Insulating the floor from freezing
Many owners prefer to insulate the floor with expanded clay. You can get the desired effect, but you will have to pour a concrete screed on top of the heat insulation layer.
Create a multilayer pack, which includes:
- Leveling sand bedding 5 cm;
- A layer of waterproofing film or geotextile;
- Filling with expanded clay 10-20 cm;
- Steam-waterproofing film;
- Reinforced screed 5-8 cm.
Instead of expanded clay, you can lay several layers of penoplex. It is not recommended to use one row of thick sheets, as moisture will gradually enter through the gaps and cracks. Insulating a garage floor is considered one of the most labor-intensive stages, since the work is carried out in difficult conditions.
Installation of insulation without sheathing
Installing lathing for wall insulation is quite a painstaking and time-consuming job. In small rooms, it is also impractical, since the loss of space on each side will be at least five centimeters or more. You can insulate a cellar in a garage using a simpler method. Such work is not difficult even to do independently. If you plan to install sheet insulation without a frame, you must follow the following rules.
Features of this option:
- The sheets must be well joined together.
- Be sure to seal the seams with a suitable adhesive solution.
- The final coating can be ordinary plaster, or you can also cover the space with plastic panels.
- Wooden sheets are not very suitable for sheathing, only in extremely dry and well-ventilated rooms.
- The layers of insulation can be fastened to each other with ordinary polyurethane foam, cutting off the remains after final hardening.
In order to carry out high-quality wall insulation with your own hands, it is necessary to carry out all work gradually, preferably even at the stage of building the garage. If you received this premises ready-made, before use it is necessary to conduct an inspection and identify possible problems. This is much easier to do when the cellar is free of food supplies and storage systems.
Stages of work
To carefully insulate a garage basement with your own hands, it is recommended to follow the sequence of work:
- primary preparation;
- construction of a frame for thermal insulation;
- installation of a ventilation system;
- installation of insulation;
- cladding, fastening of racks.
Building a frame
For better fastening of the thermal insulation, it is recommended to use a special frame that will support the insulation and help with cladding. The assembly of frames must be carried out taking into account the thickness and texture of the material.
For a sheet frame, it is recommended to clearly calculate the location of the joints of the plates and the coincidence of the installation supports with the middle of each sheet. A stacked heat insulator requires significantly fewer conditions.
Important! It is recommended to leave a small space, a couple of centimeters, between the insulation and the finishing and outline the location of future shelving in advance. This will make the final part of the installation much easier.
Making ventilation
The basement requires mandatory garage ventilation. However, natural operation will be sufficient, without installing additional fans. To create such a structure, it is recommended to fix two pipes at different heights. You need to install the first pipe at a level of one meter above the garage roof, and the second pipe at the bottom of the wall. Due to the active air exchange of the garage, the basement will also be ventilated. At the same stage, heaters and air conditioners are installed.
Laying the heat insulator
Next, you need to install the heat insulator, carefully securing the insulation to the walls and frame. It is recommended to pay special attention to the typesetting material during installation. Mineral and glass wool tend to roll up and lose shape, causing heat resistance to drop sharply.
Thermal insulation work inside the basement
Sheets of foam plastic can be glued to tile adhesive, but it is better to use profile adhesives.
How to insulate a garage basement from the inside? Insulation work begins with the floor of the room, then attention is paid to the ceiling. It all ends with a decrease in the thermal conductivity of the walls of the structure. The work is simplified if the basement is already concreted. Things are more complicated with brickwork on the walls and earthen floors. The latter needs to be filled with cement. The brickwork is impregnated with a water-repellent mixture and strengthened. Before insulating a vegetable pit in the garage, you need to select all the necessary materials. As insulation you can take:
- expanded clay;
- extruded polystyrene foam;
- Styrofoam.
Expanded clay attracts with its affordable cost and good thermal insulation characteristics. But in the basement there is always a danger of groundwater seepage, and therefore expanded clay needs reliable waterproofing. In addition, logs are needed to fill it. Their organization increases the cost and complexity of the work. Wooden logs will not work here. Only metal structures are used. Polystyrene foam and extruded polystyrene foam have almost identical thermal insulation characteristics. But the latter has a significant advantage over the former. This is a closed-cell structure, it increases the service life of the material and its strength.
Concrete and cement surfaces in the basement must be treated with penetrating, water-repellent compounds, for example, Penetron, Kalmatron. They are applied with a sprayer. The average consumption is 0.7 kg/sq.m. m. Afterwards, polymer compounds of the same effect are applied to the surface.
Thermal insulation of the concrete floor in the basement is carried out according to the same scheme as do-it-yourself insulation of the floor in the garage:
- leveling the base;
- installation of a hydraulic barrier;
- laying slab insulation;
- reinforcing mesh;
- wet and semi-dry floor screed.
If extruded polystyrene foam is used, the bottom layer of waterproofing is not installed. The upper hydrobarrier is needed for uniform drying of the cement stone. Complete insulation of a vegetable pit in a garage is impossible without proper thermal insulation of its walls. Insulation installation instructions:
Foam putty is performed with fiberglass reinforcing mesh.
- surface preparation;
- wall primer;
- installation of slab thermal insulation;
- laying reinforcing mesh;
- plastering walls;
- finishing.
Surface preparation involves cleaning it from dirt, oil stains and fungus. All defects are sealed with cement mortar. As a result, the basement walls should be smooth. If they have not been previously primed, then penetrating compounds are applied to the surface after cleaning. Using a building level and a thread, an even strip is struck on the wall. The first row of insulation will be installed along it. Apply tile adhesive to the back side of the slab material using a notched trowel. It is carefully leveled.
The plate is glued to the wall. Direction of movement: from left to right. After installing the first row, lay the second one. At the same time, do not forget about the displacement of the seam. The insulation sheets of each subsequent row must cover the slab locks in the previous row. The foam is additionally secured with dowels with wide heads.
Many people ask about how to insulate a basement in a garage efficiently and beautifully. For high efficiency of the thermal insulation layer, it is necessary to purchase certified component materials. To make the insulation layer look beautiful, you need to rough and finish it. The rough layer is necessarily reinforced with a fiberglass mesh. Tile adhesive is used for its installation. It is applied to the surface with a notched trowel, the mesh is immersed in it, after which the walls are plastered. As soon as the cement stone gains sufficient strength, it is subject to finishing. It is possible to achieve complete thermal insulation of a room only by completely insulating the floor above the garage, its roof and walls.
Walls
The main purpose of insulating cellar walls from the inside is to protect against heat loss.
Reliable insulation of wiring is also considered important to prevent short circuits, breakdowns and fires. When insulating, the following goals must be achieved:
- dry walls;
- high-quality wire insulation;
- waterproofing joints between walls and foundation;
- treating walls with special products to prevent the appearance of mold and mildew;
- insulation of wall surfaces from the inside.
Let's consider some insulation options.
A fairly inexpensive and reliable option for insulating a cellar or basement is polystyrene foam. The material has high thermal insulation rates, is easy to use, and can be coated with any solution if necessary.
In case of high humidity, it is recommended to use polystyrene foam with a density of 25 kg/m³ or higher, the properties of which allow it to not allow moisture to pass through. It is also possible to use extruded polystyrene foam, which costs an order of magnitude more, but at the same time has absolute hydrophobicity and a long service life.
The first step is to carefully seal the seams, joints and cracks with foam or sealant. If there is a possibility of underwater water entering, it is recommended to treat with a penetrating solution, which experts note as the best remedy for moisture.