Using a duct extension
What it is
- If there are more than 10 sections in the radiator, then there is a possibility that with a side connection they will heat up unevenly, that is, the further the section is from the supply pipe, the colder the coolant will be in it, since circulation in the heating device will take place at different speeds. Therefore, in order not to change the side connection to a diagonal one after installing the battery, which can cause certain problems with arranging the interior of the room, you can install a duct extension for radiators with your own hands.
- After installing such a device, the circulation of the coolant becomes uniform - the internal diagonal movement of water begins to occur at the same speed, and thus the problem of uneven heating of the battery is eliminated by itself.
But it turns out that not everything is as simple as it should actually be - the fact is that buying a duct extension in a store that sells plumbing or even ordering it on the Internet is a whole problem and the reason is the most banal - no, not the high price , but their absence. But for those who have a desire to arrange their home, we can solve this issue - you can make the adaptation yourself.
Do it yourself
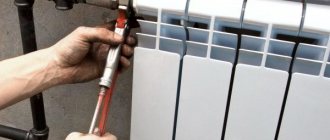
In order to carry out such a manipulation with the radiator, there is one important condition, which, however, must be met for many situations - this is the presence of shut-off valves on the supply and return pipes, which will include ball valves and “American” valves. To dismantle you, first of all, you need to turn off both taps and carefully unscrew the upper left or right fitting - there is a chance that the silicone gasket will be damaged, therefore, it is best to buy it in reserve - fortunately, it costs a pittance
Of course, it’s best if you completely free the battery from the pipes and remove it from the brackets - it will be much more convenient for you to carry out further work on the floor
To dismantle you, first of all, you need to turn off both taps and carefully unscrew the upper left or right fitting - there is a chance that the silicone gasket will be damaged, therefore, it is best to buy it in reserve - fortunately, it costs a pittance. Of course, it is best if you completely free the battery from the pipes and remove it from the brackets - it will be much more convenient for you to carry out further work on the floor.
Now let's figure out how to make an extension cord, but first of all, to implement the project you will need a piece of copper water pipe - its outer diameter should be 18 mm, and the wall thickness should be at least 1 mm. In addition to the pipe, you will need a twentieth coupling for soldering - its outer diameter is not 20, but 19.5 mm.
To solder the sleeve to the pipe, you will need a set of special tools, such as:
- A pipe cutter with which you can cut a copper pipe without deformation;
- A chamfer remover, which you can use to remove chamfers and burrs at the ends after cutting;
- Pipe expander or flaring machine;
- Steel brush for cleaning copper surfaces before soldering;
- A brush for cleaning the treated surfaces from dirt that will interfere with soldering;
- Solder;
- Gas burner with nozzle, adjustable.
First of all, you will need to solder the sleeve to the pipe, but first you need to cut it off evenly - we use a pipe cutter for this, only the pipe itself must be held strictly perpendicular to the tool so that the edge is even.
Then we remove the burrs with a brush, which in any case will be on the cut end, and use a brush to clean the surface from the inside. We remove burrs and dirt, and then apply flux to the surface of a smaller diameter, distributing it evenly with a brush.
We insert the parts into each other, wiping the squeezed out flux with a napkin and heat the ends evenly, determining readiness by the color of the flux - when heated enough, it becomes silvery.
We apply solder to the joint - it will melt from the temperature of the pipes, without heating from the temperature of the copper, and, spreading, fill the voids - this happens due to the capillary effect.
When you see the solder starting to bead up, stop the process immediately, but continue to hold both ends (without blowing on them) until it hardens completely - this will take less than a minute.
Pros and cons of using
The main advantages of the device are ease of installation and increased efficiency of the heating system. To purchase it or make it yourself, you will not need serious financial investments. To install the device, it is enough to have basic plumbing skills. Increased productivity is achieved without adjusting the existing battery connection diagram.
The duct extension for a bimetallic radiator has certain restrictions on its use. It can only be installed on radiators connected one-sided on the right or left side. They must also be equipped with shut-off fittings on the return and water supply sides. If this is not the case, you will not be able to install the fitting. You will have to contact a specialist and reconnect, which requires a lot of labor.
Ready-made extension cords are quite rare in stores, but they are easy to make yourself or order online.
Radiator duct extension: use and DIY production
Probably, many are familiar with the situation when only the first few sections of a radiator heat up, and the rest remain cold, and you are sure that there is no air in the heating device, and the connection is made as required by the instructions - you won’t be able to tamper with it.
In most cases (99%), plumbers will offer you a reconnection, that is, replacing the old connection with a diagonal one - this allows the coolant to be evenly distributed over the entire area of the heater, but the rework will require not only material, but also aesthetic costs, which is not acceptable for everyone.
Radiator guide or duct extension
Flow extension with thermal head for adjustment
- If there are more than 10 sections in the radiator, then there is a possibility that with a side connection they will heat up unevenly, that is, the further the section is from the supply pipe, the colder the coolant will be in it, since circulation in the heating device will take place at different speeds. Therefore, in order not to change the side connection to a diagonal one after installing the battery, which can cause certain problems with arranging the interior of the room, you can install a duct extension for radiators with your own hands.
- After installing such a device, the circulation of the coolant becomes uniform - the internal diagonal movement of water begins to occur at the same speed, and thus the problem of uneven heating of the battery is eliminated by itself.
But it turns out that not everything is as simple as it should actually be - the fact is that buying a duct extension in a store that sells plumbing or even ordering it on the Internet is a whole problem and the reason is the most banal - no, not the high price , but their absence. But for those who have a desire to arrange their home, we can solve this issue - you can make the adaptation yourself.
For any type of connection, a shut-off valve must be embedded in front of the radiator
To dismantle you, first of all, you need to turn off both taps and carefully unscrew the upper left or right fitting - there is a chance that the silicone gasket will be damaged, therefore, it is best to buy it in reserve - fortunately, it costs a pittance. Of course, it is best if you completely free the battery from the pipes and remove it from the brackets - it will be much more convenient for you to carry out further work on the floor.
Now let's figure out how to make an extension cord, but first of all, to implement the project you will need a piece of copper water pipe - its outer diameter should be 18 mm, and the wall thickness should be at least 1 mm. In addition to the pipe, you will need a twentieth coupling for soldering - its outer diameter is not 20, but 19.5 mm.
Copper pipe soldering tool
To solder the sleeve to the pipe, you will need a set of special tools, such as:
- A pipe cutter with which you can cut a copper pipe without deformation;
- A chamfer remover, which you can use to remove chamfers and burrs at the ends after cutting;
- Pipe expander or flaring machine;
- Steel brush for cleaning copper surfaces before soldering;
- A brush for cleaning the treated surfaces from dirt that will interfere with soldering;
- Solder;
- Gas burner with nozzle, adjustable.
Copper pipe cutting
Then we remove the burrs with a brush, which in any case will be on the cut end, and use a brush to clean the surface from the inside. We remove burrs and dirt, and then apply flux to the surface of a smaller diameter, distributing it evenly with a brush.
In the photo: the soldering process
We insert the parts into each other, wiping the squeezed out flux with a napkin and heat the ends evenly, determining readiness by the color of the flux - when heated enough, it becomes silvery.
We apply solder to the joint - it will melt from the temperature of the pipes, without heating from the temperature of the copper, and, spreading, fill the voids - this happens due to the capillary effect.
When you see the solder starting to bead up, stop the process immediately, but continue to hold both ends (without blowing on them) until it hardens completely - this will take less than a minute.
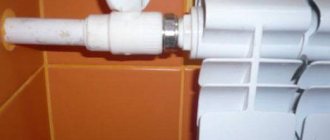
Installing a homemade extension cord
In terms of length, you can make the pipe to the middle of the last section when it is in a twisted state - in some cases the length is made to the middle of the radiator, but you will always have time to trim off the excess. Insert the extension into the hole and tighten it.
This is interesting: Expanded polystyrene - what is it, technical characteristics, application
Flow extender - where to install and where to buy?
Re: Flow extender.
This is not how surgeons work!
The duct extension has many variations:
Why a flow extender? it is better to change the direction of water movement into the radiator
reworking the heating in winter - there is no need to strain the housing office: it is easy to do without dumping the risers.
“Overlap” scheme - instead of a flow extension: changing the direction of water movement in the battery. changing the direction of coolant circulation.
Efficiency of flow extender in heating
You won’t get warm using an extension cord—you won’t turn up the heat as much as possible. for powerful efficiency - there are other solutions: https://www.santexsvar.ru/batarei-holodn. #udlinitel
They came to order - to redo the competitors’ installation in a year. Since the client called us, he tested this same extension cord the hard way in winter. There's no point in it: just a milky goat!
- 1. the RIFAR Forza radiator for 10 sections was connected to the usual circuit, although on the top floor it is better to use a different one viewtopic.php?f=2&t=2 2. we moved these 10 sections to another room instead of 6. and when replacing the taps, we found an extension cord inside flow 3. new EQUATION radiator with 12 sections. viewtopic.php?p=3186#p3186 4. You can’t attach 2 sections to a used radiator, and so as not to throw it in the trash, it’s better to install it in another room: like they added 4 more sections.
new scheme - diagonal overlap: viewtopic.php?f=5&t=18
this Equation produces RIFAR for Leroy Merlin. the same forza - only under a different trade name: completely identical. very powerful batteries with developed convective surfaces.
How to make a flow extension for a radiator
A flow extender for a radiator is a rational solution for uneven heating of the heating structure. It distributes the coolant equally over the entire length of the battery and thereby brings the necessary heat into the room. Suppose, in the case of a lateral connection, the first sections of the battery are hot, and the next sections are cold.
- Peculiarities
- How to make it yourself
Flow extension for radiator radiator right 1/2″
The housing office specialist tells you that the problem is in the battery, and you are presented with two options:
- or reconnect the radiator using a diagonal coolant supply circuit;
- or build a special flow extension cord with your own hands.
The first method will require large financial investments. Plus, not every property owner will be happy to reconnect the radiator, since such an operation will definitely spoil the entire design of the rooms.
Conclusion - if you recently carried out a major overhaul, then reconnecting the battery will not be an option for you. That is, you will need to look for another option.
This is where the duct extension for heating radiators comes to the rescue.
Below you will read more about what a flow extender is, how it works and how to install it correctly.
Peculiarities
A duct extension for a radiator is a ½- or ¾-inch fitting-type part with an outlet for connecting a metal-plastic, polyethylene, stainless steel or copper “extension pipe”, which is installed on the return connection of the heating structure and facilitates the movement of the coolant diagonally in the battery when lateral connection.
An extension cord is used, as a rule, for batteries with a number of sections of ten or more.
It can be used for batteries connected to the heating system of the house through standard taps with an American connection: there must be a shut-off valve on the coolant return and supply circuit. If it is missing, you will not be able to connect such an extension cord for a bimetallic radiator. You will have to call a technician and do the labor-intensive job of reconnecting the battery.
Operating principle of a flow extender for a radiator
The main problem with an extension cord is that it is not that easy to get. It is rarely found in a plumbing store.
However, there is a way out - you can assemble and install the flow extension for the heating radiator manually.
How to make it yourself
As mentioned above, it is possible to make a flow extender for a bimetallic radiator with your own hands, and anyone can do it.
An important condition is that the battery is connected through ball valves with American connections:
You need to close the taps, drain the water and remove the heating structure. Carefully, in order not to damage the paint, you need to unscrew the top plug with the installed part of the detachable fastening.
During self-installation, you may need a silicone gasket under the plug, so you should purchase it in advance. + You need to take care of the presence of a copper water pipe with a diameter of 18 mm with a wall thickness of 1 mm (the length should be equal to the length of the battery), as well as a straight coupling for soldering with an outer diameter of about 19.5 mm.
It is necessary to connect the pipe and sleeve using soldering. You can use fat for soldering as flux and soft solder. The parts are connected and both elements are heated by a burner. You can take a standard small burner, guided by lighter gas. After this, solder is applied to the joint.
If heated correctly, the solder melts and flows into the joint. The diameter of the American from the inside after cleaning from plaque is 19 mm. The coupling diameter is larger. Using a small file, you need to remove the excess to such a state that you can hammer it in
However, you should do this carefully so as not to harm the parts.
To do this, when hammering, you can take wood spacers. That's all. All that remains is the installation of the duct extension for the radiators. You need to “play” with the length. Depending on the water supply, sometimes it is better to leave the length to the middle of the battery. However, you can always cut it off.
The flow extension and gasket are installed, the radiator is put in place.
The work is finished. All that remains is to remove the air from the structure. Why do you need to use a Mayevsky crane?
Remember that the radiator must be bimetallic, because installing a copper flow extension for a heating radiator on aluminum is unrealistic. Both metals are non-ferrous and react chemically, oxidizing and breaking down.
Purpose of the flow extender
Most often, a flow extender is used when connecting radiators to the side.
The part is used to change the direction of flow of the coolant, which allows the battery to heat evenly without reconnecting. The duct extension is suitable for radiators connected from one side. Often it is installed on a reverse connection, due to which water moves diagonally.
Typically, the part is used for long batteries (the number of cells is more than 10), since their design contributes to uneven heating. The further the section is from the tube through which the water is supplied, the more likely it is that it will remain cold. The easiest way to fix this is to install an extension cord. This will help ensure even and efficient circulation. The device is suitable for bimetal batteries (with aluminum and steel components). It is rarely used for cast iron structures.
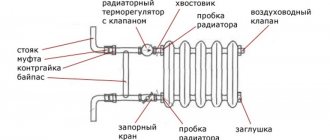
Bottom connection of the radiator where is the supply and where is the return
Many users of our site are looking for information about how Kermi radiators are connected, and what kind of jumper or so-called bypass they have inside, which is a tube originating below the supply connection itself (as Kermi knows, it is from below). From this lower connection pipe, the tube inside the radiator rises and is adjacent to the tap, with the help of which the supply of coolant is regulated.
Well, due to this tube, proper thermosiphon circulation of the coolant inside the radiator occurs. This was also done to conveniently adjust the temperature in the coolant supply radiator. Due to this, from such radiators it is possible to build a radiator branch up to fifty meters in length on the principle of natural circulation (without pumping) natural - gravitational or thermosiphon circulation of the coolant will pump itself. This distinguishes regular radiators with a bottom connection from a conventional radiator connected at the bottom – bottom in the picture below.
In the figure we see a regular - sectional radiator that does not have a tube inside it, a tube that would lift the coolant up from where it would be pressed into them as it cools, so a regular sectional radiator for its natural circulation must be connected top - bottom diagonally - this is mandatory and very reliable connection that should be used for natural circulation. And in the case when a conventional sectional radiator is connected to the bottom, it needs to be pumped using forced hydraulics and it will always become airy.
But this is a fixable problem, and if you really want, you can depict the bottom and bottom of a regular panel radiator.. To do this, you need to buy a flow distributor - do not confuse it with an extension cord. A flow distributor is just such a thing.
It is needed in order to use a gasket supported by a spring to plug the intersectional flow inside the battery between the first and second sections, then the heat flow will have to rise upward and this is the same as the tube for radiators with a bottom connection, or it’s the same as a diagonal connection when the inlet is at the top and the outlet from below on the opposite side. But let’s return to the Kermi radiators, their bottom connection and bypass connector.
Connectors for Kermi radiators with a standard axial distance of 50 mm - which corresponds to the standard interaxial size of most radiators with bottom connections, unlike Rifar Monolith, but not about that now.. That means - connectors for fucking batteries with bottom connections are straight and at an angle of 90 degrees so that the liner goes into the wall. And with straight connectors, the liner will be hidden in the floor.
This is a direct connector for laying pipes of the heating branch under the floor.
And this is a corner connector for laying a heating main inside the wall.
The standard bypasses for all radiators with bottom connections look something like this, only “Rifar Monolit” has its own standard, which is wider than usual and the distance along the axes is not 50 mm but 80 mm.
Are all these expensive bypasses really necessary? In principle, they are not needed and can be completely dispensed with. For example, connect the radiator like this - directly.
If there are special requirements for aesthetics and even if the pipes will be laid inside the walls, then it is recommended to install corner connectors.
Flow extension (duct) for a bimetallic radiator - Construction
07.12.2019
Flow extender: where to buy, how to make a heating extension, where to put it in the radiator?
When new radiators freeze in the first winter: the first 2-3 sections are hot, the rest are cold - many begin to look for a method of “how to direct the coolant to the distant sections.”
And in the web they find such a divine solution as a flow extender
: you can install it yourself like an amateur and you don’t even need to remove the risers!
And no messy alterations of connection diagrams with burnt wallpaper from welding. In general: the naive dream of any spider.
Flow extender - this tube is inserted into the inside of the radiator after the tap.
With this flow extender: all sections are heated more or less evenly: the water has reached the end of the radiator. It seems like everything is fine!
But in reality, everything is not so: the temperature of the radiator is much lower than the temperature of the risers:
The risers are hot, but the battery is just warm.
Maximum heat transfer can be obtained by moving water inside the radiator from top to bottom: only with such circulation is the natural circulation gravity pump
and the main factor of non-heating (the most important problem) is the draining of the cooled coolant from the radiator from above. A flow extender does not correct this factor!
When the flow is extended in half of the sections, the water moves from bottom to top - again a loss of 50% of gravitational circulation.
And this tube inside the radiator will narrow the upper or lower battery collector. There are already two flows: inside the tube itself and outside between the walls of the radiator.
If the diagonal is incorrect (the diagonals for the top and bottom feed are completely different and are not interchangeable), at least all the pipes pass outside: there are no narrowings inside the battery.
Mixed up diagonal
- and it gives more heat than this extension cord! But you won’t get warm on it either - I’ve already remade it.
To avoid waste coolant escaping from the top of the radiator
— it is better to use a bottom connection: a bottom-to-bottom circuit.
In this scheme there is no concept: distant sections - the entire radiator is also heated evenly as with an extension cord and even better: there is less difference in the temperatures of the riser and the radiator.
But the loss of heat transfer against the upper spill is up to 30% - it depends on the internal flow area of the vertical channels in the sections - it is better to choose radiators with large diameters.
There are imported extension cords on sale for true bottom connections: when plastic pipes run through the floor of the apartment and exit from below under the radiator itself, there are no steel heating risers in the corner of the room.
And many begin to think: this is a factory-certified product, which means it works! Yes - this extension cord works!
But it works in a 2-pipe collector system (there is a pressure difference in the supply and return risers), where all apartments are connected in parallel, and it often happens that the radiators inside 1 apartment are in a parallel circuit.
And the problematic bottom supply is a single-pipe system with a vertical riser inside the room: the pressure in the pipes in front of the radiator is the same (the bypass jumper in front of the battery completely equalizes) and all the radiators on the riser are connected in series.
- In an imported extension cord there is no outlet of waste, cold coolant from the top of the radiator.
- And in fact, it has a purely decorative function: 2 pipes side by side enter the radiator from below from the floor.
- And without an extension cord, the connection will be: 2 tubes separately at the ends of the battery - this is kind of less beautiful!
- This imported hydraulic extension works like a BOTTOM-BOTTOM circuit - just a slightly different visualization.
- There is also a more expensive bottom connection unit for plastic pipes in the floor: an additional external supply pipe to the top of the radiator.
We make and install an extension cord - low costs and wonderful results
Let's get to the main point. First of all, separate the required length from a piece of copper pipe using a pipe cutter. The edge of the product must come out really smooth. This can be achieved if you hold the copper tube only perpendicular to the pipe cutter. Using a stiff brush, carefully remove burrs from the edge of the cut product, and then take a steel brush and treat the surface inside the copper pipe.
Installation of flow extension
Decisive moment! Some craftsmen try to clean the pipe with sanding tape. This is absolutely unacceptable. Always remember that copper, due to its structure, is considered too soft a material. If you treat it with sandpaper, abrasive crumbs will remain on the pipe, which will not make it possible to make a good and good soldering. Then proceed according to the following scheme:
- Apply soldering flux to the pipe and the created sleeve. Using a brush, distribute the composition evenly. Don't apply too much flux. When you start soldering, the excess volume will flow into the pipe and solidify in it. Then, when operating heating systems, this frozen droplet will cause a lot of noise when the coolant moves through the battery.
- Insert a handmade flow extension into the pipe. Remove the squeezed out flux with a rag or an ordinary napkin.
- Heat the ends of the pipes with an atmospheric burner. Continue heating until the solder turns silver. This color indicates that the flux is completely ready.
- Apply solder to the joint of pipe products and watch as the flux begins to melt, filling the microscopic cracks and all the inherent voids.
The soldering is pumped in at the moment when the flux begins to form droplets. You need to keep the ends of the pipes pressed for another 1-2 minutes. This time is enough for the solder to harden well. As a rule, that's all. Evaluate your own work. Insert the handmade extension cord into the radiator and place the heating device in place. Tighten the cap and enjoy uniform heating of the battery due to the flow you made yourself.
The length of the extension cord can be selected differently. But in most cases, it is done in such a way that its end falls in the middle of the very last part of the bimetallic battery.
However, some experts recommend making the device described in the publication no longer than the middle of the radiator. And lastly. You should not try to install a copper extension cord into room heating devices made of aluminum. In this case, the chemical mutual action of non-ferrous metals will be observed. Over time, it leads to the formation of oxide on the pipes and their destruction.
Similar publications:
Ceiling insulation in a house with a cold roof - selection of materials and installation diagrams
How to make a chimney pipe on the street warmer on your own?
How to install heated floors in a wooden house - options and instructions for carrying out the work
Review of popular brands
It is worth noting that despite the low prevalence of extension cords on the market, some companies still produce them. Usually these are large manufacturers who can balance costs. All such companies produce devices with the so-called right and left versions, which allows you to equip the heating system without unnecessary problems. The VT model is now widely promoted under the Valtec brand. 503. The manufacturer itself positions such a product as an advanced, unique product.
It is stated that when using it, difficulties with non-uniform heating of radiator units with a one-sided type of connection are successfully solved. Heat loss in sections of the device remote from the input is completely eliminated. In engineering terms, VT. 503 is a nickel plated brass fitting. It is additionally equipped with a pipe, inside of which a thread in the form of a triangle is prepared. The rifling pitch is increased to the maximum (this is a very important point).
You will have to screw a section of pipe made of a metal-polymer mixture into the pipe, the outer dimension of which is 1.6 cm. Model VT. 503 can be right-handed or left-handed, indicated by the symbols D and S, respectively. It is allowed to install pipes and shut-off parts with a nominal cross-section of ½ or ¾.
Rifar also supplies good heating extension cords. A striking example is Monolit 3/4. This is a high-quality Russian development, and almost any consumer can afford it. The device is optimally suited for diagonal one-sided connection of conventional radiators. The width of the model reaches 80 cm.
Popular manufacturers
Flow extenders for bimetal batteries from Valtec are well known. This Russian-Italian company produces products for uniform heating of multi-section radiators. Fittings are made of brass and plated with nickel. They have a 1-inch external thread and a pipe designed to connect to a 1.6 or 1.8 mm pipe. The catalog has small-sized options of 0.5 and 0.75 inches. Parts are produced with right-hand and left-hand threads.
The domestic company Rifar produces mainly sectional radiators made of bimetal and aluminum. Suitable extension cords are provided for different battery models. Most are 0.75 inches.
Extending the flow will be an excellent solution in a situation where sections of the convector remote from the supply remain unheated. The device has a low price and can be easily done at home. Suitable for sectional radiators with a length of more than 0.8 m and connected from the right or left side. When purchasing or making your own, you need to pay attention to the compatibility of parts made of different metals.
Source
Installation Features
Some information about installing a radiator flow extender has already been given. But there is another important point: sometimes it’s worth not installing a ready-made system, but making it yourself. Knowing how to do this is useful, if only because of the rarity of such a product in stores.
Before this, prepare the battery itself for use:
- turn off the taps;
- pour out the water;
- dismantle the radiator;
- Carefully unscrew the top plug along with the detachable fastener.
In order for everything to be installed correctly, it is sometimes necessary to use a silicone gasket under the plug - it is worth buying it in advance. A copper water pipe is also required. It is exactly the same length as the radiator. The cross-section of the pipe should be 1.8 cm, and the wall thickness should be 0.1 cm. Another mandatory point is that you will need a direct coupling for soldering; its outer cross-section is approximately 1.95 cm.
The technology allows the use of regular-sized burners fueled with lighter gas. Next, solder is applied to the joint, and if everything was done correctly in the previous stages, it will melt and flow into the joint.
The cross-section of the “American” inside after removing the plaque will be 1.9 cm. The coupling should be larger. The excess is removed using a small file, so that it can be hammered in with a hammer. Of course, you need to work as carefully as possible. Wooden spacers will help prevent damage to parts.
To correctly install the duct extension, you will have to “play” a little with the length. Focusing on the flow of water, sometimes they leave an area only up to half the battery. But this is not too important, since you can cut off the excess later. After installing the extension cord and gasket, the radiator must be immediately returned to its place. In this case, the air is immediately released using the Mayevsky valve.
Important: you cannot install a copper extension circuit on an aluminum radiator. These non-ferrous metals, due to the peculiarities of electrochemical interaction, will oxidize and quickly degrade
But even bimetallic radiators deserve a scrupulous approach
Some types of such devices contain aluminum manifolds, which means that they must be connected with the utmost care.
The most precise instructions in this regard are given in the official instructions of the manufacturers. It is almost always recommended to use torque wrenches that provide precise control of the applied forces. If the collectors are made of aluminum, then they should not exceed 100 Nm. For radiators made according to a full bimetal design, in which the collectors consist of steel, a force of up to 170-180 Nm can be applied. There is no need to get carried away with excessively wrapping the flax, since microscopic cracks will then appear, the paint will peel off, and a leak will occur.
It is best to use a professional plumbing sealant. It is applied to a small amount of flax, or even used in its pure form. Paint of any kind can only be used when water is used as a coolant. Any other liquids will destroy the paintwork and begin to seep out. Do not allow coolant, including water, to get under the paint.
Cutting an extension cord from a copper pipe is most easily done with a specialized tool - a pipe cutter. It allows you to get a smooth edge. But to do this you will have to hold the pipe at a right angle to the tool. Then take a stiff brush and carefully remove burrs from the cut. The inside of the pipe is processed with a steel brush.
The flux is applied evenly with a soft brush, and in a small volume. Otherwise, even because of one drop of flux that has rolled inside, the coolant will then “rattle.”
The extension cord prepared by yourself is inserted into the pipe. The flux that is squeezed out is wiped with a napkin or rag. Heating with a torch is carried out until the solder appears silvery in color. Soldering ends as soon as the flux begins to group into droplets. Then the products are kept pressed for 1-2 minutes, otherwise the solder will not have time to harden.
For information on the VT.503 flow extender, see below.
What to do if the radiator does not heat up fully?
Many residential property owners encounter an unpleasant difficulty, which is that a brand new bimetallic battery, installed and connected correctly, does not want to heat up equally. The first 3-4 parts of the radiator in such options warm up as expected, but all the others remain cold. If you encounter this situation, you should first make sure that air has not accidentally entered the heating device (during installation). Any plumber can easily determine this. If there is no air, then you have two options:
- 1. Reconnect the radiator using the diagonal method of supplying the coolant.
- 2. Purchase or make a special flow extender yourself.
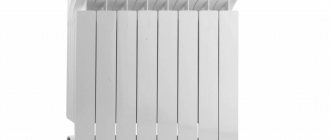
Bimetal radiator
The first option requires quite significant financial costs. Moreover, absolutely not every home owner will want to reconnect the battery due to the fact that this operation is guaranteed to damage the entire design of the room. If you recently carried out a major overhaul, another connection of the radiator will be completely unacceptable for you. And this means it is necessary to look for another way out. A duct extension for the radiator will solve the problem. More on him later.
Types of connection
The connection can be two-pipe or one-pipe. The first option is more expensive and difficult to install. To create such a system, you will need to first develop a detailed plan. When creating it, a careful calculation is required, in which many technical nuances should be taken into account.
The single-pipe system for connecting radiators is simpler. When carrying out self-installation, this option is preferable. It is advisable to install a heating radiator flow extension in a single-pipe system.
Restoring the functionality of the heating device
Let's figure out how to make an extension cord. First you need to stock up on the following materials and tools:
- solder coupling (twenty);
- a piece of copper water pipe with walls more than 1 mm and a cross-section of 18 mm;
- adjustable atmospheric burner with nozzle;
- a pipe cutter (it will make it possible to cut off the required piece of copper pipe without deformation);
- solder;
- iron brush;
- a chamfer remover (without it it will not be possible to qualitatively remove burrs at the ends of a tubular product);
- a stiff brush;
- silicone gasket;
- flaring tool (a pipe expander can be used instead).
Now that you are fully prepared, you can begin the process of restoring the normal operation of the bimetal heating device. Shut off the shut-off valves on the pipes leading to the battery. If a single-pipe connection scheme is implemented, close one tap. Then you need to drain the water from the radiator.
Flow extender with thermal head
In theory, the extension cord can be placed on the battery without disassembling the heating device. But performing this procedure will be uncomfortable. Because of this, it is recommended to remove the radiator. This is very easy to do. Unscrew the plug together with the wedge connection. Immediately check the condition of the silicone gasket. If you are not happy with it, install a new component. The gasket costs a penny and still performs its main function. In this case, there is no need to waste time on trifles. Then disconnect the radiator from the pipes and carefully remove it from the spider fasteners
Let's move on to the important stage of the operation.
Features of the bottom connection
Open bottom connection
Three connection methods:
- Connecting ordinary radiators through the lower holes.
- Using a set of components from below, steel or bimetallic radiators.
- Purchase batteries that are designed for this connection.
Now let's look at the methods, pros and cons of various methods of lower connection.
Connection with side outlets
Double-sided bottom connection
The connection itself is not very difficult. The pipes are located below - above the floor or hidden in the floor. A radiator is mounted on the wall, and a pipeline is connected to the lower holes. So that the battery can be removed without stopping the heating process, shut-off valves must be installed on both sides. An air vent is installed in the top hole (no matter which side).
Connection using an adapter
Connection diagram
Sometimes it is not possible to connect an ordinary radiator by connecting a pipeline to it from both sides. In this case, you can use an adapter. It is screwed into the lower hole, and a stainless steel tube is connected to the upper hole. The heating pipes are connected to the adapter itself from below.
Bottom connection with flow extension
Flow extender
The bottom connection can be made using a flow extender. The device screws into the bottom hole and does not have any outlets to the top. The circulation of the coolant occurs due to the fact that water, passing through the tube in the middle of the radiator, comes out of it at the end of the heating device, rises, squeezing cold water through the outlet located in the device.
Connecting batteries with bottom connections
Piping in the wall
Now let us dwell on the more effective and most aesthetically acceptable method of lower connection - from below, simultaneously describing its advantages and disadvantages.
Advantages
Flow direction adapter
- It is possible to install a flow direction adapter.
- Both pipes go directly from the battery into the floor or wall (or into pipes located above the floor).
- When buying radiators with bottom connections, you do not need to worry about purchasing a suitable thermostat, since it is already installed there.
Flaws
You need to bleed the air from the battery
- An air vent must be installed on each battery.
- Warming is less uniform and not as effective.
- Cannot be used for gravity heating systems.
- You need to constantly use the circulation pump.
DIY extension cord
When making your own, it is better to use a copper pipe
It is not difficult to make such a design yourself if you have all the required components and a suitable type of battery connection. The valves through which the radiator is connected must be ball-type and equipped with American valves. They need to be shut off and the water drained. Then you can begin installation work.
Procedure:
- On one of the sides there is an upper footer. It must be unscrewed together with the detachable fastening element mounted there. This must be done carefully so as not to damage the paint coating. Then it is advisable to replace the silicone round. You can completely dismantle the heating battery if this seems more convenient for work.
- Proceed directly to the assembly of the extension structure. The tube cut with a special tool will need to be soldered to the sleeve. First, it is cleaned from the inside from plaque and dirt using a brush. Solder fat works well as a flux. Using a small brush, it is applied on top of a part that has a smaller diameter. Then one element is inserted into the other and the excess fat is wiped off. The joint area begins to be heated with a burner until a silvery tint appears.
- After this, solder is applied to it. If heating is performed correctly, the solder softens from the high temperature, flows into the joint area and fills the space. When this happens, you need to wait at least a minute until the molten metal completely hardens.
- The American one with cleaned inner walls has a diameter of 1.9 cm. The coupling has a slightly larger diameter. You can use a small file to remove excess. This must be done carefully so as not to damage the parts. For driving, you can use wooden spacers.
- Sometimes you have to experiment with the length of the tube. Sometimes the optimal length is to the middle of the radiator, but it is preferable to start with a longer one. If necessary, excess length can be cut off later.