Insulation of external window slopes
If the slopes were not treated during installation, then in winter the apartment will feel cold and condensation will accumulate on the windowsill and window. This promotes mold formation. To avoid problems, finishing is necessary.
Insulation of slopes from the outside is a mandatory and important aspect of installing a window system. The procedure increases functionality and ensures long service life. Insulation is necessary if:
- The frame does not fit tightly to the corner. A void appears between them, which is filled with polyurethane foam. When exposed to moisture, this material is destroyed. As a result, cold air penetrates into the apartment.
- A window frame without finishing is dependent on the influence of external factors. Without special insulation, water will penetrate into the joints. This will cause deformation and destruction of the fasteners.
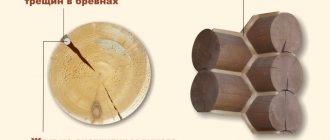
- Over time, the structure shrinks. Space appears between the opening and the box. Voids are the root cause of room freezing.
The formation of condensation and temperature disturbances have a negative impact. Mold appears in the apartment. It poses a direct threat to human life and health. In winter, moisture hardens, compromising the integrity of the fastenings and elements of the window system.
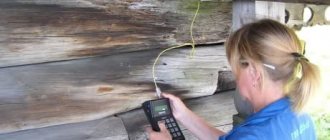
Mold on slopes
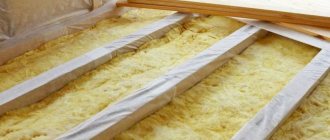
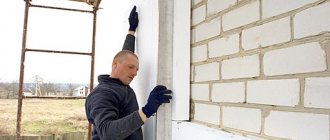
External insulation technology
For external work, mineral wool or polystyrene foam is used. In addition, you need to prepare:
- reinforced mesh;
- glue mixture;
- paint;
- primer.
The technique involves the following sequence of actions:
- Work should begin by removing dirt and foam from the base.
- Next, a layer of primer is applied to the surface, which should dry well.
- At the next stage, you need to measure the height and width of the slope and cut the mesh and insulation in accordance with the obtained parameters. In this case, when cutting the mesh, you need to add 20 cm to the resulting width, and when cutting out the insulating material, make an overlap of 2 cm.
- Next, the insulation is attached. The adhesive mixture is applied first to the slope, then to the insulation. After which the material is glued to the slope.
- Then the mesh is attached to the insulation using glue. It is necessary to glue on the side that is closest to the window, leaving an overlap of 10 cm on the wall.
- The remaining fragment of the mesh is distributed along the slope and wrapped on the outer wall. The glue should dry well. Then another layer of the adhesive mixture is applied.
- After this layer has dried, putty is applied, then grouting and applying a primer layer are applied.
- The final stage is painting.
Another option for external insulation is thermal slopes. These are products made on the basis of foam plastic and having a protective and decorative coating of acrylic binders and marble chips. A thermal angle is formed from two fragments of a thermal slope. This type of insulation material has a number of positive characteristics.
Thanks to the ability of marble chips to resist sunlight, the material does not fade. The decorative coating is fire resistant. A wide range of colors will allow you to choose a thermal slope to suit every taste. Insulating slopes from the outside is a necessary measure, since insulating only from the inside will not completely prevent the penetration of cold air.
Insulation of slopes of plastic windows from the inside
Before starting the operation, you should find out where exactly the penetration of air masses occurs. For this:
- With a wet hand, walk along the window sashes. In a place where a temperature difference is felt, the tightness of the structure is broken;
- determine where the cold air is coming from. Place a small piece of plastic film against the sash, the space between the frame. Where the seal is broken, the film will begin to sway in the wind;
- if a draft comes from the frame, you need to place a sheet of paper in the open sash. After closing the window, try to remove it. If the sheet is pulled out, this indicates a sealing problem.
If the main flow of cold comes from the space between the frame and the slope, you will need to additionally insulate this area. The process must begin with the preparation of technical equipment. You will need sandpaper, a utility knife, a brush and a plaster spatula, a trowel and containers for solutions.
Insulation of window slopes is carried out according to a strict algorithm:
- It is necessary to clean the window and window sill from dust and dirt. If dirt gets into the insulation, it can cause rotting. This will break the seal.
- You need to go around the perimeter of the window with polyurethane foam. After hardening, the protruding edges are trimmed with a stationery knife.
- The surface of the window is treated with a primer mixture. An antiseptic is used to increase protection. It will prevent the occurrence of corrosion processes, the formation of mold and fungi.
- The plaster solution is mixed in a separate container. It is necessary to follow the information on the packaging; the proportions of water and mixture are observed. The substance is thoroughly mixed with a construction mixer until a homogeneous composition without lumps is obtained.
- Plaster is applied to the slope with a spatula. After completing the work, the surface is leveled with a trowel. The plaster should not be smooth. Otherwise, adhesion to the insulation will be minimal. After hardening, the surface is treated with a primer.
- The insulation is cut into pieces. Each individual element is coated with glue and pressed tightly against the window opening. There is no free space between the pieces of insulation.
- After the glue has dried, the top layer of insulation is treated with a primer.
The final stage of insulation is decorative finishing. It is allowed to use water-based paints, plasterboard sheathing and decorative plastering.
Criteria for choosing material for external and internal insulation
The material of external slopes must have the following properties:
- resistance to atmospheric factors over a long period;
- resistance to deformation;
- adhesive strength;
- waterproof;
- vapor permeability;
- providing the possibility of unhindered removal of moisture from the assembly seam.
For interior work, you need to select materials taking into account the following criteria:
- steam resistance;
- durability;
- good adhesion.
The insulation process has its own nuances depending on the design features of the external wall:
- There is no need to insulate slopes if the wall consists of several layers, among which there is insulation material. And also in the presence of facade insulation of enclosing structures.
- With a single-layer external wall, preference should be given to thermal insulation liners, which should be placed along the entire perimeter of the window.
- It is necessary to ensure that the insulation fits tightly to the base and that no air gaps are formed. This can be achieved by tightly pressing the material to the surface.
The durability of thermal insulation depends on several factors. First of all, this is the level of quality of the insulation. To choose a quality material, you should pay attention to its cost; good insulation cannot be cheap. Therefore, it is not recommended to purchase material belonging to the low price category; this will be an unjustified saving. Also, in order for the insulation to maintain its qualities for a long period, the work must be performed in accordance with all technological requirements.
Do-it-yourself insulation of slopes of plastic windows
If problems arise with the functionality of the existing structure, dismantling is performed. Preparations for work begin with the choice of insulation. After this, you can begin the operation.
The procedure is performed in several ways.
Method No. 1
If the slope has unevenness or is located at an angle, materials with high elasticity are used. Experts recommend mineral wool.
The technology includes the following actions:
- the remaining foam is cut off and the resulting cut is carefully sealed;
- A guide profile is attached to the edge of the frame. Its task is to fix the installed panels;
- A wooden strip is mounted on the outer edge of the window opening. She secures the panels. If the window opening is smooth, there are no irregularities or protrusions, the rail does not need to be installed;
- the surface is treated with a putty mixture. After drying, you need to go over it with a primer and an antibacterial solution;
- While the surface is drying, it is necessary to prepare the insulation. When using mineral wool, you need to remember to wear protective gloves. This material is hazardous to health;
- a panel is prepared, which fits into the initial profile. Between these elements there is a void into which the insulation is placed. The space is completely filled.
This method is considered the simplest. Users who do not have deep knowledge in the field of construction can cope with it.
Method No. 2
Several materials are used for insulation in a brick house. They will create maximum thermal insulation. Instead of insulation, a combination of mineral wool and foil is used. Finishing is done with three-layer sandwich panels.
The procedure is performed sequentially:
- preparatory work. It is worth eliminating defects and getting rid of cracks. All joints are treated with sealant;
- Profiles for panels are installed around the perimeter of the window. After this, you need to fix the wooden slats. They will serve as a guiding element. Foil with steam and heat insulating properties is applied to the slats;
- The sandwich panel is cut into pieces of the required size. They are superimposed on the main profile;
- free space appears between the slats and the foil. It must be filled with mineral wool.
The final step will be securing the panels. They are pressed tightly against a wooden block and secured with glue or dowels. After performing this operation, the corner is puttied. You need to wait until it dries. Then a plastic corner is mounted on it.
Types of designs
Slopes are the outer or inner surface of the window opening from the frame to the wall. These elements perform several functions. First of all, their presence gives the window a complete and more aesthetic appearance. Slopes also prevent noise from entering the room and provide thermal insulation. There are several types of structures that differ in finishing techniques, materials used and functionality. Let's take a closer look at the main types of slopes:
- Slopes made of plasterboard material. They have good thermal insulation properties and a relatively affordable cost. However, the performance characteristics are inferior to subsequent types of structures, since they can only be installed from the inside of the room. The reason for this is the instability of the material to moisture.
- The most economical option is considered to be slopes using plaster. The plaster composition is applied to the surface of the opening in two layers, and after it dries, the primer mixture and paint are applied. Such a slope can last quite a long time, but has a number of disadvantages. Plaster slopes have relatively low heat-saving properties, and as a result of temperature changes, cracks can form in them; the installation process is quite labor-intensive. In addition, plastic and cement are incompatible materials, which may result in the need to eliminate gaps between the window and the slope.
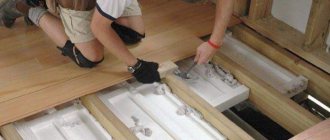
- Plastic-based slopes are recognized as the most durable. They are resistant to moisture and sunlight, and also go well with plastic windows. Insulation of plastic slopes can be done using mineral wool or polystyrene foam. The working surface must be thoroughly cleaned of dirt and all defects must be eliminated. Then cut the insulation to the required size and secure it with glue. Then along the perimeter of the slope it is necessary to drill holes into which to hammer plastic dowels.
How to insulate slopes
For thermal insulation of warm slopes for plastic windows, use:
- Styrofoam . The material has zero vapor permeability and does not release steam from the room. Has thermal insulation parameters. It has a porous structure and can accumulate moisture inside.
- Extruded polystyrene foam . Used for external insulation. When exposed to high temperatures, it releases harmful substances.
- Mineral wool. It has high vapor permeability and absorbs moisture. Rigid (facade) slabs do not shrink and have poor thermal conductivity. Non-rigid slabs shrink over time. This leads to the appearance of voids in which air convection will take place.
- Sandwich panel . This is a composition of insulation and facing material. Used for external and external types of insulation.
- Penoplex . An analogue of polystyrene foam with the same properties. Designed for insulation of internal and external slopes. Resistant to moisture.
You can insulate slopes from the street by plastering followed by painting. When performed correctly, the method provides hydro- and thermal protection. Suitable for processing window frames made of plastic and wood. Decorative plaster exhibits the same properties.
Foam plastic is recommended to be chosen by users who do not have the skills to insulate slopes. The material is inexpensive, you can perform the necessary tasks yourself.
When working with mineral wool, safety precautions must be observed. The material has a brittle structure and low mass. Small pieces of cotton wool may become suspended in the air. To ensure complete protection, it is recommended to perform the warming procedure wearing a respirator and gloves.
Inside
Having decided on the material, you can move on to the internal insulation of the slopes.
The first step is to do the preparatory work:
- Remains of polyurethane foam are removed from the surface of the window;
- treated with a primer with antibacterial properties. This will protect the structure from formations such as mold and fungi;
- plastering the surface. The layer of plaster should be even. It is necessary to clean the work area and treat the surface with a primer;
- laying thermal insulation material.
After the window slope is insulated, it is necessary to allow the structure to dry. After this, you should putty the corner and apply a finishing coating (plasterboard covering, painting, plastering).
Thermal insulation material should not have a smooth structure. In order for it to stick to the slope, you must first scratch the surface. Good adhesion is ensured and air does not enter the structure.
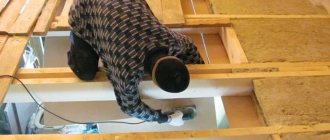
Outside
Insulating the slopes of plastic windows from the outside faces problems, especially in multi-storey buildings. Insulation from the outside of the window occurs in several stages:
- When installing the structure, the remaining foam is removed. The surface is treated with a primer and antibacterial solution;
- if the slopes are uneven, you will have to plaster the surface;
- the material is cut into fragments and fixed to the slope with glue. To increase strength, the thermal insulation is secured with dowels paired with mushroom-shaped screws. They provide strong adhesion and do not damage the structure of the material;
- a protective corner is installed, glue and a fiberglass mesh are applied. The surface is carefully leveled, another layer of glue is applied;
- After complete drying, the slope is covered with water-based paint or plaster.
The outer part of the slope, made of foam plastic, paint and plaster, will protect the home from heat loss. The element is located at a slight angle; moisture will not accumulate on the window.
Various insulation options
There are several ways. They are produced during the installation of windows and slopes. However, after installation is complete, problems with air flow may occur. The reason is poor quality materials, violation of installation technology, careless handling of the structure. To eliminate it, you need to seal the seams with complete removal of the finish. It may be necessary to purchase cladding material.
cotton wool
According to the budget, they are divided into three ways:
- For those with a low budget. The process includes the purchase of materials, protective reinforcement on the outside and inside.
- The combined method involves the use of more expensive materials.
- The latter is for final sealing of cracks. Combine the materials required to seal the cracks. In this case, insulation and thermal insulation occur simultaneously.
Budget method
With this method, it is assumed that the slopes are made of heat insulator. When working, you will need several slabs of polystyrene foam, a putty mixture and an adhesive composition. This method is good for treating windows both outside and inside.
To carry out installation you will need the following set of tools:
- construction or laser level;
- screwdriver or hammer drill with a set of cue balls;
- primer brush;
- container for primer composition;
- knife;
- construction foam gun.
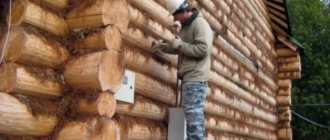
Carrying out work outside
How to insulate the slopes of plastic windows from the street? If it is carried out in apartment buildings, it is advisable to invite specialists to avoid injury. If this is not possible, carry out work only with insurance.
To provide warm slopes for plastic and metal-plastic windows you will need:
- Completely remove all dust and dirt from the outer surface. To do this, use a damp cloth. Then use a sharp knife to cut off the protruding parts of the foam. They will quickly crumble under the influence of sun and wind.
- Then you need to apply a thin layer of deep penetration primer.
- Then cut the foam. The vertical parts of the slope should be slightly less than the thickness of the horizontal.
- To achieve a better connection, rub the foam. This can be done with a grater and sandpaper.
- Apply the adhesive composition to the prepared surface, cut a sheet of foam, and attach it in place. After the glue has hardened, you can continue working.
- Using a hammer drill, drill a hole for the fixing dowel. Cover the foam with a layer of protective putty to prevent damage from environmental factors.
- Attach the reinforcing mesh, securing with dowels.
- After finishing the work, putty and paint all the elements.
This method requires careful execution. Any mistakes made will be visible from the outside.
Sandwich panels
Insulation from the inside
The process of insulating window slopes from the inside is simpler. No risk of injury. Glass often gets wet, and drafts appear from under the slopes. These are the consequences of poor-quality installation. The design needs to be improved. If the glass unit is under warranty, it is better to call specialists. If this is not possible, you need to insulate the slopes of plastic windows from the inside on your own. The process is practically no different from external insulation. However there are differences:
- When working, there is no need to use a fiberglass reinforcement net. Instead, corners with holes are often installed.
- It is not necessary to cut large slabs of foam. You can make one part from several fragments.
- The thickness of the plate is selected taking into account the location of the hinges and other elements of the mechanism.
The budget method is easy to implement and does not require a lot of effort and money. If the draft is strong, you will have to use more reliable methods.
Combined method
Foam is difficult to cut at specific angles. Some slopes have a bevel, which should be taken into account when working. The insulation of slopes on plastic windows with polystyrene foam is further complicated by PVC cladding.
It is better to use mineral wool. To attach you need:
- Completely clean the protruding parts of the polyurethane foam. Then seal the resulting cut.
- Attach the profile to the edge of the frame. It is needed to secure the panels.
- Place a wooden beam along the edge of the opening to secure the insulation.
- All surfaces are puttied and primed.
- Afterwards you need to prepare the material. It is produced in the form of rolls or panels. It is better to use a rolled one. When working, you need to protect your hands with gloves.
- Afterwards the panels are cut and fixed in the starting profile. A gap appears between the panel and the facade, which is filled with insulation. It must be secured so that it does not interfere with the installation of the slopes.
Polyurethane foam
Reliable insulation method
To protect against blowing, you need several different materials. A good option is to combine insulation and vapor barrier. Penoplex or mineral wool boards are good for thermal insulation. You will also need foil insulation and multilayer sandwich panels.
- Initially, surface preparation is required. All cracks and crevices are puttied and joints are sealed.
- Profiles for panels are mounted. Afterwards, a wooden beam around the perimeter of the opening.
- The entire area is subjected to vapor barrier with foil material. It is fixed on external walls.
- Sandwich sheets are then cut.
- The entire gap between the sheathing and foil insulation is filled with mineral wool.
- Install the panels and secure them securely.
- The corner is puttied and secured with a plastic corner.
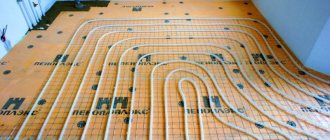
Step-by-step instructions for insulating walls outside with your own hands
After preparing the materials, the insulated area of the house is calculated. Step-by-step instructions for insulating a house with a ventilated gap are presented in the video
The video contains recommendations that will help you easily insulate a building.
When everything is ready, the mineral wool is installed using the following technology:
- The walls are being prepared.
- A vapor-tight membrane is installed.
- Wooden or metal slats are mounted.
- Insulation is installed in the installed slats.
- A waterproofing film is installed.
- A ventilated gap is created.
Preparation begins with cleaning the walls from plaster layers if the wall is concrete or brick. The wooden surface is impregnated with an antiseptic to protect against mold. Window slopes and platbands are dismantled.
The vapor-tight membrane is installed with the smooth side facing the insulation. Its installation is carried out to remove vapors from the wall of the building. The insulation can be installed without the use of such waterproofing, but only if the surface is perfectly flat.
Then vertical slats are mounted to the wall of the building using self-tapping screws.
To determine the distance between the slats, the width of the insulation sheets is taken into account. For example, if wooden blocks measuring 50x50 mm are installed, and the width of the mineral wool is 600 mm, then this distance will be equal to 598 mm. The installed material is easily compressed when installed between the slats, and then straightens out, taking its original shape.
Insulation is installed in the spacer between the slats. If necessary, the mineral wool is cut with a knife to the required size. If installation is carried out on a wooden wall, the material is secured with dowels. And if on a concrete surface or on brickwork, then the use of glue is allowed.
If necessary, you can use a second layer of insulation. It is necessary to ensure that the seams of the 2 layers of insulation do not coincide in order to avoid the occurrence of an air gap.
The waterproofing film is installed on top of the insulation. It ensures moisture removal from the material. The film is secured to the slats using dowels. The seams are additionally taped with special metallized tape.
The ventilated gap is mounted on top of the slats. For this purpose, additional counter rails are installed. Various finishing materials are then installed on them: block house or siding.
Installation methods
Whatever material you choose for internal wall insulation, it must be covered with a false wall. The only exception can be polystyrene foam, which can be plastered, but that’s not what we’re talking about.
Insulation of the loggia with mineral wool followed by cladding with plastic panels
Since the false wall is attached to a frame rigidly attached to the main wall, it should be used for installing mineral wool. There are two ways to do this.
Mounting on hangers
This method is convenient for installing rolled mineral wool.
The sequence of work is as follows:
- Having made preliminary markings, attach straight hangers for metal profiles to the wall. Fasteners are selected depending on the wall material. The hangers are installed one below the other in increments of 40-60 cm; the horizontal distance between them when facing walls with plasterboard is taken to be 60 cm.
Attaching hangers
- Bend both halves of the hangers forward, giving them a U-shape.
- Measure the height of the wall and cut a strip of mineral wool from the roll with a margin of 10-15 cm.
- Having applied the insulation to the wall with a slight overlap on the ceiling, pierce it with the protruding shelves of the hangers, as if putting it on them.
- Install the next strip so that the edges of the strips fit snugly against each other, leaving no gaps. To do this, you can make a small overlap, then slightly crumple the edge of the second strip and press it into place.
- Next comes the installation of a frame under plasterboard sheets, consisting of horizontal guides and vertical rack profiles. They are attached level to previously installed hangers on top of the insulation.
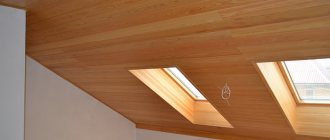
Photo of an insulated wall, ready to be covered with plasterboard
- The insulation should be covered with a vapor barrier film over the profiles. It is overlapped and attached to the profiles with small self-tapping screws.
The foil should face the inside of the room
After completing all this work, you can attach drywall to the frame, followed by puttying the joints and decorative finishing.
If you have already assembled the frame and only then decided to insulate the wall, you should not dismantle it. Rolled or slab mineral wool insulation can be slipped under the racks, still observing the principle of tight installation without gaps. But, since the mineral wool will no longer be held by the hangers, it will be necessary to secure it with horizontal inserts.
Laying into a finished frame
It should be noted that the previous method has one significant drawback: metal hangers in direct contact with the outer wall become cold bridges through which it is transferred to the inner lining. This is one of the reasons why it is preferable to insulate walls with mineral wool from the outside rather than from the inside.
However, this can be avoided if you use wooden blocks as frame elements. This material also has its drawbacks: wood is afraid of moisture, which can cause it to rot, and when temperature changes cause it to warp.
Treating the bars with antiseptic compounds and drying them well before installation helps to minimize the risk of such troubles.
Warming occurs as follows:
- Mount the frame from bars with a cross-section of 40x50 mm.
- Even if you are going to cover the wall with plasterboard, the frame should consist not only of vertical posts, but also of horizontal jumpers on which the insulation will rest.
- Lay mineral wool into the resulting sections of the frame, cutting it to size so that it completely fills the gaps between the bars without gaps.
Mineral wool can be easily cut with a regular sharp knife
- As in the previous case, stretch a vapor barrier film or foil penofol over the frame, securing them to the bars with a stapler.
There should be no gaps between the vapor barrier strips
The same scheme is used to insulate frame walls with mineral wool. But, since this material absorbs moisture well, while losing its thermal insulation properties, it is necessary to ensure its waterproofing and provide an air gap between it and the outer cladding of the building.
Installation of mineral wool slabs in the frame