Thermal insulation of an attic in a private house
During thermal insulation work, walls are usually insulated. But it should be remembered that it is through the attic that about half of the heat is lost, and there are often cases when, without proper insulation, owners of private houses have many problems with dampness, etc.
On a note! Warm air in the room rises to the top. If you do not take care of proper insulation in advance, the moisture level will increase. These are favorable conditions for the development of mold.
Knowing how to insulate an attic in a private house, you can prevent these problems. And in winter, the temperature in the house will noticeably increase to a comfortable level.
The technology for self-insulation of the attic includes only 3 stages of work:
- Insulation of the ceiling.
- Roof insulation.
- Insulation of gables.
To carry out this work without large financial costs, without losing quality, you need to know the features of insulation materials. Each of them is designed for specific operating conditions and installation methods.
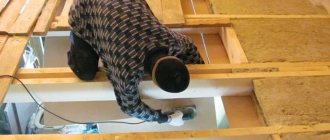
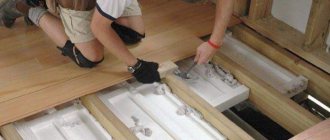
The first thing you need to do is insulate the ceiling Source serviceseeking.com.au
How to insulate a floor at minimal cost
This insulation stage consists of 3 steps:
- Preparation of the necessary materials;
- Floor preparation;
- Insulation of the ceiling.
First you need to decide how to insulate the attic in a private house. Independent work means saving money, which is why you should familiarize yourself with the list of inexpensive materials.
What to choose for attic insulation
How to insulate the attic in your home without special expenses - 5 materials to choose from with different levels of thermal conductivity:
- sawdust (0.07-0.095 W/(m*k));
- reed (0.042 w/(m*k));
- expanded clay (0.1-0.18 W/(m*k));
- penoizol (0.028-0.040w/(m*k));
- mineral wool (0.038-0.055 W/(m*k)).
Advice! When choosing how to insulate an attic in a private home inexpensively, you should focus your attention on the first two materials. Their peculiarity is that you can get them absolutely free.
Insulation mats made from reed stems are excellent for thermal insulation of the attic Source pinimg.com
However, when working with these materials, certain conditions must be observed. If it is sawdust, then it must be dried and processed before use. Any antiseptic agent is suitable for treatment, including slaked lime mixed with carbide.
Attention! Any wood material is susceptible to fungus. If traces of mold or rot are found on the sawdust, it is better to simply throw them away. This material is no longer used for thermal insulation.
It is advisable to harvest reeds in the fall. At this time, the stem is already completely freed from foliage, changing its shade to light yellow. It should be remembered that immature reeds should not be used in the work.
Expanded clay is considered a relatively inexpensive material, since its cost does not exceed 1000 rubles per cubic meter. However, for high-quality insulation of the attic you will need a 20-centimeter layer.
It is important to know! The main advantage of expanded clay in comparison with the materials described above is fire safety. If a fire occurs, this insulation will not ignite.
Penoizol is a little more expensive than expanded clay. Its price is 2000-2300 per cubic meter. But there is a significant drawback in working with this material. To use penoizol, special equipment is required, i.e. You won’t be able to cope with insulation on your own
Insulation with penoizol using special equipment Source instrumentgid.ru
See also: Catalog of companies that specialize in insulating houses and roofs
Penoizol is characterized by three advantages:
- fire safety;
- waterproof;
- resistance to fungi.
The same qualities are characteristic of mineral wool. The material benefits only by its environmental friendliness. At the same time, the price is slightly higher - up to 2500 rubles.
Knowing how to insulate the attic of a private house, you can purchase other necessary materials. These include a vapor barrier membrane. It prevents steam from accumulating. It is also necessary to purchase additional boards or OSB sheets. For the last stage of processing, you will need a solution with antiseptic properties.
How to prepare the floor for work
Preparation for floor insulation is done in 3 steps:
- Dismantling.
- Treatment.
- Binder.
Old beams usually have a deck on them. If you want a high-quality result, you need to understand that you cannot immediately apply insulation to such a surface.
The old coating and all the rubbish need to be removed Source bytrf.ru
Attention! Wooden beams require mandatory impregnation with an antiseptic. To do this, you need to take the prepared product and treat the surface with it. Otherwise, there is a risk of fungal infection.
To properly impregnate wood with an antiseptic solution, you should pay attention to the instructions. The manufacturer of such formulations provides step-by-step instructions on the back of the package.
The last step involves preparing the binder (or roll). It's easy to do it yourself. You only need nails to nail the boards to the surface.
When the ceiling is prepared, you can move on to the next stage Source buildhome.semtex.ru
How to insulate a ceiling along beams
So, we found out that thermal insulation of the attic floor along the beams can be done with any type of wool or bulk insulation.
The general technology of arrangement in all these cases is the same, only the thickness of the material differs:
- Mineral wool boards must have a thickness of 100 mm.
- Soft cotton mats are laid with a thickness of 150 mm.
- Bulk insulation must have a thickness of 200 mm.
If we assume that we already have a subfloor underneath, then the insulation technology will consist of 4 stages.
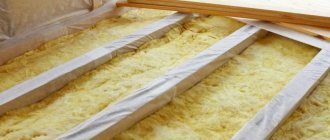
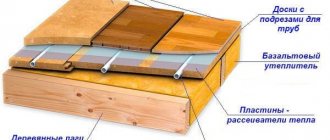
General scheme for insulating an attic floor using wooden beams
- The bottom layer of vapor barrier is laid first. In the diagram above, this layer is hemmed under the rough ceiling, but this is rarely done; usually the membrane is wrapped around the beams and laid on the rough ceiling. The canvas is secured with a stapler.
- Next, insulation is poured or laid onto the vapor barrier between the beams. There should be 30 - 50 mm from the top layer of insulation to the edge of the beam. This gap is left for ventilation.
- Another layer of vapor barrier is laid on top of the beams. The membrane should sag slightly between the beams.
- According to the technology, you need to fill a counter batten on top of the membrane and attach the attic floor covering to it. But in practice, the counter batten is not always used; the floorboard is often placed directly on the beams.
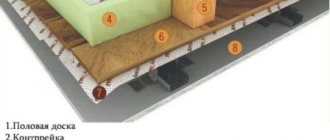
Photo of insulation with mineral wool slabs on beams with a ventilation gap
Important! Both layers of vapor barrier are laid with the vapor-permeable side down. Steam must pass freely from the room into the attic. The only exception is the arrangement of the ceiling of the bathhouse, where foil is sewn underneath, which is waterproofing.
How to insulate the attic ceiling of a bathhouse
Video description
Watch this video on how to properly insulate a floor:
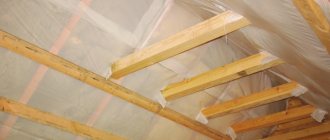
Roof insulation
This stage of work is optional, since roof insulation is required only for residential attics. If the rooftop room will be used as a separate room, then the necessary materials should be prepared.
To insulate the roof you will need the following tools:
- nails;
- threads;
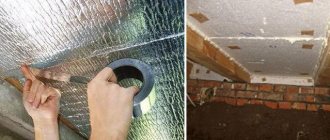
- vapor barrier;
- antiseptic;
- wooden slats.
Advice! For those who want to save money, we recommend using reeds at this stage. It can be used to make good thermal insulation mats.
Roof insulation, similar to the previous stage, involves the preliminary purchase of materials, preparation of the surface itself and the main thermal insulation process. If you are considering options for making a warm attic, you need to study the technology of working with roofing.
Preparing the roof for insulation
The roof preparation process consists of 3 simple steps:
- Inspection.
- Extension.
- Treatment.
Surface inspection involves a detailed analysis of the integrity of the rafter system with subsequent repair or replacement of unsuitable parts. This is especially important if cracks or rot have been noticed.
In this case, a complete update of the damaged elements is required Source roofs.club
Bulk insulation for attic floors
Vermiculite is the best option for insulating attic floors.
We wrote a separate article about bulk insulation materials, in which we talked about their types and characteristics. Today we will only briefly consider the main points that relate to the insulation of the attic floor. For this purpose the following can be used:
- expanded clay;
- perlite;
- vermiculite;
- sawdust;
- ecowool.
Perlite and vermiculite are rocks that, after swelling, can be used as thermal insulation. The material is quite expensive, but it lasts almost forever. It does not burn, does not enter into chemical reactions, and mice do not live in it. It has the property of distributing moisture evenly over its entire area and quickly removing it outside, when wet, it does not lose its characteristics. In principle, this is an ideal option for insulating horizontal floors.
The insulation of attic floors with expanded clay was already familiar to our grandfathers. The only advantage of expanded clay is its cost. The rest of the material is frankly weak.
Its thermal conductivity is high and it absorbs moisture (weakly, but still). Compared to other modern insulation materials, the characteristics are clearly inadequate, so it is used only when it is available for free. Although there are even worse options - insulating the attic floor with sawdust.
Expanded clay is a frankly weak thermal insulator.
To achieve at least some insulation effect, you need to pour sawdust in a layer of at least 30 cm. At the same time, they tend to absorb moisture and rot. In order to allow moisture to escape, sawdust is mixed with clay or expanded clay. Sawdust is not suitable as independent thermal insulation. By the way, vermiculite can be mixed with sawdust, resulting in quite decent insulation. Mixing should be 50/50.
We wrote about ecowool insulation in one of the previous articles. This is also a loose insulation material and can be applied dry or wet. Strongly absorbs moisture, while easily parting with it. The material contains a lot of chemistry, so it is indirectly related to environmental friendliness, and only due to the fact that it was developed as part of a program for recycling recyclable materials.
For all bulk heat insulators, insulation of the attic floor is carried out according to the following scheme:
- ceiling;
- film or membrane - prevents steam from entering and prevents thermal insulation from spilling into the house;
- layer of insulation.
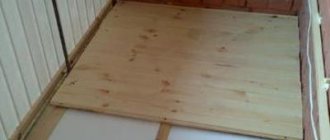
If you plan to make a floor in the attic, then it can be laid directly on top of the thermal insulation without additional film barriers.
Video description
Watch this video for possible errors and their correction when insulating the roof:
Attention! It is important to monitor the density of the thermal insulation material. The further result depends on this. If gaps form in the insulation, they must be filled. This can be done using scraps of thermal insulation.
You also need to remember about fixing the insulation. To do this, you need to drive nails into the rafters and once again tighten the threads in a zigzag. Upon completion of the process, you need to make the sheathing using slats or boards. Their thickness should be at least 2 cm.
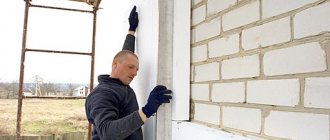
Insulation of gables
Pediments are usually insulated from the outside together with the facade. But if this work is not planned, you can make thermal insulation from the inside.
Attention! To insulate the gables you will need beams. If they are not there, you can replace the material with boards. In this case, it is necessary to measure their width so that it matches the width of the heat-insulating material.
Gables can be insulated using dry blowing. Source oboiman.ru
To insulate gables, you should follow 6 steps:
- Fastening on the surface of the slats to ensure ventilation between the heat-insulating material and the wall (in this case, you must adhere to the distance parameters - half a meter vertically, about 10 cm horizontally);
- Placement of the vapor barrier membrane on a plane of slats (here you should pay attention to the position of the slats and correct unevenness, and the film should not sag);
- Installation of vertical racks in the form of beams or boards, followed by fastening with screws and metal corners (it is necessary to compare the distance between the beams - it should be 2 cm less than the width of the insulation);
- Filling the space with heat-insulating material (the insulation should fit tightly - this is an indicator of the correctness of the previous steps; if the mats fit easily, then additional reinforcement will be required);
- Re- attaching the vapor barrier ;
- Installation of sheathing.
After all the work has been completed, you can begin the final finishing of the room. Before purchasing material, you should analyze the further use of the room. For residential attics, drywall and finishing putty are suitable.
Advice! If the attic is cold, you should give preference to materials designed for low temperatures. The finish will quickly deteriorate if operating conditions are not followed.
Briefly about the main thing
Thermal insulation of the attic, like any other construction work, requires calling specialists. If you want to save money and have the necessary skills to work with tools, then you can try to do it yourself.
When choosing how to insulate an attic, you first need to decide on the material. At this stage, it is important to consider the further use of the premises, as well as correctly calculate your budget.
There are many thermal insulation materials. The cheapest of them are sawdust and reeds. Expanded clay, penoizol and mineral wool are a little more expensive. They have better quality properties.
Thermal insulation is carried out in three stages - insulation of the ceiling, then the roof and gables. In the process of insulating the attic yourself, it is important to follow the instructions presented above with all the recommendations. The result of the next one depends on the quality of one stage.
Ratings 0
Conclusions about insulating the attic floor
All methods of insulating the attic floor are aimed only at reducing heat loss in the room. As you know, the main amount of heat escapes through the ceiling, and then through windows/doors and walls. Warm air tends to rise upward, taking with it all the moisture. In fact, a lot of moisture is generated in the house, so the insulation in the attic needs to be protected with film barriers (waterproofing, vapor barrier).
To insulate the attic floor, you need to choose a material that meets the following requirements:
- low heat transfer coefficient;
- environmental friendliness;
- preferably should not be afraid of moisture;
- must allow steam to pass through;
- Mice should not live in it.
The material that will meet all these requirements will undoubtedly not be cheap. We are talking about vermiculite, but it is possible to slightly reduce the cost of insulation. It is necessary to mix vermiculite with sawdust, but this will lead to the fact that the material will be less able to protect the house from heat loss. In addition, a good budget option is penoizol (liquid thermal insulation). It is better to avoid polystyrene foam. The use of mineral wool has both pros and cons, although the material is very popular.