First of all, let’s define the concept of “wooden house”. A house whose walls are made of logs or timber can be considered wooden, since the tree in this case not only performs a constructive form-building function, but also serves as an obstacle to the penetration of atmospheric influences, primarily temperature influences: cold or heat. On the territory of the Russian Federation, of course, more often you have to deal with the cold, and insulating a wooden house is something that needs to be done immediately after its construction.
A frame house, in the construction of which wood and materials derived from them are also used very widely, cannot be considered “wooden”, since wood in it is not the main structural element that insulates the premises of the building from the penetration of temperature influences. Further details.
Features and methods of insulation
Calculations and construction practice have established that in case of frosts prevailing in central Russia, in order to obtain an acceptable level of heat loss, it is necessary to use logs with a diameter of 45-50 cm, or walls made of timber 40-45 cm thick. It is from logs of this diameter that the lower crowns of the frame of the house of Peter I, in which the tsar lived during the construction of the Novodvinsk fortress near Arkhangelsk, were made. The upper crowns of the frame are much thinner; according to the guide, they replaced the original thick crowns when the house was moved to Moscow, to Kolomenskoye.
There is simply no suitable timber of the appropriate diameter given the rapid development of individual housing construction! And it is extremely difficult to work with logs or beams of the indicated sections, both for technical and economic reasons. Therefore, in recent decades, the practice of using round logs with a diameter of 18–22 cm and timber with a cross-section of 150x150 mm in low-rise construction has gained ground. Moreover, the timber, declared as 150x150, actually has dimensions of 145x145mm. Since such thicknesses are absolutely insufficient to obtain the proper thermal insulation properties of the wall, it is necessary to resort to insulating a wooden house from the outside or from the inside.
In principle, both options are possible. Initially, the second one was more widespread. This design solution reduces the complexity of finishing work for the builder and costs for the customer. However, at the operational stage, its serious disadvantages become obvious: freezing of thin wooden walls, which negatively affects the durability of the building, and freezing of water pipes if they are mounted on the inner surface of the outer wall. Awareness of these points led the construction community to the understanding that wooden houses should be insulated from the outside. As an “additional bonus”, this does not reduce the floor space of the house.
additional information
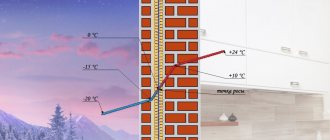
- Lay another layer between the wall of the house and the insulation, as there is a danger of “cold bridges” occurring, which will negatively affect the entire insulation process.
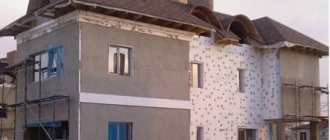
Insulation of a wooden house made of logs from the outside begins with sheathing
- Install stone wool slabs under the sheathing. Again, it is necessary to exclude the occurrence of “cold bridges”, so the mats should fit tightly to each other.
- Make a starting bar that will help avoid any unevenness in your work. Place the first layers of stone wool on it, ensuring the evenness of further rows.
- Start fixing the insulation from the bottom and gradually move up. And in order to avoid possible unevenness, before starting work you need to mount the starting bar.
- Lay a layer of waterproofing over the mats after they are securely fastened.
How to insulate an old log house from the outside using a frame and insulation
Advice: the durability of a house depends not only on the materials correctly selected for its construction, but also on waterproofing. If it cannot fully perform its functions, its walls will become covered with mold and mildew.
- Begin installing another layer of sheathing, which is made from the same bars.
- Cover the walls with pre-prepared material. The most popular and affordable is vinyl siding, the colors of which can be selected depending on personal preferences. To make your home look more natural, you can choose colors that imitate wood or stone.
Insulation of a log house from the outside under siding on a ventilated facade
Main nuances
External insulation of a house is a very effective measure, but its use does not allow preserving the house in its original form. Therefore, it is advisable to use it only in extreme cases when other methods are ineffective.
First, you should still try to insulate the structure from the inside; you need to find and caulk all the cracks. After this, you can take drastic measures and insulate the building using the same insulation. At the same time, the technologies for insulating a house from the outside and inside are almost similar.
Choosing insulation for the walls of a wooden house
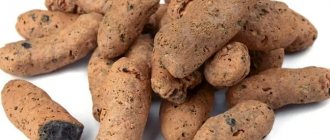
The list of insulation materials is quite extensive. From ecological exotics, like fallen oak leaves, to technological exotics - spraying polyurethane foam directly onto the surface of the outer wall of the house. There is also ecowool, made from waste paper and waste from cardboard and paper production. This material combines both types of exotic. When deciding how to insulate a wooden house, it is more prudent to use proven materials, which include:
- Styrofoam;
- extruded polystyrene foam;
- mineral wool.
Let's consider the applicability of these insulation materials for the walls of a wooden house.
Styrofoam
Produced according to GOST 15588-2014. It is characterized by high thermal insulation properties, low specific gravity, ease of processing, and sufficient durability. Disadvantage: high flammability. Low vapor permeability under certain conditions also has to be considered a disadvantage.
Extruded polystyrene foam
It is a further development of foam plastics. Produced by extrusion, i.e. by squeezing a mass of material through a profiled hole while maintaining the appropriate pressure and temperature conditions in accordance with GOST 32310-2012. In Russia it is known under the brand name “Penoplex”. Has very good thermal insulation properties. Mechanical strength is higher than that of foam plastic. It is also easy to process with cutting and sawing tools. Durability – 50 years. According to manufacturers, it is able to resist biological pests. The last statement should be taken with caution. Wasp nests in this material were observed several times. It practically does not swell and does not allow steam to pass through, which under certain circumstances can be interpreted as a disadvantage.
Mineral wool
Generalized name for fiber insulation materials produced in accordance with GOST 31913-2011 (EN ISO 9229:2007) “Thermal insulating materials and products. Terms and Definitions". The starting raw materials are broken glass, basalts, and metallurgical slags. Insulation made from basalts has the highest consumer properties. The advantages of mineral wool include good thermal insulation qualities, low specific gravity, easy workability, high vapor permeability, and relatively low cost.
Types of insulation
Let's consider how to insulate walls in a wooden house, since it is through them that the main heat loss occurs. The outer side surfaces of the house consist of a base and walls. The basement in modern low-rise construction is usually made of reinforced concrete or red moisture-resistant brick. The basement of a wooden house is insulated from the outside using polystyrene foam or penoplex. In conditions of high humidity and proximity to soil, the lack of swelling and moisture permeability, considered to be the disadvantages of these insulation materials, become advantages.
Mineral wool
Mineral wool is usually used to insulate wooden walls. It’s good if it’s basalt wool, which has the best combination of properties of all mines. wat, provided for by GOST.
Styrofoam
It is not recommended to use it for insulating wooden walls. This is explained by the fact that a wooden wall is considered “breathable”, i.e. Through the pores in it, moisture penetrates from the room to the outside. If you line such a wall with foam plastic that does not allow moisture to pass through, it will accumulate on the outer surface of the wood, which will cause the latter to rot.
Penoplex polystyrene
The same rules apply to polystyrene foam as for polystyrene foam. In a wooden house, these materials are best used to insulate the basement.
The better to insulate
Wall insulation
It is better to insulate the walls of a wooden house with basalt mineral wool. Since houses built from logs or timber experience significant shrinkage, walls should not be insulated earlier than a year after their construction. The use of “non-breathable” materials such as polystyrene foam is undesirable, since if they fit tightly to a wooden wall, moisture will accumulate and pass through the pores of the wood. Cotton wool, for thermal insulation of walls, is taken in the form of slabs.
As an exception, the walls of a house equipped with modern ventilation and air recovery systems can be lined with foam plastic and penoplex. In this case, excess moisture is removed through the ventilation ducts, and moisture does not accumulate on the outer surface of the walls, which allows the use of more effective insulation materials.
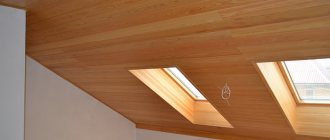
Ceiling
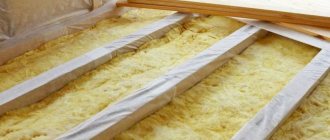
Ceiling insulation is an important energy-saving component in the design of a house. It is carried out during the construction of the “box”. It is convenient to use mineral wool in the form of rolled materials as insulation. Roll materials are produced in various thicknesses with an interval of 50 mm, which allows you to select the desired thickness of the heat-insulating layer and lay the insulation in one operation. Just roll out the roll.
Floor
Insulation of the floor, as well as the ceiling, is carried out during the construction of the “house box”. The insulation is laid over a vapor barrier film covering the “black” floor. You can use both mineral wool slabs and rolled materials. In the case of slabs, the joints should be separated in different layers so that the cold does not penetrate through the joint.
If the house has a modern ventilation system, for the ceiling and floor as well as for the walls, insulation with foam plastic and penoplex is possible.
Finnish house
For the first time, such houses appeared on the territory of the former USSR after the Second World War as an option for prefabricated housing for temporary residence. The structure was a wooden frame-panel structure. The frame of such a house is sheathed on the inside with plywood, and on the outside, along the vertical bars of the sheathing, with wooden “siding”. The insulation inside the frame is 3 layers of soft fiberboard 18mm thick, installed “in space” in several layers with air layers. No vapor barrier. It is clear that such houses were cold and drafty. Trying to make them warmer, the owners lined the walls with brick. True, this helped insignificantly. A more effective method of modernization - replacing the insulation inside the frame - was tested in practice by our reader, Valentin. He shared his experience of insulating his parents’ house:
“I decided to carry out the modernization from inside the house. Opening the walls showed that the wooden parts of the frame were in excellent condition - everything was dry, intact, and strong. And this despite the fact that the house was built back in 1958. I threw out the old insulation, installed 10cm stone wool in its place, covered it with a vapor-proof film, and nailed down old plywood. The walls were additionally lined with gypsum board. The house has become noticeably warmer, however, in order to meet today’s requirements for the thermal resistance of walls, it would be necessary to sacrifice the area of the house and add another 50 mm of insulation to the walls.” (You can read more about the reconstruction of the Soviet “framework” here).
How to insulate an old wooden house with your own hands
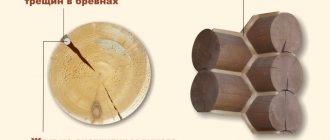
Insulation of an “old” wooden house assumes that it was built quite a long time ago and the shrinkage process has already occurred. In addition to this positive point, apparently there is also a negative point: the inter-crown insulation, due to natural reasons, has partially lost its insulating properties, and wide cracks have formed in some of the logs or beams from which the walls are made.
Based on the above, it is logical to begin insulation work with the preparation of the insulated surface.
Surface preparation
In this section, only the processes of insulating the walls of a wooden house will be considered, since they constitute the bulk of insulation work. In addition, insulating the foundation of a wooden house from the outside, as well as insulating the ceiling and floor, has already been discussed.
The preparation of the walls is as follows:
- the surface of the walls is cleaned of accumulated dirt and dust;
- old paintwork is removed;
- blackened areas are treated with bleaching solutions;
- rotten wood is removed to healthy material;
- in case of extensive and deep rot, the crowns are partially replaced.
After completing these measures, the inter-crown insulation is checked. Depending on its condition, partial or complete caulking of the walls is carried out. A cord of appropriate diameter made of foamed polyethylene is placed into deep cracks. The cord is pushed into the crack so that its cross-section is reduced by approximately a quarter, after which the crack is sealed with a special sealant that maintains elasticity throughout its entire service life. The crack is filled using a special syringe equipped with a pistol grip. The sealant is spread over the crack with a rubber or silicone spatula. This operation can be conveniently performed using two spatulas at the same time. This makes it easier to remove excess sealant from the surface of wood and spatulas. The preparation of the surface of the walls is completed by impregnating them twice with antiseptics, which protect the wood from rotting when wet, damage by insects and making the wood somewhat more resistant to fire. The last property of commercially available construction chemicals should not be overestimated. A log or beam treated with “fire-bioprotective” compounds does not lose its ability to burn.
Laying a vapor barrier layer
Laying a vapor barrier film on the wall of a log house differs from laying it on a wall made of timber. The log wall is initially uneven: it has protrusions and depressions, which is why the film does not fit tightly to it, leaving sufficient gaps for moisture. The vapor barrier can be attached directly to a log wall using a construction stapler. When laying a vapor barrier film on a timber wall, it is necessary to provide a gap of 2-2.4 cm between the wall and the film. This is achieved using slats mounted vertically on the wall. You can cut them from an inch edged board on a circular saw. The thickness will be approximately 25mm, and the width will be approximately equal to the width of the timber prepared for the sheathing. The slats are secured to the wall using nails 70mm long. For a wall up to 3 m high, three nails are enough: below, above, approximately in the center. In the future, through these slats, the sheathing bars will be attached to the wall; accordingly, the slats will not stand on three nails for long, but it is necessary to align them vertically using a level, and horizontally - as a rule - it is necessary. This further ensures flatness when attaching the outer skin. The distance between the slats should correspond to the width of the insulation boards. Usually this is 600mm. Before installing the slats, they should be treated twice with a fire-retardant compound. The film is attached to the slats using a stapler. It is necessary to pay attention to which side the vapor barrier should be located towards the insulation. This is very important information. It is in the instructions included with each roll of material.
The vapor barrier strips should overlap each other by approximately 150mm. The joints are taped with special tape.
Installation of sheathing
The sheathing consists of beams with a cross section of 50x50mm or 50x100mm vertically fixed on top of the vapor barrier material. The last size is selected if the wall is insulated with 100mm thick slabs or a double layer of 50mm thick mineral slabs. The sheathing is necessary to further secure on it a layer of windproof material, counter battens and, ultimately, the outer skin. The material for the sheathing should be chosen dry. Without a large number of knots and other wood defects. Before installation, it must be treated twice with a fire-retardant compound using a brush or roller. You can fasten the sheathing bars to the wall using nails 100-120 mm long or self-tapping screws of the appropriate length. To prevent wood from splitting, you can drill holes for both the nail and the screw. Such drilling is especially necessary when the timber size is 50x100mm. The labor intensity increases, but allows you to perform the work more accurately and with better quality. If the wall is made of logs, and the installation of slats for vapor barrier was not carried out, the sheathing beams must be aligned vertically and horizontally, using a level or plumb line and a rule for this. At the very bottom, a starting beam is installed horizontally. All vertical beams of the sheathing rest on it.
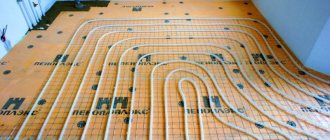
Installation of heat insulator
Insulation boards with a thickness of 50 or 100 mm are used as a heat insulator. The thickness of the slabs is chosen depending on the region, the thickness of the wooden walls of the house, and the desired degree of insulation. In this case, you can focus on SNiP 3.03.01-87, the P3-2000 manual and numerous reference materials. The density of the slabs should be taken according to the manufacturer's recommendations.
The slab is installed between the sheathing beams. It is desirable that it fits between them with a slight “tightness”. As an additional fastening of the insulation to a wooden wall, you can use plastic mushroom washers with self-tapping screws of the appropriate length. One plate is secured with 5 washers. In the corners and center.
Laying windproof film
Thermal insulation slabs installed and secured to the wall are covered with a windproof film. In the instructions included with each roll, you should read which side of the film is mounted to the insulation, after which, using a stapler, it is secured to the sheathing beams. The film strips are placed horizontally. They should overlap each other by approximately 150mm. The joints are taped. It is bought together with the film. The bottom panel of the film should not touch the ground. It is necessary to provide for the possibility of draining moisture condensing on the film.
The material must be laid carefully, from bottom to top, without folds or sagging. It is more convenient to do the work together.
Installation of lathing for fastening finishing materials outside
To ventilate the space between the sheathing and the windproof film there should be a gap of about 40-60mm. Therefore, a counter batten with a thickness of at least 40 mm and a width of 50 mm is stuffed on top of the film onto the sheathing beams. The final finishing of the outer wall of the house will be mounted on this rail in the future. The type of sheathing depends on how much flatness is maintained when fastening the counter-batten, so its installation should be controlled by level and rule.
Exterior wall decoration
Exterior wall decoration can be made of:
- imitation timber - thin profiled boards that have a tongue-and-groove joint and imitate a timber wall;
- block house - imitation of a log wall;
- siding - a plastic material that imitates thin planks laid at an angle to each other;
- thermal panels - a material that imitates an almost unlimited list of natural materials, such as various types of brick and stone.
Imitation timber and block house are made of wood. Before installation, they should be treated with impregnations that protect the wood from rotting. After installation, their outer surface is coated with tinting compounds that give the desired color shade and protect against exposure to ultraviolet rays, which cause darkening of the wood. Plastic siding and thermal panels do not require additional finishing.
Insulation technology
There are several ways to properly insulate a wooden house from the outside. The choice depends on the characteristics of the material and the architectural features of the structure. Instructions for the use of insulating agents are indicated on their packaging. It is necessary to take into account the fact that within 2-3 years after construction, structures made of logs and solid timber undergo shrinkage. You need to start finishing them after this process is completed.
Insulation of wooden buildings is carried out using the following technologies:
- Wet facade. Foam is applied to the walls, which, after hardening, is finished with paint that allows air to pass through.
- Ventilated facade. It is made in the form of a vertical heat-insulating surface located at a distance of 5-10 cm from the external wall.
- Sheathing. The building is upholstered with wood-fiber boards, the gaps between which are sealed with waterproof mastic.
List of tools
To carry out thermal insulation work, you will need the following tools and materials:
- roulette;
- level;
- hacksaw;
- stationery knife;
- electric drill;
- screwdriver;
- membrane film;
- antiseptic;
- stapler;
- fire retardant;
- wood putty;
- fastening devices (screws, dowels);
- paint brush;
- metal brush;
- acrylic paint;
- timber or steel profile for the frame;
- insulation.
It is recommended to take the material with a margin of 10% to cover installation errors and damage during storage.
Surface preparation
The sequence of work to prepare the wall surface for insulation is as follows:
- Remove from the facade all signs, brackets, wires, lighting fixtures and other items that should not be covered. Pull out the nails and unscrew the screws.
- Thoroughly clean the wood of moss, dirt, and mold. To do this, it is better to use a metal brush and a knife.
- Check for holes through which insects could enter the walls. Such places need to be treated with insecticides.
- Carry out surface repairs. The holes must be plugged with plugs, and the cracks must be sealed with acrylic sealant.
- Treat the walls twice with an antiseptic solution.
Laying a vapor barrier layer
To prevent moisture from entering the walls from the outside and to ensure the removal of steam from inside the building, a membrane sheet is used. The material is produced in rolls up to 200 cm wide. The fabric is fastened in strips parallel to the ground. Fastening is done with staples using a stapler in the direction from bottom to top. The first strip is laid in such a way that its lower edge is recessed into the damper joint between the wall and the blind area. Each subsequent strip is attached to a 10 cm overlay. The joints are glued with aluminum tape.
Laying insulation
Isoplast and foam panels are screwed directly to the walls using disc dowels. To lay fiber boards, a lathing is made from timber or a metal profile. The frame cell is made 3-5 cm smaller than the width of the slab, so that the insulation is held in space due to its elasticity. The first row of insulation is installed from below, after which the rest are laid. The cracks are filled with mounting foam or acrylic sealant.
After installation of the insulation is completed, its surface is covered with facade panels or finished with plaster for street work.
Possible problems with insulation
You can avoid problems when performing home insulation work by strictly adhering to good construction practices, instructions from material manufacturers and safety regulations. More details about safety rules: when starting to work with mineral wool, you should wear overalls made of thick fabric. Wear thick gloves on your hands. On the head - a headdress. The respiratory organs must be protected with a respirator. Eyes - glasses. Shoes must have reliable soles that protect the foot from injury from sharp objects. In the process of work, do not lose vigilance, constantly monitor your actions and the actions of your colleagues. Avoid littering work areas with construction waste. The slogan “Sobriety is the norm!” - the key to successful and safe work.