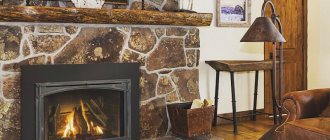
When the furnace is completed, the work on its arrangement cannot be considered completed. It requires regular maintenance in the form of tinting and whitening the surface. And, despite all efforts, this does not make the stove any more beautiful. To solve this problem, it is logical to use decorative stone finishing , which is easy to install and does not require maintenance in the future.
To decorate a stove with stone with your own hands, you do not need the help of professional builders, since it is laid even lighter than ceramic tiles, and you will need a minimum of tools and materials for this.
Properties of decorative stone
The advantages of decorative stone include:
- Durability and reliability. Due to its strength characteristics, artificial stone is very resistant to mechanical and physical damage.
- Easy to care for. The surface of the coating is easy to wash and clean.
- Moisture resistance. A protective layer on the surface of the decorative stone protects the coating from moisture absorption. Therefore, you can safely wash it with a damp cloth and a mild detergent.
- High temperature resistance and fire resistance. Artificial stone will withstand even prolonged exposure to open fire, since it does not burn at all.
- Wear resistance. Despite constant wet maintenance, the stone finishing of the stove retains its decorative properties for a long time without losing its appearance.
- Resistant to sudden temperature changes. Such a material retains its properties despite changes from very low to high values, and vice versa.
- And the biggest advantage is the ease of laying decorative stone with minimal expenditure of time and materials.
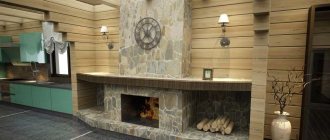
Features of soapmagnesite
Warm stone has a number of advantages compared to other materials:
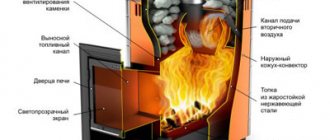
- Talkomagnesite, even at temperatures above 1500 degrees, retains its strength and environmental friendliness. When it is exposed to the highest temperatures, no harmful substances are released; they simply are not in its composition. The heat of such a stove always lasts longer, yes, stoves made of soapstone heat up longer than, for example, stoves made of metal, but the heat in them is retained for a long time. This feature has been confirmed experimentally; even when a warm stone is lowered into water, it retains its heat for about an hour.
- Magnesite makes warm stone one of the most durable natural materials. the pattern after cladding is very similar to works made of marble, which makes it an elite and elegant material. Talkomagnesite is waterproof, this feature makes it possible to use it for finishing saunas and swimming pools. If soapstone gets wet, it does not slip, which makes its use in the construction of water structures the most suitable material.
It has been proven that soapstone is not only an environmentally friendly material, it also has a number of healing properties, has a positive effect on the human body, the heat emitted from a warm stone perfectly relaxes and calms.
Products made from warm stone will last for decades; this material is strong and durable, not afraid of even temperature changes, which allows it to withstand the harshest climates.
Warm stone has no disadvantages; the main thing when choosing a material or product is not to purchase a fake; there must be documents confirming the quality.
Preparing the stove surface for finishing
Before laying out the stone, you need to carefully level the surface of the stove using plaster. For the plastering process, various mixtures based on clay and lime are used. More often, lime-clay, cement-clay-sand or lime-gypsum mortar is used. And for additional strengthening, reinforcing material is added to the mixture, for example, straw, hemp, asbestos or fiberglass.
For clay-sand mortar , clay and sand are taken in a ratio of 1:2, and ingredients are added to a solution of cement, clay and sand in proportions of 1:2:1.
In order to obtain an elastic solution with good adhesion, it must be thoroughly mixed until a homogeneous mass is obtained. If everything is done correctly, after drying the plaster can be easily rubbed off.
The first step towards decorating a stove with decorative stone is plastering the stove surface.
Before applying the first layer of plaster mixture, the entire masonry surface of the stove must be well sprayed with water. You can do this using a hand sprayer.- Next, the solution is applied using a plaster trowel from top to bottom. The first layer should be more liquid than subsequent ones.
- In order for the solution to dry evenly, you need to ensure even application over the entire treated area.
- All subsequent layers should be within 5–8 mm in thickness.
- When starting to grout, do not wait until the surface is completely dry. You can move on to this stage when the plaster layer has set slightly.
- If the grouting stage is difficult, the wall can be additionally sprayed with water.
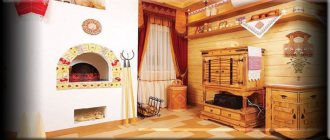
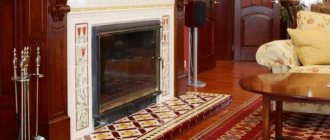
Fireplace plaster
Plaster is one of the simple and practical options for decorating a brick fireplace. A few years ago, plastered surfaces were whitewashed or painted. Today it is possible to apply a decorative layer with different textures on top of ordinary plaster.
Finishing a fireplace with plaster can be fragmentary
Types of plaster for fireplaces
Finishing a fireplace with plaster is popular for the reason that any design can be developed. The second plus is that if everything is done correctly, you can achieve a smooth surface, the finish is beautiful and durable. For plastering fireplaces, the same compositions are used as for brick stoves. Although the heating temperatures of the surfaces differ, the plaster mixtures are made the same. There are two options: make the plaster composition yourself or buy a ready-made one. If you don’t have experience working with clay and determining its fat content, it’s better to buy one. Store-bought plasters for fireplaces and stoves contain additives and additives that make the surface more durable and cracks are less likely to appear in it.
Mixtures for fireplace plaster
As a rule, each manufacturer has two formulations with different properties. The first is basic, for rough finishing. It can be applied in a fairly thick layer - up to 10 mm. After drying, the second layer is laid - the finishing layer. It contains more finely ground substances, is applied in a thin layer - usually up to 3 mm, and the surface is smooth. Such a surface can already be painted if it has been plastered smoothly) or decorative plaster can be applied.
If you want to finish the fireplace at a minimal cost, you can make plaster compositions from clay, sand and lime yourself. But, let us repeat once again, without experience working with clay, it is difficult to ensure that homemade plaster does not crack. Compositions for plastering a fireplace for making them yourself are different, here are a few proven ones:
- Clay-lime: 1 part clay and slaked lime + 2 parts sand;
- based on slaked lime - 2 parts lime, one part gypsum and sand.
To make the fireplace plaster solution more durable, reinforcing fibers are added to it. Previously, it was finely chopped straw, later - asbestos fibers, and today glass or fiber fiber is mainly added. The fractional part of this additive is small - 0.1-0.2 parts. It is added to the dry components (cement and sand), and everything is mixed. The dry mixture is added to the clay and/or lime dough, mixed thoroughly again, and water is added if necessary.
It is better to take lime already slaked, in the form of lime paste. If you extinguish it at home, unreacted particles always remain, which are then extinguished during the operation of the fireplace, destroying the plastered surface. Regarding sand, its quantity is precisely selected depending on the fat content of the clay. The solution must be sufficiently plastic. The fat content of the solution is checked using a piece of wood. Dip it into the solution and remove it. If an even layer 2-3 mm thick remains on the surface, the solution is normal. If the layer is thick and lumpy, you need to add sand; if the stick is almost clean, add clay.
Normal fat solution
The clay is pre-soaked (2 days or until all the lumps are limp), then rubbed through a metal sieve with a mesh of 2 cm. The ground clay dough is once again pressed through the mesh, but with a fine mesh of 0.5-0.7 mm.
You need quarry sand, it must be clean and dry. It is also sifted before use.
For those who don’t want to deal with homemade compounds, here are several companies that produce plaster for fireplaces and stoves. The following compositions performed normally:
- Plitonite super fireplace refractory;
- Petromix KU;
- heat-resistant Terracotta plaster;
- Bossnab;
- RS Parade;
- rtner;
- Kiln plaster HEFNERPUTZ.
The list includes both domestic and European manufacturers. This is not to say that Russian compounds are worse, but working with imported ones is easier.
Features of plastering stoves and fireplaces
The technique of applying the solution itself is no different: a certain layer is applied (sprayed) with a spatula or a special ladle, then leveled (possibly using beacons). The main points are to prepare the fireplace surface for plastering:
- First, all old finishing, if any, is removed from the walls - paint, lime, remains of plaster, mortar, etc. Only clean brick should remain.
- For better adhesion of the plaster mortar to the surface, the seams are deepened by about 1-1.5 cm. Take jointing, a chisel or a screwdriver and scrape out the mortar in the seams.
- All existing cracks are sealed with a repair compound or heat-resistant sealant (which can withstand heating up to 800°C).
- When everything is prepared, take a brush with long bristles and clean the surface well. It must be clean.
- The following are the options: If the surface of the fireplace is relatively flat (the difference is less than 5 mm), you can wet the walls and begin to apply plaster.
- If, due to the curvature of the surface, the layer will have to be made more than 5 mm, reinforcement is necessary. A metal mesh with a fine mesh is stuffed onto the walls of the fireplace. It is secured with nails, which are driven into the seams (the seams can be left unstitched, or stitched, but not so deeply). To ensure that the caps hold the mesh, metal washers larger than the mesh size are put on. Plaster is applied over this stack. In this case, you can be sure that the plaster will not fall off.
Fireplace after plastering
Before you start plastering the fireplace, carefully read the instructions on the package. It usually describes under what conditions and how the plaster should be applied. But experts advise lighting the fireplace, heating the walls to 60°C, then moistening the surface and starting to plaster. The walls are heated so that the brick takes on its “working” dimensions. In this case, there is less chance that the plaster will tear when heated. Wetting with water is necessary to ensure that the solution is not too dry: brick is hygroscopic. If it is dry, it quickly draws water out of the plaster mortar and it becomes too dry and does not harden to its normal state. The result is cracks on the surface.
A few more points regarding drying. When plastering a fireplace, at least two layers are applied. The second can be applied only after the first has dried completely. To speed up drying, you can create a draft, but you cannot light the fireplace. The same applies to the second - finishing - layer.
For the technology of plastering stoves and fireplaces, see the following video.
Priming oven surfaces
After the preparatory work comes the priming stage. The strength of the masonry will depend on this process, so it should never be ignored. And if you take into account the large weight of decorative stone, then you need to take the choice of consumables very seriously, without trying to save money. It is better to choose reliable material.
It is worth remembering that the oven constantly heats up to very high temperatures, and if the materials are chosen incorrectly, the tiles may begin to peel off over time. Therefore, instead of regular tile adhesive, you need to choose heat-resistant one .
Applying glue for laying decorative stone
For strong adhesion of the material to the surface of the oven, both must be covered with a layer of glue. To do this, first apply glue using a simple or notched trowel, after which a wavy groove is made in it. Next, you need to press the stone tightly to the surface and, to be sure, tap it with your fist or a special rubber hammer.
The next row is laid above the first in a checkerboard pattern to obtain a stronger masonry.
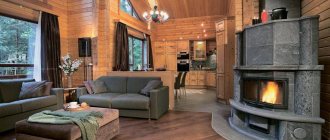
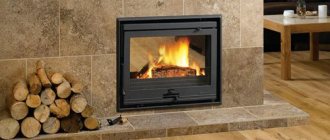
How to veneer a fireplace with decorative stone
A flat wooden strip or metal profile is laid on the floor close to the fireplace wall and installed in a horizontal position using a level. Using a spatula with a smooth edge, the adhesive mixture is applied to a small section of the wall, equal to the height of one and the width of 3-4 tiles, and leveled with a notched trowel. The first tile is pressed against the mortar and pressed into it, after which adjacent tiles are installed side by side. The entire first row is mounted in this way, after which it is lightly tapped with a hammer with a rubber nozzle.
Laying stone
First, pieces of stones are selected according to size and laid out on a horizontal surface to create a future composition. Then, in the same sequence, they are transferred to the prepared oven surface.
The pieces can be adjusted in size to the desired size using a grinder. You need to be very careful to maintain the integrity of the stone, and therefore work at low speeds of the tool.
You can create and lay out various variations of masonry, but the simplest is in even rows. For accuracy in the first row it is necessary to use a building level.
For reliable installation, a special mixture is used, but not silicone, as this will have a bad effect on the quality of work.
Some people believe that when laying out decorative stone, order is not important. However, their random arrangement will give the surface an untidy appearance. The most commonly used is seamless masonry.
For masonry imitating brick, a certain amount is left between the tiles.
distance. Scraps of cardboard are used to adjust the width of the seam, and plasterboard is used for wider seams. You need to ensure that the seams harmoniously complement the appearance, since too wide ones look unnatural.
And if you make seamless masonry, the resulting structure will have a complete monolithic appearance.
If we compare decorative and natural stone, the first is more durable and is not prone to becoming covered with moss or fungus.
Structural variety of artificial stone:
- gypsum dough. Outwardly it resembles natural sandstone, with many imitations on the surface. Has high strength characteristics.
- Acrylic stone. It is superior in strength compared to the previous type. The surface of such material is well protected from external influences.
- Fake diamond with the presence of natural stone chips. The most popular type in finishing work.
- Porcelain tiles. Contains several types of clay, mineral salts, marble chips and pigments. Thanks to its integral texture, it is highly resistant to mechanical damage and high temperatures.
- Heat-resistant composite (based on concrete, quartz or minerals). Contains crushed rock, dyes and polymer resin. In terms of strength, the composite can be compared with granite. Has a large selection of decors. Today you can purchase a completed stove with a composite lining from European class=”aligncenter” width=”620″ height=”470″[/img]
Criteria for choosing decorative stone for finishing
When choosing the optimal artificial material, you need to pay attention to a number of nuances:
- The product must be well packaged.
- The surface of the material must be smooth. If the stone has a porous structure on the front side, then its production technology has been violated. Such material will not last long.
- Experts believe that the imitation must have “endurance.” In their opinion, the strength of the stone reaches its maximum values only after a month has passed from the date of its manufacture.
- The product comes with several certificates. Since the material is synthetic, it is important that these documents are available, because we are talking about finishing a surface that will periodically heat up. Production flaws will certainly affect the quality of artificial stone, as a result of which it can become harmful to human health.
- The packaging of a high-quality imitation must contain the name of the manufacturer and the date of manufacture.
Also, you shouldn’t buy artificial stone secondhand, since you don’t know where and by whom it was produced, how well it meets quality standards and how many years it will last.
Installation of natural stone
Before installation, preparatory work is also carried out, however, it is somewhat different from work with decorative stone.
The wall surface is reinforced with a special metal mesh, which is secured with staples.
Next, the mesh is covered with concrete mortar or a layer of plaster. This stage must be approached very carefully and avoid the appearance of defects and irregularities, since they cannot be sanded and leveled.
All other actions will be the same as in the case of artificial stone.
Questions and answers
Which stones will last the longest?
Granite and marble have the highest durability.
What artificial stones are best to choose for cladding?
You should focus on your budget and the desired type of fireplace. The only rule is that when decorating a fireplace, it is better to avoid stones with a polymer filler.
Which stone will be the most durable?
Granite has the greatest strength.
What material is the safest to line a fireplace with?
Natural rock stones are safe for humans and do not release harmful compounds into the environment when heated.
Is it necessary to use heat-resistant stones for facing a fireplace?
Yes, fireplace stones must be heat-resistant. The only exception is plasma fireplaces.
Possible problems
The most common mistakes and tips for avoiding them:
- The large distance between the stones creates the feeling of a “broken” stone. Such a seam does not look very aesthetically pleasing.
- Due to poor quality primer, some stones may fall out of the overall composition. Therefore, you should immediately treat your work with respect and do the job well the first time.
- You need to cut stones with a grinder very carefully, because careless movement can damage them, break them, or chip the surface.
- It is necessary to select the surface decor with great care to avoid disappointments. A wide variety of colors and textures of stone finishing allows you to choose the appropriate option for every taste.
- If you disturb the arrangement of the rows at the beginning of the work, you may end up with chaotic masonry, which will have a bad effect on the appearance of the product.