Houses made of rounded wood or natural timber are rightfully considered the most comfortable. Their high popularity is explained, first of all, by the naturalness of the material and good protective characteristics.
But all types of one-story buildings are characterized by significant losses through ceiling structures. Therefore, you have to fight for warmth and comfort in a wooden private house. The correctly chosen method and a well-thought-out insulation scheme are the main components of success in this fight.
Methods of thermal insulation of wooden ceiling structures
Numerous technologies for insulating ceilings in wooden houses are divided into two groups according to the location of installation of the insulation:
- from the side of residential premises (from the inside);
- from the attic (outside).
Both approaches have their advantages and disadvantages. Thus, insulating the ceiling in a wooden house from the inside will save money, but will reduce the useful volume of living quarters, and insulation installed outside will require additional protection from mechanical damage and more powerful hydro- and vapor barrier, which will entail an increase in insulation costs.
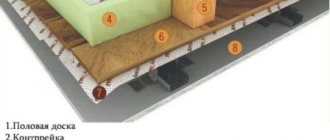
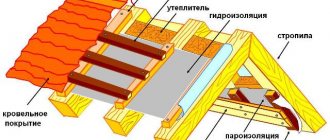
In the classic version, the thermal insulation layer has the following structure:
- external steam and waterproofing;
- insulation material;
- sheathing;
- internal vapor barrier;
- sheathing
How to insulate a ceiling in a wooden house: how to do it correctly
According to builders, 30 to 45% of heat is lost through the ceiling. The conclusion suggests itself: if you want a warm house, insulate the ceiling.
How to insulate the ceiling in a wooden house in order to create comfortable conditions without extra costs and with a minimum of effort? In this article we will talk about the best materials for insulation and present the most economical technologies.
Selecting an insulation scheme
Insulation of the ceiling in a house with a cold attic can be done according to two schemes: from the inside of the living space and from the outside, by insulating the attic floor. When insulating from the inside, the height of the room will decrease by 10-15 cm, depending on the thermal conductivity of the insulation and the type of lining. You don’t always want to lose such height, and it’s much easier to insulate from the attic floor.
If a wooden building has a warm attic, it will only be necessary to insulate the roofing from the inside.
Now that you have decided on the insulation scheme, we move on to choosing insulation.
Choosing insulation
Among the many offers on the construction market in the insulation segment, our eyes run wide. When comparing materials, we are guided by the characteristics:
Materials for ceiling insulation can be of different types:
- Plates, mats.
- Bulk.
- Monolithic installation.
- Liquid.
Plates and mats are suitable for both external and internal insulation, the rest of the ones listed can only be used for external insulation.
The most commonly used slab insulation materials are polystyrene foam, penoplex, mineral wool and basalt insulation materials. They are distinguished by efficiency, low volumetric weight, durability and cost-effectiveness. Among the slabs there are materials of both economy class (expanded polystyrene) and higher prices (penoplex, mini-slab).
Expanded clay, vermiculite, and slag are used as bulk heat insulators; these materials do not burn, are not damaged by insects and rodents, and are low cost. Disadvantages include low efficiency and high weight, because of this the insulation layer can reach 500 mm, which requires calculation of the load-bearing capacity of the floor beams.
The same can be said about lightweight monolithic concrete - low efficiency, high weight, but low price, and special equipment is required for installation. Among the materials in this group, we can mention a proven method of insulation using a mixture of sawdust and cement laitance, which is easy to implement and affordable.
Liquid insulation, which includes, for example, polyurethane foam, also requires special equipment for installation, and with excellent characteristics they have a high price. They are fast to complete, but these materials cannot be recommended for DIY installation.
Having chosen the best way to insulate the ceiling, we move on to the next topic: how to properly insulate the ceiling in a wooden house.
We carry out insulation
Before starting work on any of the insulation schemes, it is necessary to impregnate the load-bearing beams with a fire retardant to increase fire resistance, a fungicide to protect against fungus and an antiseptic to protect against rotting, or a complex preparation that performs three tasks simultaneously. All wooden structural elements that will be used to insulate the ceiling are subject to treatment.
Insulation from inside the room
In this case, we insulate the ceiling with slabs or mats. For work you will need materials:
- Insulation.
- Vapor barrier.
- Superdiffusion membrane.
- Wood beam, section 50x100 mm.
- Wood beam, section 40x40 mm.
- Moisture-resistant OSB or chipboard boards.
- Material for covering the ceiling.
The sequence of work depends on the existing ceiling structure: if there are no plans to dismantle the existing ceiling, then a superdiffusion membrane is stapled to it. Further:
- Cranial beams with a cross-section of 40x40 mm are stuffed onto a beam with a cross-section of 50x100 mm in order to obtain a T-section beam.
- The resulting T-beams are attached closely to the ceiling to the walls with a distance between them equal to the width of the insulation board minus 5 mm.
- Insulation boards are placed into the resulting frame.
- A vapor barrier is secured from below with a stapler.
- The structure is covered from below with plasterboard, OSB, chipboard or clapboard, in accordance with the interior of the room.
- In the attic, a running flooring is made from moisture-resistant OSB, chipboard, or boards for periodic inspection of the serviceability of the roofing.
The main disadvantage of this scheme is the reduction in the height of the room by 15 - 200 mm, depending on the required thickness of the insulation.
Insulating the attic floor from above
This insulation scheme is used in new construction or with free access to the attic in existing buildings.
In this case, you can use both slabs and mats, and bulk materials. Materials required for insulation:
- Insulation;
- Vapor barrier;
- Superdiffusion membrane;
- Wood beam, section 40x40 mm;
- Slabs or boards for the subfloor;
- Moisture-resistant OSB or chipboard boards;
- Material for covering the ceiling.
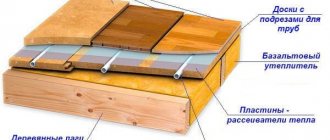
The overlap diagram looks like this:
Sequence of work:
- Using cranial beams, we bring the floor beams (joists) to a T-section;
- We lay the subfloor between the beams;
- We lay the vapor barrier freely, extending onto the wall;
- We install insulation - slabs, rolls, mats or bulk;
- A superdiffusion membrane is laid on top;
- We install attic flooring - boards or moisture-resistant chipboards, OSB.
If, according to calculations, the thickness of the insulation is required to be greater than the height of the logs, before starting work it is necessary to increase the beams to the required height.
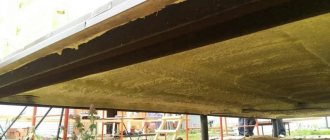
Ceiling insulated with expanded clay.
As a vapor barrier, it is possible to use bitumen-polymer roofing material, but polyethylene film is not recommended due to its low quality and short service life.
Insulation with sawdust
According to the above scheme, you can perform insulation with sawdust or wood shavings. This is the most economical way to insulate a floor, although it is inferior in thermal insulation qualities and durability to insulation with mineral wool or expanded polystyrene. Materials required:
- Medium sized sawdust or shavings.
- Vapor barrier.
- Cement.
- Skull bars with a section of 40x40 mm.
- Boards or slabs on the subfloor.
Sawdust must have the following quality:
- Humidity no more than 15%.
- At least 1 year old.
- Visible absence of mold and mildew.
- The average size.
Dilute the cement with water 1 to 10, you should get liquid cement milk. A mixture of cement and sawdust is prepared in the proportion of 1.5 buckets of milk per 10 buckets of sawdust. The mixture is poured onto the vapor barrier layer and left to dry. The dried layer is covered with a second layer of vapor barrier, then a running floor is installed.
Summary
Doing floor insulation with your own hands is not a difficult job, but it will allow the homeowner to keep the house warm and reduce heating and electricity costs.
The costs of insulation will be repaid by home comfort.
If you follow technology, safety precautions and recommendations from material manufacturers, the work will be a pleasure, and you will be proud to tell your neighbor how to insulate a wooden ceiling.
Source: https://ebtim.com/krysha-potolki/kak-uteplit-potolok-v-derevyannom-dome.html
How to insulate the ceiling?
All materials that can be used to insulate the ceiling in a wooden house are divided into three groups:
- bulk;
- soft;
- solid.
The first group is used only for external insulation. The other two are used in both methods. The most popular representatives of each group, respectively, are:
- sawdust;
- mineral wool;
- Styrofoam.
Choosing thermal insulation material
For this insulation option, any insulation available on the modern market is suitable. Slab models are more often used: polystyrene foam boards, mineral wool in mats. You can use expanded clay. Polyurethane foam, which is applied to insulated surfaces in the form of foam, is very popular today. It polymerizes under the influence of air, turning into a durable layer with high thermal characteristics.
By the way, the main characteristic that determines insulation is thermal conductivity. The lower its value, the better, the thinner the thickness of the material being laid.
| Insulation | Mineral wool | Expanded polystyrene | Polyurethane foam | Expanded clay |
| Thermal conductivity, W/m K | 0,032-0,05 | 0,03-0,035 | 0,02 | 0,31 |
Foam insulation
The easiest way to insulate is to finish the ceiling from the inside with foam plastic. Its advantages include:
- relatively low cost of material;
- light weight;
- unique steam and moisture repellent properties;
- ease of installation;
- environmental friendliness.
Stages of work
First, a waterproofing layer is attached to the false ceiling between the beams. For this you can use glassine or plastic film.
Foam boards are attached on top of the waterproofing using special glue. After applying the adhesive to the insulation, you should wait 1 - 2 minutes and press it tightly to the ceiling. The slabs are mounted end-to-end. If there are gaps between thermal insulation products, they are sealed with polyurethane foam. It is better to additionally fix the insulation on the surface using self-tapping screws with washers of large diameter (10-14 mm).
After installing the slabs, a layer of glassine or other vapor barrier material is laid again. The whole process is completed by cladding and decorative finishing of the ceiling structures.
Modern industry produces foam sheets of various colors and textures. The front surface may contain an abstract pattern, which, if chosen correctly, will enrich the interior of the room.
Insulation of ceilings from the inside
The main disadvantage of the presented method of insulating ceilings is the fact that you have to fix all the elements above your head, and this is a very inconvenient position.
Important point! If the house has already been renovated, then the presented method will not be relevant for you. Experienced specialists recommend insulating ceilings at the stage of interior work, during the construction of a house (or during a major renovation).
The sequence of insulating ceilings from the inside:
- 1. If there are cracks in the ceiling, be sure to eliminate them using polyurethane foam. Large holes must first be caulked.
- 2. In order to prevent the appearance of condensation, you need to attach a vapor barrier film to the ceiling. To perform these works you need a construction stapler.
- 3. The next stage is laying the thermal insulation material. Do this so that you are comfortable and the pieces of material fit snugly against each other, preventing warm air from leaking out.
- 4. Ceiling coverings are being installed.
The listed stages of insulation work are designed for the use of ecowool and glass wool. If you decide to use foam plastic (materials similar in structure), then after fixing the vapor barrier film, pieces of this material are glued to it, and another layer of film is applied on top.
The final stage of this work includes fixing the ceiling sheet or lining the ceiling with specially prepared boards. Pay attention to the fact that industry experts recommend insulating the ceiling in a room on both sides at the same time.
Sawdust
Sawdust is a natural material and has proven itself for thermal protection of wooden houses. This technology is somewhat more complicated than gluing with foam plastic. The main difficulty lies in the preparation, or more precisely, the manufacture of insulation, which is a cement-sawdust mixture.
Preparation of the composition
It is better to use medium-sized shavings. Thyrsa is not suitable for insulation. Its volume contains very little air. The sawdust should not be fresh. The raw materials are treated with antiseptic and antifungal compounds. The simplest solution to this problem is to soak wood chips in a solution of copper sulfate, after which it should be thoroughly dried.
The required volume of sawdust is equal to the planned volume of the insulating layer, the recommended thickness of which is 20 centimeters.
The process of preparing a cement-sawdust mixture consists of the following steps:
- in a spacious container (a trough with sides 25-30 cm), prepare “cement milk” by mixing water with cement in a ratio of ten to one, and mix thoroughly;
- Sawdust is added to the resulting mixture, which during the mixing process should be evenly covered with a layer of solution.
Surface preparation
Before you begin making insulation, you should prepare the area for its application. This preparation includes the following:
- dismantling the attic floor;
- cleaning the space between the joists from debris and other foreign objects;
- treatment of all available wooden floor structures with antifungal and antiseptic agents;
- laying a vapor barrier carpet (as insulation, you can use thick polyethylene film overlapped on the joists).
Application of insulating composition
Next, the prepared cement-sawdust mixture is scattered over the floor area and lightly compacted. The insulation must be evenly distributed between the floor joists. After complete drying, the resulting coating can be walked on.
One of the main advantages of this method of ceiling insulation is the low cost of materials. First of all, this concerns sawdust, which, with some effort, can be purchased for free.
Ceiling insulation with tile and block materials
Most modern insulation materials are produced both in the form of soft rolls and in the form of more rigid slabs. These are all types of mineral wool (primarily basalt wool) and ecowool. Polystyrene foam and polystyrene foam are also produced in the form of slabs. Most often, basalt wool slabs are used to insulate the ceiling.
Basalt wool - insulation with basalt, or more precisely, with hard basalt fibers inside, has excellent thermal insulation properties and high ductility. To insulate the attic, it is better to use basalt wool in the form of slabs from above, and in the form of rolls from below.
The technology for insulating an attic with basalt wool slabs is simple and does not require much time or much physical effort. First you need to completely clean the surface of the attic, freeing it from dust, dirt and foreign objects. If the wooden structures of the attic are open, it is better to treat them with antiseptics to protect them from fungi and mold.
Then a vapor barrier film is laid out in the attic, making sure to overlap the laid strips by 7-10 cm and tape all joints. Basalt wool slabs are laid between the ceiling beams. If the ceiling design does not allow laying basalt wool slabs between the beams, then before laying it is necessary to fill the attic with mounting slats, observing a step of 0.5-0.7 cm less than the width of the insulation slabs.
The insulation boards are covered with a waterproofing film on top, on top of which, to ensure the ability to move freely along the ceiling, a subfloor made from old boards is installed.
Using a similar scheme, the ceiling is insulated with any tile or block heat insulators, incl. and homemade, made from a mixture of hay or straw and cement.
Mineral wool
A popular method of insulating a wooden ceiling is using mineral wool. In terms of its thermal insulation characteristics, this material is superior to polystyrene foam. The installation process is relatively simple.
Vapor barrier layer
A vapor barrier is laid on the outer surface of the ceiling, freed from the coating and cleared of debris and foreign objects. As with sawdust, thick plastic film will do.
Install it with an overlap of about 10 cm. The seams are taped.
Installation of insulation
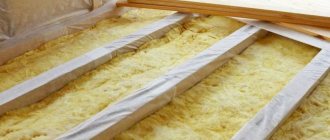
Mineral wool is produced in slabs and rolls. When using rolled material, the cotton wool is unrolled along the beams.
The second layer of insulation is laid in the opposite direction, covering the beams and joint areas.
For additional fixation of the insulation strips, you can use nails, the heads of which should be slightly “recessed” into the top layer of the material.
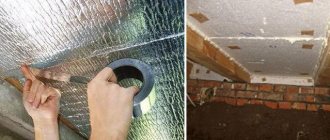
Waterproofing
One of the few disadvantages of mineral wool, but quite significant, is its hygroscopicity. It is very easily saturated with moisture, which has an extremely negative effect on its thermal insulation properties. Therefore, the insulation layer must have reliable external waterproofing.
Lay it on top of the mineral wool, overlapping it and gluing the seams.
Finishing layer
If the attic is not in use, then a cement-sand screed can be placed on top of the insulating structure. When arranging residential attics, floor boards or laminate are installed.
Insulating the ceiling of a private house is a relatively simple technological process. Performing these works does not require special skills. With the desire and knowledge of the main technological aspects, everyone is able to cope with this task independently.
Insulation with sawdust
This is one of the oldest, most effective and cheapest ways to install a warm ceiling in a wooden house. Therefore, before spending money on other insulation materials, you need to find out how to insulate a wooden ceiling with sawdust. All you need for such insulation:
- several bags of cement;
- middle fraction sawdust;
- Steam and waterproofing films;
- water;
- a few hours of free time.
The most difficult thing in this method is to stock up on enough quality sawdust. You will need dry sawdust, which has lain for at least a year, in which there are not only no visible traces of mold, but there is not even its smell. Optimal for insulating sawdust of the middle fraction. You can take small ones, but they will require more cement, which will affect the thermal insulation characteristics of the poured layer.
First, mix sawdust and dry cement in a ratio of 10:1 into a homogeneous mass. Then we clean the attic of dust, debris and foreign objects and cover it with a vapor barrier film made of glassine or polyethylene, always with an overlap of sheets of 7-10 cm.
Immediately before backfilling, mix the sawdust-cement mixture again, moistening it with water at the rate of: 3 buckets of water per 20 buckets of dry mixture, and insulate the ceiling with the resulting mixture, spreading it in a layer of 25-27 cm, and then slightly compacting the poured sawdust with your feet.
Sawdust is good because it costs pennies, and if everything is done correctly, it retains heat no worse than modern insulation materials. But such thermal insulation must be installed in the middle of summer, so that the sawdust has time to dry by autumn, and in the fall, the already dry mixture must be covered with a waterproofing film, otherwise the sawdust will get wet and begin to rot.
A similar scheme is used to insulate the ceiling with clay mixed with sawdust, only in this case the base of the thermal insulation layer will be clay, not sawdust. When insulating the ceiling with expanded clay, its granules are poured into a box prepared in advance along the perimeter of the attic and leveled with a rake.
The best materials for external insulation
The industry produces a wide range of insulation materials. Each of them has its own properties, positive and not quite qualities. First of all, environmental friendliness is important - they should not harm health.
Each of the insulation materials will make the house warmer and less accessible to the penetration of extraneous noise. The main difference lies in the price and complexity of installation.
It is important that the insulating layer does not create excessive load on the ceiling structure and copes well with the task of retaining heat. Also, it should not accumulate condensation on itself and be resistant to fire.
The material used for insulation is divided into 4 categories:
- bulk - this group includes ecowool, expanded clay, sawdust;
- slab - this is expanded polystyrene, dense mineral wool sheets, cork plates;
- rolled - all types of mineral wool;
- sprayed or self-leveling - here we are talking about penoizol.
Let us consider in detail the characteristics of the main materials used as insulation.
Sawdust as insulation
Despite the fact that there are a great many new materials, the relevance of sawdust remains the same. They are easily accessible, cheap, and the quality is not inferior to expensive thermal insulators.
You need sawdust that can be stored for no more than a year, dry, odorless and mold-free, of medium size. The volume of material is determined based on the area to be insulated.
Alternatively, sawdust is soaked in a solution of copper sulfate. Afterwards, drying will be required, and then a mixture of wood material and cement will be prepared.
Make a cement mortar in a ratio of 1:10 - for every one and a half buckets of liquid add 10 buckets of sawdust. The result is a bright gray and wet mixture. It is subsequently distributed along the plane of the ceiling. The recommended height of the insulation layer is 20 cm.
Before laying the mixture, the entire insulated area is cleaned of dust and other contaminants. Next, it is treated with an antiseptic solution and covered with waterproofing.
To improve the adhesion of the thermal insulation to the ceiling surface, the layer can be lightly trampled, it will become compacted and will retain heat better. When the solution of shavings and cement dries, you can walk on it.
Sometimes, before mixing sawdust with cement mortar, lime or gypsum is added. This makes the insulation invulnerable to rodent attacks and increases its fire safety.
Ceiling insulation with expanded clay
Another old, but not completely forgotten method of insulation is a layer of expanded clay on the ceiling. The complete environmental friendliness of the material is attractive, since expanded clay is simply high-strength balls made from baked clay.
The material is durable, resists deformation well, absorbs moisture, which subsequently evaporates. An attic insulated in this way is always dry, which is why wooden structures last longer.
The thermal insulation characteristics of expanded clay are still lower than those of the latest generation of insulation materials.
If there is another room above the insulated room, the space between the joists should not be filled to the full height. A two-centimeter gap between the insulation and the surface of the future floor will prevent the latter from coming into contact with the granules. Therefore, there will be no extraneous sounds when walking
Fine and medium fraction material is better suited. Before laying it, the surface is cleaned of anything foreign and covered with glassine or a special membrane.
Expanded clay is poured over the hydro-vapor barrier layer. Next, it is advisable to cover the surface with board or plywood. You can also use OSB boards. Another suitable option is a cement screed.
Expanded polystyrene boards for ceilings
The heat-retaining properties of polystyrene foam are much higher than those of bulk materials. Since the slabs are lightweight, they place minimal load on the ceiling structure.
It is easy to work with this material. It cuts easily, so it is not difficult to fit it to the openings. Sheets of different thicknesses are available for sale.
Since this insulation does not allow air to pass through well, it must be separated from wooden structures with a vapor barrier material. Otherwise, condensation will certainly appear.
Gaps at the joints are also a disadvantage of this insulation method. Heat is lost through them, so you cannot do without using polyurethane foam.
Lay the material as follows:
- The base is cleaned and a vapor barrier is placed on it.
- They give sheets of expanded polystyrene the desired geometry and dimensions.
- Lay out the material, pressing it tightly to the base.
- Fill the joints with polyurethane foam.
- Remove excess frozen foam.
If the attic is going to be used, a finishing coating in the form of a reinforced concrete screed of at least 50 mm thickness is laid on the slabs.
If insulation is performed in two layers, the second layer is laid in such a way that the sheets are offset by about half of the bottom sheet. This will prevent the appearance of cold bridges
Although polystyrene foam is of unnatural origin, it does not emit harmful substances during operation. This material does not rot, does not corrode, and does not contribute to the appearance of fungus or mold.
The average service life of the material is 20 years. Negative property - fragility, instability to chemical reagents.
Rolled mineral wool
Mineral wool in rolls has the lowest density - 1-11 kg/m3. This is explained by the fragility of the fibers. If you make the material dense, it will not curl into a roll. Mineral wool is a non-combustible material.
Since it is easy and convenient to install, this material is most often used. With its help, you can insulate the ceiling in a wooden house both outside and inside. It won't cost very much.
The fibers in glass wool are arranged randomly, which provides both high thermal protection and noise insulation. There are separate lines of materials that absorb sound vibrations.
When installing this type of insulation, protective equipment is needed, since the dust generated during operation is dangerous to the skin and respiratory tract
As a minus, low moisture resistance can be noted. This material cannot be compacted, since the air contained between the fibers will escape and the thermal conductivity will be significantly reduced.
The installation technology is also simple:
- The surface of the ceiling is cleaned, and nails protruding from wooden structures must be removed or hammered in over the entire length.
- Lay a vapor barrier film.
- Lay the mineral wool, trying not to leave any gaps.
- Cover the mineral wool with a polymer film or foil material.
If you plan to periodically walk through the attic, you need to arrange a wooden flooring, securing it in such a way that it does not put pressure on the insulation layer.
Some types of mineral wool contain phenol. However, if you do not go beyond the accessible temperatures, this dangerous substance will not be released.
Features of insulation with foam insulation
Penoizol is foam plastic in liquid form. It belongs to those materials that cannot be used without special equipment. It is poured or sprayed, depending on the type of installation.
In addition to equipment, you need a protective suit. It is difficult to do the job without professional skills.
The main advantage is that the material fills not only all the cracks, but also microcracks. In addition, it is safe, non-flammable, and rodents are not interested in it. The structure of the material contains many air bubbles, which guarantees excellent insulation.
Sometimes penoizol is used as sound insulation. A 5 cm thick layer absorbs about 95% of sounds. Manufacturers claim that certain types of material can last 70 years
Schematically the technology looks like this:
- a vapor barrier is laid on the surface;
- fill the gaps between the beams with foam insulation with a layer of about 25 cm;
- lay a layer of roofing felt or other similar material;
- lay a plank finishing covering.
Negative quality - fragility, mechanical stress on the material is contraindicated. High cost also cannot be attributed to the advantages of penoizol.
How to make a house warm using bulk insulation?
Let's consider options for insulating the ceiling using bulk materials: cement-sawdust mixture and expanded clay. Similar work is carried out from the attic.
We lay a layer of glassine over the entire floor area, carefully checking for gaps between the beams and the insulation. These gaps can be eliminated using regular or liquid nails, attaching the material tightly to wooden structures. Then we prepare a mixture of sawdust and cement in such quantities that the thickness of the insulated ceiling is at least 20 cm. We determine the consumption of sawdust as the floor area divided by five, and we obtain the required cubic capacity.
We prepare cement by diluting it with water in a ratio of 10:1, and make a cement-sawdust mortar. In this case, for 10 buckets of sawdust you will need one and a half buckets of cement mortar. Pour the resulting gray mixture evenly into the ceiling and compact it. After drying, the layer should not sag. We lay waterproofing material on top, you can use the same glassine, and voila, your ceiling is insulated.
Another option could be expanded clay insulation. The technology for laying vapor and waterproofing is similar to the previous process. Then expanded clay is poured in at a layer thickness of at least 10 cm for average frosty winters, compacted and covered with moisture-proof material. Since the thermal conductivity of expanded clay is quite high, carefully fitted sheets of foam plastic are often laid on the vapor barrier layer, blowing out the space between it and the beams with polyurethane foam. Then there will be bulk insulation, and again a layer of foam covered with glassine or polyethylene.
Insulating the ceiling with mineral or ecowool from the attic side will take even less time. We remove debris from the surface, line it with vapor barrier material, and lay cotton wool on it from rolls with minimal gaps, without compacting it. It is advisable to lay out two or three layers of cotton wool, placing the joints of subsequent layers on a solid part of the previous ones. We cover the cotton wool with the same moisture-proofing material, protecting it from dust, dirt and water. If the attic is planned to be converted into an attic in the future, then it is better to place boards or panels on top without supporting the insulation.