Types of chimney pipes for baths
The chimney for a bathhouse is selected depending on the material of the stove - steel and sandwich structures are installed with metal heaters, sometimes old asbestos-cement ones are found. A sauna heater is usually small; neither brick nor ceramic chimneys are used in conjunction with steel stoves. An exception is if an old house with a brick chimney in the center is converted into a bathhouse.
It is allowed to install chimneys of any type on brick stoves: brick, sandwich, ceramic, steel, asbestos-cement. Brick structures are more bulky; brick or ceramic pipes are more often used for them. But you can also install insulated steel pipes or sandwich structures on them. A rather serious drawback of brick and ceramic pipes is that they require a stationary foundation.
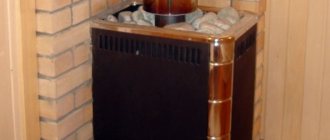
For a bathhouse, it is practical to install steel heaters - they heat up faster, transfer heat faster to the stones, the water in the heating tank, and the bathhouse itself. The sauna is used infrequently and not for a very long time, so it is metal structures that optimally satisfy the requirement of quickly heating the heater and the sauna room.
Metal pipes in a bathhouse are easier to bring up through the ceiling and roof, and they can also be used for additional heating. A bathhouse usually does not require long-term heating; there is no need to install modern long-burning stoves. After the bath procedures, the bathhouse needs to be dried - the bathhouse is heated for some time with hot stones (they have a very high heat capacity) and a hot tank of water.
So, the types of chimneys for a bathhouse:
- Indigenous with their own separate foundation, usually brick or ceramic.
- Mounted. The chimney is mounted vertically onto the outlet pipe. Above structures are usually hung on the wall.
- Built into load-bearing walls. A typical example is the installation of a chimney in the wall of old small houses and summer kitchens with stove heating.
- Hanging. Lightweight sandwich pipes are usually hung from the walls of the house.
- Now they have begun to use coaxial chimneys - “schidel”, or “pipe in pipe”. The exhaust gases heat the air entering the fireplace or boiler. A typical example is horizontal pipes for gas boilers. Vertical coaxial structures are used for large heating units; they are usually not used in bathhouses. In most cases, they try to transfer the heat from the exhaust gases to water in a heating tank or to stones in a heater.
Chimneys for baths are made of the following materials (the materials determine their design):
- Brick. They are rarely used; sometimes they use ready-made built-in chimneys from dismantled stoves. The brick box requires installation of a stainless steel box. Old brick hogs in the attic and above the roof surface need to be insulated.
- Ceramic. A foundation is needed; they are rarely used for heaters in bathhouses.
- Asbestos-cement. Installing new asbestos-cement pipes is undesirable, but sometimes old chimneys made of asbestos-cement pipes are found. If possible, they should be replaced with a modern sandwich.
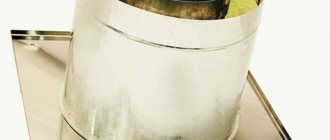
- Steel. Sometimes they install single-layer pipes with homemade insulation, but this is already the last century. It is better to overpay and install high-quality three-layer sandwich chimneys.
Stages of installing chimneys in the ceiling
Conventionally, the process of installing a chimney pipe in the ceiling space can be divided into several stages.
Stage 1: Design
First you need to draw up a detailed plan for the location of the chimney.
It is important that the chimney is located conveniently for steamers, is not located too close to the load-bearing beams and rafters, and also provides the necessary clearance to flammable finishing materials.
Stage 2: Purchase of a chimney and necessary materials
At the design stage, it is also worth deciding what type of chimney will be installed in your bathhouse. Once the choice is made, you can safely go shopping. Don’t forget to also check with the consultants in the store what additional materials will be needed to install the chimney.
Stage 3: Marking the ceiling surface for the chimney opening
In order to correctly determine the location of the future chimney, you will need a construction kit, with which we mark the place where the pipe outlet from the stove should be located.
Stage 4: Cut a hole for the pipe
Using the markings made earlier, we make a hole in the ceiling surface for the future chimney. It’s not scary if the hole is a couple of centimeters larger than it should be.
On the inside, the gaps will be closed with a special box, and on the attic side, the gaps can be insulated with stone wool or other suitable material.
Stage 5: Marking the roof for the pipe
This is an equally important stage of work, which involves marking the roof surface for the chimney. The fact is that the roof surface usually has a slope. Accordingly, the greater the roof slope, the larger the area of the hole cut for the chimney should be.
Stage 6: Preparing the hole in the roof
The hole in the roof is cut out in the shape of an oval, and the greater the slope, the larger the area of the oval. To close the hole from the street side, special rubber seals are subsequently used.
When choosing a sealant, it is very important to consider the slope of the roof.
Stage 7: Installation of the chimney
When choosing a metal chimney you must:
- maintain a distance from wooden structures (40 - 50 cm) to avoid fire in the room;
- in the area of the ceiling passage and in the attic space, the pipe must be wrapped in a sheet of asbestos, which can prevent overheating of materials close to the pipe.
The asbestos sheet is pre-moistened in water to avoid cracks and breaks when wrapping, and is also wrapped with wire on top to prevent the material from slipping.
In a steam room, the resulting hole is covered with a thin metal sheet or asbestos to reduce heat transfer between the chimney and the finish. On top of the metal sheet you can fill it with expanded clay or put basalt insulation.
A rubber seal is not suitable for closing a hole in the roof, as it will not withstand high temperatures. A sheet of metal should be used, which is laid over the hole, and the resulting cracks should be sealed with rope asbestos, generously soaked in cement mortar.
Sandwich chimney
The easiest to install would be a sandwich chimney, which is easy to install and ensures the fire safety of the building.
Sandwich pipes usually consist of several metal sheets, between which fire-resistant material is laid.
Work plan:
- a unit is installed on the roof of the bathhouse to tightly fix the chimney pipe;
- the pipe is installed in the prepared hole in the roof;
- the space formed between the sandwich pipe and pipes of larger diameter is filled with sand or expanded clay;
- if using a larger pipe is undesirable, you should use a box for sandwich pipes, the cavity of which is also filled with expanded clay;
It is important to maintain the interval from the sandwich pipe to the finishing materials. Under no circumstances should they touch each other so as not to create a fire hazard.
Brick chimney
The most reliable and preferable, but also quite expensive, design is a brick chimney. Before installing it, you need to carefully plan everything, not forgetting the fact that installing such a chimney in small baths is impractical.
Work plan:
- a hole is made for the pipe, the diameter of which should exceed the diameter of the pipe by 20 cm;
- then the chimney is brought out through the roof surface and insulated with a metal sheet;
- the structure is sealed by placing the edge of the metal sheet under the roof;
- then a metal umbrella is attached to the installed pipe, protecting it from moisture;
- The final finishing of the chimney is to apply heat-resistant paint to it, which will protect the metal parts from corrosion.
Having completed the installation outside, we proceed to installation inside the steam room.
First, the box is insulated with basalt and lined with foil insulator, and the first chimney element adjacent to the stove is installed.
Then the second chimney link is installed, and the box is filled with expanded clay. Afterwards, all remaining segments are fixed, and a metal umbrella is installed.
This completes the work on installing the chimney through the ceiling. As you can see, this is not such a complicated step-by-step procedure, which, however, requires certain theoretical knowledge and professional experience.
In any case, with a little desire, you can do this work yourself, without the help of professionals.
Types of ceiling penetrations
The chimney through the ceiling and roof of the bathhouse passes through protected openings. One of the main conditions for the safety of people in a heated building is heating the roof, ceiling and walls structures near the pipe to a temperature not exceeding 50 °C. Fire safety requirements for the installation of chimneys are set out in SP 7.13130.2013. Heating, ventilation and air conditioning. Fire safety requirements.
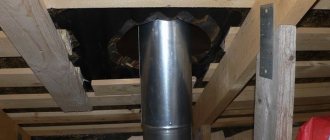
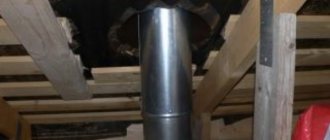
To pass the pipe from the bathhouse through the ceiling or roof structure, a through-ceiling assembly is installed - a prefabricated box with flanges. Insulation is placed between the flanges. The box insulates the surrounding structures from the heated surface of the pipe. You can make it yourself, it's not very difficult.
For the speed and convenience of passing pipes through the roof and ceiling, the industry produces ready-made passage units. They are round and square. As a rule, these units are made of stainless steel with a heat insulator, sometimes mineralite - cement boards with fiber fiber (mineral, cellulose). Previously, asbestos-cement slabs (flat slate) were used, but asbestos is carcinogenic, and their use indoors is prohibited by sanitary standards. This is still not a roof or a fence, the asbestos dust from which is washed off by rain and carried away by the wind. Sometimes there are pass-through units made of galvanized steel, but in humid bath air they will quickly rust, so they are used only as a last resort.
Mineral wool is mainly used as insulation (thermal insulator), but expanded clay, clay, and a mixture of clay and expanded clay are allowed. Mineral wool has a very significant drawback - when wet, it becomes thermally conductive (due to water), and after drying it does not completely restore its thermal insulation properties.
If the flange or body of the passage unit is made of steel, and the ceiling structures include flammable elements (wood, foam), then a layer of mineral wool must be laid between the structures and the steel elements. Otherwise, the structures may char or even burn.
The legislative framework
Let's start with the fact that the chimney from a sauna stove heats up quite strongly. Especially if the stove is wood-burning. And since the ceiling in this building is most often wooden, there is a correspondingly high probability of it catching fire upon contact with the chimney. Of course, if the chimney is a brick structure, then the likelihood of a fire is reduced. But today, in the age of modern technologies and materials, sauna stoves are metal structures with metal chimneys. This means that the temperature of the metal shell is exactly the same as that of carbon monoxide gases passing inside the chimney pipe.
Therefore, there are several legislative acts, namely SNiPs, which clearly indicate what needs to be paid attention to, and what points during the installation of a chimney from a sauna stove must be taken into account in order to guarantee high fire safety of the facility.
SNiP 2.04.05-91: “Heating, ventilation and air conditioning” Source en.decorexpro.com
So, the main set of rules and regulations that are used in the process of installing a chimney in a bathhouse is SNiP 2.04.05-91 called “Heating, ventilation and air conditioning.” In this code, namely in the section “Stove heating”, which begins at position 3.62, it is clearly described what requirements apply to stove chimneys. We will not delve into each point of the document, we will simply identify those that relate to the topic of our article.
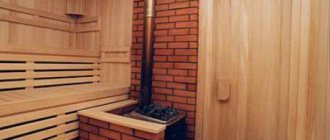
First of all, a few words about the stove itself. Firstly, the temperature of its walls should not exceed +120C. Secondly, if a fan is installed on the chimney, providing the necessary removal of carbon monoxide, in other words, an exhaust hood, then accordingly it will be necessary to provide an artificial flow of air from outside the room. Thirdly, stoves should be installed only near the internal walls of the bathhouse, which are built from non-combustible materials, or the walls should be sheathed with non-combustible materials.
A stove in a bathhouse next to a wall lined with stone Source stroisovet.com
Now about the chimney pipe.
It is brought above the ridge at least half a meter
, or the same parameter is used above the plane of the flat roof of the bathhouse.
Particular attention to pitched roofs
, where the pipe can exit
anywhere on the slope
, not necessarily near the ridge. But the height of the outer part of the chimney is determined by the same parameter.
If the bath
- a building that
is attached to the main house
, or is
part
of this house, then
the chimney
must
above the ridge
of the roof of the house by the same half a meter.
A brick chimney must be vertical
.
Metal pipes can be partially laid at an angle
, but with the condition that the angle of inclination will not exceed 30°, and the length of the inclined section will not be more than 1 m. In this case,
the inclined part
in the cross-sectional plan must be exactly
the same
as
the vertical one
.
Plus, its internal surfaces
must be
smooth
.
If the roof of the bathhouse
covered with
flammable
roofing materials,
a spark arrestor
in the form of a metal grid with cells no larger than 5x5 mm must be installed on the chimney.
Spark arrester for chimney pipe Source banyaprofi.ru
Now, what does SNiP say about the pipe exiting the bathhouse onto the roof. To begin with, the passage through the ceiling structure is called an opening. And the part of the pipe structure passing through the opening is cut. So the latter should be at least 70 mm larger than the thickness of the opening along the length of the chimney on each side. That is, it turns out that the protective element that protects the opening from the pipe should protrude into the room and towards the attic at a distance of at least 7 cm. This is done in order to ensure fire safety.
Next, as for the width of the opening relative to the cross-section of the chimney. It should be noted here that SNiP has a clause that this parameter should be looked for in the recommendations from the manufacturer of the furnace equipment. And use it as a basis for installation work. But there is an appendix in the document numbered “16”, which is designated as “mandatory”. It indicates these ratios, which are often taken as a basis by many builders and installers.
The opening for the chimney must be wide in accordance with SNiP standards Source allremont59.ru
So, in this application it is indicated that the distance from the chimney pipe to the edge of the opening, not protected from fire, should be 0.5 m, and when protected from fire - 0.38 m. And this distance must be filled with non-flammable material. And one more important point. It is impossible to join parts of the chimney pipe inside the opening. That is, the passage part must be solid to avoid depressurization of the chimney during its operation.
So, that's all with SNiP. As you can see, in this legislative document everything is, in principle, laid out on the shelves. If you strictly follow these standards and requirements, you can guarantee the high quality of the final result. Now let’s look at how to properly install a chimney pipe through the ceiling in a bathhouse.
Rules for installing a chimney pipe
The health and life of your family and friends depend on the fire safety of chimneys and the complete removal of flue gases - carbon dioxide, carbon monoxide, toxic substances, smoke, soot. Therefore, when installing chimneys, you must strictly follow the rules for their installation. These rules are defined by regulatory documentation - SP 7.13130.2013.
The main rules when installing chimneys for a bathhouse:
- Maintain distances to the nearest structures - walls, ceiling structures, roof.
- Sufficient but not excessively high chimney height.
- To determine the cross-section of the internal chimney channel and its height, calculations are necessary.
- Durable fastening to the walls and ceilings of the bathhouse.
- Reliable sealing, good insulation during installation.
- Protecting hot structures from possible contact and burns: this is especially important for a bathhouse with its small size.
- Assembly of modules for condensate. Sandwich pipe elements are appearing, designed for simultaneous assembly of smoke and condensate.
The distance from pipes to combustible structures - wooden rafters, lathing, bitumen materials - must be at least 130 mm, from uninsulated ceramic pipes - 250 mm. The passage unit must be at least 70 mm greater than the thickness of the ceiling structure. The steel structures of the passage unit must be separated from the ceiling structures by non-combustible materials - slabs of mineral wool, mineralite.
Standards for clearances from pipes to walls
SP 7.13130.2013 determines the minimum size of setbacks - the distances between the outer surface of the chimney and the walls. If structures are made of flammable materials, then the offset should be from 260 to 500 mm. If non-combustible or combustible materials are covered with plaster, reinforced with metal mesh, heat-insulating non-combustible materials - from 200 to 380 mm.
The amount of indentation depends on the thermal insulation of the chimney (thickness of the brick wall or insulating layer). Before installing a stove with a pipe for a bath, you need a drawing indicating the exact dimensions of the pipe and the distances to the structures.
Work on installing pipes in a bathhouse
Before you remove the pipe in the bathhouse through the ceiling, you should study the sequence of installation work.
The step-by-step instructions will be as follows:
- Holes measuring 45x45 cm are cut in the ceiling and roof.
- Next, two steel plates of 50 cm each are cut out - with their help the chimney will be fixed.
- Holes for fastening are drilled in the prepared plates in the corners.
- A round hole is made in the center of one of the plates.
- The other plate is intended for fastening to the roof slope; an oval-shaped hole is made in it.
- A galvanized casing is placed on pre-insulated pipes located indoors.
- The ends are closed with rings, and the edges on the outside of the tube are folded.
- The insulated lower end of the smoke exhaust pipe is inserted into the round hole of one of the steel plates, and the non-insulated end is placed on the pipe.
- The steel sheet is fixed to the ceiling, and it is important to ensure that the gaps on all sides are the same.
- Using a pre-welded pipe, the upper pipe is placed on the lower pipe, securing them with a clamp.
- A second steel plate is attached to the inside of the roof.
- The space between the pipe and the wooden elements is covered with clay or filled with expanded clay.
- Where the pipe passes through the roof, a moisture-repellent layer is laid and a seal is laid.
- After this, a cap is placed on the pipe to protect it from precipitation.
How to make a pipe passage through the ceiling and roof: a step-by-step guide from the master
The most common type of chimney for a bathhouse is made from sandwich pipes. It is his installation that I will consider. The sandwich is very easy to install; elements for pipes of any configuration are available for sale. Stainless steel chimneys last for several decades; the calculated thickness of the insulation ensures good draft.
Step 1
Initial installation stage:
- connection to the outlet pipe of the tee;
- connection of a horizontal or vertical section without insulation, transition from an uninsulated pipe section to an insulated one;
- installation from below of an element with revision and a container for condensate drainage.
An area without insulation must be installed - the temperature at the point where the flue gases exit the furnace is very high, any insulation will simply bake and damage the pipe. Often in this place it is necessary to install a heater, coil or container for heating water - to select and rationally use the heat of the exhaust gases. The wall of the bathhouse made of flammable materials near the stove and chimney is covered with non-combustible materials - stone, tiles, mineralite.
The pipe is attached to the wall with special clamps or brackets, the lower part of the pipe is also attached to the wall (you can place it on a special stand). The distance between the clamps should not exceed 1 m, it is advisable to make it smaller - 0.5–0.7 m.
The elements are simply inserted into each other, the connection point is fixed with a crimp clamp. Before connecting two pipes, a special sealant is applied to the joint.
Step 2
Holes are cut or punched in the ceiling of the bathhouse using a hammer drill or grinder. The lower flange of the passage unit is attached, a pipe (or sandwich structure) is laid, insulation is laid, the upper flange of the passage unit is installed on the ceiling and attached to the ceiling structures (occasionally to a bracket). The stage ends with the installation of the pipe in the attic.
Step 3
A hole in the roof of the bathhouse is cut in the same way as in the ceiling. It is extremely undesirable to cut the rafters when leading the pipe through the roof, therefore, when designing the installation site of the heater and the passage of the chimney, this circumstance should be taken into account: a curved chimney and set to the side can worsen the draft. In any case, before installing a chimney, it is necessary to draw a diagram of the placement of the stove and pipes in the bathhouse, taking into account the optimal passage of all ceiling and roof structures.
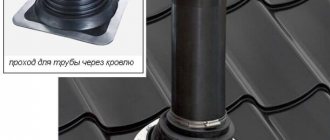
A roof sheet is attached to the underside of the roof. A roof section is fixed on top - an unloading platform with a cone. A chimney is passed through the groove, and the groove inside is filled with insulation. The joint between the groove and the pipe is covered with a cone-shaped apron. Silicone sealant is used to seal all joints - it withstands the temperature on the surface of the pipe.
The top of the cut is covered with a galvanized sheet or roofing material, and roofing material is placed under the bottom.
Step 4
Lastly, the master flush is installed - an elastic device made of high-quality durable EDPM rubber or silicone. Silicone is less resistant to ultraviolet radiation, so it is advisable to cover the master flush with a steel cap. The master flash is secured with self-tapping screws, they are screwed into an aluminum strip around the perimeter of the flash. All joints are sealed. Usually the roof under the master flush is covered with galvanized steel so that it fits tightly and seals the roof groove well.
The installation sequence of more complex roof trim for all needs is shown in the video.
Installation of sauna chimneys
If you have an iron stove, then the beginning of the chimney is put on the pipe, which is removed from the firebox just for this purpose.
We will not disassemble a brick stove; its gases usually travel a long way from the firebox to the chimney, and then - in a straight line - are discharged through a brick pipe, led through the ceilings, to the street.
So, if you are not making a sandwich, then an iron or ceramic pipe runs vertically from the stove nozzle up to the roof. It can be insulated because the temperatures there are high - several hundred degrees.
In the area up to the ceiling, a damper - a damper that allows you to change the degree of openness of the pipe during the combustion of wood, which affects the amount of exhaust gases, and, accordingly, the amount of oxygen in the firebox. The latter affects the speed and temperature of combustion of fuel - wood, gas, coal. However, sauna stoves are not heated with coal. Firewood and gas are fine.
The gate comes in two types - retractable and rotating. Both can be comfortable and inconvenient - who is used to what.
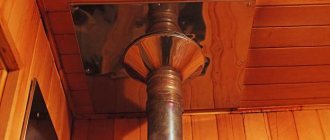
Next, the pipe approaches the ceiling and passes through the cutting box; this will be discussed in more detail below. In the attic, the monopipe may or may not turn into a sandwich before it passes through the roof.
An important point here is where the stove is installed, how close the pipe will be to the ridge of the roof. Its height depends on this.
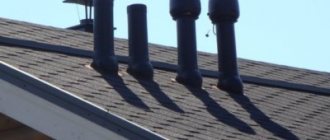
Height of pipe above ridge
The height of the pipe above the ridge of the bathhouse roof depends on the distance from this ridge it is located.
In principle, it also happens that the pipe is passed through the ridge, but such a solution is permissible where this will not reduce the load-bearing capacity of this important element of the roof structure (this is only possible when installing additional supports on both sides of the “gap” of the ridge). Because this is the basis of the rafter system. So it’s better to do it either close to or at some distance from the ridge.
If from the axis of the pipe on the roof of the bathhouse to the ridge is no more than one and a half meters , then it should rise at the ridge by half a meter or a little more.
If the bathhouse pipe comes out through the roof 1.5-3 meters from the ridge , then it will already be exactly level with the ridge.
And finally, if you bring a pipe in a bathhouse through the roof at a distance of more than three meters from the ridge , then it will be lower than the ridge, but the exact height will have to be calculated using trigonometric functions ( a leg and an opposite angle are given, find the second leg) . Illustration below:
Let's say, at a distance of 3 meters from the ridge it will be 52 cm lower.
How to choose thermal insulation material for a chimney
The best option is sandwich pipes. Their high-quality and carefully calculated insulation is covered on the outside with a reliable steel casing to protect against wetness and wind. In all other cases, insulation for chimneys in any case comes down to heat-resistant and non-rotting mineral wool, or even better - mineral wool shells. No plastic insulation can withstand the temperature on the surface of a single-layer steel chimney.
The top of the mineral wool must be covered as tightly as possible with a casing made of galvanized or stainless steel, and the joints must be sealed to prevent precipitation and atmospheric moisture from entering. Mineral wool picks up moisture and loses its thermal insulation properties, and if it freezes it can damage the chimney.
For external insulation of brick chimneys, you can use polystyrene foam or polyurethane foam in the form of sheets or by applying foamed liquid hardening compounds. The temperature on the surface of brickwork is not very high, and plastics can withstand it. But plastics must be protected from ultraviolet radiation and mechanical damage (snow, hail). Pipe cleaning methods
To maintain the functionality of the chimney hog in working condition, it is necessary to clean the hog of soot and tar deposits twice a year (read: twice during the heating season). If you use resinous firewood, such as pine, then you will have to clean the chimney more often.
Methods for cleaning chimney walls from soot are divided into mechanical and chemical. Mechanical - using all kinds of brushes or pipe cleaners. Chemical - using special logs, copper chloride, table salt, PHC (anti-carbon chemical composition) and even potato peelings.
Some chemicals contribute to the shedding of soot from the walls, some - the burning of soot on the walls. In this case, the temperature rises significantly and the chimney may be damaged. Therefore, the mechanical cleaning method is preferable.
Types and design of chimney systems
There are several types of chimneys that are installed in bathhouses and private houses:
- Pipes made of stainless steel or black rolled steel, which have thick walls. Smoke channels are assembled from them.
- Sandwich chimney. It is a double-walled pipe with non-flammable material inside.
- Brick channels.
Installation of brick pipelines is considered the most difficult. To ensure that the smoke exhaust channel is of high quality, reliable, and durable, it is better to entrust the assembly to an experienced stove maker.
The chimney is a complex structure that consists of several elements:
- The cap is a cover that prevents moisture from entering the pipeline.
- Starting adapter - an adapter from a regular pipe to a sandwich.
- Gates are parts with which you can adjust the draft.
- Panels made of mineralite - an insulating material that is laid around the stove, in the places where the chimney passes near the walls. Protects wood from fire.
- Master flush - an element that seals the place where the tube passes through the roof.
- Ceiling-passage unit - a special box that is fixed in the ceiling.
- Pipeline converter.
The final element is furnace equipment. It must be installed on a fireclay brick base.
Pipe structure and its features
Due to the design features of the chimney, before installing the pipe in the bathhouse through the ceiling, you should familiarize yourself with some of the nuances. Because the temperature in the bathhouse is very high, the bathhouse is made of wood, and sanitary standards must be adhered to, the list of installation work will depend partly on these factors.
The following rules must be observed:
- It is prohibited to use aluminum or asbestos cement pipes as chimney pipes. Suitable: stainless or galvanized steel, ceramics or brick.
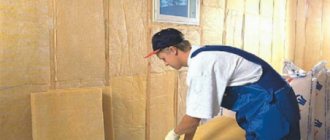
- When deciding how to make a pipe through the ceiling in a bathhouse, you need to choose the right thermal insulation material. It must be non-flammable and environmentally friendly. Basalt wool, expanded clay, and reflective foil material are suitable.
- It is worth making sure that all elements of the chimney structure have sufficient clearance with the wooden walls and roof. To ensure the best safety, it is worth taking care of metal cladding of all surfaces surrounding the structure, that is, the stove and boiler. A box for steel pipes is installed in the ceilings, which will subsequently be filled with expanded clay.
- Quite often they use sandwich pipes, which have high fire safety.
- To seal all the cracks between the pipe and the box and obtain a reliable fastening, you can use aluminum tape or foil.
Cleaning methods
After installing a chimney in a bathhouse through the ceiling, you need to understand how to clean it correctly. Over time, soot accumulates on the inner walls. If there is an unpleasant odor in the bath rooms, or traction has worsened, then the system needs to be cleaned. Cleaning methods:
- Firing the stove with a certain type of firewood. It is better to use aspen. You need to burn with such wood twice a year.
- Mechanical cleaning method. Before it is carried out, it is necessary to tighten the combustion door with a thick cloth, close the windows and doors. It is better to cover the furniture with film. Cleaning is done with a stiff brush or scraper. You should start from the roof.
One of the unpopular but effective methods is the use of special chemicals. We must not forget that chemicals can damage metal and pollute the environment.
It is impossible to imagine a bathhouse without a chimney if the stove is heated with wood. Without it, the rooms will fill with smoke. The chimney is assembled from individual elements that are connected to each other. The joints are covered with a heat-resistant sealant, which will provide a high level of tightness. Before buying pipes, you need to calculate the optimal diameter. It depends on the power of the furnace equipment.