In the old days in Rus', the construction of a bathhouse lasted for more than a year, but now you won’t surprise anyone with ready-made bathhouses, which are brought directly to the site and assembled in a few hours. However, after the builders leave, you are left with a log box that is not equipped with a heating device.
Therefore, the installation of a chimney in a bathhouse and installation of a stove falls on the shoulders of the householder. To do this correctly with your own hands requires knowledge and experience, because a frivolous attitude to this problem promises increased costs for maintaining the required temperature, the risk of fires and the danger of carbon monoxide poisoning.
Chimney classification
A chimney for a bathhouse can be equipped in several ways, depending on where the stove is installed. Methods for organizing smoke removal from a bathhouse are classified according to the following parameters:
- Material used . To make chimney pipes, metal or heat-resistant bricks are used. Brickwork is considered a more traditional option, but modern stove makers prefer a metal chimney for a sauna stove. Its advantage is quick installation with your own hands.
- Installation method . The chimney in the bathhouse is installed inside or outside the building. Installation of an external chimney system is a North American technology, according to which pipes are led through the wall to the street. It was developed in response to the disadvantages of the internal method, which involves running a pipe through the ceiling to the roof.
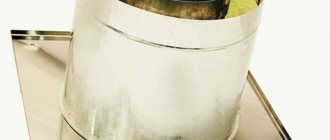
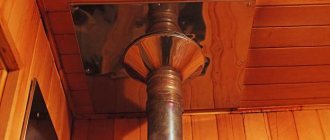
Internal and external appearance of a bathhouse chimney
The choice of material and method of installation depends on the financial capabilities, placement of the stove and the construction skills of the master. Experienced stove makers do not recommend that those who build a chimney with their own hands without experience should not combine it with a ventilation system, as this may be unsafe.
Assembly Features
There are two methods for collecting smoke exhaust system elements. They differ in the placement of the lower and upper parts.
For single-wall chimneys, when assembled “by condensate”, the upper end is inserted into the lower end. For sandwich-insulated structures, this rule applies to internal assembly. The outer part is collected “by smoke”.
Ignoring the formation of moisture leads to disastrous consequences. Condensate, mixing with soot, forms acids that corrode the surface of the pipe.
Types of installation
Installation can take place on brackets through the wall or straight through the roof.
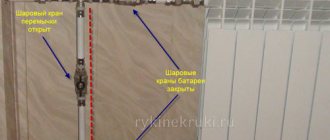
In the first case, the entire system is carried into the wall, and then rises, adjacent to the bathhouse, but without passing through it. This looks more aesthetically pleasing, and has the following advantages:
- the free space of the steam room is not used;
- there is no risk of getting burned on steel or stone;
- less chance of fire;
- It’s easier - you don’t have to make a hole through the entire attic.
- cases of smoke are easier to detect, as well as to track the general condition.
- heat loss increases, since steam actually immediately enters the outside;
- the installation itself is more difficult due to the need to comply with the dimensions of the connection between the hole in the wall and the parts of the product;
- The heating of the pipe is greater due to the fact that the gases escape in the horizontal direction. With this arrangement, the resistance of the flue gases when moving through the channel increases;
- In terms of the number of elements, this option is 10% more expensive than the usual one.
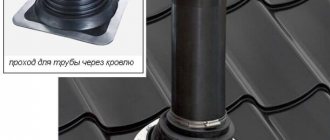
When installing smoke exhaust systems in a straight line through the roof, the chimney is located straight, without bends, it departs from the boiler and goes upward, where it crosses the ceiling and exits on the back side of the roof. Advantages of such a connection:
- Stable draft due to the location of the chimney closer to the roof ridge.
- The condensate container is kept warm, so its cleaning pocket is dry and clean. This extends the service life.
- Cold bridges do not form in the walls, and thermal insulation is not compromised.
- The stability of the smoke exhaust duct is higher due to the fastenings to the roof. The fasteners themselves can be chosen cheaper than for the option on the facade.
- The aesthetics of the structure are not spoiled by side smoke outlets.
- Only a small part of the structure is located outside, which deteriorates over time from snow and rain. You can inspect and clean most of it without leaving the building.
- You can use non-insulated parts of the chimney that are located inside the bathhouse.
- This option is easier and 10% cheaper to install than when outputting through a wall.
- Flue gases go up, there is no obstacle to their exit. Heating is less than with a horizontal connection, since the resistance to smoke flow is minimal.
However, there are also weaknesses:
- The probability of “missing” the occurrence of a fire is higher, since smoke occurs in the ceilings that are located in the attic and on the roof, and they are simply not visible until the fire appears.
- Heat loss through the roof. Tightness is restored when waterproofing is installed before coating.
- Reduction of usable area, since according to safety requirements there should be nothing around the stove pipe for a bath.
- Increased costs for changing the roof and ceiling of the steam room, in particular, after finishing the final finishing.
- If the integrity of the smoke exhaust structure is damaged, the bathhouse begins to smoke.
- Condensation leaks and accumulated soot spoil the appearance of the roof.
- Burns from heated parts are possible in emergency situations.
When deciding on the installation method, the following nuances must be taken into account:
- dimensions of the building - if it is very small, then it is logical to make an external structure;
- the steam room is built from scratch or in an old room - in the first case, you can immediately think about the issue of insulation;
- Do you need to heat adjacent rooms?
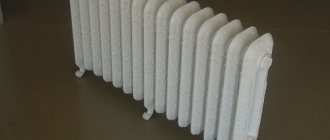
Advantages of a brick chimney
A chimney for a bathhouse was built from heat-resistant bricks before the advent of metal ones. This can easily be explained by the fact that there was no metal that could withstand high temperatures in mass production.
Only a true professional can do the brickwork of a chimney pipe with his own hands; installation is carried out according to a scheme, the violation of which will ruin all the work done. Compared to a metal chimney, a brick chimney has the following advantages:
Diagram of a brick chimney
- Heat-resistant brick, designed specifically for creating stoves, demonstrates high thermal insulation and thermal conductivity qualities, thanks to which a brick chimney effectively retains and accumulates heat inside the steam room.
- Long service life. A chimney made of high-quality brick, laid with your own hands in compliance with technology, lasts much longer than its metal counterparts, and therefore does not require periodic replacement.
- High fire protection. Fire-resistant bricks do not burn and prevent fires from spreading. Since the bathhouse is a room with a high risk of open fire, the fire-fighting properties of the brick can save the property and life of the owner.
It is important to clean brick chimney pipes in a timely manner, since its rough structure accumulates ash, dust and other contaminants, reducing stove draft or leading to smoke in the bathhouse.
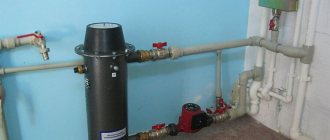
Brick chimney with water heating tank
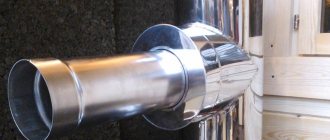
Metal chimney device
For those who make a chimney for stoves with their own hands, metal pipes are an ideal option, reducing material costs and installation time. Construction stores sell ready-made systems consisting of straight pipes, bends and clamps. In favor of metal pipes says:
- Affordable price . The cost of a metal chimney is several times lower than that of a brick chimney. In addition, I do the installation of a metal chimney with my own hands, and this saves the customer a considerable amount that he would have paid to a professional stove technician.
- The surface of a metal pipe is smooth, even slippery, so soot and other small particles do not linger on it . This allows the air, under the influence of the temperature difference inside and outside, to rise upward in a single, directed flow.
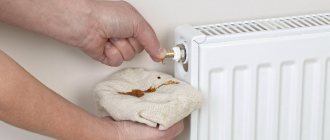
The only drawback of this method of organizing a stove chimney is that metal pipes do not have the same heat-insulating qualities as their brick counterparts, because of this, in winter, when the difference between the internal and external temperatures is maximum, condensation settles on the internal surface, this problem is solved by modern sandwich pipes protected by a layer of insulation.
Selection of chimney system elements
If you decide to install a metal chimney with your own hands, it is important to choose the correct pipe cross-section. Oven manufacturers indicate the recommended diameter for each model in the instructions.
In the absence of this information, this parameter is calculated based on the power of the stove, the height of the chimney and the number of turns. However, it is better to entrust the calculations to an experienced consultant, since the draft and safety of the chimney depends on him.
Scheme of a chimney system made of metal pipes
Please note that the length of horizontal pipe segments should not exceed 100 cm; neglecting this simple rule can result in weak draft of the stove and soot deposits inside.
- If you lead the chimney through a wall, it would be correct to place it at a distance of 50-60 cm from the edge of the overhang.
- When installing a pipe through the roof, try to place it 50-150 cm from the ridge.
- If the location of the stove does not allow this, the chimney umbrella is raised above the highest point of the roof by 1.5 or more.
- Typically, the internal chimney system is laid strictly vertically; if it is necessary to change the direction, elbows with an angle of 45 or 90 degrees are used.
- In order for the seller to correctly select the chimney for the stoves, it is better to make a diagram with its dimensions.
Preparatory work in the bathhouse before making the stove
Base
It is better to lay the foundation for the stove at the stage of building a bathhouse , and not when you already have the finished floor ready. Therefore, those who have completely decided on the type of future stove start with this:
First you need to dig a hole under the concrete foundation . Its dimensions vary for the horizontal and vertical position of the base pipe. For example, if you have a vertical stove made of a pipe with a diameter of 50-53 cm, then the concrete podium is made 70x70 cm.
So, the hole. You estimated the length and width from the above, and the depth should be about half a meter . But don’t be alarmed, the first 30 cm will go under the sand and gravel cushion, which is needed for greater stability of the base.
Before pouring the base,
a screed of liquid concrete (thin layer) is made.
The ratio of cement and sand is 1 to 4, water - as much as needed. This layer must dry before continuing work. a layer of waterproofing is laid on it , for example, sheets of roofing material, and the base itself will be poured on top of the waterproofing. Formwork is made for it. You can add fine gravel to the concrete , then the ratio will be as follows: 1 part cement to 2.5 parts sand and 4 parts gravel, water as needed.
The surface is leveled using a level - this is important! After hardening, a brick is laid on it, for example, fireclay, but red is also suitable. You can lay one, or two rows of bricks. The binder should be exclusively clay mortar .
When the base is finished, proceed to creating a protective screen . Its dimensions also depend on the size and position of the oven. But, since the stove is always either next to the wall or even in a corner, the flammable walls should be protected with a fireproof screen, and it is preferable to completely replace a piece of the wall with a fireproof one, especially if the stove has an external firebox.
For your information: the issue of foundations for furnaces is discussed in great detail in this article.
Screen
This is a means of protecting bath walls from overheating and fire. The screen is made of brick, but there is no longer a need to use fireclay, and the solution can be with cement , and not just clay diluted with water.
The height of the screen should at least correspond to the height of the oven , and at a maximum it can reach the ceiling.
Thickness - it is preferable to make it half a brick . A quarter is acceptable, but only if you are aware of the overheating of the bath at such a thickness.
Keep in mind! Where a brick wall touches a wall made of flammable material, it is strongly recommended to make a gasket made of refractory material - mineral wool, fire-resistant cardboard.
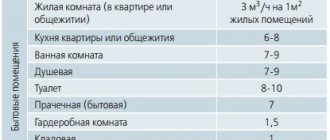
The distance to the oven may vary. If the firebox is not remote, then place the stove 20 cm from the screen; this will not work with a remote one, so try to ensure a gap of at least 5-7 cm.