The need for a passage through the roof
If it is impossible to install a chimney from the outside, it is carried out through the roof.
A passage through the roof for a chimney may be necessary when constructing a building, installing a boiler or stove in it, or when overhauling the roof. When building a house from scratch, there are usually no difficulties with the correct installation of a chimney, since the work is organized in accordance with the project and the instructions attached to it. If a tenant decides to install heating equipment in a building that is already in use, the question arises of organizing the passage of the chimney through the roof in compliance with fire safety standards and high-quality insulation of damaged areas of the roof from moisture.
If the design of the unit allows, the smoke exhaust unit can be made outside the building. This is especially advisable when using fuel oil or diesel fuel, as it will help relieve the inhabitants of the home from the specific smell of these substances.
Tools and accessories for installing a ventilation pipe on the roof
Before performing installation work on the roof, you must prepare all the necessary tools and equipment.
As a rule, for work you need:
- roof passage unit;
- insulation;
- sealant;
- sealing elements;
- self-tapping screws;
- mounting belt for compliance with safety regulations when working on the roof;
- gloves to protect hands;
- perforator;
- metal scissors or jigsaw with blades for wood and metal;
- level;
- screwdrivers or screwdriver.
Consequences of poor installation
When organizing a penetration through the roof for a chimney, it is important to provide good protection from moisture. Therefore, you need to follow installation technology and use high-quality materials. Inadequate pipe insulation increases the fire hazard. In addition, it causes the following negative consequences:
- the brickwork is destroyed due to weakened mortar, smoke enters the home;
- Moisture accumulates inside the chimney, and fungus appears in the summer;
- heat losses increase, which forces you to spend more fuel on heating;
- sections of the roof adjacent to the pipe are destroyed by ice.
If the circulation of air masses in the space under the roof is disrupted, humidity increases, and wood parts begin to rot. There is a need for overhaul of rafters. Therefore, it is important to carry out the excavation work correctly.
Making a metal box
Let's say a hole in the wall or ceiling has already been made, now it's just a matter of making the body. Therefore, we carefully study the stages of work and instructions. So:
- After cutting the required hole, we recommend strengthening the edges with “supports”; use timber with a cross-section of at least 40 by 40.
- We cut out two metal plates, keep in mind that they should be 50 mm wide. more hole. Next, we bend them so that an angle of 90 degrees is formed, thereby obtaining two U-shaped figures.
- The strips are screwed to the hole.
- The next stage involves the production of similar U-shaped structures, but of a different size, according to the original parameters and dimensions of the already screwed strips. New elements need to be screwed together with an overlap.
- Next we prepare the bottom and “roof”. We cut out two identical sheets, the size corresponding to the hole. Cut a hole in the middle for the chimney.
- Next, mark four identical stripes from the center. We bend it at an angle of 90 degrees, thus obtaining a fastening. Keep in mind that the optimal width is 20 mm.
- Next, the bottom and lid are attached to the U-shaped forms and screwed. After this, you can insert the pipe, pay attention not to its fastening, use clamps. Next, the entire space is filled with the selected thermal insulation.
Fire safety
Consequences of improper installation of a chimney passing through the roof
The rafter system, as well as the vapor and waterproofing layers of the roof can melt or ignite when heated. To cover components vulnerable to fire, a protective box made of a block of wood treated with anti-flammable and anti-rot compounds is installed around the perimeter of the hole. It is installed from the outside at the same level as the sheathing. Insulating layers need to be fixed around the perimeter. The canvas is cut into a cross and triangles are wrapped inside. The material is secured with staples or large nails. To seal the joint, the joint can be treated with a special compound.
The passage of a pipe through the roof involves insulating the chimney from temperature effects: for this, the corresponding areas must be sheathed with a non-flammable gasket, for example, made of basalt wool. To organize penetration, it is prohibited to use parts that are not heat-resistant.
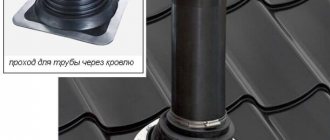
Sealing the joint between roofing and pipe
The shape of the pipe passage through the roof may vary depending on the cross-sectional shape of the pipe itself (square, rectangular, round), as well as on the type of roofing material, but the general principle of the device will be identical.
Sealing a pipe on the roof is one of the integral tasks, the solution of which is carried out in order to ensure the drainage of water flowing down the pipe, as well as the roof slope. Sealing the chimney is usually done using an apron.
Ensuring that the chimney pipe is protected from moisture
Let's look at how to seal a pipe on the roof and protect it from water, in more detail:
- Pipes with brick or concrete outer walls of square or round cross-section are sealed using aprons supplied as part of the roofing material kit. For example, among the components for cement-sand and ceramic tiles there are aluminum elastic bands, one of the edges of which is treated with an adhesive composition.
- The joint is sealed using tape by gluing one of its longitudinal half to the pipe, the other to the roof.
- Next, press the upper part of the tape (glued onto the chimney) with a metal profile strip, securing the tape directly to the pipe with heat-resistant dowels or to a groove previously made in the pipe.
- The junction of the strip with the pipe, as well as the places where the fasteners are installed, are coated with a moisture-resistant sealant to completely eliminate the possibility of water penetrating under the strip.
Roof pipe insulation
An adjacent roofing assembly made of flexible tiles is organized in an identical way, but the role of an elastic band in this case is played by a valley carpet or ordinary tiles placed on a pipe.
In the case of metal tiles, the difference in technology will be that the apron used for sealing will be made of smooth sheets of the same color (as the roofing).
Advice!
The upper part of the adjacent chimney apron, located on the roof slope, must necessarily be placed under the roofing material.
In other words, the roofing sheet located above must be laid on the apron with an overlap. Otherwise, leaks cannot be avoided.
Sealing round chimney pipes
Apron cap for round pipe
Modern round chimneys are, as a rule, heat-insulated three-layer structures, the outer pipe of which is made of steel.
A pipe of this type is installed on the roof using ready-made connections made in the form of flat steel sheets that are connected to an apron-cap. The pipe runs inside this apron.
In this case, the roof passage can be made manually using a flat metal sheet.
Such a part can only be rigidly attached to the roof structure, since attachment to the chimney can lead to damage to both elements if the roof shrinks or the pipe expands and contracts under the influence of changing temperatures.
In this case, a special steel clamp with an elastic heat-resistant gasket is put on the chimney, which covers the junction of the pipe and the apron, protecting the joint from moisture penetration under the apron. The installation of the pipe on the roof and the organization of the passage remain unchanged.
The perimeter apron can be covered with segments of lead or aluminum tape, or a ready-made oval-shaped lead part can be used, profiled according to the roofing material. It is important not only to bring the top edge of the apron under the bottom of the above-laid sheet of roofing material, but also to lay the bottom edge of the apron overlapping the top of the laid roofing sheet below.
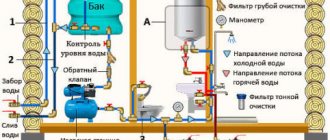
Before installing the pipe on the roof, you will need to mount a heating device, as well as correctly select the cross-section of the pipe.
If the instructions for the device do not indicate the required pipe diameter, it is necessary to select it based on the size of the outlet opening of the device (the cross-section of the pipe must be no less than the cross-section of the outlet). Strict adherence to the prescribed rules will allow you to achieve the desired result, while ensuring the necessary level of safety.
Did you like the article? Subscribe to our Yandex.Zen channel
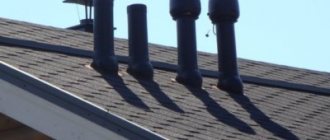
Choosing a location for the chimney on the roof
The pipe should be located near the highest point of the roof
When organizing a penetration for the chimney, it is important to correctly select the location for the outlet channel on the roof. The pipe should be located near the highest point of the roof. In this case, a number of fire safety requirements must be observed:
- cross-sectional dimensions and height are selected based on the advice of the manufacturer of the heating equipment used;
- you need to remember the direct correlation between the height of the chimney duct and the resulting draft force of the unit;
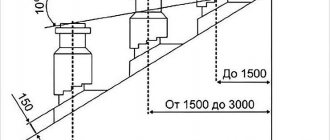
- the channel should end 0.5-1.5 m above the roof ridge;
- in order not to damage the rafter system, the outlet is placed between its components;
- if the pipe will be located low on the slope, you need to make it long to fit into the recommendations regarding the elevation above the roof elements;
- the structure is made up mainly of vertical parts of tubes (horizontal lengths are no more than 1 m).
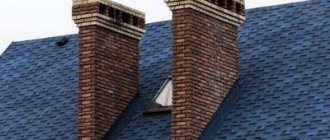
Passage units should not be placed near attic windows, otherwise the wind will blow fuel combustion products into it. At the junction of the slopes that form the internal corner, this is also not worth doing. It is difficult to achieve a good connection to the pipe there. In addition, in winter, snow accumulations appear in these areas. The chimney structure must not be rigidly fastened to the roof: if the latter is damaged, the pipe may collapse. It also increases the likelihood of a fire.
Chimney
The purpose of the chimney is clear from its name. Thanks to it, smoke is removed outside the home. There are GOSTs and SNiPs for stove pipes, containing standards for the dimensions of its cross-section depending on the thermal power of the boiler or furnace, and the height of the pipe from the mouth to the furnace grate.
According to the requirements of the governing documents, two stoves or boilers cannot have a common chimney, with the exception of boilers or stoves located on the same floor and in the same apartment.
The pipe should rise above the roof:
- for a flat roof - 50 cm above the roof level;
- when the pipe is indented from the roof ridge by 1.5-3 meters - at a level not lower than the level of the ridge;
- when retreating at a distance of more than 3 meters, the pipe level is not lower than the angle from the ridge 10 degrees down relative to the horizon.
Read here: Roof construction: construction technology and installation of various types of roofs for a private home
What determines the choice of passage unit design?
Stainless steel pipe, lined with brick, insulated with mineral wool
. What the final design of the passage will be is determined by several factors. The final decision is influenced by the performance characteristics of the heating unit and the roof itself.
Flue pipe material
Most often, these structures are made of refractory brick, stainless steel and other metals. Ceramic and asbestos-cement chimneys are less common. The materials used impose certain requirements on the choice of the shape of the unit.
Fuel combustion temperature
Different types of fuel burn at different temperatures. This influences the raw materials chosen. For example, if you use solid fuel (firewood, peat briquettes, compressed coals), you cannot install a metal pipe.
External finishing of the chimney
The usual practice is to line the pipe with bricks or cover it with plaster. The finishing method influences the design of the unit, since a chimney lined with decorative bricks is heavier.
Type of roofing
It is more profitable to build a configuration with a section shaped like a rectangle or square. For such options, ready-made additional components are produced that are used when arranging the connection with the roof.
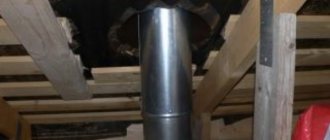
How to install a box on a steel chimney pipe
You can make a steel case yourself or buy a ready-made one. It is necessary to leave a gap of at least 6 centimeters between the pipe and the case in order to make a layer of heat-insulating material.
The choice of thermal insulation material depends on the material of the pipe and casing. It is worth keeping in mind that if the box (casing) is made of polymers, the thermal insulation material should be chosen with the highest fire resistance rating.
After installation, the case can be painted with oil paint. You can also buy decorative parts of different shapes and textures for the box. This is true if you want to significantly improve the appearance of your roof.
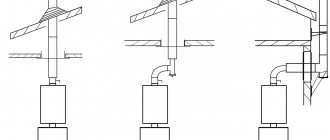
Options for passing a chimney through the roof
When passing near wooden rafters, the wood is treated with fire-retardant impregnations.
To remove the chimney through the roof, you need to make a hole in it. For a brick pipe, its diameter should be 0.25 m greater than the diameter of the chimney. If the roof is made of non-combustible material (for example, asbestos-cement slate), the indicator can be reduced by 3-5 cm.
If the roof is covered with tiles, when installing the penetration it will be necessary to install an additional structural element of rafters and sheathing. Wooden parts must be treated with fire-preventing impregnation and insulated with fire-resistant material - for example, soft mineral wool will do. A safety apron is placed under the tube located next to the ridge beam. If it is removed from the ridge, the apron is placed on the chimney structure on one side, and hidden under the roof on the other.
Proper implementation of the passage of the chimney opening through the roof minimizes the likelihood of fire. When calculating the dimensions of the structure, it is necessary to comply with SNiP standards.