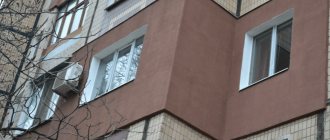
Features of plaster technology for insulation
The advantages of this technology are that it allows you to make the room warm without reducing the internal space. This thermal insulation reduces heating and air conditioning costs, creating a comfortable indoor climate. The method is quite simple and you can do this work on your own, of course, with strict adherence to the rules. Materials used for thermal insulation are affordable, lightweight and do not require additional reinforcement of structures. Facade plasters with insulation can give the exterior an attractive appearance and increase service life. If necessary, they can be easily dismantled. The procedure is difficult to apply only in the restoration of architectural monuments, where the possibilities are limited by the historical appearance of the building.
The method is also called “wet facade”, this involves applying layers of wet compounds and drying each layer. The layer-by-layer structure consists of insulation, reinforcing mesh and plaster with a finishing coating.
A necessary technical requirement is that the materials must be combined with each other; for this purpose, mixtures with a single base composition are used.
The advantages of this technology are that it allows you to make the room warm without reducing the internal space.
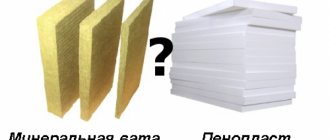
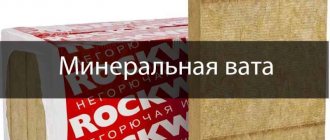
Why mineral wool
Rigid slabs of stone wool are used for plaster.
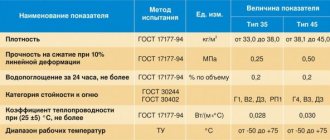
Mineral wool for facades for plaster is produced in the form of slabs measuring 50×100 cm and 60×120 cm, with a thickness of 50 mm, 100 mm and 150 mm. The most popular material among builders is Knauf and Rockwool products with a thickness of 100 mm.
The choice of mineral wool for insulating walls outside under plaster is due to the following advantages of the insulator:
- Low thermal conductivity, providing excellent protection against heat and frost.
- Low density. Provides low weight, which does not create excessive pressure on supporting structures.
- Excellent sound insulation. No street noise will penetrate into the room.
- Fire resistance. The insulation does not burn; in the event of a fire, it will become a barrier to the flame.
- Vapor permeability. The slabs allow gases to pass through well and ensure effective removal of moisture from the building. Mineral wool for plaster can be installed on walls made of wood, brick, aerated concrete and other materials with ventilation properties.
- Biological inertia. The material does not harbor fungus and mold; animals and insects avoid it.
- Ecological cleanliness. Thermal insulation does not emit substances harmful to humans. Caution is only needed during the installation process, when a lot of volatile fibers are released.
- Durability. If you properly insulate the outside of a wooden house with mineral wool under plaster, the finishing will last the entire period of its operation.
- The ability to do the work yourself, as it is not particularly difficult.
The only disadvantage of high-quality Knauf products is their high cost. Wetting and shrinkage occur in case of violation of installation technology, when vapor barrier and reinforcement are ignored.
Choosing material for home insulation
For thermal insulation, polystyrene foam or mineral wool is used. The first is flammable and can become a pleasant place for various fungi and bacteria, therefore it is not used for buildings made of timber, wood and frame panels. Otherwise, the properties depend on the varieties available on the market. It is permissible to lay slabs of greater rigidity and fire resistance around door and window openings.
It is permissible to lay slabs of greater rigidity and fire resistance around door and window openings.
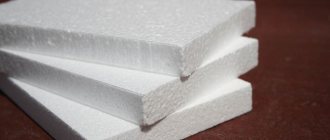
Expanded polystyrene
Depending on the additives, there are different types: penoplex, teknoplex, extrol. All manufacturers guarantee high quality thanks to approved production standards and mandatory certification. Ideal for brick and concrete walls and gas blocks. It retains heat well and is easy to install: even one person can do the job. Reduces costs for air conditioning and heating, is valued due to its environmental friendliness and high resistance to temperature changes, and protects against noise.
The main disadvantage is flammability; it has a high hazard class, which manufacturers reduce with the help of special granules and additives, but even in this case it smolders, creating very toxic smoke. When burning, droplets cannot even set fire to paper, but inhaling such air is harmful. Expanded polystyrene of flammability class G4 is unacceptable to use, as it poses a threat to human life. It is possible to add special fire-fighting agents during installation, but it is better to immediately purchase slabs marked G3. This material will give people time to close their windows and leave.
It is afraid of ultraviolet radiation, so the conditions do not imply long-term storage on a construction site.
It retains heat well and is easy to install: even one person can do the job.
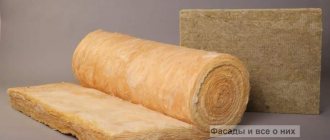
Mineral wool
Breathable and fireproof material. It weighs more than polystyrene foam, so the sheathing must be stronger. It is used on wooden, expanded clay concrete, aerated concrete and gas silicate facades.
The advantages include low thermal conductivity, non-flammability, resistance to deformation and temperature changes. It is not subject to mold, rotting, or decomposition from sunlight. Cotton wool allows moisture to pass through without absorbing it, but during installation it is advisable to add a layer of waterproofing and treat the slabs with a moisture-repellent agent.
When wet, it loses its thermal insulation qualities. Installation is carried out only with a mask, goggles and gloves so that dust does not get on the skin or into the lungs.
The advantages include low thermal conductivity, non-flammability, resistance to deformation and temperature changes.
Types of plasters suitable for insulation work
Facade plasters on insulation protect against moisture, create a ventilated facade system, fit well onto the insulation, level the surface and allow you to create relief compositions. Minimum number of layers: adhesive, leveling and decorative. The method and conditions of application depend on the chemical composition of the mixtures.
Facade plasters with insulation protect against moisture and create a ventilated façade system.
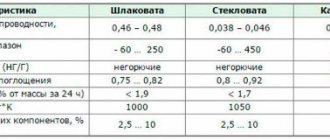
Mineral. The most economical, as they are made on the basis of cement. The additives in the base composition are: sand, talc, chalk, cellulose, titanium dioxide, plant and mineral substances. They have been used in construction for more than 120 years, are not exposed to external influences, are environmentally friendly and have a long service life without repair. They have excellent adhesion, resist mold, but cannot withstand vibration loads. Mixtures should be stored in a dry place and mixed immediately before use, as they set quickly.
The most economical, as they are made on the basis of cement.
Acrylic. Elastic and resistant to any weather and biological influences, with high vapor permeability. It is used in latitudes with high humidity, amplitude of daily and seasonal temperature fluctuations, and is not afraid of solar radiation. Settling dust can be easily washed off with a stream of water from a hose. The main difficulty is the difficulty of application due to the speed of hardening. It is necessary to cover the entire wall without stopping; breaks are acceptable when moving to another plane.
Elastic and resistant to any weather and biological influences, with high vapor permeability.
Silicate. Plastic and porous mixtures based on liquid potassium and sodium glass, are breathable. They are valued for their decorative texture; depending on the added fractions, the structure obtained is bark beetle, lamb and others. They do not crack when shrinking, are designed for extreme temperature conditions, and visually smooth out unevenness. Change color when wet. Application to a large surface area is mainly done by machine; when applied manually, a color gradient is noticeable.
They are valued for their decorative texture; depending on the added fractions, the structure obtained is bark beetle, lamb and others.
Silicone. The most expensive. Due to their plasticity, they are used in areas with large soil movements, as well as when significant shrinkage is expected. Practical for coastal areas, they will not change under the influence of salt air and sun. Thanks to fillers, it can have any texture with a grain size of 1.5-3 mm. It has such high strength and adhesion that removal during repairs turns into a labor-intensive process. Apply to concrete contact primers. Do not work under scorching sunlight; it may crack when setting under such conditions. You can add colors.
Due to their plasticity, they are used in areas with large soil movements, as well as when significant shrinkage is expected.
Plastering the facade, main stages of work
Plastering on facade insulation technology consists of the stages of preparing the base, fastening the slabs, lining with reinforcing mesh and layer-by-layer application of plaster mixtures.
Preparatory work
Depending on the choice of materials, the optimal temperatures for insulating and plastering the facade are in the range from +15 to +30 degrees. It should be remembered that the outer part of the wall begins at a level of 60-70 above the ground; additional waterproofing is applied to the base part using bitumen compounds. The surface is thoroughly cleaned of decorative coatings, washed with water under pressure and dried. Oil or other contaminants are removed with solvents. Conduct a study of voids and differences. Deviations of more than one centimeter are noted with a two-meter ruler.
Residues of enamel and paint coatings are checked for compatibility with the adhesive composition or removed by sandblasting, chemical treatment or annealing. Restore cracks, voids and differences using a screed, after drying, prime. Window and door openings are framed with L-shaped profiles.
Restore cracks, voids and differences using a screed, after drying, prime.
Installation of insulation
The adhesive composition is applied to the slabs using beacons of 8-10 pieces. or stripes, retreating 3 centimeters from the edge, it should cover at least 70%. The stripes along the edges are applied with a dotted line so that there are no air pockets left under the thermal insulation.
They start by gluing the bottom plates from the base level, in horizontal rows. At the same time, bandage the joints as when laying bricks. At least 20 cm are retreated from the joint of the slabs of the previous row. In places where they adjoin structural elements (window openings, columns), open joints of 1.5 centimeters are left, which are filled with waterproof mastic.
During installation, the slabs are pressed with a wooden float. It is important not to allow irregularities larger than 3 mm, because they will be impossible to hide. The dowels are fastened in the middle of the slab and at the joints after a day, when the glue has dried. Wide gaps are filled with strips of insulation.
They start by gluing the bottom plates from the base level, in horizontal rows.
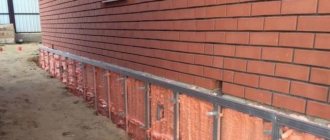
Wall reinforcement
The mesh for plastering the facade over the insulation is first attached to the corners, using plastic fasteners on the insulation or on the plaster with a thickness of at least 2 mm. A perforated corner profile is mounted on the corners.
The mesh for plastering the facade over the insulation is first attached to the corners, using plastic fasteners on the insulation or on the plaster with a thickness of at least 2 mm.
Base plaster layer
After three days, apply the base layer. The method is no different from plastering indoors, with the installation of beacons and maintaining the thickness of the layer. To protect the edges of the corners, corners made of aluminum or galvanized steel are attached to glue. The junctions with structural elements are protected with a perforated profile. The process is carried out strictly according to the beacon map with planned technological breaks.
To protect the edges of the corners, corners made of aluminum or galvanized steel are attached to glue.
How to apply a leveling layer
When plastering walls over insulation, the main layer is applied in this way: the solution is poured between the beacons and distributed from side to side in the direction from bottom to top. The excess is cut off.
The solution is poured between the beacons and distributed from side to side in the direction from bottom to top.
Grinding and expansion joints
Puttying is done in a spiral from a large circle to the center. Thus, a tubercle is obtained in the center which is leveled by the reverse action. The seams are filled with grout and sanded.
For the plinth, the same procedure for plastering the facade with insulation is performed, but after reinforcement, bitumen waterproofing compounds are needed. Additionally protected with asbestos-cement slabs or other materials over which a canopy is formed. The upper edge of the insulation on the pediment should also be covered with tiles or a metal canopy. The gaps are filled with waterproof mastic.
If weather conditions do not correspond to those specified by the manufacturer, scaffolding is built around the house and completely covered with a film that protects from wind and light rain.
The seams are filled with grout and sanded.
A plaster facade with insulation will make your home more comfortable inside and more beautiful outside. An experienced plasterer can easily cope with the task; a person who is far from finishing work will have to learn how to work with power tools and apply the compounds smoothly.
Main stages of installation
When working with glass wool, it is necessary to protect the respiratory system from small fibrous particles.
Insulating a facade with mineral wool under plaster is a simple process that does not require professional skills.
To work you will need the following set of tools and materials:
- roulette, level;
- a knife with a long blade, a hacksaw for metal;
- perforator;
- hammer, screwdriver, plaster spatulas, scissors, marker, stapler;
- paint brush or roller.
- steel profiles, corners;
- Ceresit glue;
- membrane film;
- primer, antiseptic;
- mesh for reinforcement;
- facade plaster on mineral wool, acrylic paint;
- fastening hardware.
When working with mineral wool, a large number of small fibers are released. You need to work in overalls, a mask and rubber gloves. You should purchase a reliable and stable ladder or scaffolding set.
Preparing the base
Soft insulation is secured with brackets, hard insulation with façade dowels.
Carrying out this event must be approached carefully and responsibly, since the walls will be closed without the possibility of access and repair.
The preparatory stage is carried out in the following sequence:
- Removing all objects that protrude more than 2 cm. Cleaning the surface from dirt, dust, oil and grease stains.
- Inspection of the base for the presence of rot and mold. Such areas should be scraped off to a clean layer.
- Surface treatment with antiseptic and deep penetration primer. This will minimize the likelihood of mold and mildew developing.
- Fixing the starting profile on the base. This part will serve as a supporting guide for the first row of slabs, protecting them from the penetration of insects and rodents.
- Marking. It is carried out according to the dimensions of the slabs so that they are secured in a checkerboard pattern.
The end of the preparation of the walls is the installation of a vapor-permeable sheet on them. The fabric is nailed to wood and aerated concrete blocks with staples, and to brick and concrete it is spot glued with quick-acting glue.
Fixing mineral wool
Roll insulation materials are placed in the frame so that the joints fit tightly to each other.
It is advisable to insulate a building with slabs using special through-fixation anchors. This method will allow you to avoid the construction of expensive sheathing, parts of which are cold bridges.
Fixation is carried out in the following sequence:
- Holes are drilled in the wall. Pins are inserted into them onto which the slabs will be mounted. The anchors need to be placed in the corners and in the middle of each rectangle at a distance of no more than 50 cm. In this case, you need to take an adjustment of 3-4 cm in order to install the insulation by surprise.
- Through holes are made in the heat insulators. To help you find them quickly, use a black marker.
- The workpieces are placed on the pins. Immediately after this, they are rigidly fixed with movable caps. To ensure a tight fit of the slabs, you can use special glue, applying it pointwise, in a snake or in a spiral.
- The edges are sealed and the last row is installed. The fragments are cut so that they fit into the openings with force, leaving no gaps.
Finally, the insulation is covered with a membrane film. Its edges are connected to the material previously installed under the slabs and sealed with tape.