What types of plywood are used for heated floors?
Manufacturers produce a large number of varieties and varieties of plywood. Therefore, consumers are asking questions: can it be used for laying heated floors, what types are used? Note that all types are suitable for use in installing heated floors (on logs, on wooden floors, concrete), but the material should be selected individually, for each specific case.
There are five types of material, some of which are moisture resistant. To make grade 1 plywood, veneer is used only from birch, oak, and beech; no knots can be found on it. Such materials are laid on the floor, but their cost is high, and the construction of the floors will be expensive.
For arranging a heated floor, second-rate material is more suitable, but the quality does not suffer, and it will not hurt your wallet.
Step-by-step instructions for installing water heated floors
Before installation, check the condition of the wooden floor; special attention should be paid to the joists. All wooden floors should have natural ventilation, be sure to check that it is working. The fact is that after installing the heating system, the wooden floor elements will only be able to dry on one surface, which significantly slows down the process. At the slightest deviation in the efficiency of natural ventilation of the underground space, the service life of the structure is sharply reduced.
First you need to check the condition of the wooden floor, strengthen the boards if necessary
Preparing the base and laying the contour
Clean the floor from dirt and construction debris. It is not necessary to level the surface and seal cracks; pay attention only to the strength of the load-bearing elements of the structure.
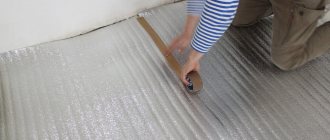
Step 1. Lay a pad on the floor, you can use any, but it is better to buy more expensive foil materials. Due to this, it is possible to slightly reduce heat losses and increase heating efficiency. The lining is fixed with a stapler, the joints are sealed with ordinary or special foil tape.
The wooden base is covered with a foil backing
Practical advice. If the old wooden floor did not have any insulation, then they should definitely be installed. The thickness of the slabs is at least 10 cm.
Step 2: Cover the backing material with slabs. It is recommended to use CSP (cement particle boards), they are not afraid of moisture and have high bending strength. If such materials are not available, then you can use moisture-resistant plasterboards, but we must remember that this is the worst option. Drywall must be primed; it is advisable to repeat the operation twice. This should increase the material's resistance to direct contact with water.
GVL slabs are laid on top of the substrate, staggering the joints
The slabs are laid in a checkerboard pattern, thereby increasing the stability of the surface. They are fastened along the perimeter and two axes with wood screws in increments of approximately 30–40 cm.
The slabs must be screwed to the base with self-tapping screws
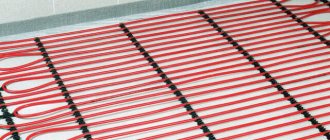
Step 3. Mark the location of the heating system hose. Calculation of the length and distance between turns is carried out using formulas depending on the technical parameters and purpose of the room. Such calculations can be performed by professional heating engineers, and the actual heat loss in each room must be taken into account.
On the floor surface you need to make markings for the water circuit pipes
Step 4. Attach special plastic elements to the plates into which the hose is mounted. They are sold complete with a heating system.
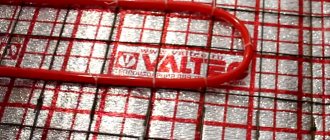
Profile mats for laying heated floors
Step 5. Proceed with laying the heating hose, avoiding twisting and sharp bends. Plastic reacts extremely negatively to stress concentrations; leaks will certainly appear in places where there are kinks.
Lay out the hose according to the markings and fix it to the plates
After all the heating system circuits have been laid on the floor surface, you can begin to prepare the surface for linoleum.
Leveling the base under linoleum
As you know, linoleum requires the most even and very durable surface, because it is a soft material and cannot withstand mechanical loads. In addition, it exactly copies the geometry of the base plane; if there are depressions or tubercles on it, then they will all become noticeable on the front surface. For leveling, it is recommended to use gypsum compounds; in terms of physical strength, they fully meet the requirements of manufacturers of heating systems. Another plus is that gypsum mixtures are much lighter than cement mixtures, which is important in situations with wooden floors as load-bearing bases.
Gypsum floor mixtures
It is recommended to prepare the solution in a large container; it is desirable that its volume is sufficient to knead a whole bag. This not only significantly speeds up the floor leveling process, but also improves the quality of work. Why? The bag is always divided into parts by eye, as a result, in practice it will never be possible to make several batches completely identical. Areas with compositions of different proportions appear on the floor; the mass is not uniform in consistency, which can cause the formation of unevenness. If you prepare a bag right away, then measuring the exact amount of water is not a problem, and the weight of the bag is standard.
The mixing container must be large enough
Practical advice. Before leveling, it is recommended to make a blind area around the perimeter of the room to the height of the pour. It will help control the process in height and prevent the mixture from spreading beyond the heating system. The blind area can be made from sections of slabs; the total height should be approximately 5 mm above the location of the hoses.
Step 1. Prepare the first portion of the leveling mixture. The amount of water can be slightly adjusted based on the actual viscosity of the solution. If the consistency meets the requirements, then remember the mixing proportions and adhere to them when preparing the next portions of the solution.
Prepare a solution according to the instructions
Step 2. Pour it onto the floor, the mass will spread as it goes. Pay attention to how it behaves, whether it spreads well over the horizon. If there are problems, then slightly change the volume of water.
The finished mixture is poured onto the floor
Work very carefully, watch your step - the plastic clips break easily; if damaged, you will have to interrupt the pouring for repairs. This is very bad; according to the recommended technology, the self-leveling floor must be poured without interruption, otherwise the strength indicators will noticeably decrease.
Step 3. Continue work until the surface is completely filled; to level the solution, you can use any available tools with smooth surfaces. Professionals recommend tapping the plastic pipes a little; in this way, air pockets are removed and the floor plane is better leveled.
Distribute the solution over the surface so that there are no voids left
The gypsum hardens in about six hours, and after this time the linoleum can be laid. It is advisable not to rush into this, but to completely install the heating system, check its performance and adjust the heating parameters.
When the leveling screed is completely dry, you can lay linoleum
Advantages of plywood floors
Using plywood material, a good quality intermediate base is made for floor heating. When, for finishing, piece parquet or parquet boards, attached to the rough base with self-tapping screws, are placed on an adhesive mixture, then the addition of sheets of plywood is mandatory.
Professionals advise installing such a “pie” of the floor even when laminate or linoleum is used as a decorative covering. With this position of materials, plywood plays the role of heat and sound insulation.
The general advantages of plywood in the installation of heated floors include:
- Strength characteristics;
- Environmental friendliness of the material;
- Reasonable cost regarding purchase and work;
- The range includes moisture-resistant types for use in rooms with high humidity;
- The material is easy to process and maintain.
The use of plywood for heated floors is not as effective due to its poor heat conductivity. Consequently, the heated floor under the insulating plywood will have to be used at full capacity so that the heat leaks through the wood, and this will lead to increased heating costs. To maximize the effect of the heated floor, it is recommended to choose the appropriate installation option for the structure.
How to choose linoleum
This issue should also be given due attention - the correct choice of finishing coating affects the efficiency of heated floors. Modern industry produces a wide variety of different types of linoleum, and each of them has its own thermal conductivity indicators.
Table. Types of linoleum
| Type of linoleum | Performance indicators |
| PVC | The most common type of coating belongs to the cheap segment. For heated floors, it is recommended to use materials without an insulated base; it reduces thermal conductivity. Disadvantages - when heated, harmful chemical compounds are released into the air. Another disadvantage is that with increasing temperature, physical strength noticeably decreases. |
Colloxylin (nitrocellulose) | A very thin coating, characterized by high thermal conductivity. Disadvantages - unsatisfactory strength, it is recommended to lay it in rarely visited rooms. |
| Alkyd (glypthal) | New material has excellent performance characteristics. For heated floors it is considered the best option; it is approved for use by sanitary organizations without restrictions. |
| Relin (rubber) | The coating is manufactured for limited use in technical premises only. It has a low cost, is easy to install, and can compensate for minor unevenness on concrete foundations. Use in residential premises is strictly prohibited. |
The wrong choice of linoleum can lead to the following negative consequences:
- the color of the front surface changes, areas with different shades appear on it;
- linoleum peels off due to large fluctuations in linear dimensions when heating/cooling;
- when heated, an increased amount of harmful chemical compounds is released into the air;
- the physical strength of the material decreases noticeably.
Incorrectly chosen linoleum may swell and peel off when the surface heats up.
If you have chosen the optimal heating system, the brand of linoleum and checked the condition of the old floor, then you can begin installing the heating system. For example, let's look at two commonly used options.
Important. Each linoleum has a recommendation with the maximum possible heating temperature. In practice, it should be lowered by at least 2°C. Moreover, the indicators should be measured in the hottest places. This is a significant limitation and should always be kept in mind.
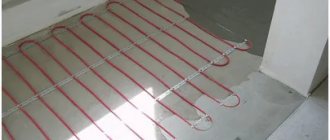
Installation of a heated floor system using plywood
Installation of underfloor heating on a plywood base, in contrast to the traditional installation method, is done without rigid fixation. Sheets of material are secured with this installation method using metal fastening brackets. This makes it possible for wood veneer to expand with increasing humidity, eliminating the appearance of swelling and cracks.
Layout of plywood for heated floors
To install intermediate plywood decking, several methods are used:
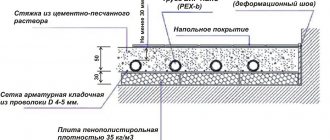
- Material 1.2 cm thick is laid on the concrete screed;
Attention! Plywood sheets are attached to concrete using dowel-nails and adhesive mortar.
- On a base of wooden logs, thick sheets 2 cm thick are used in 2 layers with seams spaced apart;
- Material of any thickness can be used on old wooden floors.
Recommendations from experts on working with plywood in heated floors
The material for the rough covering under the heated floor also determines the subsequent installation method. For example, a plywood base requires the absence of standard dowels.
It is necessary to use brackets for fastening, thanks to which, during thermal expansion, the wood veneer in the plywood sheet can expand without obstacles.
It is especially important to take this point into account in rooms where high humidity is possible - bathroom, shower, kitchen.
In this case, a warm plywood floor can be covered with tiles or stone, and over many years of operation there will be no swelling or loss of decorative material in the floor covering.
Subfloor installation options
In total, it is possible to use several acceptable options for installing a rough coating:
- When installing plywood on a concrete base, the sheets must be 12 mm or more;
- If there is wiring on the floor, pipelines or other communications, it is worth making logs for the heated floor. To make subfloors, you will have to arrange a thin overlap and a 2 cm layer;
- In the case where the base is made of boards or wood flooring, the plywood floor can be made of any thickness. It is important to ensure that there are no creaks or bends
Regarding the adhesive layer, a two-component or alcohol version is considered suitable. You can choose water-based glue, but this is only suitable for an option where high humidity in the room is excluded.
The sheets are laid cut into 4 parts; laying the original sheet is not recommended, since then there is a risk of deformation or excess stress. When installing, the coating should not be placed end to end; the gap should be 4 mm relative to each other and 8 mm to the wall.
As the temperature rises, a slight expansion occurs. Tiled floors themselves are very cold; they need an additional covering made of plywood, which will be more comfortable to use. The owner will find it more pleasant to walk on warm floors than on ice tiles.
Infrared film for linoleum
What to lay under linoleum on a wooden floor? This question is asked by those who have already decided on the coating and base, but do not know which heating to choose. Here, of course, each manufacturer will insist on their product, but you should understand that everything is done with the desire to earn more. These recommendations from representatives of trading companies should be considered as attracting new customers. Most independent experts can say that a high-quality infrared floor would be the best option.
The fact is that the film provides more uniform heating of the finish coating. And this is exactly what linoleum requires. In other cases, it will simply cause deformation. It is worth choosing a system based on the rated power of the device. Infrared film should not emit more than 150 watts per square meter of area. This will ensure the service life of both the linoleum itself and the heating. In addition, the decorative function of the coating will remain at the same level. Stronger heating of the PVC-based coating is fraught with the following:
- swelling of the cladding;
- changing the color scheme;
- release of phenol and other harmful substances into the indoor air;
- softening and ruptures.
To correctly calculate the heating load, it is better to use the services of an experienced engineer. If this is not possible or you want to do everything yourself, then you can use regulatory literature or special calculators for similar calculations.
The nuances of laying laminate over a warm floor
Laminate flooring is laid according to certain rules, detailed in the instructions included with the materials upon purchase. The technology for installing a covering on a heated floor is practically no different from the generally accepted one; the only difference is in laying a rigid support layer of sheet material - plywood or chipboard.
Between it and the laminate, a backing is placed - sheet cork or foamed polyethylene, which serves as a sound insulator. If you refuse the backing, then when you walk, the covering will begin to rumble, which will create problems not only for the people present in the room, but also for the neighbors on the lower floor. These layers, along with the laminate itself, create a cutoff for the thermal energy generated by the heater. The maximum efficiency in this case is demonstrated by infrared structures, which do not heat themselves, but heat the parts located above them. The film raises the temperature of the rigid support layer, which transfers heat to the substrate and laminate, distributing it evenly over the entire area and softening excessive flows, if any.
Temperature limits for a wooden base under heated floors
Any coating or base for electric heating has its own thermal limitations in operation. So, the optimal temperature for a wooden floor is 25–26 degrees. The maximum permissible temperature is 27 °C. This indicator is valid for the floor surface. But you should understand that the sensor is not mounted on the floor, but directly in its structure. Therefore, on the thermostat you should expect the parameters listed in the following table:
From the above data it is clear that for soft species (pine) higher temperatures are allowed, while when using hard types of wood (oak, hornbeam) one should strive for a slightly lower regime.
Important! At an average room temperature close to 20 degrees, a specific power of 80–100 W/m will be sufficient for the floor. In this case, the temperature on the surface of the coating will be approximately 26 °C.
When using infrared heating in a room with poorly organized insulation, the issue of achieving optimal temperature conditions is not extremely pressing. In this case, it is possible to operate heating devices with a specific power of at least 80 W/m2.
Installation of film heated floors
1Installation of a heated floor system
The rules for selecting and installing an electric heated floor differ significantly from the selection and installation of a water heated floor .
1. Selecting a heated floor kit
| Brake film power | 150 W/m2 | 220 W/m2 | |
| Type of repair | Capital, cosmetic | Capital, cosmetic | |
| heating option | comfortable | At least 60% of the area | At least 40% of the area |
| basic | At least 95% of the area | At least 70% of the area | |
| Flooring type | Laminate, linoleum, carpet | Parquet board, carpet | |
| Room type | Not the first floor, not a balcony | All rooms, including the first floor and balcony | |
The recommended temperature is 20-21oC for the room and 24-26oC for the floor. The desired temperature for the room is set by the thermostat. For comfortable heating, the installed power for the entire area should be at least 80 W/sq. m, with the main one - 140 W/m2. 2. Determine the area and configuration of the surface on which you will lay the heated floor.
| When installing a heated floor with your own hands , lay the thermal film only on the free area, i.e. to the area that is not occupied by furniture and appliances (refrigerator, stove, kitchen wall, washing machine, wardrobe, etc.). When installing heating, heated floors should be laid on 75-80% of the total area. Can only be installed in areas that need to be heated. |
3. Lay down heat-reflecting material.
| The heat-reflecting material is laid on the prepared and leveled floor surface. Then the sheets of material are secured with tape. After the surface is prepared, thermal film can be laid directly on it. |
4. Place sheets of thermal film on heat-reflective material
| Cut the thermal film into strips of the size you need. The cutting line is marked on the thermal film (cut space) and is located every 17.4 cm. It is prohibited to cut the film along other lines. Install the contact clamps onto the strip. |
The contact clip is installed on the copper strip (the smooth side of the clip should be inside the thermal film, the other side should be outside on the copper strip). Clamp the contact clamp with pliers or a special tool. Make sure the clamp is tight and there is no sparking. Insulate the cut lines of the copper strip located at the end of the strip of thermal film, for which use short bitumen insulation from the bag. For example, on the thermal film, contact clamps are already installed at the beginning of the strip and insulation is installed at the end of the strip. Lay out the pieces of thermal film over the area of your room so that the copper conductor is at the bottom (turned towards the heat-reflecting material). The front side of the thermal film will be the side where the carbon semiconductor strip is longer, that is, the copper conductor will be at the bottom. The thermal film is unwound on a clean, dry and flat place. It is advisable to lay the thermal film along the length of the room, avoiding damage to it; in this case, there will be more solid strips and fewer connection points for installation wires. Thermal film strips must be secured with tape to the reflective material to prevent it from shifting during further installation of the floor covering. 5. Install the thermostat
| It is recommended to install the regulator close to existing electrical wiring, unless special wiring is required to connect the system. It is installed on the wall, in the most convenient place for the user (near the sockets), so as not to interfere with the further arrangement of furniture, kitchen installation and installation of household appliances. |
The regulator can be installed permanently, as an electrical outlet for hidden or external wiring, or connected to an existing outlet using a cord. 6. Lay out the installation wires and determine where to strip the insulation. The thermal film is connected to the network in parallel, that is, all installation wires are connected on one side of the room. The kit includes wires of two colors. One wire color is connected to only one end of each strip. Position the wires so that the main wires run under the baseboard. If you want to make the connecting cable hidden, you need to cut a channel in the wall; if you want to make it external, use a decorative mounting box. 7. Connect the thermal film to the wire
| Remove the insulation where the thermal film is connected to the tip. Bring the bare wire to the terminal and clamp it tightly using pliers. |
8. Isolate connections
| Each strip of thermal film includes 5 pieces of insulation. Use 2 pieces for each connection. One piece is attached to the outside, the other covers the inside of the thermal film and the tip with the wire. The fifth section is used to insulate the copper busbar. Thus, we obtain electrical insulation and waterproofing of the connection. |
9. Connect the connecting wires to the thermostat.
| The wiring diagram is indicated on each thermostat. |
10. Install and connect the floor sensor to the thermostat. The floor sensor is installed under the thermal film closer to the thermostat and is attached to the black strip of the film using tape. To level the floor under the finishing coating, make grooves (recesses) in the heat-reflective coating under the floor sensor and the wire connections. 11. Connect the thermostat to the electrical network. The connection of the thermostat and power supply from the electrical network must be carried out by a qualified electrician. Be sure to consider additional electrical devices that may be connected to the same network. For a system with a power of 2 kW or more, we recommend connecting through a separate circuit breaker with a power of at least 16 A. 12. Test the heating system. Turn on the system and set the floor temperature. Check the heating of each strip of thermal film. Check with a tester the connection points of the installation wires, as well as the insulation along the cut line. 13. Lay the finishing floor covering.
Lay the laminate or parquet board over the plastic film according to the instructions
Lay the protective material (fibreboard, SML, hardboard, plywood) on top of the polyethylene film. Apply double-sided adhesive tape specially designed for laying soft floor coverings onto the protective material. Lay the floor covering on it. |
14. Installation of the heated floor is complete, turn it on and enjoy the warmth.
| All information provided is advisory in nature. When installing, connecting and servicing electrical devices and/or circuits, contact only properly trained and licensed professionals. |