Why do they insulate?
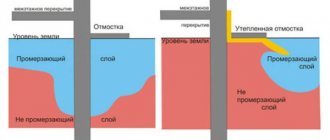
A significant portion of the cool air enters the room through the foundation. Therefore, the designs of many houses are built in such a way as to raise the floors above the ground level.
Warm, heated air rushes upward. When the roof is not insulated, heat leaks out, melting the snow on the roofs. And the room is filled with cold air, which penetrates through the floors of the building. Based on such considerations, the question of whether it is necessary to insulate the foundation seems inappropriate. If the walls are in frozen ground, the room will have to be constantly heated.
How to protect the base of a building from the cold?
Builders use various options for foundation insulation. Some of them have been known for a long time, others began to be used after the invention of new thermal insulation materials.
It is more effective to insulate before pouring. However, if the structure has already been erected, the finished one can be insulated. For most buildings it is poured with concrete. This material has very high thermal conductivity. In summer, concrete heats up, in winter it cools. Using thermal insulation, it is necessary to reduce the contact of concrete with the ground to a minimum.
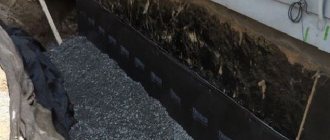
Insulation usually also involves waterproofing work. If the foundation of the building is constantly located in a humid environment, it is necessary to limit the access of moisture to the living quarters.
Sometimes it is necessary to install special drainages to remove water from insulating structures. For drainage, pipes are installed with a slope of five percent. The pipes are placed on a bed of gravel. Excess moisture, thanks to the drainage device, will accumulate and then flow into the sewer or well.
Basic Concepts
Due to the fact that in my case there was both the construction and insulation of the foundation from scratch (during new construction), and the insulation of an existing (old part) of the house, then to understand the specifics of the work in a given case, we will give several definitions.
The foundation of a house is the supporting structure at the bottom of the house, located in the ground under the load-bearing walls of the house.
A shallow foundation is a special foundation design that provides for its construction at a shallow depth (above the depth of soil freezing) and the adoption of a number of additional measures to ensure its reliable operation.
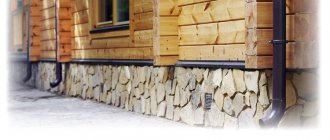
Plinth is a part of the foundation structure located above ground level.
Backing - in the case of a columnar foundation, the space between the surface of the earth and the walls of the house, resting on the columns, along the perimeter of the house is protected by a special structure. The implementation can be different: panel structures, brickwork, etc. For example, in the old part of my house, the frame was installed on oak columns (columnar foundation), and the space between the lower crown of the frame and the ground was closed along the perimeter with a wall cast from slag concrete. The height of the existing fence is 90 cm, thickness is 50 cm. Additionally, on the inside of the underground, internal rubble (a mixture of sawdust and slag) about a meter thick was installed around the perimeter. I thought about the problem of “felt boots” for the house when I was faced with the fact that in the old part of the wooden house, despite the fairly solid and warm construction of the fence and internal fillings, the floors in the house were still cold in winter. The question arose, why? And what to do to correct this situation?
Ground
Our ancestors solved the question of how to insulate the foundation in exactly this way. A layer of earth or sand was poured around. So much earth was poured in that it reached the floor level. The basement and the foundation itself were underground.
Soil insulation is carried out before the construction of the house begins. It is imperative to provide a ventilation shaft for the basement.
Advantages:
- when insulating with soil, you don’t have to buy insulation;
- the house will not freeze through the basement.
Flaws:
- large volumes of earth and sand will have to be leveled;
- soil is a weak heat insulator;
- the foundation walls will let cold into the room, but in smaller quantities.
Expanded clay
To figure out how to properly insulate a foundation, we will describe how a popular insulation material, expanded clay, is used. Sometimes builders combine insulation with soil and expanded clay.
Expanded clay is a porous material. A small layer of insulation will help keep the room warm.
Advantages and disadvantages
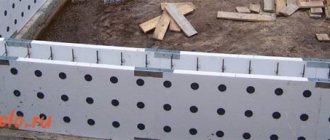
How to insulate a foundation with expanded clay:
- at the pouring stage, we install wooden formwork next to the future foundation;
- a mixture of concrete and expanded clay is made;
- the prepared mixture is poured into the formwork.
Disadvantages of this insulation:
- concrete that is mixed with expanded clay will still conduct cold.
Sometimes slate sheets are used as formwork. Expanded clay is a fragile insulation material. If you insulate a floor with expanded clay, you will have to place a layer of mineral wool on top. The cotton wool will have to be protected with a waterproofing film.
Materials and technologies for foundation insulation
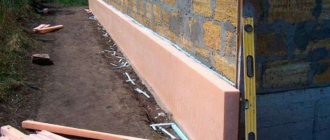
It is most effective to lay horizontal thermal insulation at the level of the base of a shallow foundation. Vertical thermal insulation should cover the entire foundation from the base to the top of the base.
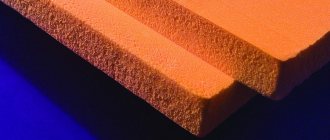
The best options for heated buildings are technical solutions based on extruded polystyrene foam, taking into account existing SNiP standards:
- 52.01 – structures made of reinforced concrete;
- 23.01 – climatology in construction;
- 12.01 – organization of construction;
- 3.04.01 – coatings for finishing, insulation;
- 3.02.01 – foundations, foundations, earthworks;
- 2.03.11 – anti-corrosion protection of structures;
- 2.02.01 – foundations of structures, buildings;
- 2.01.07 – impacts, loads.
For cottages, the following thermal insulation scheme for MZLF tape is recommended (according to the manufacturer’s terminology, TFMZ is a shallow warm foundation):
- vertically placed expanded polystyrene slabs on the surface of the tape at least 1 m up from the sole;
- a horizontal layer of the same material along the perimeter of the sole;
- backfilling with non-heaving materials, the thickness of the sand cushion is twice that of the gravel backfill located on top of it;
- protection of the heat-insulating layer with a blind area made of waterproof material (extends 10 - 20 cm).
This option is suitable both for floors on the ground with a heat insulator inside the screed, and for floors on floor slabs. In unheated buildings, it is recommended to place a heat insulator under the base of the foundation along the entire perimeter. In this case, insulation sheets are laid in the formwork on top of a non-metallic material cushion before pouring or installing FBS blocks.
In addition to reducing tangential swelling forces, this technology almost completely eliminates the lifting of the belt by soil. In many modern projects, around the heated premises of the cottage there are extensions without heating - terraces, garages, verandas. When thermally insulating a building, this must be taken into account by laying XPS under the entire perimeter of these premises. Otherwise, the tape may break at the boundaries of these rooms due to uneven subsidence/rise.
Country houses and garden dwellings for seasonal or temporary use can be built without a project. Therefore, errors when insulating the base occur here more often. Experts recommend equating these buildings to unheated ones and laying a thermal insulator under the entire perimeter of the tape. In this case, lateral gluing of the vertical surfaces of the foundation underground is not effective; the owner will receive nothing except the expense of funds.
Thus, it is recommended to lay drains after the construction of the foundation strip, lay out a horizontal layer of thermal insulation, and mount polystyrene foam on the outer surface of the MZLF. After that, fill the trench with sand (layer-by-layer compaction every 10 - 20 cm), crushed stone, make a blind area from concrete, paving stones, and other waterproof materials. If you have a limited budget, you can process at least the corners of the cottage using this method.
Cold bridges occur when the integrity of the heat insulation layer is damaged. If basalt and glass wool, due to its high elasticity, independently fills the cracks in the joints of the slabs, then for extruded polystyrene foam they must be foamed.
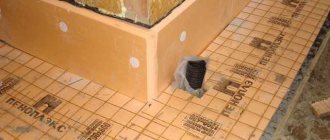
The insulation layer is not able to fully protect concrete structures from moisture. Therefore, pasting with a heat insulator is carried out after waterproofing the structure. EPPS is protected from lumps, large debris, and other mechanical damage by dornite and geotextiles.
Manufacturers of this type of nonwoven fabric often advise laying it down before backfilling the sand bed. It is strictly not recommended to do this, as the efficiency of compaction of the lower layer is reduced. Sand cannot penetrate into the soil, dilute the heaving soil, and movement is possible even if the technology is followed.
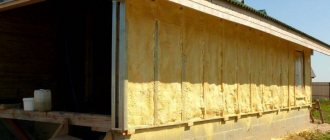
Mineral wool is usually used in ground wet or ventilated facades where increased fire safety of structures is required. Underground, this material gets wet more easily and loses its thermal insulation properties by 50–70%. It is more difficult to work with soft insulation when gluing vertical surfaces (additional fixation with anchors is required).
Environmentally friendly insulation materials cost at least twice as much as polystyrene foam; there is no point in “burying” the increased construction budget. Therefore, the following materials are most in demand in MZLF thermal insulation technologies:
- URSA, TechnoNIKOL, Penoplex, Technoplex - extruded polystyrene foam boards;
- PS – pressed polystyrene foam from foreign companies;
- PSB-S, PSB - a product of Basf.
The developer can choose any of these insulation materials depending on the budget and characteristics of the materials.
Expanded polystyrene
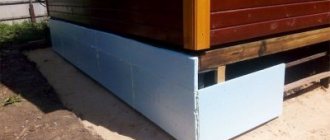
Expanded polystyrene is now used for insulation everywhere. The material is produced in sheets that are easily attached to any surface. Expanded polystyrene is not destroyed by moisture and has low thermal conductivity. Let's see how you can insulate the foundation with polystyrene foam:
- We apply waterproofing to the finished foundation walls;
- We fasten the sheets of expanded polystyrene, laying the bottom plates first.
It is believed that insulation from the outside is more effective. However, if the house has already been built, you can insulate the building with polystyrene foam slabs from the foundation side.
To attach polystyrene foam boards, you can purchase special glue. When insulating a building with expanded polystyrene, we must not forget about waterproofing.
Non-heaving soil type
Testing the soil is an important stage in a builder’s entire work. Before you directly build the foundation for a house, you need to know what heaving is. So, non-heaving soil is a soil that is not subject to frost heaving. Heaving includes such a concept as the degree of heaving. It shows how much soil can expand in volume as a result of freezing at low temperatures.
This indicates that when the ground freezes to a depth of 1 m, the soil increases in size by less than 1 cm.
Why does this phenomenon occur? It's quite simple. During the cold season (autumn or winter), the water that is located directly in the soil begins to freeze, turning into ice. According to the laws of physics, ice has a lower density than water, so its volume increases. This is called heaving. The soil, increased in comparison with the initial state, can exert great pressure on the foundation and change its location, the same applies to the entire building. In addition, moisture that gets directly into the foundation itself can gradually destroy it and render it unusable. All this is typical for heaving soil. For non-heaving soil, everything is different.
What about a wooden house?
Most often, the foundations for wooden houses are insulated with expanded clay or polystyrene foam. We pour expanded clay into a special formwork, mixing it with concrete. Foam boards can simply be glued to the foundation walls, providing waterproofing.
The simplest and most effective method of insulating the foundation of a wooden house is to spray polyurethane foam. No additional work or separate waterproofing is required. Using a special gun, we spray insulation onto all surfaces. Polyurethane foam dries instantly. It forms a smooth surface impenetrable to cold and moisture.
If polyurethane foam was applied to the outside of the building, it should be covered with other materials. The insulation is afraid of direct sunlight. We glue a mounting mesh onto the layer of polyurethane foam, onto which leveling plaster can be applied.
How to properly insulate the blind area around the house
The blind area protects the foundation not only from erosion, it can also eliminate the effects of frost heaving of the soil, if, of course, it is properly insulated. At the same time, regarding the insulation of the blind area, a fairly large number of questions arise that need to be understood
An uninsulated blind area protects the foundation from softening the soil underneath; however, clay has the ability to accumulate moisture. In winter, when ground temperatures drop below freezing, the clay expands, putting pressure on the foundation. The forces of both lateral and extruding frost heave act, which causes the effect of torsional and bending loads on the foundation.
Construction of an insulated blind area: 1 - shallow foundation; 2 — insulation of the foundation EPPS 50 mm; 3 - geotextiles; 4 - sand bedding; 5 - waterproofing; 6 — EPPS 100 mm; 7 - reinforced concrete blind area; 8 — paving slabs; 9 — finishing of the base
In most cases, frost heaving does not pose a threat to the structural integrity of a concrete structure. However, the foundation has non-zero elasticity and is capable of deformation within certain limits.
The problem is that soil heaving is always uneven, which is why the reaction of the support becomes concentrated, bending the concrete base. At the same time, the walls and decoration of the house become covered with cracks.
If you limit the outflow of heat from the soil by placing a heat insulator under the blind area, the temperature of the soil near the foundation will be maintained positive, thereby eliminating the destructive effects of frost heaving.
In what cases is insulation not required?
It makes no sense to build an insulated blind area only for pile-grillage foundations, which are protected from the effects of frost heaving by other methods. In other cases, insulation is recommended for shallow and normally buried strip and slab foundations, and especially for houses with a prefabricated basement.
There are, however, a number of exceptions. For example, if the foundation rests on a layer of soil located below the freezing depth, only the lateral forces of frost heaving will act on it, which can be neglected if the rigidity of the concrete structure is sufficiently high. However, if the basement floor is heated, overcooling the walls can cause condensation to form on them, which is why insulating the blind area is highly recommended.
Is it possible to insulate a soft blind area?
Bulk and paved blind areas that do not have sufficient rigidity can also be insulated. There is no difference in what is located above the insulation - a concrete screed, a gravel embankment or a bulk paving slab base. You just need to ensure that the drainage layer is thick enough to distribute the pressure on the insulation from passing loads. In most cases, a shock-absorbing layer thickness of 10–12 cm is quite sufficient.
When installing an insulated soft blind area, the main waterproofing is placed on top of the insulation and is separated from it by a compacted layer of sifted sand. At the same time, in cross section, the thermal protection belt has an L-shaped profile and is lowered onto the wall of the drainage channel along with the waterproofing.
Foam plastic
We told you how to insulate the foundation. If there is a basement under the house, its walls also need to be insulated. A warm basement will reduce the flow of cool and humid air into living spaces. What to do for this:
- we prepare the basement walls, clearing them of debris and fallen plaster;
- We cover all the unevenness of the wall with mortar so that the slabs fit perfectly to the surface;
- lubricate the foam boards with special glue;
- glue the slabs starting from the floor;
- We additionally fix the insulation boards with plastic dowels;
- glue a mesh onto the slabs and apply a leveling mixture to it;
- finishing materials can be attached.
It is very important to insulate basements from moisture.
How to insulate a basement from excess moisture
The basement should be dry. If moisture seeps through the walls, all insulation efforts will not bring results. Another problem is condensation. Moisture, unable to find a way out of the basement, condenses on the walls and ceiling. Mold or mildew may appear.
In a humid environment, many insulating materials lose their characteristics and become useless. For example, wet mineral wool does not prevent cool air from entering the room.
How to properly insulate the foundation and basement to avoid excess moisture? It is very important to provide ventilation holes in the basement. When there is an influx of fresh air, moisture will be able to leave the basement.
If there is high humidity in the basement, you can insulate its walls with insulation that does not react to moisture. You can use special equipment to cover the entire basement with a thin layer of insulating foam. This material instantly swells and forms a smooth surface that does not allow moisture to pass through.
What else do you need to remember?
Ready-made plastered wall
To prevent it from happening that you were tormented with placing beacons and plastering and, it seems, even received smooth walls as a reward, and then all this beauty fell off along with the wallpaper (or even worse - tiles), use the recommendations of professionals:
Before installing beacons and plastering, it is necessary to remove any type of contamination from the walls: remnants of old mortar, construction dust, traces of grease - all this negatively affects the final result of the repair. Before starting work, treat the surface with an antiseptic solution.
It is especially important to do this in rooms with high air humidity - over time, mold or fungus may form under the layer of plaster. To reduce the consumption of plaster, even before installing the beacons, a layer of primer is applied to the walls - this does not improve the “adhesion” of the mortar to the base, but it also slightly levels the surface, which makes it possible to more objectively determine the degree of unevenness of the walls. Do not forget that each additional layer of plaster “steals” the area of the room - try to choose the thickness of the lighthouse in accordance with the “needs” of your walls. If leveling the surface in one layer does not give the desired result, apply a second layer of plaster. But do this only after the previous one has completely dried.
It may seem to you that plastering walls is an insurmountable obstacle for a non-professional. But this is only “in theory” - in practice everything is much simpler: looking at your walls, you will understand where to place the beacons and how to plaster the surface in the best way.