Kitchen
A kitchen hood is a type of household appliance that eliminates unpleasant odors and removes combustion products, grease and other particles from the air.
Often, when renovating and remodeling a kitchen, an old hood is no longer suitable in size or appearance. In this case, a homemade hood can help, which anyone can do.
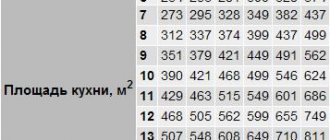
How many appliances are enough in the kitchen?
They are safe, adapt to your space and style, and are easy on your pocket. Meet our, microwave ovens, microwave ovens. If you also like a healthy lifestyle, having a kitchen that allows you to cook to your taste and efficiently is a plus. Study the space in which you are counting. If you have what it takes, choose devices that have features e.g. Can give you the capability you are looking for and fit into small spaces.
What you need to know before work
Before you start developing a homemade kitchen hood, you need to understand exactly how such a device functions, look at photos of ready-made models online to choose the best option for yourself.
Not everyone knows that there are types of devices that do not simply extract exhaust air, but process it with special filters, releasing it back in a purified form. Some models simply remove the air mixture from the kitchen through the ventilation system to which they are connected.
But if your kitchen is medium or large, you have no problem and make your life easier with our entire range. They're built to last for years and are very energy efficient, so save yourself the guilt and skip the dishwasher or a nice refrigerator or microwave!
Range hoods have the design and technology to cook food without worrying about smoke or odors. Our removable, integrated or traditional island decorative hoods adapt to all spaces and designs. Discover a huge catalog of powerful, quiet and low range range hoods that will also be impressive in your kitchen.
Therefore, the first thing you need to do before developing hoods with your own hands is to make sure that the ventilation system in the house is working properly.
If the ventilation is dirty, the draft force will be reduced or may even be absent altogether. As a result, the hood will not be able to perform its functions. Therefore, before starting all work, it is important to clean the air mixture exhaust system from the kitchen.
From 40 to 120cm wide, 44mm high and in a range of stainless steel or glass finishes, at Teke we have the hood to suit you best. Perimeter suction system that eliminates smoke and root odors and a recirculation function that does not require a chimney. Models with remote control and motorized opening, anyone give more? They're super easy to clean, with anti-fingerprint stainless steel, removable filters that you can wash in the dishwasher, and keep vent-free systems to prevent grease buildup.
- Huge range of sizes.
- With suction programming and automatic shutdown.
- So you don't have to worry about anything other than cooking.
- You will hardly notice if they are working because they are very silent.
- They have sound-absorbing panels that reduce noise and vibration.
You'll find a variety of shapes and sizes to suit any space, with eye-catching designs in stainless steel or white or black glass that you'll fall in love with.
When plastic window structures with high tightness are used in the kitchen, special ventilation valves should be installed on them, otherwise the operation of the hood will be low in efficiency.
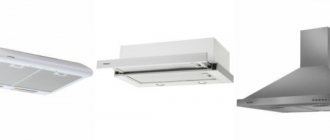
A DIY kitchen hood can be one of two types:
- active;
- passive.
Passive-type models remove the air mixture from the room only due to upward draft, since they do not have any fans or electric motors. As a result, a self-made hood of this type can only work if the ventilation is in excellent condition.
Video - installation of a kitchen hood
At Teka you will find the decorative bell your kitchen needs.
Models that allow you to extend your extraction area when you really need it and remain invisible the rest of the time. The kitchen stove is an indispensable product for cooking in good conditions. And because every cook is different, the hood comes in many models: Filter Unit, Range Hood, Corner Hood, Center Island Hood, as well as Decorative Hood Wall, Retractable Hood, and Worktop Hood or Hood Our catalog contains over 500 items from the industry's leading brands ! Active hoods operate thanks to an installed electric motor. Such models are highly efficient, but consume a lot of electricity.
How to make an exhaust filter with your own hands: operating principle and step-by-step guide
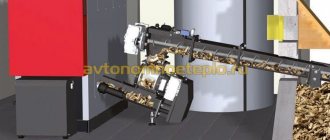
Filtration of air from harmful vapors, carbon monoxide and various odors is important in any ventilation system of industrial enterprises, medical, administrative and public institutions and residential complexes. For large areas, industrial carbon filters with high performance are used for cleaning. But what about residents of private houses and cottages? Buying equipment is expensive and requires professional installation. You can make a carbon filter for your hood with your own hands, the main thing is to know the principle of operation and its features.
Required materials and tools used
The next stage of the process, the result of which will be a do-it-yourself kitchen hood, is preparing or purchasing all the required tools along with materials. Among them:
To eliminate unpleasant odors in the kitchen, look no further than a powerful and efficient range hood. A good kitchen hood makes a difference. This place should never allow itself to be interjected other than the smells seasoned, uplifted and pleasant by good cooking.
And, in addition, you can combine functionality with aesthetics, choosing designer hoods with the most beautiful effect. There are several models to consider, such as a center hood island that sits in the middle of the kitchen, open above your countertops and other kitchen furniture. This type of American style kitchen makes the misfortune of the moment, their opening promotes a meeting and conviviality.
- sheets of plasterboard, characterized by increased resistance to moisture;
- profiles with galvanized surface;
- perforated corner;
- corrugated pipe;
- fasteners;
- insulating material for corrugation;
- paint and putty, spatula and brushes;
- hammer drill and screwdriver;
- corner covers.
Sequence of work
If your kitchen is more conventional and your space is smaller, then a decorative hood will surely fulfill most of your expectations. Always also designed and easy to use, it is replete with very nice functions. Multiple electronic controls provide control of suction speed, with a boost function to speed up the capture of unwanted flavors. Lighting also gives your stove a little more visibility and gives you more control over your work.
Finally, it is very important to note that current models make it much easier to replace lube filters. Changing a clogged or time-consuming filter is no longer a chore with modern hoods. They are compatible with most devices sold in this department! You are sure to find a device that can meet your expectations and your budget.
After preparing all the required materials along with the tools, you can begin to carry out the necessary work. Their first stage is marking the future device and its air duct on the walls of the room. The simplest option is when the ventilation hole is located directly above the hob. If it is somewhere to the side, it is also necessary to develop a box for decorating the corrugation.
Choosing a design or a fume hood?
Need a built-in fume hood with efficient evacuation and recirculation systems?
Although the main function of a hood is suction, it is important to choose a range hood that suits the style of your kitchen, then look for a range hood or a stainless steel range hood. The color and style will vary greatly depending on the decor of that room, for example a gray or black hood with a modern finish is ideal for a modern kitchen. On the other hand, if your kitchen has a classic, rustic wood decor, we recommend a classic, white or colored matching cabinet. If the kitchen ceiling is finished with plasterboard, the air duct can be partially decorated with it.
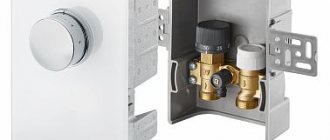
The next step requires making a frame to accommodate the air duct using galvanized metal profiles. They are mounted where the air duct will pass in the future, using anchors. If the pipe is not straight, the profile will need to be installed with bends in the required places. The initial profile - the starting one - is installed downwards in several parts, securing them with self-tapping screws.
What does a homemade kitchen hood consist of?
Side pots and pans, not height.
The unpleasant odors and unbearable noise of the exhaust hood are gone; the silent exhaust hood will remain unnoticed while functioning effectively. If you cannot stand the noise emitted by the motor of this unit, we recommend that you purchase a model that does not exceed 30 decibels. Whether equipped with metal filters or carbon filters, the hood is equipped with a high-performance extraction system. Please review the information available on our product sheets before purchasing. There is a lot of information available. We indicate the exact dimensions as well as the power of this device. The number of speeds is indicated. You will be able to adjust the evacuation speed to suit your cooking, whether the heat is low or steady. You will also find the sound level and energy class.
The next stage is the completion of the arrangement of the plasterboard box. To do this, a second panel is installed on the already finished parts. Upon completion of the development of the lower part, transverse strips are installed on top of it, later they will be sheathed with sheets of plasterboard.
At the fourth stage, you need to make the body of the future hood. Above the stove, the lower part of the exhaust device, made of a profile, is installed on the wall. The task will be greatly facilitated when a niche is provided for the device. If it is not there, then the lower side of the hood should also be attached to the sides from the sides. The main components of the hood are made from a profile, attaching them to the bottom. To give the structure greater rigidity, it can be reinforced with jumpers, which are also made from a profile.
Our buying guide is also at your disposal to inform you of the important points. In addition to the volume mentioned above, you should also consider the type of evacuation. The most effective is external extraction. Oil vapors, water vapors and unpleasant odors are sent outside through the air duct. If you are unable to drill into the wall to install this hood model, we recommend using a recirculating device. These models have a carbon filter that you will need to replace every six months to ensure its effectiveness!
To prevent unnecessary noise during operation of the hood, the pipe must be wrapped in high-quality soundproofing material.
The last stage is finishing the device. To do this, the hood body and the duct with the air duct are sheathed with sheets of plasterboard. Next, a layer of putty is applied to it, which will hide the seams between the sheets and fasteners. After this, all that remains is to paint the hood and the box; you can also decorate them instead.
To help you with your purchase, read our customer reviews. After ordering their fume hoods from our online store, they impartially rated these filtration units, taking into account various points such as installation, ease of use, lighting power, sound level or unit efficiency.
Making a kitchen hood with your own hands: plasterboard hood
High quality, reliable and high performance hoods are available: unbeatable brands at unbeatable prices, all you have to do is enjoy! Lubricant filters are a very important part of the functionality of a hood, but most of the time we don't think about it. Neither when purchasing a hood, nor when installing it at home.
This type of design is suitable for both passive and active exhaust devices. In the second case, an electric motor must also be installed inside the device body, connected to a grounded outlet. It will create a strong draft that will quickly remove waste air from the kitchen.
Properties of coal for eliminating odor
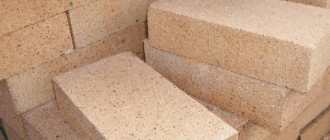
The easiest way to deal with unpleasant odors is with a carbon filter, but its performance depends on many factors:
- Size. Coal can be of different sizes, but for filters it is better to use large fraction granules.
- Best before date. Activated carbon has a certain service life, after which the filtering qualities will be greatly reduced.
- Replaceable blocks. When buying ready-made filters, it is better to give preference to designs with replaceable carbon blocks. Such devices will last longer and provide clean air in the greenhouse without extra costs.
- Coal quality. High-quality coal is the main component of successful filtration, so when choosing a filler you need to pay attention to what the coal is made from and what characteristics it has.
To produce activated carbon, wood, coal or bitumen coal, as well as coconut and even walnut shells are used.
True, the latter are extremely rare for sale. The most common and popular varieties are:
- Australian, rc4\8. The material has a large number of pores, thanks to which it perfectly absorbs and retains unpleasant odors.
- Australian, ckv3 and ckv4. A more budget-friendly option with a less porous structure and a weak absorption effect.
- Pressed. It also received a second name - molded. The Russian market is represented by options from German and domestic manufacturers. It is harder than previous brands, has a modified pore system, and copes well with the task of absorbing odors.
- Coconut shell charcoal. Very durable, finely porous, copes well with the problem of unpleasant odors and absorbs microscopic fractions of dust.
In addition, manufacturers indicate the pore size of the carbon. They can be of three types: micro-, meso- or macro-. The first type with small pores is more suitable for filters.
Features of frame development
However, it is important to keep the grease filters clean: regular maintenance is important to maintain the efficiency of your hood. You should also be aware that there is a fire hazard if there is grease in the filter. Some home fires are caused by exhaust hoods - one of the main reasons is lack of maintenance of the filters.
Installing a hood in the kitchen with your own hands
To maintain your metal oil filters, you can either wash them by hand, as some hood manufacturers recommend, or put them in the dishwasher, which is much more efficient. Place them in the bottom compartment of the dishwasher and run the machine at 65 degrees to dissolve the grease. It is advisable that you only place the filters in the machine, otherwise - take a greener gesture - place them, for example, in slightly dirty glasses.
To make the appearance of the finished device attractive, you will need to perform the following work.
Assemble the main body of the device, installing a grille and, if necessary, an electric motor on its lower part. If at the initial stages of work the structure does not look very attractive, do not worry - the cladding will qualitatively hide any unevenness.
How the hood works
The metal lubricating filter is relatively expensive, but with regular maintenance it has a consistent lifespan.
Attention, a hood in a lower price range may have a synthetic fiber filter instead of a metal filter. The latter must be replaced on a regular basis: it must be remembered, done and accepted as a recurring cost. Carbon filters are intended only for “recycling” hoods. If you don't have an exhaust pipe, you can't install one from a hood or vent. An alternative to this type of hood is a recirculation system that returns ambient air and filtered air to the kitchen.
Next, the frame is attached to the base; everyone chooses its shape independently, depending on their own preferences. The main thing is that the air duct pipe must be placed inside. In this case, you can look at ready-made ideas in photos from the Internet or do everything yourself.
Finishing parts are cut out from the selected material and used to cover the frame. After the glue has dried, the surface of the material is sanded and a layer of putty is applied to it. After it dries, all that remains is to paint the finished hood, made by yourself, in the desired color.
As in a fume hood, an aluminum filter is used to remove some grease. To remove odors with the hood installed during the disposal process, there is a carbon filter that needs to be changed every 2-6 months. But after 10 well-cooked meals, the effectiveness of the carbon filter was halved. The big downside: Almost all users forget to change the carbon filter due to its price, and it's rarely a priority in everyday life - the recycling hood is becoming less and less efficient at all levels.
- Keep in mind that the recovery hood is useless for removing vapors!
- The frequency depends on the type of food you prepare and the frequency with which you cook.
Please note: Most fume hoods can be installed in either evacuation or recirculation mode.
Having done everything correctly, you will make a high-quality and functional hood with your own hands, which will not only do its job perfectly, but also have an attractive appearance.
Thus, the process of developing a hood with your own hands does not imply anything complicated, so anyone can do it themselves. The result is a functional exhaust device that will have a completely original appearance.
What do you need to know for ventilation to work effectively?
It should be noted that some manufacturers pre-assemble the carbon filter.
This means you must remove it in case of a build for extraction. We have seen several cases where a consumer complaining about poor hood evacuation realizes that it is due to the presence of a pre-assembled carbon canister they were not aware of. If the hood is rotating with a carbon filter that becomes increasingly oily, it can also affect engine life in both extraction and recirculation mode. Quite often, when remodeling a kitchen, we are faced with a problem: the kitchen hood either does not fit the dimensions of our set, or does not fit into the design of the kitchen at all. The solution in such a situation could be a homemade kitchen hood - and even though its creation will require us much more time than installing a factory hood, but as a result we will get a device that ideally meets all our requirements!
In this article we will tell you how to make a hood in the kitchen yourself, and we will provide two fairly detailed instructions for making it yourself.
General information about kitchen hoods
Before moving on to considering the proposed options for manufacturing devices for removing “exhaust” air from the kitchen, it is necessary to understand the very principle of operation of the hood.
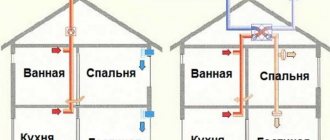
As the name implies, a kitchen hood forcefully “pulls” hot, polluted air from the kitchen—or rather, from the space above the stove—and then removes it from the room.
As a rule, the air is removed into the ventilation ducts of the building - which is why, when buying or making a hood, you must first of all take care of the proper state of the ventilation of the house. If there is no draft in the system (and this happens when the ventilation has not been cleaned for a long time), then the efficiency of the hood will be extremely low.
In order for air to be removed as efficiently as possible, it is necessary, along with proper ventilation, to ensure sufficient air flow into the room.
Note! If you have metal-plastic windows with a high level of tightness installed, you may observe some problems in the operation of the hood - therefore experts recommend either using the micro-ventilation function or installing supply ventilation valves on the windows.
The modern market of household appliances offers us many models of hoods, but by and large they can be divided into two large groups:
- Passive - dome-type hoods that remove air solely due to upward draft. There are no electric motors or fans inside these devices, but such a hood will only work if the ventilation ducts of the building or a high ventilation pipe are in good condition.
- Active - hoods, the operation of which is ensured by an electric motor installed inside. Such devices operate more stably, but consume quite a lot of electricity.
You can do it yourself. At the same time, the final price of the new device will be much lower than that of one purchased in a store, and even more so than that of a custom-made one.
Below we will tell you how to properly make a kitchen hood if you want to create a truly individual model!
Filter types
Recirculating hoods, unlike air exhaust hoods, do not remove dirty heated air, but clean it through filters and return it to the room.
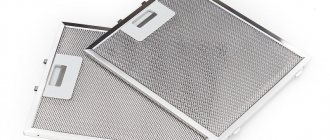
These hoods are equipped with two types of filters - grease and carbon. The grease filter is designed for rough air purification and prevents the formation of greasy deposits on the engine and fan blades. The efficiency of the grease filter is 95%. In turn, filters of this type are replaceable (disposable) and metal (reusable).
Grease filter
- Disposable filters are produced in the form of plates made of padding polyester, non-woven fabric, acrylic or other synthetic material. They are used mainly in economy class hoods.
- The reusable coarse filter is made of anodized aluminum, stainless steel or galvanized steel. This product may have several modules or layers.
Attention! Replacement filters are not washable. They will lose their properties, will not retain suspended particles of fat, and the engine will quickly fail.
Behind the grease filter is a carbon filter . Its role is to perform fine cleaning and absorb kitchen odors. Visually, it is a round plastic cassette or a rectangular cartridge with an adsorbent - powder or small coal granules. The filter is protected from spillage of contents by a fine-mesh mesh.
Carbon filters
The carbon filler collects small pollutants on its surface. Therefore, purified fresh air is returned to the room. The filter loses its throughput after 3-4 months. Some hoods are equipped with an indicator that indicates that the anti-odor filter is very dirty.
Advice. Do not rush to turn off the hood after finishing work in the kitchen. If it runs for an extra 10 minutes, the clean air passing through the filter will remove moisture and prevent coal dust from compacting, which means the cartridge will work longer.
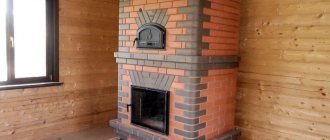
Homemade plasterboard hood
Tools and materials
The easiest way to make a hood is to build a corrugated pipe with an electric fan into a kitchen cabinet located directly above the stove or hob. But such a hood cannot be called beautiful - which means we will take a different, more complex, but more productive path!
To make a passive dome hood we will need:
- Moisture-resistant drywall - from this we will make a box to house the air duct and the dome of our hood itself.
- Galvanized metal profiles for the frame of the box and dome.
- Perforated metal corner for decorating the corners of our hood.
- Corrugated pipe - air duct.
- Fastening elements.
- Insulating material for wrapping corrugated pipes.
- Putty and paint for finishing the dome.
The set of tools with which we will make our hood will be familiar to anyone who has ever worked with drywall:
- Hammer.
- Screwdriver.
- Metal scissors for cutting profiles.
- Tape measure and level (preferably laser).
- Spatulas and brushes.
When everything is ready, you can start working.
Manufacturing
We begin work on the manufacture of the hood by marking the room. We will need to place on the wall not only the hood itself, but also the air duct, which we will hide in a plasterboard box to ensure the aesthetic appearance of our kitchen.
The easiest way to mark is if the ventilation hole in the kitchen is located above the stove itself. If the hole is to the side, you need to mark on the wall the position of the box for laying the air duct.
Note! If you plan to make a suspended plasterboard ceiling in the kitchen, then you don’t have to hide part of the air duct, but run it under the ceiling lining.
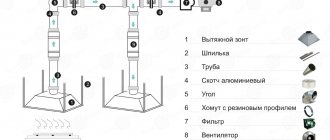
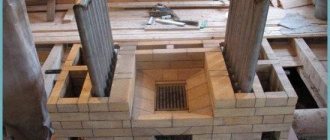
When we have decided on the placement of the air duct, we proceed to making a frame for it:
- We attach a starting profile made of galvanized metal to the wall at the level marking the lower surface of the air duct box. To fasten the profile we use anchors with a 6 mm plastic sleeve.
- We also attach the starting profile to the ceiling according to the markings we applied. If we plan to make the air duct box curved, we cut and bend the profile before fastening it.
- From the starting profile, we lower several vertical fragments of the main profile down, attaching them to the starting profile using self-tapping screws.
- We complete the formation of the frame for the box by installing another panel of the starting profile on the resulting hangers. We install transverse strips on the lower part of the resulting profile, which will then be covered with plasterboard.
You can study in more detail the technique of working with drywall and the profile for it by watching video instructions on the Internet.
Making the hood body
The box is ready - it’s time to move on to making the hood itself:
- From the starting profile we make the lower frame of our hood, securing it to the kitchen walls. The easiest way to attach the frame is if we are in a niche - otherwise the side parts of the frame will need to be additionally attached to the box.
- We cut out the frame elements of our future structure from the main profile, and use them to connect the box with the lower frame, as shown in the photo.
- To add rigidity to the structure, we reinforce the side surfaces of the hood with transverse bridges from the profile.
The frame is ready. Now all that remains is to attach the air duct from the corrugated pipe to the ventilation hole - and you can cover the dome with plasterboard.
To prevent the air duct from making noise during operation, we wrap it with batting or other soundproofing material.
Advice! Before making an air duct for a kitchen hood and connecting it to the ventilation, check the presence of draft in the system. If it is not there, you need to contact the operating authorities to clean the ventilation ducts of the building.
Hood finishing
We finish the hood as follows:
- We cover the air duct box and the hood body with plasterboard.
- We protect the corners with a metal perforated corner.
- We putty the resulting plasterboard structure, masking the joints of the plasterboard sheets and the locations of the fasteners.
- We paint the hood in the color of our choice or finish it in another way. Our homemade kitchen hood is ready.
The advantage of this technology is that this instruction is suitable not only for the manufacture of a passive hood, but also for the manufacture of an active type hood. In this case, it is enough to install an electric motor inside the housing at the entrance to the air duct and connect it to the network.
How to assemble a carbon filter with your own hands
A high-quality carbon filter will not be cheap. In addition, you can’t buy them in every store. Therefore, if you don’t want to overpay or search for a suitable model for a long time, you can assemble the filters yourself. Your own device will cost much less. Especially if you assemble it from scrap materials.
Required Parts
You can assemble a carbon filter using an old channel filter or using simple sewer pipes. The simplest option is made from the following materials:
Iron mesh fabric. Sealant. Sewer pipes with different diameters for the base (can be replaced with a channel filter). Coal. Charcoal fabric. Fan.
Also, to make the filtering part of the device, you will need gauze or a piece of nylon stocking, pliers, soft wire for connecting the mesh, sealing gaskets or foam rubber, a funnel for more convenient filling of the filter, and electrical tape. To cut the mesh you will need metal scissors. And to pre-fix the plugs, you can use double-sided tape.