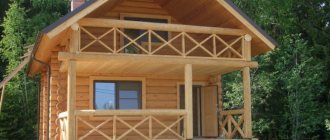
Frame houses on stilts mean quick construction and low cost. But they do not have a solid foundation, which leads to the cooling of the floors. Therefore, it is recommended to install underfloor heating in these houses.
If you are planning to build a frame house on stilts, then this article will be of interest to you. You will learn about the positive and negative aspects of underfloor heating systems. We will figure out which model is better to choose, and tell you how to install the heating yourself.
Pros and cons of heated floors in a frame house on stilts
Warm floors are artificially created heating that can provide comfort in the home. There are two ways to insulate a house with underfloor heating, using water or electrical systems. We will understand the advantages and disadvantages of such systems specifically in relation to installation in a frame house, which does not have a permanent foundation, but is placed on screw piles.
The main advantages of heated floors in a frame house on screw piles:
- uniform heating;
- saving usable space;
- there is no movement of air, thereby no movement of dust and microbes;
- they improve the appearance, since there are no heating radiators;
- have a convenient way to maintain temperature due to automation and regulators;
- long service life - especially for water ones.
In addition, since frame houses on stilts do not have a permanent foundation, the advantages of heated floors include the fact that they cut off the cold air that moves under the floor.
And an additional advantage of electrical types, especially infrared systems or cable mats, is ease of installation.
Let's consider the disadvantages - high cost and inability to install in a thick concrete screed. In addition, complex calculations are required.
Electrical systems are a fire hazard when considered in tandem with wooden houses. But if the installation technology is followed, the risk of fire is minimized. The disadvantages of water heating include the possibility of leakage and the large mass of the screed into which the “pie” is placed.
Question # 5 What is the peculiarity of the floor design in a house on a pile-screw foundation
The installation of a floor pie in a building on stilts does not differ from the technology of installing a floor in a wooden house. Of course, a subfloor is required. A heat insulator is placed between it and the finishing coating. A mandatory step is vapor barrier. The outer side is covered with moisture-resistant material. And to reduce the wind load, the perimeter space under the house is covered with a decorative plinth.
Of course, there are many more topics for discussion regarding the literacy of flooring. But, I believe that non-professionals should not be loaded with overly specific information. Therefore, we will consider other problematic issues next time.
What type of underfloor heating should I choose?
Before choosing a heating floor model, you should decide whether it will be the main heating or additional heating. If the main one, then you need to take a more powerful system.
Electric floors (cable or infrared) can be installed everywhere, but the water type can only be installed on the ground floor - there will always be a risk of leakage. In addition, if a screed is poured, the result is a heavy structure, and it is not recommended for frame frames, since this is an additional load on the piles.
When choosing a model, the following are taken into account:
- climatic conditions;
- geological features of the region;
- house design;
- level of heat loss.
From the point of view of energy saving, water heating is more profitable; heat is released due to the movement of hot coolant through pipes. The coolant is heated in boilers, which often operate on gas or solid fuel.
However, the installation process is more labor-intensive and expensive, but these investments quickly pay off during operation. In addition, you should pay attention to the fact that today lightweight systems have been developed specifically for frame buildings.
Electric types (heating cable, mats or film) are easier to install, and the structure is lighter in weight, especially infrared film. Electric floors can be laid without screed, in a “dry” way, or in a layer of tile adhesive. But they run on electricity, so their use will cost more.
Selection of structural elements and materials
The reliability, durability and thermal efficiency of the floor largely depend on the materials used. Let's consider acceptable options and indicate unacceptable solutions.
Attention to the quality of floor beams
In frame house construction, wood is mainly used for tying screw piles. Usually softwood lumber is used: larch, pine and spruce.
Useful: We calculate the cost of building a frame house
The main requirement is the use of dried materials . The moisture content of the timber should not exceed 12%, otherwise deformation of the structural parts may occur after their installation.
Arrangement of the grillage is possible in several ways:
- Laying a monolithic beam measuring 20*15 cm. When constructing a two-story house, you can use a beam 20*20 cm.
- Grillage made from assembled boards. A budget option. Each beam is formed from two to three boards. The output should be a beam with a cross section of 20*15 cm.
When the boards are securely fixed, the “batch” method is not inferior in strength to strapping made from solid beams .
Bottom trim options
When choosing material for the base, you must remember that it is not advisable to overload screw piles. Therefore, the skin should be strong enough, but not heavy. Its main task is protection from wind and moisture.
What's suitable? Here are several options:
- OSB. An affordable material that has good strength, but is vulnerable to water. Before installation, it requires treatment with a composition designed to protect wood. The weak point is the joints of the slabs. They must be coated with acrylic sealant.
- Chipboard. Easy to process, but like OSB it is vulnerable to moisture. Inferior to the previous material in terms of environmental friendliness.
- Multilayer plywood. It is permissible to use only moisture-resistant sheets marked FK or FSF. The composition contains formaldehyde resins - they increase the resistance of the material to aggressive environments.
Very often, ordinary flooring made of boards with a cross section of 5*10 cm is used to install a subfloor. This option cannot be called economical, but its strength and environmental friendliness are beyond doubt. The main requirement is pre-treatment of the wood.
Insulation is the basis of floor insulation
When choosing a thermal insulation material, the main focus is on the possibility of its operation in a humid environment. The most rational solutions:
- Mineral wool . The best solution is basalt fiber mats. Pros: environmentally friendly, non-flammable, low thermal conductivity, resistance to deformation, minimal water absorption - 2%. Over time, stone wool shrinks by only 5% - with proper installation, cold bridges do not form at the joints with the joists.
- Extruded polystyrene foam . Leader in insulation properties. Additional advantages: elasticity and resistance to deformation, lack of water absorption, biostability, ease of installation. Disadvantages: high cost and flammability.
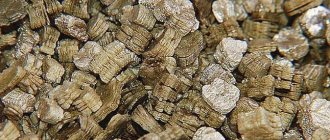
- Expanded clay . A budget alternative to sheet insulation. It is somewhat inferior in thermal insulation characteristics to mineral wool and expanded polystyrene. An important plus is fire safety.
Foam plastic is sometimes used to insulate the floor in a frame house on screw piles. Main advantages: good thermal protection and low cost. However, upon contact with moisture and under the influence of low temperatures, the material loses its structural integrity. This solution is applicable in warm regions.
Installation of heated floors on stilts
We will look at the simplest and most convenient technologies for constructing water and cable heating.
Warm floor in a frame house according to SNiP. Build Yourself a House.
Water
Water floors can be installed using two technologies: a floating screed or a flooring method (wooden or polystyrene). The heater is a 16 mm metal-plastic pipe.
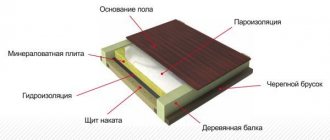
For frame houses on stilts, a “dry” screed made of polystyrene foam mats is better suited, since it is lightweight compared to concrete. The “pie” of such a hydrofloor consists of:
- flat base;
- waterproofing;
- damper tape;
- polystyrene plates with grooves;
- special aluminum reflectors;
- pipeline;
- second layer of waterproofing;
- GVL sheets;
- floor covering.
The coolant is heated in a boiler; it can be gas or solid fuel.
Cable mats
Although the infrared system is easier to install, we will consider installing a cable floor, since the film is only suitable for installation on the second floor. To heat the first floor of a house on stilts, which does not have a capital foundation, its power will not be enough.
Cable mats are wires fixed to a mesh with a standard pitch. The peculiarity of installation is that they can be mounted in a layer of tile adhesive. It is enough to prepare the base and cover it with waterproofing material and insulation on which the mats are placed.
In addition, to regulate the temperature level you will need a thermostat and a sensor.
Do-it-yourself floor in a timber house on stilts
Buildings installed on screw piles require serious floor insulation. You can avoid cooling the lower part of the house by using serious insulation and covering the base with facade slabs. Nowadays there are a large number of materials on the market that allow reliable insulation of a building.
The floor on screw piles is made of timber well impregnated with an antiseptic, which prevents the destruction of wood during operation. Sometimes builders, in order to avoid costs in materials and complexity in work, use several boards connected to each other as tying screw piles; this method is not reliable and correct. Boards are subject to deformation and distortion than solid timber. It is worth considering that when installing the floor, the lower crowns are sheathed and a subfloor is created on which the insulation is attached. A skewed part of the floor will not allow for high-quality insulation, avoiding cracks, and therefore heat loss. This is very important for frame buildings, where a board is used as a frame instead of a beam. The main part of the connecting elements of the piles should be made of timber better than 150 mm. by 150 mm. A fiftieth board is quite suitable for intermediate joists.
How to insulate a floor on screw piles ? There are a lot of insulation methods, it all depends on the materials used in the work. it can be polystyrene foam, various foam fillers, basalt slabs, etc. It is better to finish the bottom of the house with materials that prevent the impact on wood.
When installing a floor for a bathhouse on screw piles, special attention should be paid to waterproofing. It is important to prevent moisture from entering the wooden parts of the structure. Be sure to install a ventilation and humid air extraction system. When constructing a facade, be sure to leave exhaust openings on both sides of the building. This will allow the lower part of the building to be ventilated.
How to properly make a floor in a log house on screw piles ? The lower crown of the timber structure is connected to each other by cuts (fastened with lock joints), the joints are tightly tightened with studs or bolts. The timber is rigidly attached with bolts or special formats to the heads of screw piles, which contributes to reliable fastening of everything
buildings to the foundation. The use of nails and self-tapping screws in fastenings and joints connecting parts of the building and foundation is unacceptable. The main load-bearing elements of the structure connected with nails or self-tapping screws do not give the structure sufficient rigidity and reliability, which will lead to distortions during operation. deformations and, as a result, repair or destruction of the structure.
A typical question that we often hear from customers is how to insulate the floor. After all, figuratively speaking, the wind will “walk” between the piles.
Of course, you definitely need to install a subfloor. Insulation is installed in the space between the subfloor and the floor coverings of the living areas. The choice of material depends on your desire. The main thing is that the insulation is dense and the spaces between the floors are densely filled with material. Any cracks and possible gaps must be eliminated. The floor insulated in this way is covered with a vapor barrier material. The lower part of the floor from the outside is sewn up with moisture-resistant material. To reduce the wind load in the lower part of the building between the piles, decorative facade slabs imitating brick or stone masonry are attached to metal guides (profile pipe).
In the process of building a building on screw piles, it is important to understand that the building does not have a basement, but a feature is a ventilated underground. In houses built on screw foundations there will be increased humidity in the “underground” space. Therefore, when building a house on screw piles, it is necessary to pay special attention to the quality and characteristics of the insulation materials used.
The necessary materials used when installing a floor on screw piles as insulation can be polystyrene foam, mineral wool, for vapor barriers, all kinds of films and vapor-windproof materials, which are now available on the market in a large selection.
Floor insulation in a wooden house on screw piles
How to install the floor correctly? To install a ceiling over the ventilated space, it is necessary to perform actions in the following sequence:
1. assemble a wooden frame, joists, lintels, subfloor for insulating materials;
2. lay a layer of vapor-permeable wind protection to avoid “weathering” of the insulation in the future;
3. the next stage is the laying of thermal insulation materials; different, including combined, options can be used;
4. Next, a layer of film is laid for steam and waterproofing;
5. The last stage is the installation of the finished floor, here the choice of materials with its own specific installation depends on tastes and wishes.
It is in this sequence that materials for flooring in houses on screw piles should be laid. Neglecting the sequence of floor installation can lead to undesirable consequences. Steam settling in a warm room in colder places will form condensation, which, in the absence of a vapor barrier layer, will penetrate into the insulation, which will subsequently lead to dampness with all possible consequences.
As a result, the appearance of dampness on the surface of the insulation and inside can lead to the following problems: increased costs for heating the house, increased humidity inside the building, rotting of the wooden elements of the building structure and the appearance of fungus, which leads to the destruction of the floor structure and can subsequently result in expensive repairs .
What materials are best to use for underfloor heating? It is necessary to pay attention not only to insulation, but also to waterproofing, vapor barrier, and wind protection.
The following materials can be used as thermal insulation: mineral wool (available on the market in the form of rolls and slabs; when installing floors it is better to use slabs), mineral wool made from various raw materials can be “stone”, “glass”, “slag”. When laying min. cotton wool, it is necessary to observe safety precautions - special protective equipment;
polystyrene foam is the cheapest insulation material, used in the form of slabs of various thicknesses, the edges of the slabs must be tightly adjusted to avoid gaps and violations of thermal insulation, however, at high humidity and during very high temperature conditions, polystyrene foam can crumble into its component elements (balls), which may lead to damage to thermal insulation;
Another possible material used in thermal insulation could be extruded polystyrene foam, which is similar in appearance to polystyrene foam, but has a number of distinctive characteristics; polystyrene foam is more durable, has a very low water absorption coefficient due to which it is not subject to destruction at very low temperatures and, thanks to special additives, is not flammable, can be used in the form of slabs or filled in the form of foam using special equipment.
The following materials can be used for waterproofing and windproofing: polyethylene film, vapor-permeable film (isospan), wind-moisture-proof film, glassine.
For vapor barrier, a special film is laid on the insulation; there is no point in listing the names and characteristics, because now there is a wide variety of similar materials available.
A necessary requirement when installing a floor on screw piles is the mandatory treatment of wooden elements with antiseptics, which will prevent damage by fungi and insects in the future during operation.
The floor arrangement for a bathhouse on screw piles is somewhat different. In many cases, there are specifics to the work carried out and the materials used. When installing a bathhouse floor, it is necessary to take into account a very aggressive humid environment, where it is often necessary to use layers of moisture-proofing materials, concrete solutions and insulation. There is no doubt that installing the floor of a bathhouse is a much more complex process than installing the floor of an ordinary house. In addition, when building a foundation for a bathhouse, power frames are often created from channel bars and other steel materials.
In this specific area of installation, we have accumulated extensive experience and understanding of the processes of foundation operation. A properly constructed foundation is the key to long-term operation of any structure .
Insulating the floor in a frame house on stilts is a complex, rather labor-intensive process, which has its own characteristics. This is a mandatory event in buildings where permanent residence is planned. Thermal insulation of the floor of a frame house is carried out simultaneously with its waterproofing, which prevents the penetration of moisture into the building and contributes to the formation of comfortable living conditions. Proper arrangement of the basement is an important stage in the entire complex of insulation work, which increases the energy efficiency of the building.
Pile-type foundations have become widespread in construction due to their relatively low price, quick installation and good performance on unstable types of soil. The floor insulation scheme in a wooden house on screw piles is as follows:
- support frame made of timber;
- subfloor made of boards treated with a special composition or OSB (plywood, fiberboard);
- windproof layer, permeable to steam;
- thermal insulation coating;
- hydro- and vapor barrier layer;
- finished plank flooring.
Floors are made on a pile foundation by laying the material in the given sequence. Creating a blind area and finishing the base - these activities complement the entire insulation scheme and increase its efficiency.
General insulation scheme
Thermal insulation must be done to avoid the following problems during the further operation of the house:
- heat loss through the floor covering, reducing the energy efficiency of the building and increasing the cost of heating the premises;
- formation of condensation inside the structure (between the rough and finished floor);
- the development of putrefactive processes, the occurrence of mold, which are a consequence of increased humidity.
A warm floor in a log house, erected on screw metal piles, allows you to create favorable conditions for living inside and extends the life of the entire building.
To make a high-quality insulated flooring in a house on screw piles, it is necessary to choose the right working materials: heat insulator, hydro- and vapor barrier, and windproof coating. In practice, various products are used for these purposes. The most suitable thermal insulation materials with their brief characteristics are presented below in the table.
The following types of mineral wool are used as insulation:
These products are distributed in rolls and slabs. Due to the increased rigidity, it is recommended to give preference to the latter release form.
Laying penoplex
For wind protection and moisture insulation, you can use both different materials and modern products that combine both of these functions at the same time. Vapor permeable membranes are an example of such multifunctional products. Thanks to their use, savings in working time on laying coatings are achieved.
As a vapor barrier, a polyethylene film is used to cover the insulation.
To prevent the occurrence of putrefactive processes and the formation of fungus, all wooden elements of the house on stilts are coated with antiseptic agents. This treatment also prevents insects from destroying the wood.
If you are insulating the floor in a house with a pile foundation, designed for permanent residence, then it is better to use penoplex or mineral wool as a thermal insulator. Cheaper expanded clay is well suited for a summer house.
In its structure, the floor of a wooden structure on a pile foundation is similar to the false version. Installation takes place in several stages:
- fix logs (load-bearing beams) on supports;
- cranial bars are attached to them on both sides;
- create flooring from sheet products (plywood, OSB, fiberboard) or boards;
- a windscreen permeable to steam is placed on top of it;
- install a heat insulator;
- a plastic film or other waterproofing material is laid on top of it;
- lay the finishing coating.
Installation of mineral wool, wind protection and waterproofing.
The technology considered shows how to insulate the floor in a frame house on stilts, how to protect yourself from dampness and create comfortable living conditions.
The technology for creating warm floors in housing on stilts is simple, but labor-intensive. It is quite possible to do all the work yourself without the help of specialists. In addition to gaining skills and knowledge, this will save money.
The arrangement of the basement contributes to additional insulation of the floor of the house on screw piles. In this way, blowing is eliminated, and due to the arrangement of the blind area, the soil freezing zone is shifted away from the construction.
Thermal insulation of the base is created in several ways:
- erection of masonry;
- creating a frame.
Covering the frame with brick panels
The wall under the building (along its entire perimeter) is erected from:
The technology consists of the following stages:
- dig a shallow trench around the perimeter of the house on stilts;
- lay a cut-to-size reinforcing mesh inside it;
- make a concrete screed of the required height;
- when the created foundation is completely dry, then a wall of the selected material is erected on it.
In order for the concrete to dry correctly and not crack, it is necessary to periodically wet the base or cover the pouring with a polyethylene film.
After laying, aerated concrete blocks are plastered to protect them from moisture.
The frame is created by performing actions in the following sequence:
- install a metal or wooden sheathing around the structure on piles;
- Thermal insulation and sheathing are fixed on it.
Extruded polystyrene foam boards are often used as insulation. If the height of the base is insignificant, then they limit themselves to further covering it with decorative plaster.
The created frame is sheathed with the following sheet products:
- corrugated sheeting;
- siding of different types: wall, facade, basement.
Corrugated sheeting is easy to install, durable, and strong.
The use of siding is the best option for large basement heights. Also, the created cladding has a beautiful appearance.
The basement is waterproofed using both methods of its construction using roofing material.
The blind area is made on a sand cushion made of paving stones, paving slabs, or concrete screed.
Building a wall is a more labor-intensive and expensive option. If the height of the base is small, you don’t even have to pour a foundation for the masonry, but build it on a sand bed. This allows you to save time and money by installing the frame, as well as attaching siding or corrugated sheets to it. During the construction of the base, it is necessary to make 2 holes on opposite sides for natural ventilation.
Considering the design features of a frame house on stilts, the floor must not only be durable, but also light enough so as not to unnecessarily load the foundation of the house. Good thermal insulation of this part of the structure is equally important. That is why it is better to make the flooring in a frame house from wood. This material is environmentally friendly, warm and light. To increase the thermal insulation of the ground floor floor, a heating system can be provided.
If you are going to make the floor with your own hands, then first you need to choose the right building materials. When choosing the type of wood from which the main load-bearing parts of the structural floor pie will be made, you should take into account the climatic conditions of the construction region, the intensity of the loads on this structural part of the house, your financial capabilities, as well as the characteristics of each room, for example, in the bathroom you will need good waterproofing of the floor.
When building a house on screw piles, the frame of the first floor can be made using the following types of wood:
- Needles. This type of wood is relatively inexpensive, durable and strong. It is suitable for construction in small spaces, for example, in a bathroom or hallway.
- Aspen and oak are more expensive types of wood. Their performance indicators of strength, reliability and durability are significantly higher than those of other breeds. Using elements from these types of wood, you can make frame structures in a children's room and bedroom.
When constructing a floor in a house on screw piles, it is equally important to use well-dried wood. If you build a floor from wet material, then as it dries, cracks will form in the structure. The external condition of wooden elements for building a house is no less important. They should be free of stains, cracks and other defects.
Advice: to install a floor in a house on stilts, it is better to buy 1st grade wood with a moisture content not exceeding 20%.
To correctly calculate the required volume of material, it is necessary to add 10% to the area of the room. The flooring of a house on screw piles is best made from two-meter boards. To avoid discrepancies in color and texture, you should purchase products from the same batch. The best flooring for any floor of a frame house will be a tongue-and-groove edged board. It does not require finishing grinding, which will reduce work time and reduce labor costs.
When making a floor in a frame wooden house, most often the following is used as flooring:
- glued parquet boards (inexpensive material with low performance characteristics);
- parquet (a more expensive and durable product);
- solid parquet board (durable coating);
- solid wood board (material with high wear resistance).
Naturally, all of them are not suitable for the floor in the bathroom, kitchen and toilet. For bathrooms and toilets, it is better to use ceramic tiles. The main thing in the design of the second floor floor is to provide good waterproofing in places with high humidity.
The installation of a floor in a frame house can begin after the construction of a pile foundation and completion of the strapping. It is better to make it from timber, I-beam or channel. We will use wooden beams for strapping, to which we will attach logs. The span length of the framing beams should be no more than 3 m. If the span is greater than this value, then it is necessary to use additional supports from piles. For beams, you can take a beam with a cross section of 100X100 mm made of softwood.
Before laying the strapping, it is necessary to waterproof the base using penofol, roofing felt or plastic film.
Before laying the strapping, it is necessary to waterproof the base using penofol or roofing felt.
After installing the beams, you can proceed to laying the joists. The pitch of these elements is 500 mm. The construction of the floor in a house on stilts is carried out using beams (joists) with a section of 100x250 mm for the first floor and 70x200 mm for the second floor. If the spans to be overlapped are small, for example in a bathroom, then the cross-section of the beams can be reduced to 50x150 mm. In some cases, a lag pitch of 40 cm is used to increase the strength of the structure. For more information on how to install a floor frame, see the video at the end of the article.
Before laying the logs on the harness, you need to make markings equal to their pitch. Next, recesses along the width of the lags are sawed into the strapping beam. After laying in the grooves of the strapping, the logs are fixed with dowels, screws, nails or self-tapping screws.
Important: all wooden load-bearing floor structures must be treated with antiseptics and fire retardants to protect them from rotting and burning.
You need to attach 30x30 mm boards to the joists from below. To increase the strength of the floor structure, sometimes during construction the logs are connected to each other by transverse jumpers with a pitch of 150 cm. But this is not necessary. This kind of structural reinforcement is recommended if a heated concrete floor is to be installed.
As for the second floor floor frame, floor beams will be used here, not joists. We take their pitch to be 500 mm. The flooring will be laid directly over the beams.
If you decide to build a house on screw piles with your own hands, then special attention should be paid to insulating the floor of the first floor. The structural design of a wooden floor on the second floor does not require such careful thermal insulation.
As a rule, the construction of houses on stilts is carried out using beams. To do this, we lay OSB boards or plywood along the slats attached to the bottom of the joists. The design in cross section will resemble the letter W.
Layout of a wooden floor on joists with insulation
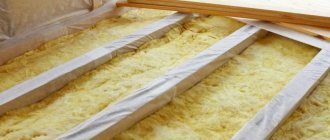
Now you can begin installing hydro- and vapor barriers. To do this we do the following:
- We spread the waterproofing film over the joists so that it sag into the gaps between the joists. You can use membrane waterproofing or regular film.
- We place thermal insulation material in the spaces between the joists (on top of the film). Mineral wool is suitable for these purposes. If you want to properly insulate your house on stilts, then it is better to use basalt wool.
- The waterproofing film on the joists must be secured with a stapler.
- The structural design of the first floor floor in a house on stilts must include a vapor barrier. If you are building with your own hands, then do not forget that the vapor barrier material is laid with an overlap of 150 mm. The joints must be taped.
Using the method described above, the construction of the ground floor floor is carried out in any room, be it a bathroom, kitchen or living room. As for the structural pie of the second floor floor, it can be done without heat and waterproofing material. But in the bathroom and other places with wet processes, it is worth laying a waterproofing layer into the floor structure. In the video below you can learn in more detail about the construction of the floor of a house on stilts with your own hands.
Flooring installation
The next layer of the structural pie is made with a board 3 cm thick. When laying the boards with your own hands, keep a step of 40-50 cm. This sheathing along the joists will allow you to get a ventilation gap. You can attach the boards to the joists with self-tapping screws.
We then proceed with the construction of the floor in the house in this order:
- We lay the subfloor on the sheathing of boards. It can be a tongue-and-groove board or a regular board. We fasten it to the sheathing with self-tapping screws.
- You can lay purchased flooring on the boards with your own hands.
Since the front layer of the floor in the bathroom and toilet will be tiles, it is better to lay plywood or OSB on the rough boards to level the surface. At the same time, the structural pie in such rooms must include additional waterproofing, which is laid over plywood.
Warm floor of a frame house
You can make a warm floor in a house on stilts with your own hands. This is not shown in the video below, but the process is simple and takes place in the following sequence:
- A structural heated floor pie includes the same load-bearing wooden frame as for a non-heated floor, with the only difference being that the plywood sheets are not laid on backing boards, but on cranial blocks attached to the joists with self-tapping screws on the sides. You can use a cranial block with a cross-section of 30x30 mm and fasten it in increments of 15-20 cm.
- After laying the plywood on the beams and performing waterproofing, we lay expanded polystyrene in the gap between the joists. The top surface of the polystyrene foam boards should be flush with the top of the joists.
- Next, you need to lay a layer of vapor barrier film, placing it on the walls above the expected level of the finished floor.
- We lay a reinforcing mesh over the film and fill it with a thin layer of cement mortar.
- Then we lay the heating mats of the underfloor heating system on the reflective layer of foil insulation. We perform concrete screed.
- We install flooring. If the floor is in the bathroom or kitchen, then you can use tiles.
Insulation of the floor in a house on stilts must be carried out taking into account the design features of such a home. Only in this case there will be no problems with its operation.
Residential buildings installed on pile support elements do not have a basement or basement level. But they have an underground area, blown from all sides by winds. Such buildings are usually erected on marshy soils. In this regard, the space under them is always characterized by a fairly high level of humidity.
In order for a house on screw piles to be used for a long time and not be subject to the harmful influence of natural factors, its floor covering is arranged in several layers:
- Wooden supporting skeleton. It must be built with a subfloor.
- Wind protection (vapor permeable). It is necessary to protect the heat-insulating material used from weathering.
- Direct heat insulator.
- Moisture and vapor barrier layers.
- Finished floor covered with boards.
Floor covering of a house on screw piles
The floor foundation for a dwelling on screw piles is built this way. At the same time, the performance characteristics of thermal insulation materials for such buildings should be as high as possible. It is also recommended to use high-quality vapor and waterproofing products that reliably protect rooms in a wooden house on stilts from moisture. If the owner of a structure on a pile foundation does not provide high-quality floor insulation in his home, he will face the following serious problems during the operation of the building:
- increase in heating costs due to a decrease (and significant) in the energy efficiency of the building;
- the presence of condensation above the technical underground (directly on the surface of the floor base);
- the appearance of fungus, mold, rotting of wooden building elements caused by constant high humidity.
It is enough to properly insulate the floor in a house on a pile foundation once and forget about all these troubles forever.
In principle, thermal insulation of the floor of a pile structure can be made using different products. The main thing is that they are suitable for use in wet conditions. From the point of view of specialists, it is most rational to insulate floors in a house on stilts with the following materials:
- Styrofoam. It provides high-quality thermal protection. But you need to take into account the fact that at high humidity and low temperatures, foam can break down into separate small pieces. If you decide to use this material for thermal insulation, take care to effectively protect it from moisture.
- Minvata. It is not afraid of biological influences, is characterized by very good heat-protective properties, and is a non-flammable material. True, when moisture (even a small amount) penetrates into cotton wool, its unique protective properties are lost. Floor insulation can be carried out with any type of mineral wool - slag, glass or stone. This heat insulator is produced in slabs and rolls. It is advisable to use mineral wool in the form of slabs (it is characterized by a higher density compared to rolled material).
- Penoplex is expanded polystyrene made by extrusion. It has low moisture absorption and increased strength. These characteristics distinguish it better from cheaper, but also less reliable foam.
Often, insulation of buildings on screw piles is carried out using expanded clay. It is easy to use, which is important for home craftsmen engaged in independent repair work without the involvement of specialists; it is not subject to combustion and has a low cost. But in terms of heat-protective characteristics, expanded clay is inferior to all the previously mentioned materials.
Floor insulation with expanded clay
It is recommended to use modern vapor-permeable moisture-proofing membranes as wind and waterproof products for the floors of structures on pile foundations. They are quick and easy to install, but the price of such multifunctional products can be steep. Important! All elements of a wooden house on stilts should be treated with compounds with special antiseptic properties.
And don't forget about vapor barrier. A simple polyethylene film is quite suitable as such. It is laid directly on a layer of thermal insulation material.
First you need to make a subfloor. Its device is simple - you nail a wooden beam, which is called a cranial beam, to the joists. It will serve as a support for the flooring boards. Be sure to treat all used elements with an antiseptic. Then lay the boards into the flooring. When using polystyrene foam or expanded polystyrene, it is allowed to install a special mesh instead of the subfloor. It must be properly attached to the joists so that it can easily withstand the weight of the insulation used.
In general, you must always remember that you cannot overload piles with excess weight. After arranging the subfloor, lay a vapor barrier layer on it. All moisture from the atmosphere should remain outside, not falling on the heat-shielding material. This part of the vapor barrier can be made from polyethylene film or roofing felt. Then you lay the insulation, and on top of it another layer of vapor barrier. It will protect the cake from condensation and internal moisture.
When installing heat and vapor barriers, do not leave gaps between the individual elements of the materials used. This is fraught with the formation of cold bridges. They are very dangerous for insulation, as they quickly destroy it during operation. Now feel free to equip the finished floor in your house using chipboards, plywood sheets, floorboards and other products for these purposes. Pro tip! Be sure to cover the piles with a warm, stationary base. Then snow will not get under the house. If there is no desire or opportunity to build a warm structure, cover the supporting elements with an inexpensive and quick-to-install decorative base.
When installing a house on a pile foundation, there is no base in the structure's design. As was said, it must be done. Often, instead of a full-fledged base, a decorative imitation of it is erected - a fence. It perfectly protects the underground from snow drifts and wind. To perform this operation, you can use one of two methods:
- Rubble or brickwork. This kind of fence is built using half a brick. The first row of stones is laid on a bed of sand (it needs to be compacted very well). The fence is waterproofed using roofing felt.
- Frame imitation of the base. This technology allows you to build an analogue of a ventilated facade. It is very economical and quick to implement. The frame is erected by installing galvanized profile sheathing or wooden beams directly onto the piles. Then this structure is sheathed with roofing felt, and PVC sheets are attached on top to look like brick or stone. PVC products should be fixed with nails (if the sheathing is made of wood) or universal self-tapping screws (metal profile).
Frame imitation plinth
Insulation makes it possible to reduce the consumption of insulation: it can be laid in a thinner layer. Let your home always be dry and warm!
Subfloor installation
The subfloor is a flat covering located between the blocks; the finishing is installed on it. Since overloads are not desirable for piles, a durable but not heavy material is required.
There are several suitable options for arranging the foundation of a frame house:
- OSB - the material is durable, but vulnerable to water. It needs to be treated with a special protective compound. The weak points of this coating are the joints.
- Chipboard is easy to install, but is also susceptible to moisture. In addition, it is less environmentally friendly than OSB.
- Multilayer plywood - only moisture-resistant types (FK or FSF) are suitable. They contain formaldehyde resins, which make the material more resistant to aggressive environments.
Often boards up to 10 cm thick are used to construct the flooring. The result is a durable and reliable floor.
Base insulation
To make a warm floor on the first floor, you can insulate the basement.
Scheme of basement insulation in a frame house on screw piles.
The insulation must also be installed under the blind area. The temperature in the ground under the blind area will already be above zero, which will ensure a comfortable temperature on the first floor.
In conclusion, it must be said that there is no need to put a large residential building on screw piles without calculations, since it is unknown how the piles will behave under heavy load. If some part of the piles gets into loose soil (former cellar, toilet, dugout), then they may settle. The house can become warped and it will be very difficult to correct this situation.
We produce flooring
When choosing the type of material for the floor, it must be not only durable, but also lightweight. After all, it is desirable to minimize the load on the supports. It is better to choose wood - aspen, oak or coniferous trees. The tree must be dry and without damage. It must be treated with antiseptic agents before installation.
The floor in a frame house on a pile foundation is two-layer - the base and the wooden material. It should be equipped immediately after installing the base of piles and grillage.
The work consists of several stages. First, the strapping is done, for this you need beams 10 by 10 cm. They are installed on piles and connected with screws. If there is more than 3 m between them, then additional racks in the middle are required.
Logs with a cross-section of 10 by 25 cm are mounted on the beams, in increments of 50 cm. To install them, grooves are made in the harness into which the logs are inserted and secured to the base with screws. The bottom of the logs is covered with boards 3 by 3 cm.
To make the structure more durable, slats are placed on top of the logs in increments of 150 cm. Flooring made of OSB boards or plywood is mounted on them. Hydro- and heat-insulating material is first laid in the logs.
Bearing structures
The construction of floors in a frame house on stilts begins only after the foundation itself has been laid out and its piping has been completed. The strapping allows the structure to become more rigid and stable. Essentially, it keeps her “in place.”
When creating a pie at home, beams made of wooden beams are used for strapping, fastened together with lags. The cross-section of the beam must be at least 10 by 10 cm. In most cases, this value will be quite sufficient. Although, a lot depends on the thickness of the walls, since the strapping is oriented specifically towards it.
The beams are installed on the foundation piles so that the length of one span does not exceed three meters. If it is larger, then additional piles must be installed. Waterproofing made of roofing felt or penofol is placed under the beams. Each beam is connected using pre-cut “locks”, after which nails are driven in.
The connection must take place on piles.
For logs, beams are also used, but thicker ones. Their cross-section should be at least 10 by 25 cm if we are talking about the first floor. To frame the second floor, beams with a section of 7 by 20 cm will be sufficient. The distance between the logs is 50 cm. In some cases, if an increased load on the house is expected, it can be reduced to 40 cm.
Before laying the beams, markings are made on the main frame structure and grooves are cut out in its beams, into which the logs will be laid. They are fastened using dowels, screws or nails.
If the design assumes the presence of a heated concrete floor, then the structure is strengthened with additional jumpers located at a distance of 1.5 m from each other.
Boards with a section of 3 by 3 cm for the subfloor are placed under the joists. Also, after all the work on creating this wooden structure is completed, all elements must be treated with antiseptics and preparations that reduce the flammability of wood. Thanks to this, the floor will not rot, and the danger of fires will be significantly reduced. After all, wooden structures near the ground are especially susceptible to various adverse environmental factors.
Floor insulation
It is recommended to choose thermal insulation from the following types of materials:
- Mineral wool - slabs of basalt fiber. The material is environmentally friendly, non-flammable, has low thermal conductivity, and a water absorption level of 2%. When using cotton wool, do not treat boards with water-based emulsion.
- Extruded polystyrene foam is a leader today. PPS is resistant to deformation, elastic, easy to install and does not absorb water. The main disadvantage is the high price and flammability of the product.
- Expanded clay is a budget option, an alternative to sheet insulation. It is fireproof, but is slightly inferior to the above listed types in terms of thermal insulation.
- Polystyrene foam is inexpensive and has good heat-shielding properties. But under the influence of cold and moisture, its structure is disrupted.
Mineral wool is most suitable for a frame house on stilts. It is lightweight and does not create a serious load on the floors. A layer thickness of only 10 cm is enough to ensure good thermal insulation of the building.
For thermal insulation of the first floor, the best option is expanded polystyrene foam . It creates a hard coating that protects against moisture and other influences. Expanded clay is recommended for insulating the base - cheap and high quality.
Installation of the floor of a frame house on screw piles
To protect the wooden elements and also extend the life of the building, I use antiseptics and fire retardants. These are special compounds that protect wood from rodents, insects, as well as rot, mold, etc. This must be done before installing the products.
The floor installation is carried out in the following sequence:
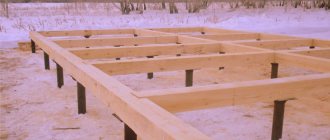
1. To begin with, I make four holes on the supports of the screw foundation, then lay a layer of waterproofing and secure it. I lay out the beams around the structure and connect them together.
2. Using self-tapping screws, I install the beams to the ends, and attach the remaining beams to the ends. I take steel staples and connect the strapping parts together.
3. Using a building level, I check that the beams are evenly installed.
4. I install the sheathing at the bottom of the beams; it will serve as the base for attaching the substructure.
5. Then I proceed to the rough finishing and laying of thermal insulation:
- First, I cover the base of the floor with a waterproofing film, which will prevent moisture from getting inside the insulation.
- I put thermal insulation between the joists. On each side I provide a margin of 0.5 cm so that the material fits snugly against each other.
- I put a vapor barrier on top of it. It should be overlapped to prevent the formation of cold bridges.
The pile-screw foundation requires the mandatory driving of the base. You can do this in one of the following ways:
- Brick - the base here is a backfill of crushed stone and sand. Then I lay the filling itself in half a brick; it is not necessary to use reinforcement here. I recommend ceramic and clinker bricks.
- From corrugated sheeting - the basis for installing corrugated sheets are the spans, which I attach to bored pillars.
- I install the material from chipboard in the same way as corrugated sheeting.
We must not forget about natural ventilation, which does not allow moisture to form in the structure. I lay out the blind area from paving slabs or paving stones or pour a concrete screed. It is important to maintain an inclination angle of 4 degrees from the house. I seal the junction of the cladding and the blind area with sealant, this prevents the accumulation of moisture and other precipitation under the base of the house.
Technology for insulating the floor under the house and the first floor
To keep a frame or log house warm, it is important to properly insulate the floor of the first floor. For thermal insulation of the floors of the lower floor of a house on stilts, polystyrene foam boards are suitable. They are taken standard 1 meter by 120 cm.
The technological process is simple:
- the slabs are laid along the joists;
- the slabs are screwed onto long self-tapping screws to the joists, while boards are placed across the joists;
- all joints are sealed with foam from the house;
- 200 mm insulation is laid between the joists on the side of the house. Mineral wool is suitable;
- vapor barrier is installed;
- a subfloor is installed - inch boards or chipboard.
With this insulation option, the dew point will be in the house, so it will be warm inside.
Why do you need floor insulation in a house on stilts?
The main feature of a wooden house on screw piles is the void between the floors and the ground, where there is often a draft. As a result, a large loss of heat occurs. If the site has marshy soil, then in addition to the wind, moisture also affects the house.
If you do not take additional measures to insulate and waterproof the floor, problems will appear over time:
- During the cold season, heating costs will increase due to large heat losses in the house.
- Due to temperature changes, moisture-condensation will begin to accumulate inside the underground.
- Due to constant moisture, wooden structures will begin to rot and become covered with fungus and mold.
To avoid this, it is necessary to properly insulate the floor in a wooden house.
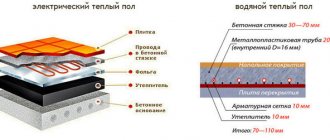
Installation of a water heated floor in a polystyrene screed
Warm floors on a pile foundation. Sewerage. Water pipes. Frame house. "Build and Live"
We propose to make a warm water floor with a polystyrene screed in a frame house on stilts. The arrangement diagram looks like this:
- The rough base is being cleaned.
- If heating is installed during the construction of the house, this assumes that the floor is level. If the room has already been used, then it is necessary to level the surface.
- A thick polyethylene film is laid on the base, it serves as waterproofing. It is overlapped and secured with a stapler.
- Damper tape is glued along the walls - it will compensate for expansion when heated.
- Polystyrene mats with bosses are laid. They are connected using locking connections.
- Metal plates are placed between the grooves; they are designed for proper heat distribution.
- The pipeline is laid out in the grooves of the plates, according to the “snake” or “snail” pattern.
- A second layer of polyethylene is placed.
- The device is covered with GVL sheets in two layers. The joints are sealed with glue. The second layer is laid in a checkerboard pattern.
Before covering the “pie” with gypsum fiber sheets, the pipeline should be connected to a power source. In private buildings, this is boiler equipment that is responsible for heating the coolant.
The pipes must be connected to the boilers through a mixing and distribution group; with its help, the temperature level is adjusted and the coolant is distributed along the circuits. After this, the system is pressed, and only then can the structure be covered with plywood and the finishing laid.
Features of floors supported by a grillage
Point foundations, which include piles, are good because they allow you to erect a house on rough terrain without much expense for excavation work, and make it possible to obtain a reliable foundation in areas with weak soil or close to groundwater. They can be pipe-monolithic, driven reinforced concrete, but in private construction, metal screw piles are usually used.
To make it possible to support the walls, a channel with a wide flange is welded along their axes to the ends (if masonry will be carried out), or they simply make a wooden frame if the house is timber or frame.
Wooden grillage on metal screw piles
The frame beams are attached to the grillage, and the wall frame racks are attached to them.
But in a frame house, for example, there may be a brick cladding, so a metal grillage, which will serve as the basis for the floor, can also be provided for it (read about the construction of a foundation with a grillage in the article).
Metal grillage
The floors of a house on stilts have a similar design to frame walls. However, here protection is required not from wind loads, to which the façade is exposed to the maximum, but from getting wet, since high winter snowdrifts can come close to the bottom of the building. There are many protection options - the decision depends on the properties of the insulation used in the floor sandwich.
How to calculate the load on wooden floors from a screed
If a warm floor is installed in a screed, then you need to correctly calculate the load on the logs - whether they can withstand the weight of concrete.
To calculate the load, the average mass of 1 cubic meter is taken. meters of concrete with a reserve of 2300 or 2500 kg. The size of the total cubic capacity of the screed is calculated: the area of the house is multiplied by the height of the screed. For example: area 87 m2 and screed 6 cm.
87 x 6 = 5.22 m3
the mass of the screed is 5.22 x 2500 = 13000 kg.
13000 x 87 = 150 kg per m2.
It is better to do the load with a margin so that the m2 can withstand a weight of not 150 kg, but more.
Insulation of the floor below the house
To keep the house warm, you need to insulate the floor of the first floor. The floors take a very long time to warm up. Only when the entire volume of the house has warmed up do the floors begin to warm up.
If the floor of the first floor is not insulated, it will remain cold and this will create discomfort.
Insulation of the ground floor floor with polystyrene TM15
The ceiling of the first floor of a house on stilts can be insulated with polystyrene slabs. The technology of such insulation is very simple.
Polystyrene slabs measuring 1 m * 1.2 m are attached from below along the joists and across the joists with an inch board with 5 * 12 cm self-tapping screws. All joints between the slabs are foamed.
In total, the floor of the first floor will consist of the following elements:
- Expanded polystyrene.
- Lags.
- Insulation 200 mm.
- Vapor barrier.
- Inch board.
The dew point is obtained in the house, that is, the insulation will be dry, and the house will be warm.
Insulation of the ground floor floor with polystyrene TM15.
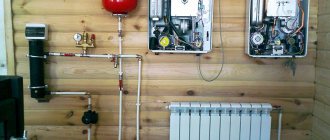
Installation of electric heated floor
You need to start installing any electric floor by choosing a location for the thermostat. In this area, a sub-station with the wiring removed is being prepared. A vertical groove is made to the floor for the wires.
After that, you can move on to laying the “pie” itself. We will make a heated floor in a frame house based on cable mats. The special feature of installing mats in a frame is that they are placed directly on the finished surface.
- The surface is cleared of debris and treated with a primer.
- A reflective substrate is laid.
- Mats are spreading.
- A temperature sensor is placed strictly between the heating conductors. It is placed in a corrugated pipe and placed in a pre-made groove.
- A thermostat is installed in the prepared area, to which the wires from the sensor and the floor are connected.
- The system is being tested.
- The mats are filled with a layer of tile adhesive.
Typically, such heating is installed under ceramic tiles. In a frame house on stilts, even in severe frosts, it can be comfortable with a properly designed heating system.
Installing heated floors, especially on the ground floor, will prevent cold air from entering through the floor, and the house will be warm and cozy.
Heating of a Frame House / Warm Floor. Energy consumption.
Floor in a building on screw piles
Before covering the horizontal floor of the first floor, you need to wisely choose the type of wood to minimize heat loss, since the floor in a frame house on screw piles is not protected from the external environment like the floor in a regular house. Therefore, types of wood are required that will ensure the tightest fit of the floorboards to each other.
In order to lay the floor of a frame house on screw piles, it is recommended to use coniferous species, which combine high strength, durability and an affordable price. For wealthy homeowners, it would be preferable to choose oak or aspen, which are many times superior to coniferous varieties in many characteristics.
Insulation of the ground floor floor.
The right floor in a frame house will allow you to use any type of floor covering of natural origin, be it parquet, parquet boards or treated solid wood boards. You also need to keep in mind that you will have to use ceramics as a floor covering in order to tile the bathroom. The wood must be able to withstand the effects of moisture-repellent impregnations well.
Ground floor floor
Horizontal floors of the first floor are most susceptible to heat loss, so in this case it is necessary to lay insulation between the main floor surface and the floor covering. Thus, the thickness of the floor of a frame house on the first floor will be significantly greater than on the second. Additionally, it is necessary to nail sheets of plywood or isoplat sheets to the joists from the outside.
The counterbattens on which the floor covering rests must be located directly on top of the joists above the insulation. The floor of the first floor in a frame house requires additional protection from moisture accumulation and evaporation. You need to think about waterproofing at the initial stage of laying the floor, even before installing the floor covering.
Layers of insulating material must overlap. The width of the overlap must be at least ten centimeters. The installation of floors in a frame house on stilts resembles a kind of pie, the “filling” of which is a subfloor, wind protection, layers of thermal insulation, vapor barrier, and flooring.
Requirements for the second floor floor
What kind of flooring in frame houses is used on the second floor? The main requirement for the floors of the second floor is that they must bear a minimum load on the building, since it is not recommended to build frame houses more than two floors high. The ceilings of the second floor do not give off heat and are less demanding on the type of flooring. The main requirement for floors of this type is lightness of construction and good sound insulation.
Sectional view of the second floor floor.
It is unacceptable to use a thick layer of insulating materials on the upper floors of a frame house. To reduce the load on the floor, you can make more rooms on the ground floor. Spacers and partitions will become part of the power structure of the house, thereby relieving the floor of the second floor of the frame house.
Step-by-step installation of a floor on a pile foundation
Let us describe the sequence of actions for arranging and insulating the floor of a frame on screw piles. Work begins after careful preparation of the wooden elements: treatment with an antiseptic and fire retardant compound.
Strapping device and lathing fastening
Let's assume that the piles are installed and the metal heads for fixing the beams are secured. Further progress of work:
- Drill four holes on each “bottom” of the screw supports.
- Lay waterproofing, for example, roofing felt, on the heads.
- Lay out the beams along the perimeter of the structure and connect the elements together “in half a tree.”
- Attach the beams to the heads with self-tapping screws.
- Insert the remaining beams inside the perimeter.
- Use steel staples to additionally connect the strapping parts.
- Check the horizontal placement of the beams.
- Fill the bottom of the beams with sheathing - a base for attaching the substructure.
Useful: Windows in a frame house: installation features
Rough base and thermal insulation
Lay sheets of OSB, chipboard or moisture-resistant plywood on top of the guide rails. If edged boards are used, they must be nailed perpendicular to the joists.
After preparing the subfloor, they begin to insulate it:
- Cover the base with waterproofing film.
- Place insulation in the cells between the joists. When cutting mineral wool, it is necessary to provide a margin of 0.5 cm on each side for the tightest possible fit and to prevent the appearance of cold bridges.
- Spread a vapor barrier membrane over the insulation with an overlap between the sheets. Tape the joints with construction tape.
Subsequent steps depend on the type of flooring .
Creating a thermal contour for the plinth
The installation of a floor in a house on stilts necessarily involves driving in the base. The following methods of insulating finishing are possible:
- Brickwork. The base is a cushion of crushed stone and sand. The fence is laid out in half a brick; reinforcement is not necessary. Ceramic or clinker bricks are used for work.
- Siding. Thermal plates are mounted on a lathing made of galvanized profiles or bars, assembled on piles.
- Profiled sheeting. Purlins are welded to the bored posts, which serve as the basis for attaching the profiled sheet.
- DSP. Sheet material is mounted by analogy with corrugated sheets. The outer part can be decorated with flexible tiles and porcelain stoneware.
Regardless of the chosen method of finishing the underground part, it is necessary to provide “vents” - openings for natural ventilation .
The blind area of the house is laid out from concrete screed, paving slabs or paving stones. When arranging, it is necessary to maintain a slope angle of 4° outward. It is imperative to seal the junction of the false plinth cladding with the blind area. This will prevent melt water and precipitation from entering the underground.
Protecting a frame house from mice
So, having chosen the strapping option, we come to the choice of the “pie” of the ceiling, that is, what should be laid there and in what order. And we always start with protection from small rodents that can live in the insulation if measures are not taken.
The main measure in our case is the use of a fine metal mesh over the entire floor area:
Rodent mesh, bottom frame frame on tape
In this ↑ photo you see the lower floor of the frame in Lomonosov; it was built on a ready-made old strip. But this does not change the essence of the matter, if there were piles there and not a tape, first we would have made the strapping and stretched the mesh in the same way. Like this:
In the photographs above, the lower floor of the frame at the SVF in Kiskelovo, the mesh is sandwiched between the lower frame and the board lying flat on the ends. In the case of the option with a triple bottom frame and floor joists on top of it, the mesh is mounted on top of the frame. The point is that the mesh is located immediately under the insulation, in order not only to protect it from rodents, but also to support it - to prevent it from sagging or falling out.
This is what the finished harness and stretched mesh look like from above:
Aerial photography of the construction site in Kiskelovo, lower ceiling and rodent mesh
We usually use woven galvanized metal mesh 0.7mm with a mesh size of 5*5mm, rolls 1*30m, but this size is not important, the main thing is that the mesh is small so that no mouse can get through.
The need to insulate the floor of a house on screw piles
Pile-type foundations have become widespread in construction due to their relatively low price, quick installation and good performance on unstable types of soil. The floor insulation scheme in a wooden house on screw piles is as follows:
- support frame made of timber;
- subfloor made of boards treated with a special composition or OSB (plywood, fiberboard);
- windproof layer, permeable to steam;
- thermal insulation coating;
- hydro- and vapor barrier layer;
- finished plank flooring.
Floors are made on a pile foundation by laying the material in the given sequence. Creating a blind area and finishing the base - these activities complement the entire insulation scheme and increase its efficiency.
General insulation scheme
Thermal insulation must be done to avoid the following problems during the further operation of the house:
- heat loss through the floor covering, reducing the energy efficiency of the building and increasing the cost of heating the premises;
- formation of condensation inside the structure (between the rough and finished floor);
- the development of putrefactive processes, the occurrence of mold, which are a consequence of increased humidity.
A warm floor in a log house, erected on screw metal piles, allows you to create favorable conditions for living inside and extends the life of the entire building.
The nuances of arranging a heated floor
Warm floors in a frame house on stilts are made using a water circuit or heating mats.
Arrangement scheme
- After installing plywood or OSB on the beams and waterproofing the subfloor, sheets of expanded polystyrene must be laid in the gaps between the joists. The top surface of the slabs should be flush with the trim.
- Spread a vapor barrier over the insulation, leaving a reserve of film around the entire perimeter based on the height of the finished floor.
- Lay the reinforcing mesh, fill it with a thin layer of cement-sand mortar and leave until completely hardened.
- Lay out the foil backing, shiny side up.
- Lay out heated floor heating mats and fill with concrete screed.
During the setting process, the solution must be moistened periodically to prevent cracks from appearing. After final hardening, you can lay the topcoat .
Arrangement of the load-bearing part of the floor in a frame house on stilts
After screwing in the piles, so-called caps are mounted on them. These are metal mini-platforms that will serve as support for the load-bearing part of the floor of a frame house. To prevent the metal from which the heads are made from reacting with the wood of the frame, the latter is insulated using rolled waterproofing material - roofing felt.
The base frame is a beam, which is installed and secured in the form of a lattice on a pile foundation. By default, 100×150 mm timber, laid on edge, is used for these purposes.
Next, floor joists are attached to the harness, which in the future will serve as a supporting frame for the floors in the house. Logs are unplaned boards 40x150 mm, which are installed on an edge with a pitch of 600 mm. Lumber is taken at natural moisture content.
The next stage is the arrangement of the so-called subfloor. It consists of a base made of edged 20-mm boards, from which a continuous sheet is assembled onto bars along the underside of the lag.
Why is there no wind and moisture protection in the lower ceiling?
Yes, yes, the VVZ film/membrane is not visible in the photographs. It's not visible because it's not there. But no, because it’s not needed.
Most often they write to me about this: “But what about moisture from the ground?”, “After all, the insulation will get wet!” and so on. But the trick is that stone wool can only get wet if there is direct contact with moisture in the form of drops or streams, which certainly won’t happen in the underground. But it simply doesn’t pick up moisture from the air.
So, only the issue of air permeability remains relevant, i.e. wind protection. Therefore, as the first layer I usually use denser stone wool, for example Paroc WAS 35.
Facade insulation Paroc WAS 35
The manufacturer confirms that there is no need to use wind protection (note that protection from moisture is not even mentioned) in the case of using these boards with limited air permeability:
The letter talks about ventilated facades, but this does not change the essence of the matter at all, because these windproof slabs work the same way, whether in the wall or in the ceiling.
Of course, this is not the only way to perform the “lower part of the lower floor”; as an option, it is also possible to use Isoplaat MDVP windproof boards, although they are more difficult to install. But I would not use wind-moisture-proof films or membranes. The fact is that such membranes are not capable of passing water in the liquid phase, which is extremely undesirable for covering, because water, with a high degree of probability, can get there sooner or later. For example, emergency leaks of communications; unfortunately, no one is immune from them.
Load-bearing structures of the floor of a frame house on stilts
The installation of a floor in a frame house can begin after the construction of a pile foundation and completion of the strapping. It is better to make it from timber, I-beam or channel. We will use wooden beams for strapping, to which we will attach logs. The span length of the framing beams should be no more than 3 m. If the span is greater than this value, then it is necessary to use additional supports from piles. For beams, you can take a beam with a cross section of 100X100 mm made of softwood.
Before laying the strapping, it is necessary to waterproof the base using penofol, roofing felt or plastic film.
Before laying the strapping, it is necessary to waterproof the base using penofol or roofing felt.
After installing the beams, you can proceed to laying the logs. The pitch of these elements is 500 mm. The construction of the floor in a house on stilts is carried out using beams (joists) with a section of 100x250 mm for the first floor and 70x200 mm for the second floor. If the spans to be overlapped are small, for example in a bathroom, then the cross-section of the beams can be reduced to 50x150 mm. In some cases, a lag pitch of 40 cm is used to increase the strength of the structure. For more information on how to install a floor frame, see the video at the end of the article.
Before laying the logs on the harness, you need to make markings equal to their pitch. Next, recesses along the width of the lags are sawed into the strapping beam. After laying in the grooves of the strapping, the logs are fixed with dowels, screws, nails or self-tapping screws.
Important: all wooden load-bearing floor structures must be treated with antiseptics and fire retardants to protect them from rotting and burning.
You need to attach 30x30 mm boards to the joists from below. To increase the strength of the floor structure, sometimes during construction the logs are connected to each other by transverse jumpers with a pitch of 150 cm. But this is not necessary. This kind of structural reinforcement is recommended if a heated concrete floor is to be installed.
As for the second floor floor frame, floor beams will be used here, not joists. We take their pitch to be 500 mm. The flooring will be laid directly over the beams.
Thermal insulation of the first floor
When deciding to build a frame house on screw support structures, attention is paid to insulating the first floor. The structural design of the floor covering of the second floor of a building is not so important. Here thermal insulation is practically not needed.
The construction of a capital structure on pile supports is carried out by filing beams. The underside of the logs is insulated with plywood sheets. The cross-section of the design resembles the letter W.
Thermal insulation
The base is clogged. Options:
- execution of brickwork. At the base there is a sand and gravel cushion, 0.2 m high. The arrangements are made in half a brick. A reinforcing frame is not required. A ceramic, clinker type of brick is used;
- siding. Thermal plates are fastened to galvanized sheathing or timber;
- facing with corrugated sheets. Purlins are fixed to the screw supports by welding - the basis for reliable fastening of the profiled material;
- cement bonded particle board. Installation is carried out similarly to fastening corrugated sheets. The facade of a building on stilts is decorated with flexible tiles or porcelain tiles.
Regardless of the type of cladding, holes are provided to organize natural air circulation.
The blind area is made with cement screed, paving slabs or paving stones. The tilt angle is maintained at 4 degrees. The junction of the facing covering and the blind area is sealed. This will protect the structure from the dangerous influence of melt water and precipitation underground.
Advantages of a pile foundation
Such a technological solution has a number of advantages:
- minimum draft level;
- Possibility of use on any type of soil;
- quick installation of the foundation;
- lack of a large amount of excavation work;
- high level of structural stability;
- slight susceptibility to aggressive environmental factors.
An important point is that with the help of a foundation on screw piles, it is possible to build frame houses in areas with a significant difference in height: on cliffs, slopes of lowlands or ravines, artificial embankments.
On a note
The weaknesses of the described technological solution include the inability to equip a basement and the difficulty of insulating the floor in a frame house on stilts.