Choice of shape and material
The chimney cap was invented quite a long time ago . It solves several practical problems:
- protects the chimney from external factors: rain, snow and wind;
- acts as an additional roof decoration.
It is important to provide, first of all, protection from wind and precipitation, otherwise the walls of the chimney will be destroyed under the influence of weather conditions.
The cover should be selected in accordance with:
- channel type;
- hole diameter.
Based on these indicators, select:
- a cap made of chrome and nickel if the house is heated with gas;
- a removable product if the apartment is heated by a fireplace, solid fuel boiler or wood stove.
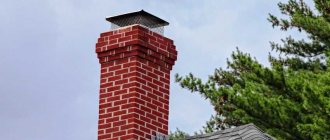
The main types are models with a round and square base, stationary or folding, made of tin - chromium-nickel or black.
Many modifications are unfounded. They are fixed directly to the chimney duct. Today, chimneys made of galvanized or stainless steel and copper have appeared. It is also possible to select modifications so that the shade of the cap matches the color of the roof. The selected option must correspond in functionality to the specific type of pipe. It should also match the style of the building.
Roof sealants
When passing through the roof, the most important thing is to remove the water flowing down the roof and the pipe itself. To protect against precipitation, protective aprons are used, the upper edge of which is placed either under the sheet of roofing material located above, or under the ridge.
The apron is placed either under the sheet of roofing material located above or under the ridge
When venting the chimney through the roof, it must be fixed, but so that it remains movable relative to the roof. Otherwise, due to thermal expansion/contraction, the integrity will be compromised and leaks will certainly appear. For example, a round pipe can be given direction by metal strips or corners.
When installing, check the verticality using a plumb line - this is important so that soot does not accumulate and there is good traction.
The pipe should not be fixed rigidly when passing through the roof.
If the chimney is brick, rectangular or square in shape, you can use the materials included with the roofing material.
When passing a brick pipe through the roof, you can use elements offered by roofing material manufacturers
If the roof is made of metal tiles, then the companies that produce it offer special tapes for sealing the joint with the pipe, on one side of which an adhesive layer is applied. These elastic bands are a complex compound containing aluminum and/or lead. One edge of such a tape is glued with the adhesive side to the base of the chimney, the other - to the roof sheathing. The upper edge is additionally fixed with a metal strip, which is attached to the brick with heat-resistant dowels.
To reduce the likelihood of water flowing along the wall, you can make a recess under the bar - a groove. Then the tape and bar will be in the recess. To completely eliminate water seepage, a heat-resistant sealant is applied to the joint.
They practically also seal the passage of a pipe through a roof made of soft tiles or roofing felt. But in this case, instead of an elastic tape, the tiles or roofing felt themselves are placed on the chimney.
When a pipe passes through a roof covered with soft tiles, its edges are placed on the chimney or apron
You can make an apron for a square or rectangular pipe yourself. Roofers usually use sheet metal for this, but sheet aluminum works well. Four separate parts are made of metal - two side, front and back.
An apron for a rectangular or square pipe is easy to make yourself
The metal strips are bent so that one part fits onto the pipe, and the second is attached to the sheathing. In a brick chimney, in the upper part of the apron, an edge is made, which is inserted into a special groove and coated with sealant. To prevent water flowing down the apron from getting onto the sheathing and insulation pie, a sheet of metal of large width is placed under the front part of the apron, with curved sides along the edges. It goes under the roofing material and is called a “tie.”
If metal tiles are used on the roof, then an apron is made from a smooth sheet of the same color, the upper edge of which is tucked under the row of roofing material located above so that water flows onto the apron and does not flow under it. If the pipe comes out close to the ridge, you can either tuck it under the ridge itself, or bend it to the other side.
There is one important nuance: if the width of the brick chimney is more than 80 cm (its size is perpendicular to the rafters), you need to make a slope - a small gable roof located higher. It removes sediment, reducing the likelihood of leakage. But such a width of chimneys in a bathhouse is the exception rather than the rule.
Modern round chimneys in bathhouses are usually a sandwich pipe. Occasionally, you can still see asbestos pipes on the roofs of bathhouses, and even more rarely - a single pipe without thermal insulation.
A simple single wall, which is discharged through the roof, carries a very high probability of a fire. Therefore, using this option is extremely undesirable.
Modern round pipes are usually sandwich pipes.
The video below shows an option for sealing a pipe when installed on a metal tile roof.
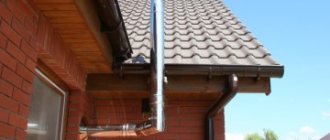
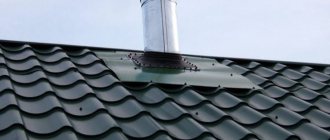
If metal tiles are used as a roofing material, then manufacturers often offer roofing passages. They are made from a sheet of the same color and connected to a special cap through which the pipe passes.
Pipe passage through a metal roof
It is easy and simple to seal a round pipe on the roof if you use a factory penetration. It consists of an aluminum flange to which an elastic part made of rubber or silicone is attached.
Factory-made penetrations are the easiest option for sealing the junction of a pipe and a roof.
They come in different sizes and have different slope angles. You can choose it for any diameter, roof type and installation location. The penetration flange is coated with a composition similar to the composition of the corrugated part; there are grooves along the edges into which they are filled with sealant. One of the penetrations, “Master Flash,” has 11 sizes that cover diameters from 3 to 660 millimeters.
Walkthrough "Master Flash" MASTER FLASH
When installing such a penetration, part of the corrugation is cut off in accordance with the required diameter. Then it is put on the pipe. The rubber must move with force to ensure a tight fit. Since the hole is about 20% smaller than the diameter of the pipe, you have to pull hard. To make less effort, you can lubricate both with soapy water.
How to install a factory penetration
After the corrugation is pulled to the desired location, the flange is given the required shape - the material is plastic and you can use a hammer, but you need to work carefully.
Using a hammer, give the flange the required shape
Then the grooves located on the inside are filled with sealant, the edges are pressed against the roofing material and secured (self-tapping screws are included in the kit). If the roofing material is not iron, self-tapping screws are not suitable. You need to use either long screws that will reach the sheathing, or dowels for the floor slabs.
Split model of penetration
There are quite a few options for factory-made penetrations, and there are detachable models. They are used when there are thickenings on the pipe or when they have to be mounted on an already assembled chimney of great height. In this version, the kit includes clamps that connect the parts of the passage to each other. The rest of the installation is similar.
The video shows how to seal a penetration through a regular slate roof using a MASTER FLASH corner penetration.
In order to seal the joints of different parts of the bathhouse pipe passage through the roof, you need to use not just a roofing sealant, but always a heat-resistant sealant. It is advisable to use a neutral silicone heat-resistant sealant.
Roofing silicone sealant retains its properties in the range from -50°C to 300°C, which is sufficient for all weather conditions and is quite suitable for sealing a chimney.
Roof sealant must be neutral and heat-resistant
But you need to remember that the surface to be treated must be clean and dry. The time for complete hardening is indicated on the packaging, usually 24 hours.
Architectural form
As for the architectural shape of the cap, a multi-slope weather vane can perfectly protect against precipitation and snow.
This chimney looks very impressive, especially if you place figures of any animals made of metal on top. Models with a flat surface are more often used. There are caps with an opening lid, which are also popular. They are convenient for preventive maintenance and unhindered maintenance of the chimney. The deflector, which has a ventilation hole in its body, significantly improves traction.
But the smoker is not always used. There is virtually no need for it in areas where there is rarely precipitation and virtually no wind. But for Russian latitudes it is a necessity.
Chimney umbrella
A chimney hood can be installed for several reasons:
- it is capable of partially closing the mouths from blowing wind, due to which the draft is prevented from overturning;
- the chimney prevents small debris from getting inside;
- mesh design provides protection from nesting birds;
- such a product extends the service life of the head of a brick pipe, which can be destroyed under the influence of precipitation;
- A weather vane of this type has good decorative qualities, and therefore is able to complement the architectural appearance of the building.
Installing the hood
Here you should focus on safety and practicality. The last thing you need to think about is the external attractiveness of the structure. It is important to consider the following recommendations:
- Round steel pipes cannot be covered with traditional shaped structures. They remove smoke from highly efficient boilers whose efficiency exceeds 85%. It is better to use conical nozzles made in the form of an open nozzle. They will not become covered with a crust of ice in freezing temperatures.
- A brick chimney, devoid of inserts, connected to a high-efficiency heat generator, can be equipped with a cap-shaped nozzle. A pipe passes through it.
- It is advisable to install an umbrella on stoves with vertical channels. This shape performs a protective function on the chimney. But to make this possible, it is advisable to place a stainless steel plate inside.
It is recommended to install hip or gable hoods on smoke exhaust blocks made of brick and equipped with side vents. Due to this, the upper part of the masonry will be protected from precipitation and wind. In this case, contact with the gas duct openings on the sides will be excluded.
To protect a brick block, where chimney and exhaust pipes are open at the top, you can make a box with several through pipes. They, in turn, are inserted into the specified channels. Conventional mushroom-shaped caps are installed on top of the ventilation terminals, while conical nozzles must be installed on gas terminals.
DIY materials
Resources for homemade protective installations for smoke ducts are selected depending on the characteristics of the planned work. Most often, galvanized steel sheets or corrugated stainless steel are used. If the process of arranging a gas duct indoors or on the attic floor is to be done, fire-resistant plasterboard is used. For brick chimneys, wooden protection is sometimes made in combination with basalt insulation and steel cladding. At the same time, do-it-yourself galvanized and corrugated chimney casing models are positioned as durable and effective options.
Making a visor
You can make a cap for the chimney pipe with your own hands. The drawings will help you navigate this, but it is important to follow all the parameters specified in it. First of all, you need to determine the external dimensions of the head. The umbrella will be attached here. Following this, you need to sketch a sketch depicting the future structure. To do this correctly, you need to consider the following points:
- the diameter of the product must be 10 cm larger than the dimensions of the pipe so that the edges protrude on all sides up to 50 mm;
- slope angles should vary from 30 to 45 degrees;
- from the chimney cut to the fungus, the minimum height should be 100 mm.
An umbrella is a traditional solution . There are other design options:
The latter makes it possible to increase traction through wind pressure. Thanks to it, a vacuum is created in the cylindrical body, into which the smoke channel passes. In calm weather, this device retains all its positive qualities. At the same time, it reduces the traction force in the pipe, which results in increased resistance at the exit of combustion products.
A semi-cylindrical weather vane is often popularly called a “sycophant” because it turns with the wind. It is mounted on a special bearing and consists of several components. This is one of the best options, but there are doubts about the reliability of the bearing, and the price of this design is high. It is especially good to install such a model on a round chimney, as it protects the mouth of this device from precipitation and blowing out.
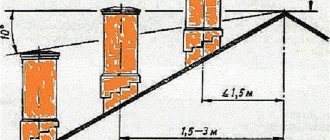
How far should the pipe be raised above the ridge of the bathhouse?
When installing a pipe, the following rule applies: “The closer to the ridge, the higher the pipe should be raised.”
Elevation of the chimney above the roof plane
- If the distance from the center of the chimney to the roof ridge does not exceed 1500 mm, the pipe must be raised above the ridge by at least 500 mm;
- With a distance from the center of the pipe to the ridge from 1500 to 3000 mm, the top of the pipe can be at the same level as the roof ridge;
- At a distance of more than 3 meters, the top of the pipe must be no lower than a line drawn down from the ridge at an angle of 10 degrees to the horizontal.
The most convenient option for bringing the pipe through the roof is to pass it through the ridge. In this case, installation is easiest; there are rarely snow pockets on the ridge, and thanks to this arrangement, it is easy to carry out insulation work. But this method has a drawback: the rafter system should not have a ridge beam.
The most unfortunate option for placing a chimney is in a valley (a valley is a roof element made of a kind of tray, forming an internal angle between the joints of the pitched roof elements). Large masses of snow usually accumulate here; during rain, water flows down from two slopes, so even with the most careful insulation, a leak will only appear a matter of time.
The most convenient option for venting the pipe through the roof is near the ridge
Based on this, the most acceptable option for pitched roofs is not far from the ridge, but below it:
- installation is quite simple,
- There is usually little snow accumulation, which means there is no need to install snow retention,
- installation is not the most difficult,
- Due to the not very high height of the pipe, it does not need to be reinforced with braces.
If it turns out that the chimney runs close to the floor beams, or close to them (the minimum distance should be 13-25 cm depending on the type of pipe), exits in the valley or close to the slope, an additional elbow, with which you can lead the pipe to the right place.
If the roof of the bathhouse is pitched, the most reasonable solution would be to organize the pipe outlet through the roof near the top point of the roof.
Bathhouse roofs, as a rule, have solid insulation, which solves the problem of heat preservation. To ensure good heat and moisture protection properties of the roofing pie, it is necessary that the membranes and films of heat and moisture protection are continuous.
By bringing the pipe through the roof, we necessarily violate their integrity. Moreover, according to fire safety standards, the distance from the pipe to flammable materials (which are vapor barrier and waterproofing films) must be at least 13-25 cm. How to get out of this situation? The best option is to separate the area where the pipe passes through the roof.
It often happens that “the pipe hits the rafters.” In this case, the rafter leg is cut, additional rafter legs are installed, as well as cross beams. This creates a box for the safe passage of the chimney through the roof
The space between the pipe and the rafter structure is filled with mineral wool. Not with fiberglass - it does not tolerate high temperatures, but with basalt wool, which tolerates temperatures normally and does not lose its heat-insulating properties when exposed to moisture.
At the same time, to ensure the tightness of the roofing pie within the box in which the pipe will be located, the materials are cut into an “envelope”, the edges are wrapped up to the beams and rafters, secured with staples or nails (counter sheathing strips can be used). To prevent moisture from entering, the areas where materials adhere to the wood must be additionally insulated using adhesive tapes or sealants.
The roofing pie at the passage site is cut into an “envelope” and secured to the sheathing and rafters
But there is another option. If the temperature of the pipe in the area where it passes through the roof does not exceed 50-60°C, you can simply glue the roofing cake films using the same sealants and adhesive tapes. This is possible if, for example, a tank for heating water is installed on the pipe after exiting the firebox or an additional heater is installed, etc., but it is not a sandwich that goes out onto the roof.
In any case, to drain condensate in the waterproofing layer, you will need to attach a drainage groove. You can buy it (usually it is made from stainless steel), or you can make it yourself from a film of sufficient thickness. The groove is secured around the pipe and its end is pulled out to the side. Thus, the condensate flows into this groove and is discharged onto the roof slope.
Making a Simple Round Umbrella
To perform such work, you need to prepare tools: a drill, metal shears, a hammer and equipment for installing rivets. Once the size of the fungus is determined , work is performed in the following order:
- Screw two self-tapping screws into a wooden plank, maintaining a distance between them equal to the radius of the product + 15 mm. It turns out to be a homemade compass, with which you can make a mark on the metal, marking the central part of the circle. Its outline is also drawn.
- The workpiece is cut with scissors, after which a sector is drawn, the arc length of which is 120 mm. The resulting figure is somewhat reminiscent of a piece of cake.
- The indicated wedge is cut out, and then the outer edges of the figure are aligned with force. Fix them with a vice.
- Drill three holes along the resulting line and connect the ends of the part with screws or rivets. The upper part of the weather vane can be considered ready.
Using steel strips, legs for the fungus and a clamp encircling the pipe are created. They take thin sheets that are bent several times. These parts are similarly secured to the umbrella with rivets.
Gable model
To make a gable weather vane, you need to use a machine called a sheet bender.
Just as in the previous case, first measure the outer surface of the brick chimney. Calculate the pattern and make the corresponding diagram. Next, the cap is assembled using a simple algorithm.
You need to cut the metal and bend it following the dashed lines. The resulting parts must be connected with rivets. The function of rigid racks is performed by ready-made corners made of painted metal , the thickness of which varies from 0.5 to 0.7 mm.
Do-it-yourself chimney deflector drawings and photos
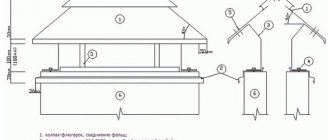
To make a deflector, it is first necessary to develop drawings of the future device, which are integral elements of the work.
Variety of chimney cap configurations
To make correct calculations regarding the design parameter, it is necessary to know the internal diameter of the chimney.
Table for correct calculation of a chimney deflector.
| Internal diameter of the chimney d, mm | Deflector height H, mm | Diffuser width D, mm |
| 120 | 144 | 240 |
| 140 | 168 | 280 |
| 200 | 240 | 400 |
| 400 | 480 | 800 |
| 500 | 600 | 1 000 |
Algorithm for performing manipulations:
- All elements of the drawing are transferred to paper;
- The paper elements of the structure are pre-connected, as they should be in the final form;
- All elements are transferred from paper to building material and cut out;
- To make a diffuser, metal is rolled into a cylindrical structure. The edges of the building are fastened;
- The outer cylinder is made in exactly the same way;
- Strips (3 - 4 pieces) about 20 cm long and 6 cm thick are made of metal material. The elements are attached to the cap;
- The umbrella is attached to the diffuser and built into the outer cylinder.
Helpful advice! Where the structure is bent, the metal should be bent and tapped to make it thinner.
Cap for rectangular pipe section
European cap
This model is more designed to prevent the formation of condensation and has a rounded appearance. A chimney of this type can be made independently using a steel sheet and hand-made holders.
How to make a European cap:
- Take a standard metal sheet and carefully bend it around the pipe, or directly along the contour of the chimney.
- They remake the spoons that will hold the cap directly on the pipe. It is best to do this with a special machine or ask a welder you know. You can also make transverse cuts that do not go all the way and carefully bend the strips using pliers.
- These cuts do not have to be transverse. It is permissible to use longitudinal strips if the piece of metal is quite long. A rectangle is cut out along the edges and the tails are left in the center. After this, roll the sheet in the shape of a semicircle and press the tails with a clamp.
- Gently bend the legs.
It is permissible to use a regular chimney pipe clamp to mount such a cap on the pipe.
To make a European cap, all you need is a piece of sheet metal and a grinder disc.
DIY assembly
We’ve sorted out the theoretical part, now let’s look at the sequence in which the actions need to be performed in order to make a device with your own hands
Step 1.
First, take a metal blank and place it on the table so that its front part “looks” up. In the place indicated in the drawing, make a hole about 3.5 millimeters.
Step 2.
Bend the workpiece along the lines indicated in the drawing by dotted lines, at an angle of 90 degrees. This cannot be done by hand, so you will need a sheet bender. In this case, the lines will be extremely clear, and there will be no dents. In the absence of such a device, you will have to use improvised means: fix the edge of the corner with the shelf facing up on the workbench. And in order to bend the product along the entire line at one time, use a regular block.
Step 3.
Bend the workpiece along the lines marked with the letter d. Regarding the angle, we won’t recommend anything specific - determine it experimentally so that the result is a solid cap. The entire structure should be smooth, without deformations or distortions (to check their absence, place the product on the table). If everything is fine, take a marker and mark the location of the future hole on the lower stiffener rib. After that, mark it and drill it.
Step 4.
Take the chimney and fasten it with 3.2 mm rivets.
Step 5.
Bend the workpiece along lines b and a so that the legs can be fixed.
Step 6.
Based on the outer diameter of the smoke channel, build a base for the hood using metal corners. It is important to position the corners so that one side is on the side, the other rests against the brickwork. Then prepare the legs for the future structure, and then connect all the elements using electric welding.
Step 7
Clean the base and apply an anti-corrosion agent to it. After the last one has dried, apply two or three coats of exterior paint.
Step 8
Secure it to the base.
Attention! If a square cap for a chimney pipe seems too complicated to you, you can resort to a simpler option.
Option No. 2 A simple way to assemble a cap for a chimney pipe
This option is very easy to implement if you have curved sheet metal of the appropriate size on hand. And if you only have a regular sheet, not a curved one, you can bend it using a special apparatus (every tinsmith should have one). The algorithm of actions in this case will be somewhat different.
Step 1.
Measure the chimney and, based on the data obtained, build a base for the future chimney.
Step 2.
Position the corner so that the entire structure is securely held: one edge will cover the chimney pipe from the outside, the second will rest on the edge of the pipe.
Step 3.
Make legs that will connect the structure to the base and at the same time support the cap. Make the legs extremely powerful so that they can withstand the weight of snow and withstand strong winds.
Step 4.
Treat all elements with an anti-corrosion agent and apply several layers of paint (same as in the previous version).
Step 5.
Assemble the structure (the assembly method depends entirely on the material used).
Below is a video that describes in detail how to make the product with your own hands; here the author installed the structure on a ventilation pipe, although this option is also acceptable for a chimney from a solid fuel heat generator.
Video – Deflector
Here's another working option.
Video - Making a cap for a pipe
Installing the deflector
Its effectiveness has been proven by many owners of houses and cottages who have used this model.
Despite the fact that the price of such products can reach up to $140 for standard designs, the demand for them remains constant. In order not to overpay, you can make the described device yourself . The whole process will take no more than 3 hours. It all depends on the skills of the collector. At the first stage, a drawing is created, after which the blanks are made. Next comes the assembly of the device and its installation on the chimney, followed by fastening.
Before drawing drawings, you should calculate the diameter of the outlet pipe and the diameter of the cap. It is also important to measure the height of the deflector itself. To prevent mistakes at this point, special formulas will help:
- height=1.6−1.7 x diameter;
- diffuser width=1.2−1.3 x diameter;
- cap width=1.7−1.9 x diameter.
After drawing the outline of the blanks on paper, you can proceed to creating metal blanks.
It is better to take stainless or galvanized steel, the thickness of which varies from 0.5 to 1 mm. After preparing the metal pattern, you can begin the assembly stage of the product. This will require a drill , riveter or welding . If the latter option is preferred, maximum care must be taken so as not to burn through the deflector section.
The cap is secured to the base with legs, which are drawn in the same way on paper and then cut out from a sheet of stainless steel. When all these stages have been completed, only the most crucial moment remains - installation on the chimney.
Drill holes on the pipe to secure the deflector. Rivets are fixed. After this, you need to check whether the installed device has a slope in different directions. Installation of a clamp will be required if the deflector is loose. If the pipe is not made of brick, this option will come in handy. If we are talking about a ceramic pipe, then you will have to use special adapters.
Types of structures
To date, fungi have been developed in a wide variety of varieties. We will tell you about the most popular of them.
So, according to consumer reviews, the most interesting are:
- Wolpert-Grigorovich deflector. Characterized by a round shape and a cone-shaped umbrella. As a rule, it is not equipped with a drip.
- Four-sided fungus. It has a rectangular shape. Installed on brick chimneys with the same configuration.
- Mushroom with a semicircular roof. The design of this variety is quite aesthetic. It can often be seen on the roof of buildings built in the European style. But the effectiveness of this fungus is unfortunately low.
- Flat visor. It has a flat rectangular canopy. Such products are typical for decorating houses in a minimalist style. It is important to know that the brackets of this product are subject to heavy loads in winter. This is due to the accumulation of snow on the umbrella.
- Standard fungus. It has a pyramidal design. This type is made from a sheet of metal and connected to a drip apron using special brackets.
Is it possible to put a cap on a chimney pipe and how to do it correctly
Such a simple thing as a cap on a chimney pipe raises many questions: what should it be like, how to make a cap with your own hands, and in general, is it necessary to install it? Discussions and disputes on this topic occupy more than one page of the popular forum, but you will not find a definite answer there. Let's try to solve these problems ourselves, starting with the need to install a protective cap.
Why do you need a pipe casing?
The chimney pipe on the roof is a very important part of the chimney structure. Its location, the material from which it is made, as well as additional devices on the chimney - all this affects the draft performance in the system. This part of the chimney structure is located outside the building, so it is affected year-round by various destructive environmental factors: precipitation, wind, temperature changes.
Regardless of what material the chimney is made of, these factors gradually destroy it, which inevitably leads to a deterioration in draft performance in the system. And as you know, traction is the main indicator that determines the performance characteristics of the system as a whole . Therefore, installing a protective casing on a chimney pipe not only provides its protection, but also extends the service life of the chimney structure.
Let's look at the main functions performed by the box covering the part of the chimney located above the roof:
- such cases protect the chimney from mechanical damage and pipe destruction under the influence of environmental factors;
- covers create an additional margin of safety (this function is especially useful for regions where the wind load exceeds the permissible level);
- thermal insulation of the chimney. Boxes installed on chimneys reduce heat loss, which has a positive effect on draft in the system.
The casing can be used to protect chimneys made of different materials; this element is placed on an already finished pipe
Note! The chimney cover is also a decorative element that can be used to hide an unpresentable structure.
The installation of such casings, as a rule, is carried out after installing the chimney structure, however, this measure is also relevant for old buildings, since it allows you to protect the old chimney from destruction.
Chimney umbrella - pros and cons
The following arguments speak in favor of installing various caps (other names: fungus, umbrella, weather vane, chimney) on chimney heads:
- the umbrella partially covers the mouth from being blown in by the wind and thus reduces the likelihood of the draft overturning;
- the chimney serves as protection against the ingress of debris and moisture in the form of precipitation;
- if you use a mesh structure, then birds will not be able to nest inside the chimney;
- the product extends the service life of the head of a brick pipe, which is destroyed by wind, rain and snow;
- fungus with decorative elements complements the architectural style of the building.
The hood is equipped with a mesh on the sides to protect the chimney from birds.
Note. When compiling the list, we did not take into account false information from advertisers. Claims that umbrellas increase draft in chimneys and increase the efficiency of boilers are pure fiction.
Now let's look at the counterarguments. The main negative point is that the chimney cap in the form of a fungus stands in the way of combustion products. That is, it prevents the free escape of gases, creating noticeable aerodynamic resistance. This means that the chimney umbrella does not increase draft, but, on the contrary, reduces it.
The second disadvantage of using attachments has been repeatedly confirmed by sad statistics. The fact is that one of the products of combustion of hydrocarbons is water vapor, which escapes into the atmosphere along with smoke. Diesel and gas domestic boilers with high efficiency emit gases with low temperatures (up to 120 ° C). As they rise through the pipe, they cool and then come into contact with the metal of the cap.
Examples of icing on chimneys equipped with nozzles
The water vapor immediately condenses and freezes at sub-zero temperatures, causing icicles to form on the umbrella, blocking the cross-section of the chimney, as shown in the photo. As a result, fumes enter the room and poison the residents of the house. There are other arguments against installing fungi:
- In modern round chimneys there is no place for birds to live, so there is no need to cover them with a net.
- A properly constructed flue channel has a condensate collector at the bottom with a drain, where water that has entered the pipe in the form of precipitation will safely drain.
- Thin galvanized caps installed on the chimneys of solid fuel boilers and stoves burn out in 3-5 years due to constant contact with high-temperature gases (150-200 °C). It is necessary to install a stainless steel reflector, which increases the price of the product.
Is it necessary to install a cap - recommendations
Regarding the installation of umbrellas on chimneys, the regulatory documents of different countries put forward different requirements. For example, in European countries it is allowed to install nozzles only on ventilation ducts, but on chimneys it is strictly prohibited. In Ukraine, caps cannot be placed on pipes connected to gas boilers. In the Russian Federation and Belarus there is no direct ban, but the wording of SNiP is very vague:
“Deflectors, umbrellas and other attachments on chimneys should not interfere with the free exit of combustion products.”
We suggest approaching the issue from the point of view of safety and practicality, and only then thinking about beauty. Before making and installing a cap on the chimney, consider the following recommendations:
- Round steel pipes that remove smoke from highly efficient boilers with an efficiency of more than 85% cannot be covered with traditional fungus. Use a conical nozzle in the form of an open nozzle, which will not freeze up in any frost.
- A brick chimney without inserts, connected to a high-efficiency heat generator, can be protected with a cap-shaped nozzle with a pipe passing through, as is done in the photo.
- It is allowed to install umbrellas on vertical ducts from stoves and TT boilers. To ensure that the iron hood performs a protective function on the chimney for a long time, provide a stainless steel plate inside.
- It is highly advisable to install gable or hip hoods on smoke exhaust blocks made of brick and equipped with side vents. The goal is to protect the upper part of the masonry from precipitation and wind, without touching the flue openings on the sides.
It is noticeable here that the cap does not prevent smoke from escaping through the side vents, but over 15 years of operation, the iron above the flue has become covered with rust.
To protect the brick block, where the exhaust and chimney pipes are open at the top, order or make a box with several through pipes inserted into these channels. Place regular mushrooms on top of the ventilation terminals, and conical nozzles on the gas terminals, as shown in the photo.
Exhaust and smoke ducts are equipped with different nozzles
Recommendations from experts
It is not recommended to install a deflector on the chimney pipe of gas equipment. Since low gas temperatures in winter can lead to the horizontal part of the chimney outlet freezing, and the deflector helps to intensify this kind of tendency.
Experts do not recommend weather vanes, since their rotating elements fail quite quickly. In winter, due to the formation of condensation, they become covered with ice, which leads to loosening of the pipe masonry. Therefore, the best option for chimneys are canopies.
An example of a “smart” deflector with a rotating hood
Which design of visor to choose depends on the cross-section of the pipe. For example, for a round chimney, most often the canopy is of an identical shape, but for a rectangular structure it can have a large number of types.
How to make a chimney canopy
First of all, you need to find out the external dimensions of the head where you plan to attach the umbrella, and then sketch out a hand-drawn sketch depicting the future structure. To develop it, use simple rules:
- the dimensions or diameter of the product must be 10 cm larger than the dimensions of the pipe, so that the edges protrude 50 mm on all sides;
- slope angle of the slopes – from 30 to 45°;
- the minimum height from the chimney cut to the fungus is 100 mm, as shown in the drawing.