With the advent of suspended plasterboard ceiling structures, and later all kinds of suspended ceilings, the rough finishing of this area became significantly easier. There is no longer any need to create an ideal plane, as for painting or wallpaper, there are fewer wet processes, and the pace of work is higher. However, some preparation is necessary, and the specific set of operations depends on the type of foundation. Let's consider how to prepare a rough ceiling on wooden beams and a concrete floor for a suspended fabric, as well as other nuances associated with suspended ceilings.
When a suspended or suspended ceiling is the best option
In addition to situations where a plasterboard structure or tension fabric is chosen because you like it, there are conditions when these particular options are advisable in principle. In private homes, such a need arises less often, since when pouring a monolith or laying slabs, the quality is under control. Whereas in apartments, especially older ones, it is not uncommon to have large differences between the slabs and it is too problematic to bring the ceiling into a plane.
VnikolaevForumHOUSE Member
Tell me how to level the ceiling if there is a very large difference in the slabs. They advise me to use plasterboard or suspended ceiling.
Kopey71FORUMHOUSE Member
They advise correctly. With differences of more than 3-4 cm, if you pull with plaster, even on a plaster mesh, there is a high probability that the ceiling will swell - the plaster will move away under its own weight. Even up to three centimeters, four is already a big risk. The ceiling will hit your head and it will hurt. If you're lucky, it won't hurt you at all.
Which option to choose depends on many factors, but often the decisive factor is the height - the plasterboard ceiling will “eat” more. In addition, if you wish, you can assemble a spatial frame from a profile, sheath it and seal the joints yourself, whereas it is better to invite professionals for suspended ceilings.
Work order
A person who has never dealt with repairs or finishing work, but wants to do everything in the house with his own hands, is unlikely to assess the condition of the ceilings and the necessary repair work at first glance. On the one hand, this is not very good, but on the other hand, when a person makes repairs in his house, he has a whole lot of time for everything. It is from this that the entire procedure for ceiling repair work will flow.
- First of all, inspect the ceilings and decide what kind of final finish you will have.
- If you have a flood, be sure to evaluate and document the condition of the ceiling before repairing.
- The room must be completely dried by opening the windows.
- Re-documenting the condition of the ceiling.
- We make repairs according to the chosen finish.
Preliminary inspection of a damaged ceiling
The main goal when inspecting a damaged ceiling is to identify all the defects that need to be corrected. It happens that the ceiling may sag in the middle, then it is necessary to inspect the structure of the beams and identify the cause of the sagging. Until the problem is fixed, there is no point in starting repairs. If you have concrete floors with cracks between them, then they need to be completely cleaned and re-plastered, and in the future you will have to level the ceilings around the entire perimeter. If your neighbors flooded you, then you need to let the ceiling dry completely. Examine the condition of the plaster and, if it has not come off, putty it with pre-treatment with special solutions so that moldy spots do not appear on the ceilings.
Documenting damaged ceilings
Documentation will be, in this case, ordinary photography. This is also necessary for identifying defects. For example, if you take a piece of fiberboard and place it in the garage for several days. With an ordinary glance, you will not be able to determine the condition after you pick it up after some time. And if you take a photo before placing it in the garage and after, and compare the result on a computer, you will see that after the piece has become darker. If you dry it even with an ordinary hairdryer, salt may appear and streaks will appear.
This must be done so that after the completion of repair work on the ceiling, a stain that did not seem to exist does not appear after the repair. There are times when after repairs stains appear that you didn’t even see, the so-called hidden stains. Maybe the old owners painted the ceilings with oil paint before plastering; the oil, which is perfectly absorbed into the concrete floor, is biding its time. Therefore, after your ceiling has been damaged, you need to dry it thoroughly.
How to properly dry ceilings
Craftsmen who work on ceilings dry them with a hair dryer after the surface has been completely cleaned, before the ceilings are covered. But for good household drying, there are other excellent methods that we will talk about now.
- On trestles around the entire perimeter of the room you need to hang the most ordinary hundred-watt light bulbs at the rate of one light bulb per square meter. This method will not damage your wiring, but will only increase your electricity costs.
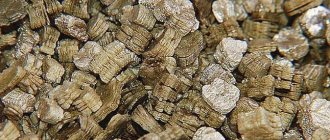
- In the middle of the room, half a kilogram of silica gel per square meter is placed in vapor-permeable bags. You can use the most inexpensive and even painted one.
- A stool is placed in the middle of the room and scales are installed, on which several bags filled with silica gel are placed. Using a scale, you can easily monitor the level of moisture absorption.
- The light bulbs on the trestles on the silica gel side need to be covered with something so that the heat from them does not dry out the silica gel, you can use ordinary sheets of fiberboard or sheets of plywood.
- The room must be completely closed, without drafts or slightly open windows. If, due to poor quality installation of plastic windows, the sashes do not close tightly and there is a slight draft, then you need to adjust your PVC windows.
Ceiling finishing: options
Drying the ceiling using this method will take you no more than one day. As soon as you notice that the silica gel has stopped gaining weight on the scales, or the indicators have significantly slowed down in growth, you can finish drying after about two hours, be sure to photograph the final result and compare it with previous photos.
It is also necessary to keep control of the temperature in the room being dried. If it becomes too hot, the lamps are turned off until the temperature drops within 40 or 45 degrees and the lamps can be turned on again.
Stretch ceilings on reinforced concrete monolith and plank filing
serg_hmaoFORUMHOUSE Member
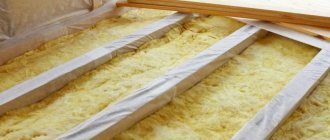
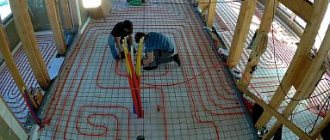
Please tell me what preparatory work needs to be done before finishing the ceilings? On the second floor, the ceiling is lined with boards, behind which there is a vapor barrier and insulation. On the ground floor the ceiling is reinforced concrete, poured. Ceilings are planned, both suspended and in combination with plasterboard. I’m wondering if it’s necessary to cover the boards with something so that nothing gets onto future suspended ceilings through the gaps between them? And also, as it turned out, the wiring on the walls under the ceiling was laid, in some places 3 cm, in others 5 cm, and in others 8 cm. How not to fall into it? Is it safe to lower 10 cm or what? Now the ceiling height of the 1st floor is 2.90 m, the 2nd floor is 2.75 m.
When laying a vapor barrier on the second floor, the joints were not glued, plus increased air humidity during the drying of the screeds and plaster, which is why the boards, packed tightly, dried out and cracks appeared. In its original form, before plastering the walls and after, it looked like this.
The preparation of concrete bases is standard - remove (knock down, tear off, chisel away) everything that can peel off and fall onto the canvas. If the ceiling is slab, with a joint, seal the seam (sealant, foam, DSP, putty), after it dries, prime the surface. The fact that serg_hmao has a monolith with unevenness does not play any role for the tension fabric, the main thing is that nothing can fall off.
As for the wooden sheathing, due to the cracks and unglued vapor barrier, in the future it is possible for both debris to get on the canvas and the insulation to get wet. Therefore, serg_hmao hedged his bets.
serg_hmao
On the first floor, I knocked off everything that could fall off in the future from the concrete floor and covered it with a primer. On the second floor I lined the boards from the room with the cheapest vapor barrier. Using photographs and an indicator, I outlined the wiring locations. I installed suspended ceilings in all rooms, lowering them by 10 cm. The wiring is intact. Everyone is happy.
KaMaZik had a similar situation, minus the concrete floor - he covered the lining boards with an antiseptic and also attached another layer of vapor barrier on top, since he was not sure of the quality of the existing one.
How is the ceiling leveled?
If it is necessary to ensure a perfectly flat ceiling surface for finishing, leveling is carried out in several stages:
- Sealing and elimination of defects. All convex irregularities (sagging) are removed with a spatula, chisel, chisel or emery cloth. The cracks are first widened slightly with a spatula and then filled with putty. Particular attention is paid to the joint of floor slabs. Here, if there is a noticeable gap, you should use a mounting mesh or sickle tape.
- Primer. It provides primary leveling and improves the adhesion of coating materials to concrete. Typically a ready-made deep penetration primer is used. The solution is applied in an even, thin layer to the entire surface of the ceiling using a paint roller, brush or wide spatula. One of the best materials is considered to be the Betonokontakt primer.
- Putty. If the ceiling has a slight degree of unevenness, and a layer 2-3 cm thick is enough to level the surface, then a putty mixture is usually used. It is recommended to use purchased compounds in the form of ready-to-use putty or dry mixture. Such materials as coarse putty Izogypsum and finishing mixture Satengips have proven themselves well. The solution is applied to the ceiling surface with a spatula 10-15 cm wide. Narrow spatulas (25 and 50 mm) are used in corners and at the junction with walls. With a layer thickness of up to 1 cm, one layer can be applied. Thicker putty is provided in 2 passes, with a coarse type compound applied first, and then a finishing putty.
- Plaster. It is most often carried out when it is necessary to apply a leveling layer 3-5 cm thick. It is recommended to use ready-made, dry gypsum-based mixtures, for example, Rotband. Plastering is carried out with the installation of beacons, which form a flat surface. They are leveled using a building level. The solution is applied to the ceiling between the beacons and leveled using the rule. After the work is completed, the beacons are removed, and the rusts are sealed with the same plaster mortar.
- Leveling and grinding the surface. After the plaster or putty has dried, the surface is treated with a sanding mesh or a sander. It is necessary to eliminate all strokes and other irregularities. You can ensure leveling with fine-grain sandpaper.
- Finishing primer. It is not a mandatory element of ceiling finishing, but will significantly improve the adhesion of paint to the ceiling. Apply the primer in a thin layer using a paint roller.
We recommend: Types and installation of gypsum plasterboard ceilings with lighting.
Construction of the box and types of lamps After carrying out all of the above measures, it is necessary to give time for the coating to completely harden.
After 2-3 days you can begin finishing the ceiling.
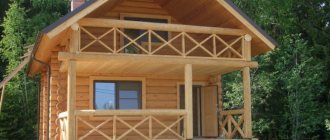
Stretch ceilings in a wooden house
Not everyone likes the wooden lining of the ceiling in a log house or house made of timber; some prefer to combine it with other materials, while others make suspended ceilings everywhere. As for the visual component, “all markers have different tastes and colors,” but there are certain technical features.
Vladimir_MoscowFORUMHOUSE Member
Stretch ceilings have two requirements for the rough ceiling.
- No debris, old plaster, wood chips, tow, insulation, etc. should be allowed to fall.
- The space behind the suspended ceiling should not have any connection with adjacent rooms (through the walls and rough ceiling), as well as with the street. Otherwise, suction-inflating of the film is possible. For example, in the next room a window was opened and the ceiling inflated.
If fulfilling the second point is impossible, it is necessary to provide for the installation of bypass grids in the film to compensate for the vacuum or excess pressure behind the film.
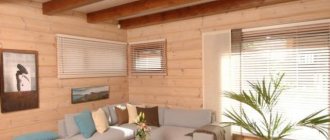
It is worth considering that stretch ceilings are not only polymer, but also fabric; a dark wooden base can be visible through the latter. Pavel T. advises a simple solution - attach a white vapor barrier to the rough ceiling with a stapler.
And this is what the suspended ceilings look like in the wooden house of a portal participant with the nickname Cake.
CakeForumHouse Member
I installed suspended ceilings - everything is super, the best option. This is PVC, the canvas is about 12 m² (but it doesn’t matter, you can do much more). Six months have passed, but everything is clear - shrinkage has no effect, everything is excellent, cheap and cheerful! Just be careful with the gloss - it reflects everything, including debris or wiring on the lid of kitchen cabinets, for example. I have matte satin.
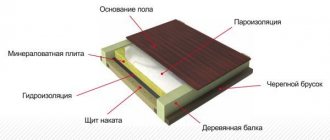
What is a pitched roof pie?
Let's first figure out what the roofing pie of a typical pitched roof actually is. All pitched roofs are divided into ventilated and non-ventilated. In residential buildings, and in most technical enclosed spaces, such a roof is made with ventilation if it has insulation.
The fact is that in any living space there is water vapor (from the kitchen, people’s breathing and the presence of moisture in containers), which rises and, despite the vapor barrier, can penetrate the insulation. If the insulation fits tightly to the ceiling, then the moisture has nowhere to go, and gradually the heat-insulating layer begins to become damp and overgrown with mold.
Therefore, there should be a little space directly above the insulation, through which air from the street will pass and take away excess moisture. But in technical rooms, the pitched roof is often not insulated at all, and therefore no one thinks about its ventilation.
Now let's understand the concepts. So, the ceiling of a pitched roof is made suspended or hemmed:
- Suspended ceiling. Here, between the ceiling and the suspended ceiling, 8-10 cm of empty space is left, where insulation is placed or ventilation is organized.
- The false ceiling is attached directly to the roof, and for only one purpose - to improve its aesthetic appearance from the inside of the room. False ceilings are good, first of all, because they do not “eat up” the height of the ceiling at all.
The ceiling of a pitched roof does not have to be made at the same angle as the roof - a horizontal option is also easy to implement. But the first method will suit you only if the ceiling itself is very low, and every vertical centimeter is important to you, or if you plan to create a unique interior design.
Stretch ceilings in unheated houses
SvtenderFORUMHOUSE Member
How do suspended ceilings withstand sub-zero temperatures in winter, if not for permanent residence, but for a summer residence?
In country houses for seasonal residence, which are not heated during the cold season, suspended ceilings are acceptable, but there are restrictions on the choice of the type of fabric.
o_o_v_vFORUMHOUSE Member
In short, the operating temperature ranges from -30 to +70 degrees. But this is a general indicator for all types of suspended ceilings. If we consider specific types of canvases, then the indicators for different materials will be different. Thus, fabric materials can withstand low temperatures well (down to -30), but are completely unsuitable for installation in wet rooms (baths, saunas). They are perfect for dry, unheated rooms. But ceilings made of PVC film, on the contrary, perfectly withstand positive temperature loads and have one hundred percent moisture resistance.
Yes, the experience of not only installers, but also owners shows that over several seasons nothing will happen to a PVC ceiling in winter or during thawing. But only if in cold weather it is not subjected to any mechanical stress and this is not only direct impact (shock), but also vibration. However, in such conditions, the PVC sheet will last less, since it is not designed for them. Some manufacturers produce specialized materials for unheated loggias, but fabric ones are still better.
Necessary tool
Always, before starting work, inspect what tools you have and what you are missing. Yes, I agree that everyone already has some kind of tool, but sometimes you need something and you don’t even know what you need. Therefore, I will list all the necessary tools for the job:
- Rotary hammer - look for less weight, but at least 800 watts of power. The hammer drill requires a concrete chisel.
- Mixing attachment for mixtures.
- Grinder – we are also looking for something lighter, but not less than 600 W. Flap disc or wire brush.
- Abrasive mesh and straight bar.
- Be sure to have a building level.
- Spatulas with flexible and thin blades.
- Trowel, roller and brushes.
- Polyurethane foam and a gun for it.
- Container for mixing gypsum mixture.
- Spray bottle and vacuum cleaner.
It is not necessary to buy bars for abrasive mesh. You can find a piece of regular timber and cut it to the size you need. This block is checked for evenness using a level. To prevent the mesh from moving off the block, you can secure it with several staples or screws.
With a set of such tools, you can repair ceilings of any level of complexity. Of course, this tool is selected for the most complex ceiling work, and according to the degree of their ease, the list of necessary tools will decrease accordingly.
High decor or choice of ceiling design
Stretch ceilings and fireplace
Quite often, in country houses, not only decorative, electric fireplaces are installed, but also real ones are built, with “live” fire, and, accordingly, increased heat transfer. In this case, it is recommended to combine the suspended ceiling with another coating in the “risk zone”.
Smiler200FORUMHOUSE Member
...I’m trying to combine a suspended ceiling and plasterboard, since the heat coming from the fireplace is quite strong, is that possible?
It’s even necessary, and you can separate it with both plasterboard and wood, for example, as Navigator6989 did.
Main types of ceiling coverings
Based on design features, the following main types of ceilings can be distinguished:
- Basic (plaster) construction - a ceiling surface without additional load-bearing elements, finished by applying a finishing coating (pasting, painting, whitewashing). The ceiling is first plastered.
- Tension systems . The front side of such a ceiling is formed from stretched fabric. In this case, usually no surface finishing is used.
- Suspended design. It provides a supporting frame, which is fixed to the ceiling. On it another solid surface is formed from sheets, slabs, panels, boards or slats. Such systems may have one or several levels.
Each type of ceiling has its pros and cons. In particular, the basic type requires careful leveling of the surface. The other two options can be used in the presence of large irregularities, because are able to disguise them. At the same time, they “eat up” the height of the room. Often the main selection criterion is cost, which is significantly lower for the first type.
We recommend: DIY ceiling repair options. What materials can be used?