Warm floors have become available to every home owner; such floors are especially relevant in private properties. It's nice to feel the warming warmth on your feet on a cold winter evening. And how great it is when a baby, who has just learned to crawl or is trying to walk, can stay on the floor for hours without the risk of catching a cold.
It is useful for every man who has his hands and head in place to know how to properly make a water-heated floor with his own hands, and our instructions with video will help with this.
Advantages and disadvantages
The following other points count in favor of underfloor heating:
- savings during operation up to 45%;
- the ability to avoid installing radiators, which allows for better use of room space;
- The finishing coating is suitable from any material;
- the air warms up more evenly, there are no drafts;
- The comfort of being in a space heated by thermal radiation is much higher than with radiator heating.
However, there are also disadvantages, which include a drop in pressure in the heating system due to the coolant diverted to heated floors, as well as the inability to quickly find and repair a leak in the event of an accident.
In any case, the main argument in favor of underfloor heating is the ability to increase living comfort while saving significant money.
Design of a water heated floor
The first question that needs to be dealt with immediately is in what capacity the water heated floor will be used. Arranging a heated floor for independent use has some differences from combined heating, in which there are several sources of room heating.
The key difference between heated floors, which are the only source of heat, is that there is no need to use a mixing unit. The heating circuit is connected directly to the boiler. In this case, the heating temperature is brought to 45 degrees, and its adjustment is carried out directly on the boiler.
To combine underfloor heating and radiator heating, it is necessary to install a mixing unit. It's all about the operating temperature of the radiators, which should reach 70 degrees - and this is too much for underfloor heating. It is for these purposes that a mixer is used - it adjusts the temperature of the coolant separately for each circuit.
Each floor of a multi-storey private house must have its own collector unit and mixer, and they all must be connected to a single riser. It is best to install collector units at the central point of the floor - in this case, the length of the pipes to each room is the same, and this makes setting up the system much easier.
The best option would be to use factory-made manifold cabinets that have passed a series of suitability tests. To select a cabinet, you need to know the number of inputs and outputs, pump power and characteristics of the mixing unit. The manifold cabinet is installed in the wall, after which all the necessary circuits can be connected to it. Of course, such cabinets are not cheap, but the high reliability and safety are worth it.
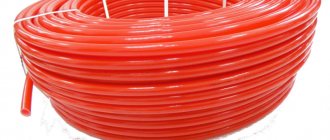
Also at the design stage it is necessary to determine the number of pipes required to equip the system. You can take an approximate value, according to which 5 m of pipes are required per 1 m2 of room area. The best and most popular option are cross-linked polyethylene pipes, which are lightweight, easy to install and have a long service life. Metal pipes are also quite reliable, but they are more difficult to work with and are more expensive.
The next design stage is choosing a pipe laying scheme from the following list:
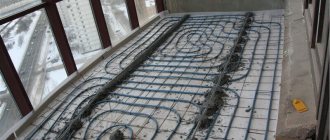
- "Snake" . This layout method is optimal for small spaces. The laying step is about 20-30 cm. The “snake” is quite simple, but it is not practical to use it in large rooms - the laying step for effective heating will have to be made very small, and even in this case the heat will be distributed unevenly throughout the room.
- "Spiral" . This method is more complicated than the previous one, but the efficiency of this layout is much higher. If installed correctly, the entire floor will heat up evenly, and the load on the pipes will be reduced. Typically, a spiral layout is used in rooms larger than 15 m2.
If a heated floor is used as the main heating system, then the distance between the pipes should be about 15-20 cm. With combined heating, the laying step can be increased to about 30 cm.
Design and main features of the installation
The principle of constructing a water-heated floor is as follows: pipelines are connected to the heating boiler or central heating system, through which hot water is supplied to a system of pipes laid in spirals along the floors , and the water that has released thermal energy is discharged through a return pipeline back to the heating system.
Work should be performed in the following sequence:
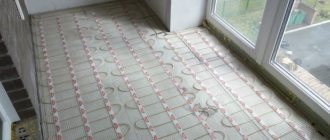
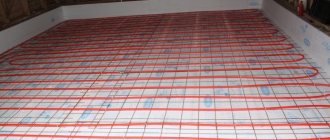
- surface leveling, waterproofing (protection against leaks), thermal insulation, laying reinforcing mesh over a layer of foil;
- laying pipes using one of the methods (snake or spiral);
- arrangement of distribution units;
- connection to the boiler or heating system of pipes for hot water supply and return pipeline;
- pressure testing and installation of shut-off valves;
- system testing;
- pouring pipes into rooms with mortar (concrete) or laying them with boards;
- installation of a clean floor covering.
You should start laying a water heated floor with your own hands by installing a screed that levels the surface of the base horizontally. Next, be sure to provide a waterproofing layer to prevent the underlying rooms from getting wet in the event of pipe damage and water leakage from the system.
Polyethylene film or special waterproofing materials can be used as protection against moisture.
The heat-insulating layer needs to be given special attention . In the basement or first floor, heat loss constitutes a significant proportion, therefore the thickness of the heat-insulating layer should be at least 20-25 cm. On the second and higher floors, a layer 50 mm thick is sufficient.
The following can serve as insulation:
- expanded polystyrene;
- mineral wool;
- glass wool;
- technical plug;
- basalt slabs, etc.
At retail outlets you can purchase special insulation with recesses for laying pipes ; these plates will help reduce work time and reduce labor costs.
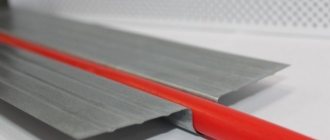
The insulation must be covered with a layer of foil , which serves as a heat reflector and increases heat transfer. It is advisable to take a serious approach to reinforcing the base for pipes, since in a year or two the insulation will bend in places, or even completely crumble, and all the work will go down the drain.
The screed is poured with a thickness of 50-60 mm , the material is a mortar of grades 100-150 or cast concrete M-300, but certainly with the addition of plasticizers, which prevents cracking.
When heated, the mass of the screed will expand, and to avoid cracks it is necessary to make an expansion joint; The most convenient way to do this is to leave a gap of 1-1.5 cm around the perimeter , which should be filled with elastic material. Instead, before starting work, it is recommended to glue damper tape around the perimeter.
A niche in the wall is knocked out with dimensions of approximately 60x40x10 cm, depending on the number of pipelines that will be located there. There are ready-made boxes on sale, specially designed for such cases, with a set of everything necessary.
Installation of a water floor
Once the floor preparation is complete, you can begin waterproofing so that if a leak occurs, the water will not harm the foundation or neighbors. If the width of the canvas is not enough to cover the entire area, then you need to lay the strips overlapping, the joints are taped. When using coating waterproofing, it is recommended to apply two layers to cover the entire surface.
Whatever underfloor heating system is used, in any case the base is waterproofed
Then the thermal insulation material is installed. Typically, polystyrene foam, polystyrene foam, and various types of mineral wool are used. They will reduce heat loss, and the reflective material with which the products are covered will direct warm air upward. If a water heated floor is used as additional heating equipment, it is enough to lay a layer of foil-foil phenol. If this is the main equipment, then an insulation layer of 5 cm is needed; if we are talking about interfloor ceilings, for surfaces on the first floor the thermal insulation thickness should be 10 cm.
Installation using concrete
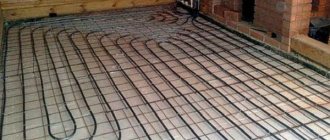
Pouring a warm water floor is one of the most popular ways to decorate the surface after installing a heating system. In addition, the screed is considered the best foundation. To strengthen it, you must first install a reinforcing mesh. Typically, metal products with a cell of 10 cm and a rod thickness of about 4 mm are used. It is laid on a layer of thermal insulation.
Installing the pipe on the reinforcing mesh and pouring the screed along the beacons are the most affordable for DIY installation
Then it is necessary to lay the pipes according to the plan. For fixation, use one of the previously described fasteners. If the area of the room is large, it is recommended to divide it into zones and work separately with each. After completing the installation of the entire system, it can be connected to the manifold. At the end it is necessary to carry out a test run. To do this, fill the lines with water and turn on the heating. This check will detect leaks. You also need to test the system in pressure testing mode, when it is subjected to the heaviest loads.
If the system is working properly, then another layer of concrete is applied to the warm water floor. The composition of the screed can be as follows: 1 part cement and 3 parts sand or 1 part cement and 6 parts screenings. You can also add 4 parts of crushed stone to the standard solution, but then the coating will be of poor quality. When pouring the heated floor screed, it is necessary to maintain pressure in the system, but do not turn on the heating. You need to wait until the material has completely dried and only then apply the finishing layer.
During pressure testing of the system, the heated floor pipes are kept under pressure for at least 3 days and only after that they begin pouring the screed or installing a dry finishing coating
Installation on polystyrene
This method is considered simpler and faster than screeding, since there is no dirty or wet work involved in preparing and leveling the mortar. In addition, the design is lightweight, it can even be used for finishing wooden interfloor ceilings.
After installing the polystyrene slabs, aluminum or steel plates are inserted into them. They must cover at least 80% of the insulation area so that the pipe laying line passes through them. On the front side of heat distribution products there are special grooves into which pipes must be inserted. Upon completion of installation, a test run is carried out. Then the pipes are covered with plasterboard, puttied and the finishing coating is laid on top.
Special polystyrene boards are expensive, but working with this material is easier
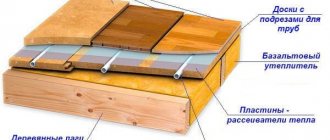
Modular wood floor
In this case, modules made of wood boards are laid on the heat-insulating layer. You can purchase ready-made products or cut the grooves yourself. The next step is the installation of metal heat distribution elements, after which the main line is laid and connected to the collector. It is also necessary to check the system for leaks. Then the pipes are covered with sheets of plywood, chipboard or plasterboard and a finishing layer is applied.
Wooden slatted floor
Most often, such structures are used for finishing interfloor ceilings in wooden houses. Unlike the modular option, in this case wooden modules are not used, which makes it possible to lay a thick layer of thermal insulation material (basalt wool or polystyrene foam). It is necessary to fasten the slats along the entire floor, as a result of which recesses are formed in which the heating lines must be laid. After this, the same operations are carried out as in previous cases.
It is easier to install a modular floor, but the price of slabs with ready-made grooves is higher
If you decide to install warm water systems, you should not immediately contact the experts; you can find a partner and do everything yourself according to the instructions above. The main thing is not to rush and follow the recommendations of system manufacturers.
VIDEO: Laying a heated water floor in a screed
Selection of coating, pipes and other materials
You should choose a coating depending on the purpose of the premises : ceramic tiles are preferable in the bathroom, toilet and laundry room, linoleum in the hallway, laminate would be a good choice in the living room, for the bedroom and kitchen you can choose any of the materials according to the hostess’ preference.
According to the technical characteristics any floor covering is suitable , and a screed that has gained strength will be an excellent basis for a final coating.
With pipes the situation is somewhat different; you should choose durable, lightweight and elastic materials.
This is polypropylene or cross-linked polyethylene .
When choosing polypropylene, you need to pay attention to pipes reinforced with fiberglass , then the high degree of expansion of this material when heated is not terrible.
Polyethylene pipes have a significantly lower coefficient of linear expansion , for this reason many experts prefer to choose them.
Pipes are sold in coils or coils; with this form of release, they are conveniently laid out on floor surfaces. Diameters are usually used in the range of 16-20 mm , and there are two more conditions for their suitability: the ability to withstand a water temperature of 95 ° C and a water pressure of 10B.
The collector is a section of pipe to which all branches with fittings are connected and in which the connection of all circuits of the system is concentrated , consisting of two branches, one of which is supply and the other return.
The collector is located exactly in the niche that was mentioned earlier and contains the following components and parts that ensure the functioning of underfloor heating:
- coolant flow controllers;
- valves;
- emergency water drainage system.
The markings of all these elements must be taken for purchase in full accordance with the specifications made by a heating engineer.
Reinforcing mesh can be made from wire diameter 4.5 - 6 mm, in increments of 5-100 mm . Sometimes a plastic reinforcing mesh is used.
Warm floors are now used as the most convenient heating method. Let's figure out which floor is better, electric or water. Warm floors are becoming increasingly popular; they are installed under any type of covering. We will consider two options: under tiles and laminate.
Read about the comparative characteristics of cast iron heating radiators here.
Device methods
A screed for a warm water heated floor is a layer of concrete that can be constructed in two main ways:
- Use of special construction dry mixtures in finished form. You can find a huge variety of them on the construction market. In addition, they come with various additives that impart the best qualities to the future solution.
- Mixing your own cement-sand screed using cement grade M150 and higher with the addition of PVA glue for the plasticity and reliability of the entire structure.
Heated floor technology allows you to make a choice in favor of one method or another. The main thing is to adhere to the established rules and recommendations from the manufacturer. If everything is clear with ready-made mixtures - it’s enough to add a certain amount of water and fill them, then independent preparation requires careful and precise adherence to proportions.
Not everyone knows how to properly prepare a solution for pouring a concrete screed. The proportions will depend not only on the brand of cement, but also on the use of alternative options instead of sand. As for glue, 1 kg will be enough for the entire bag of cement. The main thing is to add the right amount of water so that the consistency of the solution is appropriate.
Calculation and distribution of pipes
Pipes with diameters of 16, 20 or 25 mm are used . Using a pipe with a smaller diameter will result in impaired water circulation. By measuring the pressure in the heating pipe using a hydromanometer, you can find out the pressure in the system.
Too large a diameter of pipes for laying in a floor pie will result in a decrease in operating pressure and a drop in temperature .
Another characteristic of the material is its need, for which the length is calculated. You can lay pipes in one of the following ways: a snake or a spiral (snail) . DIY installation diagrams for a heated water floor look like this:
In the first case, significant differences in temperature are possible in certain areas of the area; the spiral provides better heat distribution . This layout method involves alternating direct and reverse supply of coolant.
On a sheet of graph paper or a squared notebook, you should draw a sketch of the room on a scale of 1:50 or 1:100 and mark the pipe routes , and the beginning should be at the riser closest to the window. The first row is laid 25 cm from the walls.
The pipe pitch is taken to be 25-50 cm (25 cm - with a diameter of 16 mm, 30-40 cm - with Ф20 mm, 40-50 cm - with Ф25 mm).
The length is measured on the sketch, a conversion factor is applied to the scale and the required size is obtained. To connect to the riser you should add 2-2.5 meters .
For each circuit, you need to buy pipe footage in one piece, since joining is unacceptable. One collector is made for several rooms, or for the entire floor.
Selecting and connecting the collector and boiler
When it is clear how many circuits will be connected to the manifold, you can begin to select its length and decide on the number of valves, but also take into account that in order to be able to regulate the warm coating mode, you will need a pressure sensor, air vents, drains .
The manifold with its lower pipe should be located at the same level as the supply pipeline,
slightly above the floor level.
There are specially developed plumbing standards for the assembly of this unit. It is best to hide the collector in a niche in the wall , approximately in the middle in relation to all the contours.
The boiler is selected based on its power sufficient to heat water, plus a certain power reserve. The total required power is determined as follows: 20% should be added to the sum of the circuit powers for the reserve.
For greater efficiency of the system, it is advisable to install a circulation pump; in most boiler models, the pump is already included in the kit, capable of providing hot water to a one- or two-story house with an area of 120-140 m2 . For large areas, additional pumps are needed.
Filling the screed
Laying a warm water floor in a screed begins after all the previous stages have been carried out in a clear sequence. Initially, the solution is prepared. Instead of a reinforcement layer, an additive such as fiber fiber is used, which has even better qualities and properties. A damper tape must be laid around the perimeter to help preserve the screed during thermal expansion.
According to heated floor technology, the thickness of the screed above the top of the pipeline should be 40-50 mm. The solution is poured onto the base and distributed evenly over the entire surface. All work begins from the far corner from the entrance to the room, and moves towards the entrance. In this case, it would not be amiss to use beacons for high-quality filling.
A thin screed will warm up much faster, but this can lead to its cracking, as well as the appearance of a “thermal zebra” effect, when the laid pipeline can be felt on the surface.
To increase the efficiency of a warm water floor system, you should vibrate the surface, which will get rid of air bubbles. In this case, the concrete itself will adhere more tightly to the pipes.
You can begin laying the flooring only after the concrete screed has completely dried.
An additional calculation of the thermal regime is carried out if there is a screed of more than 150 mm. But you may immediately encounter certain difficulties when heating the subfloor.
Pipe and coating technology
For fixing pipes, excellent devices have appeared on the market - plastic tracks representing combs. They are used as guides, and for more reliable fastening, special tightening elements are also used.
It must be remembered that the pipe must maintain its integrity, so sharp bends that lead to the appearance of creases are unacceptable (for plastic pipes, the bend radius can be at least 5-8 diameters). If the path to the collector passes through a partition or through a wall, then holes must be drilled.
The procedure and technology for installing a water heated floor with your own hands is presented in this video:
After laying the pipes and connecting them to the collector, installing the boiler and all plumbing work, filling with mortar or concrete is unacceptable without conducting a hydraulic test of the system .
The pipes are filled with water, the pressure is raised to a level of 6 B and maintained for 24 hours. If everything is in order and there are no fistulas or breaks, then they are filled with cast mortar or concrete.
When screeding, the pipes must be filled with water and under pressure , this is necessary to avoid crushing or squeezing the pipes.
For ceramic floors, the screed is made thicker, from 30 to 50 mm, for laminate and linoleum - no more than 30 mm , with another plastic mesh laid.
Thus, the thickness of the cake will allow the coating to warm up quickly. It is quite possible to make water floors with your own hands, but for a truly long-term service of underfloor heating, it is better to order the project, or at least sketches and calculations, from a heating engineer who will take into account all the fittings, equipment, materials down to the smallest detail and fulfill the specification.
Doing such serious work yourself will save significant money and increase the owner’s self-esteem.
Areas of application of water heated floors
The main and most important disadvantage of water-type underfloor heating is the impossibility of using them in apartment buildings with centralized heating. Of course, you can always try to coordinate such a situation with local management companies - but in the vast majority of cases the result will be refusal.
The whole problem lies in the capabilities and characteristics of the centralized heating system. It is characterized by high pressure and temperature - and these indicators are too high for a warm floor. Any errors made during the installation process can lead to a leak in the circuit, as a result of which the lower apartment will be flooded with hot coolant, and the upper apartments will simply be left without heating. Therefore, if there is a need to install a heated floor in an apartment, then you need to choose electric options (of course, you need to take into account all the nuances that arise).
In private homes the situation looks completely different. There are no longer restrictions on use, so the technology of water heated floors can be fully developed. Thanks to the rational distribution of heat in the room (heat for the most part remains at the lower level), significant savings are achieved. In addition to private houses, heated floors can also be used in other buildings - for example, in a garage or workshop.
Heated floors are most effective if the floor covering is made of tiles or laminate - these materials heat up and retain thermal energy. When using carpet as a floor covering, the efficiency of heating the room will be reduced due to the low thermal conductivity of this material.