Do-it-yourself insulation of a pit for storing vegetables
A vegetable pit, located in a private house, garage or country house, is a room with an earthen floor, concrete walls and ceiling.
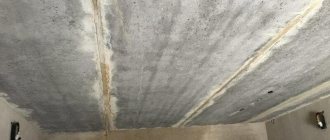
Concrete blocks only at first glance seem to be a monolithic building material. In fact, inside they are riddled with many small cracks and channels that conduct moisture into the slab.
A waterlogged concrete slab, in turn, freezes very quickly during the cold season.
In this regard, let's talk about how to insulate a vegetable pit located in a garage or private house.
Results
If you follow the rules, you can easily waterproof the inspection hole in the garage with your own hands. Even with high groundwater levels, the garage can carry out car repairs at any time of the year. You can also save a lot of money by installing your own inspection pit.
After waterproofing, thermal insulation is usually performed and lighting is installed. For safety reasons, low-voltage devices or battery-powered lights are used for the inspection pit. It is important to follow safety precautions when working with electricity.
Each material used for waterproofing has its own installation features. To learn the intricacies of the inspection pit equipment, you should familiarize yourself with the video below.
Brief overview of the most popular methods
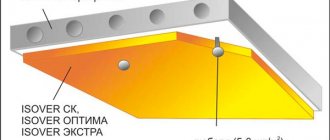
Expanded polystyrene
The first material on the list of what can be used to effectively insulate a vegetable pit is polystyrene foam. Most often, expanded polystyrene slabs are attached to the outside of the cellar when work is underway to lay and insulate the foundation.
Significant advantages of expanded polystyrene are moisture resistance, resistance to rotting and long service life.
Experts advise using expanded polystyrene type PSB-S-25 with a thickness of 5 cm. Plates with such parameters will be quite enough to maintain a stable temperature and prevent walls from freezing even in the most severe frosts.
However, it is not recommended to glue polystyrene foam inside the vegetable pit, since condensation may accumulate between it and the concrete wall, which will gradually undermine the foundation.
Hot bitumen
When talking about how to insulate a vegetable pit located in a private house or garage, one cannot help but pay attention to the reliable waterproofing of the ceiling. Hot bitumen is indispensable in this matter. They should treat the ceiling surface twice.
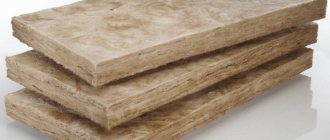
Glass wool
Using this material, previously steam- and waterproofed, you can insulate the ceiling and the entrance hatch of a vegetable pit.
To protect the glass wool layer from damage during operation, it is covered with clapboard or slate.
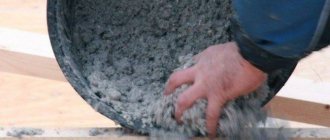
Sawdust and cement solution
Sawdust and cement are added in a ratio of 1 to 8. The solution is applied to the inner surface of the walls and ceiling of the vegetable pit in a layer of 15-20 cm, and then after a few days it is plastered.
A mixture of sawdust and cement
Thermal insulation paints
Paints of this type are a new generation material, as they not only prevent the release of heat from the cellar into the environment, but also reflect up to 70% of infrared radiation back into the room.
This effect is achieved due to the vacuum environment inside the paint filler. In addition, thermal insulation paints are non-toxic, do not require dilution with solvents and have low flammability.
For comparison: 1 mm of thermal insulation paint protects a vegetable pit from the cold in the same way as a 50 mm layer of mineral wool.
This material also effectively eliminates the cold bridge and is not afraid of moisture. According to its characteristics, a sheet of penoplex with a thickness of 50 mm corresponds to brickwork with a thickness of 740 mm.
There are no fundamental differences between how and what to insulate a pit for storing vegetables and supplies located in a garage or in a private house.
It is required to strictly adhere to safety precautions, which impose some restrictions on household and technical premises. For example, installing refrigeration equipment for storing vegetables in a garage is prohibited.
Author's video: how to arrange a typical inspection hole in a garage
Thus, we can conclude that making a vegetable pit for a garage with your own hands is very simple. This option is suitable for those who do not have enough space in the house to store food in the winter, but have space in the garage. We wish you good luck and further success!
The issue of preserving vegetable harvests throughout the winter has always been relevant. One of the options for preserving food, in particular vegetables, is vegetable pits (cellars) equipped in the garage. Read the instructions on how to make a cellar in the garage.
Characteristics
Optimal conditions for storing food in a vegetable pit:
- the air temperature should be from two to five degrees Celsius;
- air humidity should be from 85% to 90%;
- the vegetable pit must always remain dark; lighting is used only when people are in the vegetable storage;
- Fresh air supply equipment is required.
Device
The layout of the inspection and vegetable pits in the garage begins with the consideration of the following issues:
- determination of the type of soil characteristic of a given area;
- the level of soil freezing and the level of groundwater;
- checking the presence of underground communications, which is very important if the garage is located within the city;
- then a project for a garage with a vegetable pit is prepared.
The project should include the following items:
- estimated dimensions (depth and width);
- carrying out waterproofing, if necessary, equipping a drainage system;
- arrangement of thermal insulation;
- floor arrangement;
- supply and exhaust ventilation equipment.
Photo
How to do it?
The process of constructing a vegetable pit in the garage:
- a pit of the dimensions specified by the design is dug;
- a trench is dug in the foundation pit, the bottom of the trench is covered layer by layer with crushed stone and sand, then the prepared trench is concreted;
- It is also recommended to fill the floor of the vegetable pit with a five-centimeter layer of concrete;
- the walls of the vegetable pit, as an option, can be laid in the floor with bricks;
- the ceiling can be made in the form of a vault using brickwork.
Also, the ceiling of the vegetable pit can be concreted; to do this, we lay boards at a suitable height, waterproof it with roofing felt, and install a reinforced concrete screed. Read the guide on how to choose a garage roof.
In the process of arranging the ceiling, openings are left for the equipment of the manhole and the ventilation system. The finished ceiling is additionally insulated.
You can familiarize yourself with the process of arranging a basement, inspection pit and cellar (vegetable pit) in the garage by watching the video.
Ventilation
How to dry it?
During the operation of the cellar in the garage, it is very likely, for one reason or another, that dampness will appear in the vegetable pit. In this case, it is necessary to resort to drying the garage basement and, in particular, the vegetable pit. There are several ways to dry a vegetable pit:
- light a fire in an old metal bucket placed in the center of the room (the fire is maintained until the humidity level decreases);
- install a pipe with an outlet to the street; a container with a candle is installed under the pipe to support natural draft (drying the vegetable pit may take several days);
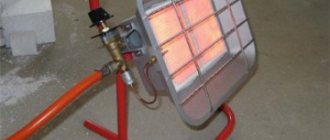
- use of a heat gun.
You can familiarize yourself with the process of draining a vegetable pit in the garage by watching the video.
How to insulate?
The principle of insulating a vegetable pit in a garage is practically no different from insulating any other room. When choosing a thermal insulation material, it is necessary to focus on certain performance properties required by the insulation used to insulate the vegetable pit. The thermal insulation material must be moisture resistant, have high thermal insulation properties, be environmentally friendly and not emit chemically aggressive substances (since food products will naturally be stored in the vegetable pit), have a long service life without loss of original performance qualities. Since vegetable pits, as a rule, are not large in size, the thickness of the thermal insulation material is also of no small importance. The optimal option for thermal insulation material for a vegetable pit, which meets all of the listed properties, is polyurethane foam. Polyurethane foam is a foamed substance that is applied to the surfaces of the floor, walls and ceiling of a vegetable pit by spraying. Polyurethane foam has excellent adhesion to all building materials and, when sprayed, hardens to form a monolithic sealed thermal insulation layer. The only drawback of this method of insulating a vegetable pit is its high cost. Read. The most affordable thermal insulation material suitable for insulating vegetable pits is expanded polystyrene foam. The process of insulating a vegetable pit consists of several stages:
- preparation of insulated surfaces (leveling and cleaning of dirt);
- waterproofing layer equipment;
- installation of the sheathing (if wooden slats are used for the sheathing, they must first be treated with an antiseptic composition to prevent mold growth);
- insulation is laid in the space between the laths;
- then plastic panels or sheets of plywood can be secured to the sheathing.
Video
Such fairly simple measures for arranging ventilation and thermal insulation of a vegetable pit in the garage will help ensure an optimal microclimate for storing vegetables over a long period of time.
In order for the car to be always ready for use, it is necessary to constantly monitor its condition and, if problems are detected, correct them immediately. To carry out repair work, you must have a convenient garage with an inspection pit. But many car owners do not have a garage equipped with a pit, so they have to create one with their own hands. To perform all the steps correctly, you need to learn more about how exactly the inspection pit is waterproofed in the garage.
Warm floor
Insulating the earthen floor of a vegetable pit is a task no less important than thermal insulation of the foundation.
We carry out this work as follows:
1. We deepen the cellar by removing about 30 cm of soil from the floor and level the surface.
We deepen the cellar, removing about 30 cm of soil.
2. We form a layer of crushed stone 10 cm thick.
Formation of a layer of crushed stone.
3. Pour 5 cm of sand on top of the crushed stone and thoroughly compact the layer.
Pour sand on top of the crushed stone layer.
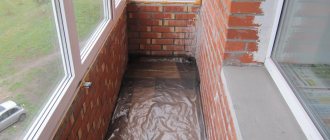
4. Fill the sand with hot bitumen, and after the bitumen hardens, we make a concrete screed.
We treat the surface with bitumen, after which we fill it with concrete.
Insulation of concrete walls of a vegetable pit in a garage is carried out from the inside using materials such as wooden blocks, insulation in the form of slabs and polyurethane foam. The work is carried out in the following order:
- we screw wooden blocks (joists) to the walls of the cellar using a drill;
- we fill the space between the joists with insulation, fixing it to the wall with glue or plastic dowels;
- Blow out the gaps and voids remaining after laying the insulation with polyurethane foam;
- We reinforce the walls with mounting mesh and plaster the surface.
When thermally insulating the walls of a vegetable pit, it should be taken into account that the dew point will shift into the insulation layer, so preference should be given to materials that do not absorb moisture and will last a long time in a waterlogged environment.
Insulation of a caisson for a cellar
The caisson can be made of polymer, reinforced concrete or metal. The shape of concrete and steel is most often cube-shaped, and plastic is cylinder-shaped.
This design is a modern version of an underground cellar and its insulation is carried out in a similar way. Before installing the caisson, the walls are insulated by pasting them with a heat insulator. Spraying polyurethane foam works best. It is easier to insulate a cylindrical caisson with liquid polymer.
Steel structures need to be insulated in several layers. They freeze more than others. When insulating, you can combine a layer of polyurethane foam with the laying of mineral wool or slab mats.
After the heat conservation work is completed, the structure is placed in the ground. The distance between the walls of the pit and the cellar is covered with crushed stone. The crushed stone is laid on top with roofing felt or filled with bitumen. The final step is to pour the soil.
The modern market offers caissons with insulation, but they are quite expensive. Therefore, it is easier to do the work yourself.
It is better to insulate any variant of the cellar during the construction of the house. But most often, ready-made properties are purchased, equipped with all outbuildings. The instructions given above are suitable for all possible types of cellars.
Why do you need to insulate a cellar in a garage?
To preserve reserves, it is important to create the right conditions. The main enemy of vegetables and fruits is low temperatures. After freezing, root crops lose their nutritional and nutritional properties. That is why it is important to ensure an internal temperature of at least +1-5 °C without using heating devices.
Another problem with vegetable pits is high humidity. It can cause fruit and vegetable products to sweat, which leads to their further unsuitability. Proper insulation of the cellar in the garage in combination with the organization of supply and exhaust ventilation helps to normalize humidity levels. This guarantees long-term preservation of agricultural stocks.
The decision on how to effectively insulate a vegetable pit in a garage should be made taking into account:
- climatic features of the area - the depth of soil freezing is taken into account;
- area and depth of the basement - spacious rooms are more difficult to heat; a large basement depth facilitates the insulation process;
- type of soil, depth of groundwater;
- thickness and material of the walls, floor and ceiling of the basement.
Sanitation
Mold and mildew are common in damp areas like a cellar, but they must be removed to keep your harvest intact. Walls, ceilings, and floors should be sanitized annually in the basement, regardless of whether there is mold or not.
Ignoring this can negatively affect not only the safety of vegetables and fruits, but also human health. Mold spores can get into food along with vegetables and lead to infection.
To disinfect the premises, you can use special means or use traditional methods of treatment. A simple folk method is to whitewash the walls with a thick layer of slaked lime.
Important! It is also necessary to carefully sort through the harvest itself before storing it in the basement. All rotten or damaged fruits are removed. They may begin to rot, which will lead to infection of all nearby vegetables, and the fumes will cause mold to form on the walls.
How to disinfect a basement:
- If there is mold on the walls, you need to get rid of it first. Spray the walls with a solution of copper sulfate and leave for a while. Then scrape off the residue with a scraper.
- We thoroughly clean the entire room, removing all excess debris, dust and dirt.
- Wash the walls with disinfectant.
- We putty the cleaned surface and paint it with paint and a disinfectant.
- It is also important to prevent rodents from infesting your basement. To do this, you need to burn a special smoke bomb in the room (their number depends on the size of the room). After all the previous steps, light the saber on a metal base and close the room filled with smoke for a day. After this, thoroughly ventilate the basement.
Important! In addition to products, cuttings and fruit tree seedlings can be stored in the cellar until spring.
During processing, we must not forget about the shelves and racks located in the basement. It is advisable to dry all wooden elements (shelves and drawers) outside and treat them with a special product, for example, paint them with disinfectants.
Work order
In the basement located under the garage, the ceiling and walls are insulated to the freezing depth. If the depth is small, the floor will also have to be insulated. The process of insulating a cellar depends on the material chosen. However, at the preliminary stage you will have to perform a number of simple operations:
- remove all items and existing structures from the premises;
- provide good lighting;
- remove old paintwork, peeling decorative and base materials;
- treat surfaces with an antiseptic, antifungal agent (quicklime, copper sulfate, etc.);
- ensure insulation of electrical wiring (if any) - the wires are laid in non-flammable corrugation.
If the groundwater level is high, it is important to take care of waterproofing the basement in advance. An effective material for this is bitumen. Different types are applied cold or hot.
How cold and hot bitumen is used
If possible, waterproofing is carried out from the outside of the garage. To do this, a trench is dug around the building. The walls are cleaned of soil and dried.
The cold method uses liquid formulations. They are applied to the surface in an even layer using a spatula or roller. The hot method uses solid bitumen. They should be warmed up before use. They are applied with a brush or roller in several (up to 3) layers.
Floor insulation
To make using the pit comfortable, it is important to take care of the thermal insulation of the floor. The insulation process depends on the type of base. In the case of a ground surface, you will have to follow the steps step by step:
- excavate the soil to a depth of about 30 cm;
- fill in crushed stone of medium fractions - height of at least 10 cm;
- arrange a sand cushion (5 cm) - fill it and compact it;
- pour the surface with hot bitumen to ensure waterproofing;
- the cooled surface is reinforced with metal mesh;
- pour the concrete screed.
If there is significant freezing, experts recommend adding a layer of insulation to the pie. The optimal solution is to lay polystyrene foam on a waterproofing material.
Insulating a reinforced concrete garage basement floor is a less labor-intensive process. A layer of roofing material is laid on the base and expanded clay 10-25 cm thick is backfilled. Some craftsmen recommend using dry sawdust to reduce the cost. However, if such insulation gets wet, putrefactive processes will begin to occur and the thermal insulation will have to be changed. Expanded clay is poured into a concrete screed with reinforcement.
How to insulate basement walls from the inside
The process of insulating a basement in a garage can only be done on dry surfaces. Therefore, it is better to carry out work in the warm season.
When applying liquid materials, preliminary leveling of the walls is not required. Spraying is carried out under pressure, so the work will require special equipment. It is also important to moisten surfaces in advance and follow safety precautions. The application of insulation should be carried out using a respirator.
When thermally insulating basement walls in a garage with polystyrene foam or polystyrene foam, you will have to do the following steps with your own hands:
- fix the insulation using a special solution and dowels. The latter are driven in along the edges and in the middle of the sheet.
- seal existing cracks and voids with construction tape or blow out with foam;
- stick the mounting grid;
- plaster the walls.
If mineral wool is chosen as insulation for a vegetable pit in the garage, then to fix it, you will need to create a wooden frame.
You should also take care of the water barrier. The easiest way is to stuff it with thick plastic film. It is attached with an overlap using a construction stapler. Drywall is mounted on top.
Insulation of the cellar ceiling
The optimal solution to quickly and economically insulate the ceiling in a cellar is to lay lightweight sheets of inexpensive foam plastic. To fix it, an adhesive composition and special dowels (umbrellas) are used. When insulating the ceiling with polystyrene foam, it is important to ensure that the sheets fit well. The resulting gaps should be filled with foam.
It is also important not to forget to insulate the cellar lid in the garage. To do this you will need:
- cut a piece of polystyrene foam or polystyrene foam - it is better to take high-density material;
- knock down a frame from wooden planks that will cover the sides of the foam;
- cover the insulation on top with plywood.
For aesthetics and additional protection, plywood should be painted.
Thermal insulation of a cellar in a garage is a responsible process that ensures a comfortable microclimate inside the room. The safety of preparations and agricultural products depends on the quality of its implementation.
Insulation of an old basement
Incorrect drainage system or ventilation design, all these factors may not have a beneficial effect on the insulation of the basement. As a result, you will have to resort to unplanned repair costs. So:
- In an already used room, dismantling the old insulation is possible, but very labor-intensive. If it was not there, then we simply prepare the surface. We remove the previous coating and then apply an antiseptic. We are waiting for complete drying;
- The first step in dismantling is to completely clean the walls of damaged materials. A mandatory requirement will be the complete drying of the room; accordingly, this type of work must be carried out in the summer. Perform waterproofing regardless of the selected material.
- One of the fastest and most effective methods will be treatment with polyurethane foam and polyurea. In just a few hours you can easily treat the surfaces you need and forget about mold, mildew and damp odors in the underground space. Environmentally friendly materials and made with the times, technically convenient and durable polyurea and polyurethane foam.
- Polyurea will protect your foundation, as well as your walls, from unnecessary moisture and condensation. It will serve as excellent protection against rot and fungus for many years. Polyurethane foam will provide high thermal insulation properties and will also serve as waterproofing.
- Polyurethane foam and polyurea materials can be easily applied to any surface, quickly harden and after 12 hours, you will be able to use the basement for its intended purpose.
Insulation based on polyurethane foam
Polyurethane-based materials have proven themselves to be one of the highest quality insulation materials. The composition includes polyurethane foam, which is known to have high thermal insulation and waterproofing properties. So:
- When applied, it creates an even coating without seams. It does not flow down when applied, thereby facilitating insulation work.
- Polyurethane foam has a cellular structure, thanks to this quality it quickly increases in volume and quickly hardens. It has high heat and waterproofing functions.
- Polyurethane foam is widely used both in medicine and in construction. In construction, this material is used for insulation of industrial buildings, as well as residential buildings.
- The insulation made on the basis of polyurethane foam is environmentally friendly, which means it will not cause irreparable harm to the health of the environment. Polyurethane foam is odorless; this material can be used in food storage areas.
You can now do the insulation of the cellar in the garage correctly. The main thing is to choose the right materials. Take your time and do everything thoughtfully. Then dampness will not bother you for a long time.
Insulation of vegetable pit
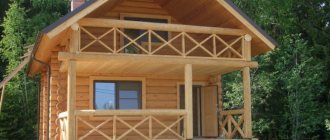
Long-term storage of food (in particular vegetables) is an issue that is relevant at all times. To solve this problem, ordinary vegetable pits (or simply cellars) are often used, which do a good job of the task. Storing large quantities of food is especially in demand in winter, when the cost of food in stores increases significantly, and the quantity decreases just as significantly. Therefore, many people, since ancient times, have retained a fairly useful and practical habit - stocking up on the necessary amount of food for the winter.
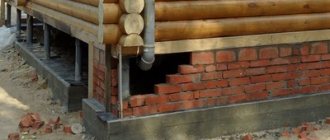
Typically, cellars are built in garages or summer cottages (both inside and outside the house). An ordinary hole dug in the ground, lined from the inside with brick (concrete, or any other selected material), into which a ladder leads, is one of the most practical and decades-tested methods of storing food...
The need to insulate a vegetable pit
An ordinary hole dug in the ground, lined with brick on the inside, into which a ladder leads - this is one of the most practical and decades-tested methods of storing food.
...however, it also has a significant drawback. In the harsh winter, characteristic of our climate zone, the earth and concrete (we will take this as an example, as the most commonly used material for interior decoration of the cellar) freeze, creating conditions inside that lead to rapid spoilage of food. The main reasons are:
- air temperature is too low - which leads to freezing of stored products;
- High humidity indoors is naturally also not very useful not only for the products themselves, but also for the cellar in which they are stored.
For these two reasons, quite often the desire to save money and not insulate a vegetable pit leads to even greater costs - the supplies stored inside simply spoil and become unsuitable for food. In addition, the process of destruction of the cellar itself is significantly accelerated. Naturally, it cannot be used to store food in this state in the future.
Brief description of insulation technology
The process of insulating a vegetable pit, in fact, looks almost the same as insulating any other room: bathhouse, garage, apartment, attic. However, there are also significant nuances that you should definitely pay attention to. We will talk about them in more detail a little later, but now we will focus on the insulation technology itself.
The essence of the work being performed is, in principle, simple. It all lies in the correct and high-quality installation of a layer of insulating material. It should be placed on all surfaces: floor, ceiling, walls. We should not forget about the cellar hatch (lid), especially if it is located outside - it is often this that causes low temperature and humidity inside the pit.
Creating a ventilation system
Another point that requires attention is the need to use ventilation.
Another point that requires attention is the need to use ventilation. Air circulation will ensure faster removal of excess moisture and improve the microclimate inside (which will have a positive effect on the condition of the products).
Usually the issue is resolved as follows: 2 pipes connected to the surface are placed into the pit. A small roof protects them from moisture getting inside. This method will be quite enough to ensure the flow of fresh air from outside.
A much more important nuance is the correct choice of material with which we will insulate the vegetable pit - the result directly depends on its quality (as well as on the quality of the work on its installation). Therefore, this issue should be given special attention.
Choosing insulation for a vegetable pit
The material that will be used as insulation must meet a number of characteristics.
The material that will be used as insulation must meet a number of characteristics. It should be:
Even concrete slabs will not be able to prevent the appearance of dampness in a vegetable pit: over time, it will seep through the pores, through joints and cracks. This is especially true if there is an accumulation of groundwater near the cellar, or if the area is characterized by heavy rainfall.
This point is also important because low resistance to moisture requires additional measures during installation. In addition to the insulation layer, you also have to use a waterproofing material, and its damage (or incomplete tightness) will very quickly affect the condition of the insulation layer.
Naturally, insulation should give a certain result - create comfortable conditions inside for storing food. So the material must necessarily retain heat inside and keep the cold out.
Since the food we eat will be stored in the cellar, it is natural that the material should not affect them in any way.
Since the food we eat will be stored in the cellar, it is natural that the material should not affect them in any way.
In conditions of high and regular humidity (sometimes insulation for a well or cellar is in contact with moisture almost all year round), many materials become unusable in almost a couple of years.
The higher the density of the material, the more difficult it will be for moisture to get inside the cellar. For this reason, you should choose the insulation that ensures maximum tightness of the layer.
Based on the points listed above, we can say with confidence that the vast majority of offers on the modern market are simply not suitable for use as cellar insulation. How to insulate a kitchen, choose materials, and find out the operating procedure on the page https://ecotermix.ru/kak-uteplit-kuhnyu-sovety-i-rekomendatsii/. Mineral wool, polystyrene foam, heat-insulating paint, polystyrene - in one way or another do not meet (or do not meet enough) the requirements.
How to disinfect a cellar
If rot and mold appear in the cellar, then it becomes necessary to disinfect it from time to time. For preventive purposes, this procedure is mandatory for a clean and dry room, at least once every two years.
For this:
- Mold is removed with a brush.
- The exhaust and supply ventilation pipes are tightly closed.
- Using slaked lime steam for disinfection. For lime attack you will need: for 10 sq.m. cellars - 3 kg of quicklime, which is poured into a barrel of water. The person must leave the premises and close the doors tightly. After three days, the cellar can be opened and thoroughly ventilated.
Advice: Such disinfection should be carried out in advance, but not one week before planting the crop, but at least a month before that.
With this method, all insects die, mold and fungi disappear. If the cellar is seriously neglected, the procedure is repeated again after a week (read the details in the article: Disinfection of the cellar: how to do it according to all the rules).
- A more radical way to get rid of mold and rodents is to use ready-made sulfur bombs or tablets in the cellar. But special care must be taken: when the substances burn, they release toxic gases, which during operation can get on your hands, leaving harmful chemicals on them. In this case, the operating instructions must be strictly followed, and the work must be performed wearing a respirator and gloves.
Advice: You cannot light checkers directly in the cellar; you need to do this outside. Then a long rope with a hook and an old galvanized bucket are prepared, paper is placed there, and a checker is placed on top, after which everything is set on fire. After the acrid smoke is released from the bucket, it must be lowered on a rope into the basement and the lid tightly closed. In this case, the bucket must be placed away from wooden structures - the burning temperature of the checker is quite high.
Checkers also effectively destroy ticks and other harmful insects that can cause pathogens, prevent the formation of fungi and rot on wooden elements, and the smell of gas repels rodents for a long time.
- Treating the cellar with a strong solution of potassium permanganate. To do this, it is diluted to a bright red color and all surfaces in the room are treated. When an earthen field is in storage, it is necessary to remove the top layer. It may contain the most rot and pests. After general cleaning, the floor should be sprinkled with a dry sand mixture.
Insulating a vegetable pit using polyurethane foam
One of the few materials that are completely suitable for solving such a problem is Ecotermix polyurethane foam. On the listed points, it demonstrates the highest possible performance, being an order of magnitude ahead of other insulation materials.
In addition, its use of polyurethane foam makes it possible to achieve complete sealing of the room: when applied (PPU is a foamed substance that hardens when it hits the surface using a special installation), a monolithic layer is obtained that does not have seams, joints or cracks. Due to the high density and complete tightness, moisture will not be able to penetrate into the material, and this property is equally well preserved for a fairly long period - up to 50 years.
Prices for our company’s services can be found in the COST
Or order a consultation with a specialist at a time convenient for you!
The application is absolutely free and does not oblige you to anything!