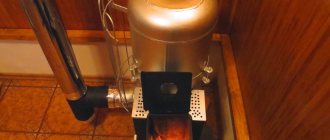
Recently, the so-called “Pompeian oven” or pizza oven has been growing in popularity, as it is very easy to make with your own hands. We use this oven not only for baking pizza, but also homemade bread. In addition, you can make various dishes, baked goods, and meat dishes in it.
The design of the stove is such that it very quickly warms up to the desired temperature, faster than a Russian stove. And it retains heat for a long time. You can bake in it using different modes: cooking while the oven is heating up, cooking while wood is actively burning, and also using residual heat.
Pompeian oven and its place in our life
The most common place for its placement is in the garden, outdoors. Such a stove can be placed separately or be part of a garden barbecue complex. In combination with a gazebo, the stove becomes a wonderful element of the landscape and a favorite vacation spot for family and friends. By using various types of stove decoration, you can get a stylish decoration for your garden plot.
Despite the fact that a pizza oven is mainly considered as an option for placement on the site of a country house or cottage, it can also be installed indoors by making an appropriate foundation and a proper chimney for it. But now we will consider the classic version of the Pompeian oven in the open air. The construction of such a furnace is quite possible in our conditions, because all materials are sold in construction stores.
It should be said right away that building such a furnace is not a quick task, it is labor-intensive, and even expensive. But those who love fresh homemade baked goods, cooked in an authentic home oven, are willing to work hard to have such an oven. And there are more and more such enthusiasts, and they are very pleased with the results of their work. After all, they receive delicious homemade bread, real pizza and a real home, around which it is always pleasant to spend time in friendly company. And if you carefully study the instructions, then building a Pompeian stove turns out to be not such a difficult task. In addition, this process is creative and will bring a lot of pleasure, both in the process of the work itself and in the process of “reaping” its fruits.
Technical and financial side of the issue
The fairly high cost of installing such a furnace is due to several factors. The first is that it is made of refractory brick and this brick is more expensive. But the point is not only the cost of the refractory materials themselves, but the fact that the brick structure has a lot of weight. In order for it to be convenient to use the stove, it should be at a height of 80-100 cm. And for this it is necessary to make a stand on which the stove will be installed. At the same time, the design of this stand turns out to be quite massive, because it must support the weight of the stove. And to top it all off, such a massive structure requires an appropriate foundation.
But the stand and foundation can be made of any materials. Usually, during construction and renovation, there is always a large amount of unclaimed materials and leftovers (blocks, bricks, fittings, rolled metal, boards, the same cement), perhaps friends and neighbors have them and they don’t know where to put them. Thus, by using leftover materials to build the foundation and stand, you can reduce costs.
Another negative factor is the duration of the furnace construction process. The entire structure of the stove consists of the following components: foundation, pedestal, countertop, and the stove itself. The foundation and countertop will be made in the form of a monolithic reinforced concrete slab. In order for the concrete to set and harden, you will have to take technological breaks for at least 5-7 days, and preferably even longer. But, on the other hand, those who come to the site for the weekend may even find a certain advantage in this and engage in construction in stages. You can even prepare the foundation or foundation with a pedestal and table top in one season, and continue building the stove itself the next summer. Thus, it is possible to divide financial investments into different periods. In addition, a foundation that has stood over the winter will show whether it was done correctly, and any defects that appear can be corrected before laying the stove. This applies to areas with unfavorable soil conditions and groundwater levels.
It is important to choose the right time for laying the stove itself. It is advisable to do this in the dry season so that the brick does not retain excess moisture, and it is easier to prepare the oven for thermal operation in the future. During work, it is better to build a canopy over the site, or at least remember to cover the stove with film after work.
About the design features of Pompeii stoves
A standard pompeii is built in compliance with certain proportions, which are mandatory regardless of the shape, size and external decoration of the structure. One of the main regularities is that the total height of the furnace dome is twice the height of the entrance. Optimization of the furnace operating process and thermal cycle, correct draft and minimization of heat losses directly depend on compliance with this proportion.
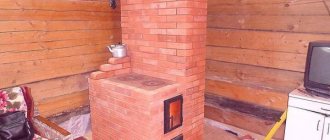
The Pompeian stove has many names - it is called Italian and Neapolitan, and also tandoor, although the latter name is considered controversial by stove makers - it is a bit of a different heating technology. But it’s not the name that matters - Pompeii have taken root in various climates and are considered ideal for baking - not only pizza, but also bread, flatbreads, and pies in Pompeik are amazing. Pompeian stoves are often built not separately, but next to gazebos or other appliances - barbecues, tandoors and barbecues. This complex serves both practical purposes of cooking, and an area for relaxation, entertainment and receiving guests, a cozy family corner in the fresh air. It is somewhat easier to build a Pompeian stove on the street, in terms of the foundation and chimney. Pompeian stoves are also built in the house, although this requires a slightly different technical approach - smoke removal is a very important aspect, and the installation of a support for a heavy stone stove in an already built house requires calculation and examination of the existing foundation and the characteristics of the soil under the house. But all options for constructing a reliable and high-quality Pompeian stove of the classical type are complex and very labor-intensive, and also require financial investment.
The designs of the Pompeii and classic Russian ovens have common features, but the heating of the Pompeii is much faster - bread can be baked literally within half an hour after heating; for a Russian oven this interval is ten times longer. The reason for such a global difference in heating parameters is the difference in the thermal masses of the furnaces, that is, the design. The Pompeian stove should heat only one row of bricks, laid in a bed and equal to 120 mm. Three quarters of an hour after that. As soon as the Pompeian oven is lit, the temperature inside it is already about 250 degrees, after another fifteen minutes - more than 350 degrees - these indicators of the thermal cycle are unique.
The distribution of heat in the Pompeii stove is also unique thanks to its special dome design:
- Inside the dome it is faster - after half an hour it is over 300 degrees, and after another quarter of an hour - 360 degrees and remains constant until the end of the cycle, and then the cooling is very slow.
- In the outer part of the dome, the temperature rises much more slowly, but after an hour it reaches the same value as inside the dome, and then remains constant throughout the thermal cycle.
The main feature and main advantage of the Pompeii oven is the ability to cook various dishes in a short time, since the heating under the arch is very strong - the baked goods are ready very quickly, and the light aroma of smoke adds piquancy.
About the operating principle of the Pompeii stove
The efficient operation of the furnace is based on its design features. In the process of burning wood under the roof of the stove, differently directed flows of hot gas arise:
- Convection heat flows come from the combustion compartment
- Reflected heat flows come from the walls of the vault
In this case, spontaneous temperature regulation occurs due to the organized movement of cold and hot flow.
During the combustion process, the wood pile flares up gradually, and the volume of hot gas released also increases gradually, but the flows of hot gas are always directed upward, and the flows are powerful enough to at a certain moment block the access of oxygen throughout the entire cross-section of the narrow mouth in the pipe. As a result, combustion becomes less intense. After the temperature decreases, the power of the flow of hot gas weakens and allows oxygen into the combustion zone - this cycle is spontaneous and constant, and the adjustment of the optimal temperature under the roof of the stove occurs without any human intervention. The main element and feature of the design is the domed vault, which accumulates and distributes the flow of thermal energy from the flame.
How does the Pompeii oven work?
The Pompeian stove differs in its structure from the Russian stove. They say that it resembles the structure of an ancient Slavic stove. In any case, it has one definite advantage over the Russian oven - it heats up much faster and you can start cooking pizza in it already in the first hour of heating, which is very convenient. This is achieved due to the fact that the Pompeii oven has a less massive thermal mass (a layer of brick that must heat up and give off heat for cooking). In this oven, the layer of heated brick is 12 cm, and it quickly warms up and makes it possible to start baking pizza an hour after the start of the fire. In 45 minutes the temperature in the oven rises to 260 degrees, and to 370 after 60 minutes.
Structural diagram
A traditional Pompeian stove consists of the following structural elements:
- foundation;
- a stand for the stove, consisting of a pedestal and a tabletop;
- bake.
The oven itself consists of the following parts:
- under (the bottom or floor of the oven);
- vault (dome);
- entrance arch;
- chimney.
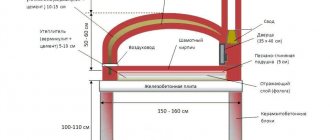
The chimney of a Pompeian stove is located in front, in front of the stove itself. This makes it significantly different from many other stoves and fireplaces. This is an important element for the proper operation of the oven. The flame of fire rises up along the dome, enveloping and heating the vault ceiling. This way, the heating effect of cooking pizza is achieved both from above and from below at the same time, resulting in heat from all sides.
Oven size and shape
The Pompeian oven has variations. There is a so-called Tuscan type of oven and a Neapolitan one. The Tuscan type has a higher arch, and the Neapolitan one has a lower arch. The Tuscan oven arch shape is more universal, and the Neapolitan one is suitable if you are making this oven for pizza - this shape is somewhat more suitable for baking pizza. Also, not all stoves must have a chimney; you can do without it.
The Neapolitan oven has a lower arch
Since many of us use this oven for baking bread, the Tuscan version with a round arch is more suitable for us.
The Tuscan type of oven has a round arch
As mentioned above, the size of the furnace can significantly affect the cost of the structure. The smaller it is, the lighter it is in weight and cheaper. But there are certain sizes smaller than which making a pizza oven is not effective. The most optimal size is considered to be an internal diameter of 80-110 cm.
There are also rules that must be followed, because... If these rules are followed, you get a stove with the correct operating mode. The oven consists of a spherical vault and an arched entrance for placing firewood and the pizza itself into the oven. The height of this arch is equal to 60% of the height of the dome (or 0.6 of the radius of the dome). The width of the entrance arch is approximately equal to the height of the furnace dome.
The Pompeian oven has a multi-layered vault. It consists of the following layers:
- inner layer of refractory brick;
- clay coating;
- the first heat-insulating layer of mineral or basalt wool;
- a second heat-insulating layer of perlite;
- covering protective layer of cement mortar.
The thickness of each heat-insulating layer can be made equal to 5-10 centimeters. Accordingly, the thicker the heat-insulating layer, the longer the oven retains heat.
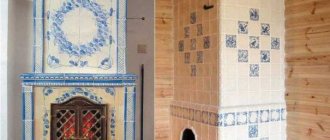
The top layer serves to protect the oven from atmospheric influences and therefore can be made using any protective and moisture-repellent materials. It is also a decorative layer. You can decorate the stove to your taste. This can be decorative plaster, painting or mosaic.
Materials for laying a wood-fired pizza oven
For the laying of the Pompeian stove, fireproof materials are used: fireclay or stove bricks and stove mortar. You can prepare the mortar for masonry yourself from clay with the addition of fireclay, or buy ready-made mixtures in the store. It is better not to use cement mortar with the addition of special additives, because it behaves worse when laying and then leaves marks on it that are difficult to wash off, which is completely unacceptable inside the oven. The best thing is to buy ready-made mortar - a special masonry mortar for stoves. SHA-28 is suitable for such a stove. It can be easily removed from the masonry surface without leaving any traces. Another thing is that when laying a sphere of almost square bricks, fairly wide seams are formed on the outside, which are filled with mortar. And it is important that this solution is special fire-resistant for laying stoves, which will not crack at high temperatures.
When buying fireclay bricks for masonry, you need to take bricks for laying the inner surface of the furnaces. There is no need to take the front or for the outside, because the entire brick will be located inside the kiln and the additional properties of kiln bricks intended for external masonry will not be required here, and such bricks are more expensive. An external entrance arch can be laid out of facing bricks if required by the design. But this is not necessary, the temperature in the entrance arch is not so high and therefore nothing will happen to the brick, and for the entrance arch you can use the same internal fireclay brick.
To build a Pompeian oven with your own hands you will need:
- fireclay brick - for laying the hearth and roof of the furnace;
- mortar - mortar for laying stoves;
- basalt or mineral wool - for insulating the furnace roof;
- perlite - for insulating the furnace roof and thermal insulation of the hearth from the countertop;
- reinforcing mesh or wire for reinforcing the furnace roof;
- reinforcement and reinforcing mesh for reinforcing the table top and foundation;
- metal profiles (beams, angles, pipes), if used in the structure;
- chimney pipe;
- boards for formwork;
- polyethylene film for formwork and covering the slab and oven;
- boards and beams for supports;
- brick or other concrete blocks for the podium;
- cement M500 for pouring the foundation and countertops;
- sand for preparing concrete for pouring;
Tools and accessories:
- grinder with discs for cutting stone;
- or electric water-cooled tile cutter;
- concrete mixer;
- or a drill with a whisk for mixing the solution;
- hammer;
- chisel;
- mallet (rubber hammer);
- saw;
- protective glasses;
- respirator;
- gloves;
- other tools.
Functions of the Pompeii oven
The Pompeian (otherwise called Neapolitan or Tuscan) oven is classified as a bell-type oven. The tradition of using this product in preparing family dinners, as well as in restaurant establishments, has a centuries-old history. This device is widely used by many peoples of the Mediterranean. Its closest relative is Russian.
Please note: in Italian pizzerias, the fire in such a device is not completely extinguished for many months. Even when there is no pizza in the oven, it maintains a high temperature. To prepare pizza, the temperature is raised to 350 - 400°C. Pizza is cooked directly on the oven floor, which should never be done on trays. In addition, the combustion is carried out by types of wood that do not smoke or emit resin during combustion - alder, cherry, olive wood. This is the secret of the wonderful smell emanating from a burning stove.
What temperature is maintained in the oven in the firebox during cooking? In the oven you can cook a huge number of different dishes at a very wide range of temperatures from 400 degrees to 70 - with low-temperature cooking. In such an oven, a Tuscan grill is also excellent, when the coals are raked out to the mouth of the oven and a grate is installed on legs. (See also: Sitemap)
Instructions: making a wood-burning Pompeii pizza oven with your own hands
Options for constructing a Pompeii furnace may differ, because... this depends on the design decision, the materials available and the size of the oven. The instructions will provide general recommendations and work procedures for the construction of a traditional Pompeii oven.
Let's look at an example of building a Pompeian stove with your own hands with these basic parameters.
Foundation. The foundation is in the form of a monolithic reinforced concrete slab, 100-200mm thick.
Oven stand. The material from which the pedestal is built is cinder blocks, the size of the cinder blocks is 200x200x400mm. The size of the pedestal in plan is 1200x1200mm. Pedestal height 800mm. The thickness of the monolithic reinforced concrete slab of the tabletop is 100mm. The heat-insulating layer between the stove stand and the stove itself is made of fireclay bricks.
Bake. The internal diameter size is 840mm. Accordingly, the height of the dome arch inside is 420mm. The first layer of thermal insulation is mineral wool - 2 layers. The second layer of thermal insulation is cement mortar with the addition of perlite. Perlite can be replaced with vermiculite or expanded clay.
The whole process is divided into two stages:
Stage 1 – construction of a stand for the stove;
Stage 2 – manufacturing the furnace.
Stage 1. Construction of a stand for the stove.
Step 1. Construction of the foundation. In the place planned for the stove, a hole is dug with a size of 1500x1500mm (100-150mm wider than the size of the pedestal on each side) and a depth of 350mm.
The bottom of the pit is compacted with crushed stone and a sand cushion 200 mm thick is made. Formwork is assembled from boards. To make it easier to pour the concrete mixture, a plastic film is spread over the sand.
A reinforcing mesh of rods 8 (12) mm thick is laid on it. It is necessary to place small supports under the reinforcement so that there is a gap of 3-5 cm to create a layer of concrete under the reinforcement. The formwork is filled with concrete. The top of the foundation slab is leveled and checked for level. The concrete is moistened with water, covered with a film and left to harden and set for 5-7-10 days.
Step 2. Construction of the pedestal. After the concrete has hardened, you can begin to build a stand for the stove. In this case, it is made from cinder blocks.
We install the blocks in the letter “H”. The plan should be a square with sides 1200mm (3 blocks each 400mm long). The shape of the pedestal in plan can be in the form of the letter “P”. It depends on your decision.
But the advantage of the letter “H” is that the middle wall serves as an additional support for the furnace and thus the load from it is transferred to all structures more or less evenly.
The blocks are placed dry. After installation, check the evenness and verticality of their installation. Reinforcement is inserted into the holes so that the blocks do not move when poured with concrete. We fill the holes through one with concrete. After this, you need to let the structure stand for a couple of days for the concrete to set.
Step 3. Construction of a monolithic reinforced concrete countertop. The formwork for the tabletop is being made. In order for the tabletop to be the required size (1400x1200mm), the formwork needs to be made 200mm longer in front. Table top height 100mm. The bottom of the formwork can be moisture-resistant plywood or boards covered with polyethylene.
Inside, the fittings are laid out again on stands with a gap of 3-5 cm.
In parts where the tabletop extends beyond the pedestal, add additional reinforcement.
The formwork is poured with concrete, the surface is leveled, and its horizontalness is checked. Next, the countertop is watered with water, covered with film and left for several days (5-7-10) for the concrete to harden.
This completes the stage of creating a stand for a wood-burning stove.
Laying a pizza oven is discussed in the sequel.
Useful video
Continuation.
The construction of a traditional Pompeian furnace is a lengthy process and requires compliance with the sequence of work and maintaining the necessary intervals so that the supporting structures gain the necessary strength. The whole process is divided into two stages:
- Stage 1 – construction of a stand for the stove;
- Stage 2 – making the furnace