Principle of operation
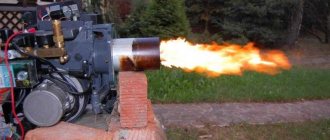
Despite the fact that a jet stove made from a gas cylinder is quite simple, its operation is based on advanced methods of generating heat by burning fuel:
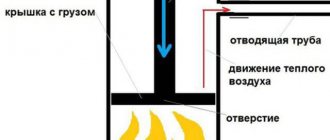
- free circulation of heated air and gases. The firewood in its firebox burns due to natural draft generated by the influx of oxygen through the hole in the lower part of the structure (blower);
- afterburning of wood gases released during fuel combustion (pyrolysis). Part of the fuel, converted into a gaseous state, burns out in an additional heat exchange device and a horizontal section of the smoke exhaust channel located immediately behind the firebox. Wood gas moves slower in it than in a vertical channel, and a thick layer of heat-insulating material does not allow them to cool, which allows the process of decomposition and afterburning to take place more fully.
The vertical pipe in the rocket stove from the cylinder is installed above the firebox, according to the drawing, and is also insulated. The pyrolysis process when burning wood significantly increases the efficiency of the stove.
Principle of operation
Design options for rocket furnaces
If you need to assemble a rocket stove with your own hands, you should use the drawing of the portable Robinson model; it is constructed from scraps of a profile pipe and a metal stand on legs. All work involves welding. The schemes are quite variable, they allow the use of pipes of a different section, in this case all parameters must be adjusted to the proportions.
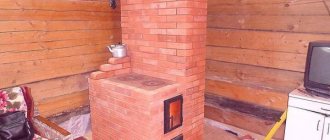
For the manufacture of large heating units, a 200 liter metal barrel or a gas cylinder is used. An outer cap is formed from these elements; fireclay bricks or medium-diameter pipes are used to assemble the internal parts. If you take a gas cylinder as a basis, you can end up with both a mobile structure and a full-fledged stationary device with a bench.
The most difficult step prior to assembly is calculating the thermal power of the device. Craftsmen recommend using ready-made drawings indicating the source materials; when choosing a diagram, you need to compare the potential dimensions of the furnace and the heated area.
To increase the efficiency of furnaces, modifications have been developed that can specifically collect heat:
- oven-stove,
- with water circuit,
- with a bed.
The first type is equipped with an extended cooking surface, on which several containers can be used simultaneously. A vertical pipe with a firebox and a door is located directly under the stove, under which there is also a horizontal channel. Hot air heats the hob both directly and through the duct. The outdoor model has stable legs that ensure the reliability and safety of the structure.
The rocket stove can be equipped with a hob
The furnace with a water circuit is mounted on a concrete base, which prevents distortions. The fire channel and the combustion chamber, lined with brick, form the lower part; an ash pan is also provided here (firewood is loaded vertically). The steel pipe in the form of a vertical channel is provided with thermal insulation and an outer casing. A heat exchanger with a water jacket is fixed on the latter.
The model with a couch is quite massive; the extension looks like a sofa or bed. If desired, you can lay a mattress here and use the platform as an additional sleeping place. The bed is laid out from stones combined with a clay mass, or bricks.
Materials
To make a rocket stove with your own hands, according to the drawing, you will need the following materials:
| No. | Name | Unit measurements | Quantity |
| 1 | Pipe section Dn158 mm with a wall thickness of 4 mm | m | 0,8 |
| 2 | Pipe section Dn127 mm with a wall thickness of 3.5 mm | m | 1,5 |
| 3 | A piece of pipe with a square cross-section 120x120 mm, wall thickness 4 mm | m | 1 |
| 4 | Empty gas cylinder 50 l | PC. | 2 |
| 5 | Sheet steel | m² | 1 |
| 6 | Armature | m | 1 |
| 7 | Perlite | kg | 2 |
| 8 | Pipe with a diameter of 120 mm for the chimney | m | 4 |
| 9 | Asbestos cord | m | 1 |
| 10 | Basalt wool | m² | 1 |
Tools
To build a rocket stove for a garage with your own hands, you will need a set of tools and accessories consisting of:
- a household apparatus for electric welding with electrodes with a diameter of 3–4 mm;
- grinders or hacksaws for metal;
- hammer - slag separator;
- an ordinary hammer;
- pliers;
- chisels;
- metal brushes;
- electric drill;
- measuring instruments: tape measure, level and plumb line;
- marker or chalk;
- personal protective equipment: protective mask, dielectric gloves, protective clothing made of thick fabric and closed shoes.
Manufacturing instructions
Scheme and dimensions
Diagram of a rocket stove made from a gas cylinder
Dimensions
Preparing the balloon
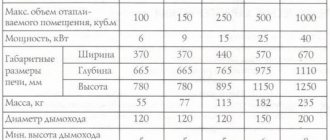
It is better to use 50-liter cylinders for transporting propane as blanks for making a rocket stove. Their height is 85 cm, diameter is 30 cm.
A rocket stove made from a gas cylinder of this size can effectively burn fuel and heat a room of up to 50 m². In addition, such containers are often used in everyday life, so finding products that have exhausted their service life will not be difficult.
In a gas cylinder, even if not used for a long time, a small amount of substance remains inside. Trying to cut it without prior preparation can lead to tragedy. To prevent detonation during cutting, the following manipulations must be done with both containers:
- unscrew the valves to release the neck of the cylinders;
- stand for 2 - 3 days until the remainder of the gaseous mixture evaporates;
- pour water into them and leave them in this position for a day;
- drain the water and allow to dry.
Such preparation will completely free the containers from gas, eliminating any possibility of an explosion.
Stages of work
Further work on the construction of a reactive furnace from a gas cylinder, according to the drawing, should be carried out in the following sequence:
- cut two 30 cm long sections from the profile pipe and one 35 cm long section for the sun lounger;
- cut two holes in the deck chair - one for the combustion chamber, the other for installing a vertical pipe;
- saw one piece of square pipe lengthwise and weld one part to the firebox. This part will facilitate the flow of air masses into the combustion section;
- weld the firebox with the pipe into a single structure;
- make and install a grate from reinforcement. Its basis will be a square frame made of reinforcement measuring 115x115 mm. Then the bars for the grid are welded to it in increments of 8 - 10 mm. It will be laid on corners welded from the inside of the firebox;
- weld the door hinges to the combustion hole and to the ash pan;
- check the quality of the seams for the absence of defects, for example, cracks and holes;
- check the functionality of the primary combustion chamber with a small amount of fuel;
- cut a piece 10 - 15 cm long from the pipe intended for the manufacture of the chimney;
- cut an opening in the lower part of the remaining pipe and weld the prepared elbow;
- cut an opening for cleaning the chimney just below the knee;
- cut off the top of one cylinder and cut a hole in its bottom;
- on the surface of this cylinder, use a tape measure and a marker to mark the location for the smoke exhaust and weld a chimney pipe elbow with a diameter of 110 - 120 mm to it;
- insert one part of a pipe of a smaller diameter, 0.8 m long, into a part of a pipe of a larger diameter;
- weld the gaps between the pipes along the entire circumference on one side;
- pour perlite into the space between the pipes for thermal insulation;
- install the pipe in the center of the prepared gas cylinder;
- weld the gaps between the pipes along the entire circumference on top;
- on the same cylinder, mark another opening and weld the manufactured firebox to it, and the vertical pipe to the sunbed;
- cut off the bottom of the second cylinder;
- clean cut areas from burrs;
- weld a valve hole in it;
- weld two metal rings to the edge of the cylinder;
- dock the cylinders together in the groove formed by the rings;
- seal the junction of the cylinders with asbestos cord for maximum tightness;
- Place heat-insulating material on the floor at the installation site, and a sheet of thick metal on top.
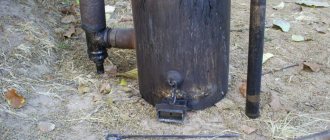
Finished design
DIY jet stove assembly for heating
Construction of the furnace begins with preparatory work. First you need to decide on the place of construction. It is chosen based on the requirements that relate to solid fuel structures: wood or coal.
Once the location has been decided, it is necessary to properly prepare it for construction. The wooden floor under the stove is being dismantled. They dig a small pit and compact the bottom.
In a small room, the jet stove is placed in the corner. The loading hopper occupies one side and the deck chair occupies the other.
The barrel or cylinder also needs to be prepared for installation. To do this, cut off the lid and tap. Then the structure is cleaned. Next, prepare the solution.
Stages of construction of a jet stove with a stove bench:
- The bottom of the dug hole is lined with fireclay bricks. Formwork is made along the contour of the recess. Reinforcement is performed.
- Lay out the base and fill it with concrete. A day later, when the concrete has hardened, further work begins.
- The base of the stove is made of fireclay bricks. The side walls are raised and a lower channel is made.
- The combustion chamber is covered with brick. There are two holes left on the sides. One is intended for the firebox, the second is for the vertical pipe (riser).
- The metal body is equipped with a flange into which the horizontal channel of the stove will flow. All seams must be airtight and well sealed.
- A side outlet is attached to the horizontal pipe, which serves as an ash pan.
- A fire tube is made from brick. As a rule, it is square.
- The flame tube is equipped with a casing. The gaps are filled with perlite.
- The installation of the cap is done from a cut-off part of a barrel or cylinder. It is equipped with a handle.
- Equip the furnace body with brick or stone.
- Equip the front part of the stove. Lay out the required contour.
- A prepared barrel is placed on the base. The lower part must be sealed with clay.
- Using a corrugated pipe, a channel is formed connecting the firebox to the street.
- The heat exchanger pipes are connected to the lower pipe.
- Installing a chimney. All elements must be sealed using asbestos cord and fire-resistant coating.
Next, you should give the stove the shape of a stove bench. The external chimney is equipped with a fire and tar trap. When all the materials have dried, you can test the structure.
Exploitation
A stove of this type, like any top-combustion heat generator, operates with maximum heat output only when the chimney is well heated. Therefore, before loading the main portion of fuel into the combustion chamber, the device must:
- warm up the chimney well. For these purposes, you can use any quickly flammable fuel, such as paper balls, sawdust or shavings. It should burn not in the firebox, but in the ash pit. The level of heating of the chimney can be judged by the attenuation of the sound or a change in its tone. Next, you can start adding the main fuel to the firebox. It is no longer necessary to set it on fire; it should flare up from the coals remaining from the burnt “fast” fuel;
- manually regulate the flow of air into the combustion chamber. A rocket stove in a garage is not capable of adjusting itself to changing environmental conditions and the quality characteristics of the fuel, so it must be adjusted manually. After loading the main fuel batch, the ash door should be opened completely, and when a characteristic hum appears in the furnace, it should be closed enough so that the tone of the sound in the furnace is reduced to a rustling sound. As the wood burns, the door needs to be closed more tightly, achieving the same rustling sound. If this is not done, then excess air will enter the furnace and cool the intermediate gas mixture. In this case, the pyrolysis process immediately stops and the oven begins to make a roaring sound.
Only dry wood can be used as fuel for such a stove, since the appearance of an excessive amount of moisture when burning wet wood can provoke reverse draft and interfere with the creation of the temperature necessary to begin the pyrolysis process.
To ensure the safety of users during operation, the following rules must be observed:
- do not use liquid fuels for kindling and do not add them to the stove during the burning period;
- avoid contact between open areas of the contact body and the surfaces of the furnace, since the cylinders and its other metal parts will become very hot during combustion;
- It is prohibited to place the device near flammable surfaces;
- Clean the chimney at least once a week, and preferably after each use of the device.
Do-it-yourself grill from a gas cylinder
You can make another useful device from a gas cylinder - a barbecue, which is used during outdoor recreation to cook meat.
To decide on the design, you will need to consider the types of barbecues that are made from cylinders.
Table No. 1. Types of barbecues
| View, illustration | Description |
| This option involves the possibility of frying meat over an open fire. |
| The meat is immersed in the interior of the structure, where it is processed with hot smoke. |
| This is a universal design that can be used for barbecuing and smoking. |
Before you start making a barbecue with your own hands, you will again need to remove the remaining gas from the cylinder. Moreover, it is better to do this away from the yard, otherwise the smell will take a long time to dissipate.
Table No. 2. Instructions for making a barbecue
| Step, no. | Description | Illustration |
| Step 1 | First you need to cut off the top ring from the cylinder. | |
| Step 2 | Then you should move on to the marking stage: - for the lid: take the joint in the middle, from which we retreat 25 centimeters on each side; — for air supply: we retreat 12 centimeters from the joint to the sides. Then you need to make cuts in the places where there will be hinges for the lid. Moreover, for the convenience of welding, no other cuts should be made yet. | |
| Step 3 | When the hinges and fasteners for the handle are fixed, you will need to cut the structure along the remaining marks. | |
| Step 4 | Now holes should be made on each side for air supply. | |
| Step 5 | Now you need to install metal spacers on the back of the cover. | |
| Step 6 | Next, use a drill and a drill bit of the appropriate size to make openings for the skewers. It is recommended to make them wider so that any skewers can fit there. | |
| Step 7 | Then you need to weld a metal plate with holes for skewers to the edge of the structure. | |
| Step 8 | Now you should use another piece of metal to weld the hole that remains from the valve. | |
| Step 9 | Next, you need to take pipes from a metal profile, cut them to size and weld a stand for the grill. The design should look like in the photo. | |
| Step 10 | Then you will need to make a removable table. It is made from corners and then covered with boards. | |
| Step 11 | Next, you should weld the handles to the structure and the canopy-limiter. | |
| Step 12 | The table needs to be covered with wood. |
The finished grill will look like this:
How to paint a grill?
Since the grill is used outdoors, the structure will have to be painted. The presence of a coating will protect the product from the negative effects of the environment. Of course, exterior painting is required, because it cannot be done inside.
You should be careful when choosing a coating, because it must meet the following criteria:
- the composition must contain substances that protect the metal from corrosion. You should choose a coating that is resistant to high temperatures (up to 480 degrees);
- Since the grill is used for cooking, the paint must be environmentally safe. As a rule, the packaging is marked accordingly.
Paints are sold both in cans and in aerosol form. The second option is practical because you don't have to use brushes.
An example of heat-resistant paint for a barbecue or barbecue
IMPORTANT! Before you start painting the structure, you must thoroughly clean the surface of any dirt. In addition, it is recommended to grind welded joints.