Material selection
At the very beginning of construction, it is necessary to decide which material is best to choose for the future structure.
There are two options here - aerated concrete blocks or refractory bricks. They do not burn out, can withstand exposure to high temperatures for a long time, and retain heat.
Aerated concrete for a summer stove will cost less. However, outwardly it looks worse and after construction the stove necessarily requires cladding (plaster, tiles, etc.). This is necessary not just for an aesthetic appearance, but also to minimize heat loss and protect the concrete from moisture.
First you need to choose the material
At the same time, brick will be the more preferable material, despite its high cost. It is moisture resistant, does not require additional cladding, and has a longer service life.
In order to accurately determine the future scope of work and correctly calculate the amount of materials required, it is necessary to develop a construction project.
What does a traditional Russian stove with a deck consist of?
Traditionally, the Russian stove with a deck is large, but a modern interpretation allows you to make a structure of any size. Dimensions of the classic version:
- width - 1.5 meters;
- length - more than 2.5 meters;
- height - up to the ceiling.
Looks good with a Russian stove, with a painted chest standing next to it Source openvillage.ru
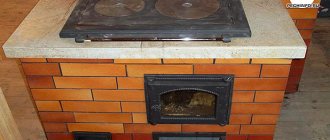
The stove requires proper care. Inspection by a professional technician is needed every 1-2 years to prevent smoke leakage. After firing the stove, you should clean it and remove the ash. Currently, the structure is equipped with cast iron plates (frying surfaces) for more convenient operation.
A cast iron hob makes life easier for the housewife Source modernplace.ru
How to make a calculation
Before starting construction, you need to decide on the location of the furnace.
If the site already has an open or partially open kitchen, then it is most rational to build the oven as a functional extension of the building. It’s best to be close to where you’re cooking. It can also be erected remotely from the kitchen, as a separate device on the site. Then you need to set up a place nearby where you can conveniently process food before sending it to the oven. For example, it would be suitable to install a gazebo with a table or stretch an awning.
See also: types and installation of a gazebo.
When choosing a place for the stove, you must also take into account the distance from the water source and cesspool, safe proximity to the eating and rest area, etc. This way you will make the building as convenient and safe as possible.
Today, summer stove designs are presented in a wide variety. You just need to choose the option that suits you best. However, creating a design and drawing of a furnace yourself will be difficult and time-consuming, especially if you do not have the necessary experience. If you have never done anything like this before, then it is best to follow ready-made “recipes” for construction.
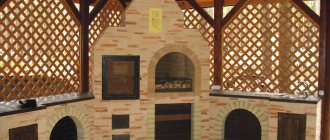
Our article will show the step-by-step construction of one of the simplest building options, which does not require special skills. This will be a stove with a barbecue and a removable cauldron (installed on the hob), stylized as a classic Russian one.
For such a construction you will need:
- 750 pcs. fire-resistant brick;
- 650 kg of special masonry mixture;
- 600 kg of broken brick or crushed stone;
- 300 kg of cement;
- 900 kg of sand;
- 1 roll of roofing material;
- 2 pcs. grate;
- 2 pcs. furnace doors;
- 2 pcs. closing iron doors;
- 1 furnace valve;
- 3 pcs. blower dampers;
- 1 hob;
- 1 barbecue grill.
This is a list of the main required materials. If you want to add something else to the design or plan to expand it, then you will need to draw up your own drawing.
Don't forget about the relevant material
Construction requirements
In this case, we will not even talk about the requirements for a summer kitchen with a barbecue and its design, but about the wishes of people regarding such structures. We analyzed and systematized these wishes, as a result of which we received a certain general picture, which we decided to present to your judgment. What do people want from a summer kitchen with barbecue?
- The barbecue oven should be placed under the roof of the summer kitchen or gazebo attached to the summer kitchen in a well-ventilated place.
- In addition to the barbecue, it would be nice to have a Russian oven, grill, barbecue and stove with regular burners.
- It is advisable that there is a sink with a sink and a countertop near the stove and stove. All this will make cooking very convenient.
- In a summer kitchen with a barbecue there should be space for a dining table. It is desirable that the place is in the air, but at the same time well protected from wind, scorching sun and rain.
- The summer kitchen should have an enclosed space where there will be a relaxation room.
- The building should have a spacious veranda (not necessarily protected by a roof), on which you could sit in good weather, lie on a sun lounger and sunbathe.
The implementation of these wishes in a specific project will depend on the size of the financial investment in construction and the available space. It is necessary to try to ensure that the summer kitchen is as optimized as possible already at the design stage. In some cases, you can get what you want while saving a lot, and the projects we want to talk about next are an example of this.
Pouring the foundation
The stove requires a solid foundation, since the total weight of the structure will be large - more than 750 kg. Before starting to lay the foundation, it is necessary to calculate that the dimensions of the foundation will be 100–150 mm larger than the dimensions of the building itself.
The foundation itself is poured like this:
- At the site of the future foundation, we dig a pit 40–50 cm deep.
- A sand substrate 10–20 cm thick is placed in the resulting recess. The substrate is well compacted until a dense structure is formed.
- We lay crushed stone on top of the sand base. The thickness of the crushed stone cushion should be at least 3 cm. But you can save on crushed stone if you first lay 2 cm of broken brick on the sand, and add crushed stone on top of the remaining 1 cm.
- After laying the crushed stone cushion, you can proceed to pouring the foundation. To do this, mix the cement mortar and pour it into the pit. The surface of the poured solution should completely cover the pit and extend to the floor level.
Now you need to let the base dry and harden.
About designs that tend to be installed in the kitchen
Reinventing the wheel in the furnace business is difficult. But, to tell the truth, there is no point in such efforts in principle - everything has already been invented, tested and brought to mind long before our days - the peak of the heyday of stove heating occurred at the turn of the 19th-20th centuries. Our ancestors had the time and incentive to understand the laws of the process and adapt the design to solve specific problems in the most optimal way.
For a long time, kitchen stoves differed little from those preserved by Vesuvius in Pompeii, Stabia and Herculaneum in 79. Essentially, it was a non-flammable pedestal with a tripod stand on which the dishes were placed. On the surface of the pedestal, under pots raised by a tripod, a fire was made - almost a simple fire. Only ennobled.
Later, when the American John Flavel invented an almost modern kitchen stove (based on the 1800 model of Benjamin Thompson), and the chef of the English Reform Club Alesis Sawyer improved it, people were able to cook, bake, heat, fry on a stove powered by one firebox. And all modern wood-burning kitchen fires still use this pattern of hot gas movement, discovered at the beginning of the 19th century.
Kitchen heating and cooking stoves are designed simply. A stove designed by Alexis Sawyer was implanted into the heating structure. This is the basis. Next are the variations.
Among the numerous universal stoves, Swedish Buslaeva, Volkov, Timokhovich, Sviyazev stoves and a whole cohort of schemes that differ from each other in details stand out. The downside is that they all do not tolerate unprofessionalism when laying, so it is difficult for a beginner to repeat these designs - they do not have enough basic skills and knowledge. What about those who have a desire to work with their own hands, but do not have the means to hire a specialist?
There is an exit. There is no need to strive to surprise everyone and everything by attempting to create a technical masterpiece that takes into account all the methods and technologies known to mankind. It is enough to repeat something simple and time-tested. Preferably something as reliable and unpretentious as a steam locomotive. A design that forgives small mistakes.
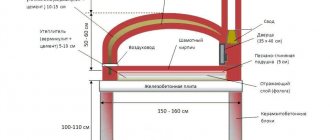
The order of a kitchen stove with an oven, repeatedly passed from one book about ovens to another. The numbers on the diagram indicate:
- Cleaning the oven.
- Oven.
- Firebox door.
- Blower and ash chamber door
Construction of the foundation
Before laying bricks, the foundation surface must be additionally waterproofed. To do this, cover the base with a roll of roofing material, and cover it with plastic film on top.
Now that the foundation is protected from moisture, you can proceed to the construction of the brick base:
- Sprinkle the film with a small layer of sand and place the first row of masonry on it. It is laid dry, without mortar. Only the joints of the masonry need to be treated with the bonding mixture.
- Now you need to determine the location of the future blower. We select the location that suits you on the first row and mark it with a door. To do this, we wrap the door around with a mounting cord and install it on a brick coated with mortar in the place where the future vent will be. During construction, the door is additionally secured with wire.
- We lay out the next three rows on the mortar so that the bricks and mortar fit tightly to the frame of the blower damper. In this case, you need to carefully monitor the evenness of the corner of the building. Be sure to use a level.
- When the masonry overlaps and goes above the blower, we form special protrusions in the base of the mortar and install grate bars. It cannot be completely built into the walls. The grate is made of cast iron, and it tends to expand when heated. Because of this, there is a risk that the wall will begin to collapse over time.
- The fifth, sixth and seventh row of bricks are laid out alternately - on edge, flat, on edge.
- In the seventh row we select a place to install the furnace door. We attach it in the same way as the blower damper.
- We prepare three quarters of brick and begin laying the eighth row with them, which is laid out flat.
- The ninth row is laid out edgewise and a hob can be installed on it. You can install only after the row is completely dry.
- The tenth row is intended for laying out the base of the firebox pipe.
- A valve is installed in the eleventh row. It is fixed in the same way as the blower and the combustion door. The only difference is that it needs to be well coated with clay before installation.
- Next, recesses are created directly in the pipe for a removable grill or barbecue grate.
- All subsequent rows of masonry gradually narrow to form a full-fledged chimney. When laying out the pipe, be especially careful that the center of gravity of the furnace does not deviate from the specified direction. Check the level regularly to avoid mistakes.
At this point we can assume that the summer stove is ready.
The main stages of constructing a furnace
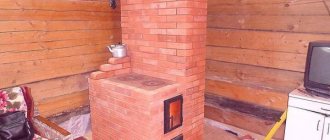
You can build a cooking and heating device in one day, strictly following the instructions of experienced craftsmen. For this you will need:
- 200-300 pcs. fireproof red brick;
- 2 pcs. doors for the blower and firebox;
- stove (it is better to buy a cast iron one with burners);
- grate;
- steel sheet 3 mm thick;
- fire-clay;
- sand.
The main thing is to take each step responsibly.
- The brick is soaked in water for a day.
- Then the foundation of the furnace is laid out from 2 continuous brick rows.
- At the beginning of line 3 it is necessary to install a blower door.
- Next, an ash chamber is formed from a brick row.
- The grate bars are attached to the 5th row, and the distance between the masonry and the grate must be at least 5 mm.
- In the next 3 lines, the firebox is formed. Doors that are strengthened with steel strips and asbestos solution.
- Now you need to lay out the chimney or install the purchased iron pipe.
- Installation of the cast iron slab is carried out only after the solution has completely hardened. It should be laid on pre-prepared metal corners.
- The bottom of the ash pan will be a laid steel sheet under the firebox. And by attaching a removable grate inside the chimney, you can cook smoked meats in the oven.
General Tips
Construction of a furnace is a labor-intensive process with many nuances. Here are the main ones:
- if the foundation is poured in excessively hot weather, then it must be moistened from time to time so that the screed does not crack;
- the first row is laid out dry, so it needs to be formed from even bricks that can be tightly fitted to one another;
- to achieve the desired plane surface of the brick, it can be trimmed with a grinder;
- hewn or chipped bricks cannot be placed with the damaged surface inside the furnace, since on this side the material is less refractory;
- Any cast iron elements cannot be installed flush with the masonry, so that it does not collapse; make a layer of mortar or clay.
If you follow these rules, they will help you create a durable structure that will last for many years.
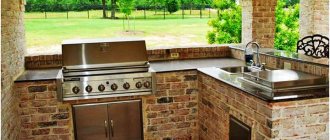
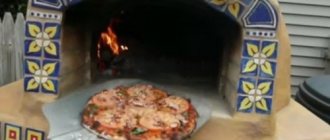
Baking in a summer kitchen is not only convenient, but also delicious. With a barbecue you can easily cook meat over coals, and a cauldron will help you prepare wonderful soups or porridges over a live fire. And it always adds piquancy to any dish.
Choosing a place for a gazebo with a barbecue oven
When determining the construction site, it is important to consider several factors that can simplify the construction process, and subsequently the operation of the furnace:
- Proximity to a water source. This point is important for three reasons: water is needed during construction, when preparing food, and also to ensure fire safety.
- Lack of trees and shrubs growing nearby. Such a neighborhood will not be useful for them.
- Parking of vehicles or storage of flammable liquids must be at a sufficient distance.
- The distance to residential or commercial buildings must be sufficient to avoid exposure to smoke and soot.
- Availability of the ability to conduct electrical energy to the recreation area.
Placing a barbecue on the site
If the barbecue is planned to be located near the boundary of a neighboring plot, it is better to find out the neighbors’ opinion on this matter in advance in order to subsequently avoid possible unpleasant situations.
What is a heating shield, and where to attach it?
In old photographs or newsreels, kitchen fireplaces are often found - the stoves of a restaurant and a private apartment differed in size, but not in design. In villages today it is easy to find them in a completely viable condition. That is, judging by its prevalence, this is generally a successful invention.
The general scheme of action is approximately the following: hot gases from the firebox are directed to the side, to the side. At the same time, they pass under the cast-iron cooking floor (with or without burners). The largest burner is located directly above the firebox. Next, the gases are lowered down. On the way, they wash a tin box with a door - an oven. The exit to the chimney is made below, under the oven.
In old English designs, the fire door was double - a blank door and a grate. When the door was opened but the grate was left in place, a piece of meat could be placed in front of it - the radiant heat passing through the grate worked like a grill. In theory, such a scheme is feasible today, but specialized castings are no longer produced. And if anything happens, you will have to come up with some kind of modernization of the standard door yourself. By the way, in most cases you will also have to make the oven yourself. You can find factory ones, but they are made of cast iron (which is not bad) and small (which is worse).
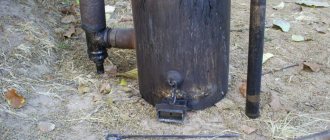
In addition to a standard stove and oven, you can add a water heating box - a tank embedded in the brickwork in which water is heated. It is only important to place it as far as possible from the firebox.
The motivation here is simple. Water boils at 100 degrees, and for cooking it is advisable to reach 200–250. Consequently, the water in the tank located close to the firebox will rapidly boil away and cool the stove - it is impossible to heat it above 100. And in this case, you will have to constantly change the water in the box and spend extra time on cooking. So we always place the water heating box at the very end of the circuit - the residual heat of the gases will be enough for the water.
So, after sequential heating of the stove, oven and - possibly - the hot water box, the gases are released into the pipe. But they still have a sufficient temperature that it would be stupid to just dump them into the atmosphere. It’s better to somehow harness this energy.
That's why they came up with heating shields - a smoke circulation system without its own firebox. In combination with a stove, such a shield produces a full-fledged heating and cooking stove, quite suitable for a summer house or a small living space located outside the city.
Moreover, the shield can be connected with equal success to a regular brick slab (or a slab to it), an industrial metal one, or a small fireplace stove in order to increase the overall heat transfer of the system. That is why the shield is mistaken for a separate heating unit. True, not at all independent.
The shield itself is extremely simple. The space inside it can be organized as a thermal hood, which is not entirely justified - the hoods suffer from weak lower and pronounced upper heating. Therefore, a conventional smoke circulation system is more often used. And most often - vertical. That is, they make a long channel, which is rolled up for compactness. And the elongated loop is placed vertically.
The internal cross-section of the shield channels must correspond to the cross-section of the outlet pipe of the stove connected to it. Or slightly higher. That is, if the diameter of the pipe is 120 mm, then the channels inside the shield should not be less than half the size of a brick - 120x120 mm.
IMPORTANT! A round cross-section corresponds in terms of throughput to a square, with side dimensions equal to the diameter. That is, the square and the circle inscribed in it have equal capacity. This happens because the flow of gases does not tend to climb into corners and goes only along the center of the provided path - along the path of least resistance.
The shield has one problem. Easily overcome, however. Each time it works at full strength - gases pass through the entire array. And, of course, this is not entirely convenient in the warm season - it is undesirable to accumulate excess heat in most regions at this time of year.
Therefore, many stove makers introduce a valve into the smoke circulation system of the shield, which allows gases to be released immediately after the stove directly into the pipe - the so-called summer move. But if you close this valve, the gases will follow the winter path - along the longest and most tortuous one.