Device and elements
Externally, the “Italian stove” resembles a “Russian stove”, but unlike the second one, it is not capable of heating the room. The design ensures a stable and high temperature inside the stove. Usually a classic Pompeian oven is built from brick or clay, but sometimes other materials are used, most often concrete cinder block.
The design of this system consists of four components:
- Foundation;
- Tabletop;
- Pedestal;
- Bake.
The Pompeian furnace was built in order of four main components:
- Floor;
- Entrance arch;
- Dome;
- Chimney;
Construction of the Pompeian furnace
Since the history of this kitchen system is very long, it developed along two different paths, which subsequently led to the appearance of two types of Pompeii stoves: Tuscan and Neapolitan.
Photo of a Pompeian oven of two types:
Pompeian ovens of different types
Tuscan designs have a high dome and a round vault, while Neapolitan designs are made exclusively with a low vault - due to the fact that they are intended exclusively for preparing large-sized pizzas and high-quality frying.
DIY Russian mini oven
A large structure is not suitable for every home, so you can make a mini Russian stove with your own hands. You can do it with a flood and use it in the summer, when there is no need to heat the premises.
Russian mini stove
When thinking about how to make a mini stove, you can settle on the classic version. The size of the base is 1x1.3 m. A mini-brick oven is built as follows:
- Organize a small foundation.
- Build a red brick guardhouse.
- Lay the walls under the stove.
- Lay down a wooden template to form the lower arch.
- Build walls with an arch for the combustion chamber.
- Pour sand into the arch.
- Proceed to forming the front wall, mouth, pole, over-tube.
This type of mini Russian oven can be laid out quite quickly with your own hands and does not require any special skills.
Arrangement of the Russian mini-stove “Housekeeper”
This is one of the variations of a mini brick oven. The housekeeper stove is different in that it has 2 combustion chambers of different sizes. The top of the structure is equipped with a vault and a slab. The 1x1.5 m design includes 33-34 brick rows.
The features of its construction are as follows:
- In the 1st row, correct bandaging of the material is important for strength.
- On rows 2-5, the construction of blower channels is necessary.
- In the 6th row, cover the chambers with grates.
- On the 7-9th row of the housekeeper, build the main firebox using wood, then start building the firebox.
- At 10-12 rows, close the channels, install the stove and proceed to the walls of the furnace and the arch of the main chamber.
- Complete the bundle of walls with rows 15 and 16.
- On the 17th row, lay a 3x3 cm steel corner. You will need to form a hilo along it and move to the base of the chimney.
- On rows 16-18, build a furnace arch. Pour sand into the arch.
- Use a double brick to cover the next rows.
- When laying the 20-25th row, do not forget about the formation of ventilation ducts.
Ordering the Emshanov mini oven
This is one of the variations of the wood-burning housekeeper. Its advantage is uniform heating of the side walls. Such a housekeeper stove is built with your own hands from rubble ceramic bricks M100. Two vertical symmetrical caps corresponding to the height of the entire structure are laid out inside. The firebox is formed from fireclay ШБ-5.
With water heating box
This modification of the Russian housekeeper stove is distinguished by a prefabricated flue gas assembly. To do this, use coaxial stainless steel pipes with thick machines.
This insert has several meanings:
- flue gases will not leak into the room;
- the thermal load on the chimney will decrease;
- When using low-quality firewood, soot will collect on the insert.
The space turns out to be small, so for a water tank of 20-30 liters you need to make a niche in the side of the stove wall. The cavity is laid out on 5-8 rows near the main firebox. The container is built into it.
It is important to build a separate channel for combustion products and fence off the container with a partition so that its walls do not burn out. The tank can be replaced with a stainless steel coil
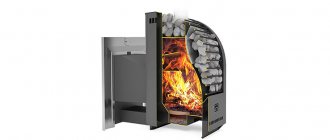
Principle of operation
The heating principle inside the Pompeian system is based on two hot air flows - convective from the hearth and reflected from the ceiling.
Expert opinion
Nikolay Davydov
Stove maker with 15 years of experience
Inside the oven, the temperature is regulated without human intervention. This is done due to the physical properties of the combustion products: if the firewood flares up strongly, the gas released by the fire when exiting the system presses the incoming air flow so that the intensity of firewood combustion decreases, and therefore the temperature in this unique design is normalized.
Principle of operation
An important role in the design is played by the dome, which emits heat flows, thereby heating the surface of the food, and consequently preparing its upper layers. That is why in these systems the pizza becomes perfectly cooked.
How does it work?
It is important to understand the furnace structure before moving on to the construction phase.
The operating efficiency of the equipment depends on the technical features. Temperature changes in the oven are regulated independently due to cyclic changes in gases, which is a characteristic feature and is perfect for baking baked goods and pizza. The dome of the structure is one of the main elements in the organization of work, accumulating heat energy emanating from the fire. During the combustion of solid fuel, two gas flows interact in the dome cavity:
- The first is convection. The flow is directed from the firebox.
- The second is reflected. Gas streams reflected from the walls of the dome itself.
How much will it cost?
A DIY Pompeian stove is a fairly expensive design, even if you decide to carry out all the work yourself. This is due to the high cost of the materials from which it is made. Since the design of a tandoor consists of several components, it is easiest to calculate the cost of each of them.
The price consists of purchased materials, and does not include construction waste and materials that can be found near the house (clay and sand):
- A bag of cement – 250 rubles;
- Cinder blocks will cost about 300 rubles;
- Fireclay bricks in the amount of 350 pieces will cost 17,000 rubles;
- Thermal insulation will cost 500 rubles;
- A cutting disc for stone costs about 250 rubles;
- Polyethylene for waterproofing will cost about 200 rubles.
In total, the construction of the entire structure, provided that fireclay bricks are used to lay the dome, will cost approximately 18,500 rubles .
Drying the oven and work after
The stove dried for a week, then the tunnel and sand were removed from the stove. During drying, two small vertical cracks, 3-4 mm thick, appeared in the dome. After this, the electric stove was again placed in the oven, and the entire space was lined with stones; the fan was placed at the end of the oven for blowing. The mouth of the stove is plugged with a piece of heat-insulating board cut out in the shape of a damper, leaving a gap of two centimeters.
Basic requirements for construction
There are no specific difficulties in building a Pompeian stove with your own hands; you only need to know a few basic rules for arrangement so that the structure can serve for a long time and be operated without problems:
- The inner walls of the stove must be made of refractory materials;
- It is imperative to provide the system with high-quality hydro and thermal insulation;
- The cladding must correspond to the location of the structure; if it is under a canopy, then plaster will do, but a stove located in the open air requires cladding with tiles or mosaics;
- The countertop must be able to withstand the stove, so its construction will require strong and stable materials;
- The dome of the structure must be exclusively spherical in shape;
- A chimney is required.
Materials and their quantity
A wood-burning pizza oven is built with your own hands using the following list of materials:
- 1 bag of cement
- 18 cinder blocks
- 1 pack of fireclay bricks
- Specialized fire-resistant mortar - 1 package;
- Boards if necessary;
- Insulation for thermal insulation;
- Polyethylene for waterproofing;
- Sand;
Required Tools
Each master can use his own set of tools, but usually the following list is needed to carry out all the work quickly and without much difficulty:
- Master OK;
- Kiyalo;
- Container for mixing and transferring cement mortar;
- Measuring instruments;
- Grinder and stone disc;
- Shovel for mixing the solution;
- Spatula, chisel, protractor - if necessary
Stages of work
How to make a Pompeii oven with your own hands from brick? Designing an Italian stove is quite simple - the main thing is desire and the availability of all the necessary materials. The work is carried out in 4 stages:
- Arrangement of a hearth and pedestal for a dome with an arch
- Forming a model from clay or earth
- Construction of the dome
- Dome lock installation
The whole order is clearly depicted in the diagram below:
Stages of work
Scheme and drawing
Scheme and dimensions
This figure shows the main stages of the construction of a pompeii, and also indicates all the dimensions of the parts of the Italian stove. The pizza oven, the drawing of which is shown above, does not require many skills to build - the main thing is to select the right materials.
Foundation
The structure definitely needs a high-quality foundation; a reinforced concrete slab with a thickness of 15-20 centimeters is ideal for this role. For proper waterproofing, you can use a two-layer roofing felt. The foundation plays a fairly important role - it ensures the stable condition of the entire structure and allows you to install very heavy structures on it, in this case it is a Pompeian brick oven, which has enormous weight.
The foundation can be made according to this scheme
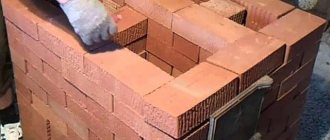
Cinder block pedestal
You need to install a pedestal on the base, on which the stove itself will be installed. A pedestal for a pompeii is also called a table. You can lay it out of brick, but it is easier and faster to build it from ordinary concrete cinder blocks - they are cheaper than other materials and have good stability compared to other materials.
You need to build the base using regular masonry, as in the photo below:
Construction of the foundation
Three walls will allow the tabletop to remain stable, and inside the resulting opening you can stack dishes or firewood; this part of the pompeii will serve as a mini-warehouse. After the three walls are folded, the tabletop is installed on them.
Tabletop
As a countertop, you can use a concrete or calcium silicate slab. Some people purchase marble slabs, and the pedestal is made of natural stone. Residents of the Krasnodar region used slabs from dismantled dolmens for Pompeii ovens whenever possible.
Example of making a countertop
Furnace laying
The construction of the Pompeii furnace itself is the most important part of the work. It begins with laying a hearth made of fireclay refractory bricks. The bottom is the name given to the lower part of the stove, which is the bottom where the wood will burn while the pompeii is running, so it should be laid out beautifully and as compactly as possible. The most suitable herringbone styling:
This option is most preferable
As you can see in the photo above, in addition to the hearth itself, you need to lay out the side of the entire structure and the pedestal for constructing the arch from fireclay bricks.
After this, you need to decide how the dome model will be made, on top of which the masonry will be made. The model can be a hemisphere made of earth or clay soil, formwork made of cardboard or wood, or a radial model made of wooden plates. The easiest way to make a model is from clay or earth:
Layouts on which you can make masonry
After the dome model is made, masonry can begin. Since it will be the inner layer of the entire structure, you should use only refractory fireclay bricks that can withstand extreme temperatures. Some owners decide to use a hinged support instead of a model; this simplifies the laying process, but increases the duration of all work:
Another masonry method
Continuation of masonry
When laying a brick dome, it is necessary to maintain its spherical shape, since it is the basis for good heating inside the Pompeian oven. For convenience, you can use refractory brick halves, which should be prepared in advance by cutting with a grinder and a stone disc. Follow safety precautions when cutting bricks:
- Use a mask, it can be purchased at a pharmacy;
- Be sure to wear safety glasses and gloves;
- Brick should only be cut with a stone disc;
- The cutting process takes place in the “pull” mode so that the brick does not jump out from under the disk.
Make sure the dome is made correctly
In order to correctly install the Pompeii stove with your own hands, keep the drawings and dimensions close to you during the work. Lay alternate rows of domes around the sphere, finishing each row of masonry before starting the next. In each subsequent row there will be 1.5 fewer bricks, so before you make a Pompeian stove with your own hands, be sure to keep blanks of 0.3-0.7 bricks on hand.
Completion of the dome masonry
Front view
Construction of a chimney
The chimney is laid out over the hole that was prepared during the construction of the structure. So the temperature inside it will be low; it can be made from ordinary brick masonry. The beginning of the work should be the installation of the arch:
Place for chimney
When building a Pompeian stove, some install a chimney made of galvanized steel. It doesn’t look so beautiful, but there is no need for work on its construction and you can save a lot on bricks.
Metal chimney
Thermal insulation of the furnace
On top of the masonry made of refractory bricks, a clay coating is made, on which thermal insulation 5-10 centimeters thick is laid on top. Mineral or basalt wool will serve best in this role.
Thermal insulation of the furnace
Next comes a layer of cement-sand or cement-lime plaster. After the thermal insulation has been completed, facing work can be carried out.
Furnace lining
When all the work on constructing the dome, installing thermal insulation and plastering has been completed, it is possible to carry out facing work that will make the stove visually attractive and consistent with the design conditions of the backyard.
Expert opinion
Nikolay Davydov
Stove maker with 15 years of experience
The type of cladding is largely determined by the location of the structure. If the system is installed outdoors, it is best to cladding it with mosaic or clay, or a high-quality cement-sand mixture.
Drying
After constructing the structure, it needs to be allowed to dry; the solution usually dries within 3-4 days, after which the first kindling can be done, which becomes the final stage of the work.
First kindling
After the entire structure has been erected, the first firing of the Pompeii furnace is necessary, which will serve as a strengthening process for it. Experts recommend heating the structure daily for a week to strengthen all layers. This is done in the following order:
- In the first fire, you need to fuse 2 kilograms of paper or 3 kilograms of straw inside the combustion chamber;
- In the second firebox, 3 kilograms of straw and 1 kilogram of wooden chips and sticks are burned;
- In the third firebox you can burn 4 kilograms of wood chips;
- The fourth fire allows you to burn one dry log;
- In each subsequent fire, the number of logs burned increases by one;
If the first kindling is carried out incorrectly, the entire structure may dry out and crumble, which will lead to the destruction of the structure.
Construction time
The time and effort required to build a pizza oven depends largely on the materials and size of your structure. Sources of professional materials such as fire bricks and other required components may not be available depending on your location and local industry. However, for a professional builder with access to the necessary materials and skills, building any furnace is quick and easy compared to DIY weekend construction. Building a prefabricated furnace typically requires less skill and allows for the use of cheap and readily available materials. These models are recommended for beginners to gain experience building a pizza oven without incurring the large expense and time commitment of a large brick oven.
Option made from clay (without brick)
Making a Pompeii oven from clay, without using bricks, is a simple process. The foundation and tabletop are made in the same way as in the case of the classical design, but the model is made from coarse sand (screenings). A clay dome is laid on top of it.
Pompeii made of clay
Device
It is best to use special clay; you can purchase it at a construction warehouse. How to properly make an Italian design from clay is well shown in this video:
A Pompeii clay oven is installed with your own hands in the same order as when constructed from other materials. After the dome is installed, a chimney is made - any materials can be used for its construction, including ordinary brick.
Expert opinion
Nikolay Davydov
Stove maker with 15 years of experience
As in the case of a brick Pompeian stove, waterproofing and thermal insulation are required, which will ensure a long service life, as well as cladding, which will protect the structure from irritating factors (rain, hail, snow).
The Pompeii clay pizza oven is a simple design to construct - anyone can make one like this.
Pizza Oven Components
If you follow these tips, you can quite easily build your own pizza oven. Regardless of the style and size of oven you ultimately choose, all structures have similar basic parts.
Foundation
When building the foundation, it is important to consider the structural integrity of the pizza oven. It is recommended to place the stove on solid ground due to its enormous weight. If the structure is placed in a house or veranda, you need to seek advice from a surface strengthening specialist.
Before you start building a foundation, you need to remove the soil to a solid surface. If you are building your stove directly on the ground, you will need to remove grass to get to solid ground. Some materials used in the oven are extremely heavy and may cause cracks when placed on a wooden platform. When building the foundation, it is recommended to consider the possibility of expanding the stove complex where it will be possible to add such additions as a barbecue, sink, firewood racks, etc. This will require more space and add weight to the structure of the project.
The hearth base can be made of various materials:
Logs Railway sleepers Brick Concrete blocks Stone
Hearth
The hearth is the main part of the Pompeian oven and is used for cooking. The hearth plate is raised above the base of the oven. Clean, medium-density refractory bricks are used. Fire bricks are able to withstand the extreme temperatures that occur in a kiln. The furnace roof is the open space above the fireplace in which hot air circulates. In order to prevent the accumulation of ash or debris between the bricks, they are laid without the use of mortar. The solution will crack when heated. The bricks on the hearth are laid on sand. Sand gives a completely flat surface and allows you to adjust the bricks using a rubber hammer. The ideal hearth size is 82 cm x 92 cm.
Dome
The width of the dome depends on how much food you will be preparing in the future, and the height of the dome is usually 3/4 of the width. The main purpose of the dome is to preserve the heat released when burning wood or coal. Thermal energy is evenly absorbed into the dome which is used for cooking. In practice, a brick or a ceramic bowl is used to build a dome. Domes have a tendency to develop cracks, especially if low quality components were used.
The height of the dome and door affect air circulation and heating, making their measurements necessary. The ideal door height is usually 25 cm high and 40 cm wide. The dome can be built in several ways:
Wet sand is formed into a dome shape and then covered with bricks. You can cut out an outline from polystyrene foam and place it inside the dome. Remove after the dome is finished. The most common method is a free-standing dome, which is built with fire bricks in a circle. The sawn bricks are stacked on top of each other and are self-supporting. The existing examples can be used as a guide, but are not necessary guidance for qualified stove makers.
Chimney
The chimney has many functions: it improves air flow through the stove, provides a path for smoke to escape, and removes almost 1/4 of the heat in a brick stove. The height of the chimney depends on the size of the stove, ranging from 1 meter and above. Some people choose not to build a chimney, which leads to problems and reduces the efficiency of the stove due to excess smoke accumulation.
The stove chimney can be built of brick, ceramics or steel. Each material has its own advantages depending on its use. The presence of a pipe will allow smoke to escape from the inner chamber of the dome. There are two zones for placing the chimney: on the side, in the center. The chimney draws smoke and gases from the stove through the chimney. Incorrect placement of the pipe leads to the fact that the furnace begins to produce more heat than necessary and this affects the efficiency of heat transfer. The chimney needs regular cleaning.
Door
A traditional Pompeii oven does not require a door. However, the door can be installed to optimize heat storage, increasing the heat retention time after the wood burns and maintaining a constant temperature. The oven door can be made of metal, cast iron or wood. The advantage of metal doors is that they will not be damaged by high temperatures. However, such a door can become very hot and touching it can cause severe burns. Choosing a wooden door will help prevent burns, but it may eventually char or catch fire. To prevent this from happening, simply soak wooden doors in water for at least an hour before use. It is a great idea to install a wooden door with a metal layer inside to get the benefits of both types.
The height of the door should be calculated according to the height of the inner roof of the oven to maintain air flow throughout the oven. The optimal ratio of arch height to door height is 100:60. For example, a vault height of 46 cm corresponds to a door height of 28 cm.
Thermal insulation
When the oven heats up, it will naturally expand. This expansion can cause cracks in the dome. To prevent this, heat-resistant insulation is applied to the dome. Additionally, it will ensure that the dome stays hot for a long time. Perlite or vermiculite can be used for this purpose. Thermal insulation is necessary to prevent heat loss. Improper insulation will result in heat loss and the lack of a stable temperature for cooking pizza. The goal is to increase the length of time the heat is retained and maintained inside the stove dome. There are different types of insulation: mineral fiber, plastered with cement plaster on top, or a layer of cement plaster with perlite sand is applied in a ratio of 1:5.
What can you cook?
Despite the fact that in these Pompeian buildings they cook mainly only pizza, which is truly tasty, because it will be prepared according to traditional technologies, many other dishes can be cooked in the Pompeian oven:
- Baked fish - usually served with baked potatoes or lemon, thanks to double-sided baking, the fish turns out tender, rich in flavor, melting in your mouth;
- Baked meats - many meat dishes are cooked to perfection in the Pompeian wood-burning oven, including kebabs and grilling, and lamb is cooked nowhere better than in the Pompeian system;
- Baked apples are a very tasty national dish, which is especially tasty in the tandoor; you can also prepare other hot desserts;
- Homemade bread and various buns - Italian wood-burning ovens allow you to prepare very tasty bakery products of various categories: Tuscan bread,
- Dishes baked in clay pots are a different story, because the temperature inside this oven is ideal for preparing various dishes baked in clay pots: beans, potatoes, fondue, vegetables, cabbage soup, mushrooms;
- Cantucci, buns, cookies, pies - baked goods for tea are excellent in Pompeika;
But every owner knows why he builds this unique structure - to prepare pizza and lasagna with an amazing range of flavors. These Italian dishes have long been prepared in Italian wood-fired ovens, so in order to get the highest quality pizza, no matter what ingredients it is made with, it should be cooked in a Pompeian oven.
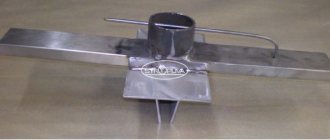
Peculiarities
In traditional Italian pizzerias, a Pompeian oven can be heated for months, the flame in it is almost never extinguished, and while baking pizza, the temperature in it can reach 350º C. To prepare various dishes, the temperature in the hearth can range from 70 to 400 degrees. For lovers of grilled dishes, the Pompeian oven allows you to install a Tuscan grill in the hearth. To do this, the coals are raked closer to the mouth and then a special metal grate with legs is placed there.
The main features that distinguish the Pompeian stove from other types of stoves.
- The chimney is located at the “entrance” to the stove.
- The height of the entrance arch is about 60% of the total height of the furnace chamber.
- Cold air is drawn into the chamber from below and immediately enters the flame. Having become hot, it rises up, goes around the arch of the chamber and goes down again, after which it is pulled out into the chimney.
- The width of the entrance arch is approximately equal to the height of the dome. This ratio provides good draft in the chamber, with little heat loss.
- It is preferable to heat the stove with tree species that produce little soot - alder, cherry, apple tree, olive.
The peculiarity of the Pompeian stove is that the chimney is located in the front of the stove
Conclusion
In order to delight your household and your guests with delicious pizza, as well as pleasant gatherings near a warm fire, every enterprising owner can build a Pompeii pizza oven in his own garden with his own hands. This structure can be made of brick, and if you want to save money, it can be built from clay material. The main thing is that the entire system is manufactured in accordance with technology and basic rules.
What kind of Pompeian stove will you make?
From brick From clay
Construction costs
For the planned construction of a pompeii in any form or composition, costs will vary depending on the source materials and the size of the furnace body. On a small budget, you need to look for free or improvised materials to build your stove. These can be any bricks that are left over from the construction site and the house. Costs are likely to increase when choosing quality bricks to build a large oven, along with load-bearing structures and coverings and stylish cladding. Hiring a contractor for the raw materials to build the stove will be more expensive. If one is looking to reduce the burden of selecting the materials needed to build a fireplace, purchasing a pre-fabricated, partially formed kit is an option.