Hello! On this page I have collected the names of the elements of the Russian stove . If you have anything to add, write by email or in the comments.
I recommend reading something interesting on my blog, KaminTeplo: Project of a Russian stove with a stove bench, stove and firebox. Project of a budget stove “Finka Stove”. Project of a stove for a black sauna. Project of a sauna stove “Russian Steam” with drawings and procedures for a Russian steam bath.
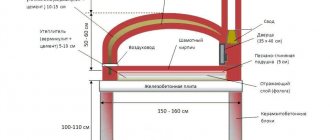
Design of a Russian stove
Drawings of Russian stoves can be very different, because the structures differ very much from each other.
Depending on the size of the oven there can be: small, medium and large.
The Russian stove is used for heating and cooking; it has an oven and a stove bench. To build such a structure, it is necessary to study its structure.
The design diagram of a traditional Russian stove consists of the following sections:
- oven - used for drying firewood. In many furnace structures there is no such department due to its lack of demand;
- cold stove - dishes are stored in it. It is also not always built;
- pole - represents a niche in front of the crucible. A cooking stove is installed in it. And if the stove is in a different place, food is placed on the stove so that it does not cool down;
- under is the bottom of the crucible. It must be installed with a slight inclination towards the entrance to the chamber to make it easier to move the dishes in it. The surface of this element should be sanded;
- crucible or cooking chamber - used for storing firewood and installing heat-resistant cookware. The chamber arch should also be made with a slight slope towards the entrance. Thanks to this configuration, hot air accumulates under the ceiling, warming up the stove bench and the sides of the stove;
- the overpipe is the niche above which the chimney pipe begins;
- view - is a window with a door with which the chimney is blocked. Through it they get to the damper, with the help of which they regulate the draft;
- stove bench - located behind the chimney, above the furnace. When the stove starts heating, it warms up well.
Modern Russian stoves are complemented by such elements as a cooking plate and a tank for heating water. In addition, in this structure the heating of the furnace section is carried out, which is why the furnace reaches the required temperature much faster, which means the room will warm up just as quickly.
Thanks to the presence of various departments in this building, there is no need to heat the entire room in the summer, but only use a hob to cook food. This creates a normal microclimate in the house and saves fuel. In winter, all sections of the oven are heated, which helps not only heat the water, stove and oven, but also the entire room.
To make a Russian stove with your own hands, preparatory work is carried out, starting with choosing a location.
Standard Russian stove: dimensions
The dimensions of a Russian stove depend on its type. So, the most cumbersome stoves will be those with a fireplace and bottom heating; the stove is rough (rough). Such designs have undeniable advantages: they are multifunctional, look attractive and can heat a large room. In addition, such stoves can be easily placed outdoors. But, unfortunately, they cannot always be installed in the house.
A classic Russian stove has a width of 150 and a length of 200 cm. At the same time, the stove bench in a traditional stove should be located at a height of 180 cm, and the hearth should be 45 cm.
The small Russian stove is 153 cm wide and 165.5 cm long. The Little Housekeeper is 100 cm wide and 130 cm long. And the popular “Swedish” Buslaeva is even smaller - 116x90 cm. At the same time, the location of the hobs and crucible determines the height of the housewife.
The choice of stove depends not only on the dimensions of the room, but also on the heat transfer performance of a particular design.
That is, the stove must be of such power that it is capable of providing the house with heat throughout the night, until the next fire. In order to carry out calculations, you can use generally accepted data, according to which for heating a room up to 10 square meters. you should choose a stove with dimensions of 150x150x200 cm.
How to choose the location of the furnace?
It is very important to decide on the choice of place where the Russian stove will be installed. If its location is in a wooden room, be sure to make the distance between the walls of the stove and the house approximately 20 cm. For safety, it is best to protect wooden walls using non-flammable material, for example, asbestos boards. The created gap will allow for an inspection of the furnace walls, which is done before the onset of the heating season.
If the stove is installed in an opening between two rooms, then it is lined with brickwork, at least 20 cm thick. A gasket of asbestos sheet is made between the masonry and the wooden wall.
Do-it-yourself mini-Russian oven: photo
Today, the dimensions of private houses, dachas and cottages do not always make it practical to fit a standard Russian stove into the kitchen. If there is no space for a large enough structure, then instead of a traditional stove you can use a Swedish oven. Such a stove will take up no more than one square meter, and at the same time will cope perfectly with heating a room measuring 30 square meters. There are several modifications of the “Swedish”.
The most common options are a mini-oven with a cast iron hob built into the oven and a full-fledged three-turn oven with a fireplace, hob, oven and drying niche.
It is quite difficult to build a Swedish model yourself. In order for the building to effectively cope with its cooking and heating functions, only high-quality materials should be selected for the work. Step-by-step instructions and recommendations from experienced stove makers will help you complete the laying.
So, before you start laying, you need to lay a square foundation for a stove with an area of 1.21 square meters. m.
We make the first two rows of masonry continuous. At the same time, in the 2nd row we install a grate under the fireplace. In the 3rd row of the stove we build an ash chamber, a vertical channel and a place for the oven, and lay out a fireplace firebox. We place the next row as the 3rd, and in the 5th we equip a place for mounting the grate. We block the passage between the oven and the vertical channel in the 6th row.
At the same time, it should be taken into account that between the oven and the firebox we always place the bricks on their edges.
In the 7th row above the firebox we place metal strips (2 pieces), and we do the 8th and 9th rows in the same way as the previous one. We will install a chimney for cleaning the fireplace along with a place for installing a hob in the 10th row. We form the crucible in the 11th row. We lay out the front wall of the fireplace in the 12th and 13th rows with bricks cut diagonally. In order to make a shelf in the 14th row, we move the bricks out 2.5 cm. We finish laying the cooking niche in the 16th row, making the next two rows the same.
We organize chimneys in the 19th row: between the fireplace duct and the vertical one we place bricks cut diagonally on both sides.
We lay out subsequent rows in the same way, and in the 26th row we connect the vertical channel to the chimney. In the 30th row, we push the bricks 30 mm outward on all sides, and start laying the pipe from the 32nd row.
Tools for laying a furnace
Regardless of the model chosen, to build a stove with your own hands you will need the following tools:
- trowel or trowel. They are used to apply mortar to bricks, and also use them to clean the masonry from excess mixture protruding between the seams;
- hammer-pick. It is used for trimming and splitting bricks, because in the process of laying bricks it may be necessary to adjust individual elements;
- jointing This tool is used only when the stove will not be decorated with decorative tiles and therefore it must look impeccable;
- building level. Can be used at any stage of construction. It is used to check the evenness of the brick row;
- plumb line Used to measure the verticality of a wall;
- order. An extremely useful device. With its help, the verticality of the masonry is maintained, maintaining an equal thickness of horizontal seams;
- rule. Apply it once to level the surface of the foundation;
- a spatula with which to stir the solution;
- solution container;
- measuring strip for measuring the width of seams.
Pouring the foundation of a Russian stove
Before you put together a Russian stove with a stove bench, you need to pour a foundation under it. It must be very durable and solid, because the weight of a Russian stove is quite large.
To pour the foundation for a Russian stove with your own hands, prepare a standard concrete solution from cement, sand and crushed stone in a ratio of 1: 3: 4. The thickness of the fill should be no less than the freezing depth of the soil.
However, since in most cases a Russian stove with a stove is installed in the center of the house, the foundation is poured onto a sand and gravel bed 15-20 cm thick to a depth of about 70 cm.
The procedure will be as follows:
- We are digging a ditch.
- Pour a bed of gravel and sand and tamp it down.
- We assemble the formwork, lower it to the bottom of the pit, and align its upper edges horizontally.
- Inside the formwork we place a reinforcing mesh made of 8-10 mm rods.
- Pour the concrete solution.
Please note that for a brick stove with a stove bench and stove, you need to build a separate foundation that will not be connected to the base of the house. Between two monolithic structures it is necessary to provide a gap of at least 10 cm, filling it with sand.
When the foundation is poured, care must be taken to compact the concrete and remove air bubbles from it. For these purposes, you can use a hydraulic press or a simple rod of reinforcement, making frequent punctures in the screed.
When pouring the base for a Russian stove with a stove bench in a village house, the concrete solution must be slightly poured over the edges of the formwork. Then we take the rule and level the foundation horizontally.
When leveling is completed, a thin layer of dry cement should be poured over the wet mortar and lightly rubbed, performing ironing. It takes 28 days for the foundation to fully cure.
Before further laying the furnace itself, a layer of waterproofing is laid on the foundation, for example 2 layers of roofing felt.
Please note that for a Russian stove with a stove bench, the size of the foundation must be at least 10 cm larger than its base.
Masonry of a Russian stove
If the drawing of a Russian stove indicates making a foundation, you should do it thoroughly, using a level to check the horizontalness.
After making the foundation, they begin to build the Russian stove itself. A drawing will help you lay out the masonry correctly. The most important thing is to adhere to the correct procedures of the Russian stove.
To make this structure safe, the masonry is made completely airtight. This is why cracked bricks should not be used. The seams between the rows usually have a thickness of 5-8 mm. It is not advisable to use clay for sealing, coating the walls of the stove with it from the inside. As a result, soot begins to be deposited and thermal conductivity decreases.
Before laying, ceramic bricks should be soaked so that they do not subsequently absorb water from the mortar. And after soaking, the brick and mortar begin to dry simultaneously , ensuring good tightness of the walls.
External walls are usually laid out in one or half brick, internal walls - only in half brick. If the interior walls are made of one brick, they will be thick and the stove will take much longer to warm up. Fuel will also be wasted in large quantities.
Russian stove with flood chamber: how to lay it
The Russian stove with heating is a modern, reliable design aimed at performing several functions. The design of the stove with heating allows you to cook food both on a cast iron stove and in a crucible, and heat a room of up to 60 square meters. m. It looks traditional, which makes it most suitable for rustic-style interiors.
In order to assemble a Russian stove with a flood chamber you need:
- Lay out the base of the pipe, small and large baking sheets in the first row.
- Form the second and third rows in the same way with space for the ash pan in the last one.
- Start laying the fourth row from a ledge (as in a conventional structure).
- In the fifth row, you should close the ash pan, and in the sixth, install a grate and lay a flue (if the stove is both wood- and gas-fired).
- Create a space for the firebox in the seventh row.
- Lay out the eighth and ninth rows with hewn bricks.
- Block the chimney in the tenth row.
- Lay out the pipe.
The finishing of the finished stove may include painting. You can paint the firebox or the roof of the furnace so that the furnace turns out to be fabulous. It is better to use traditional colors and motifs.
Tandoor or Russian oven
Tandoor is an ancient construction of a dome-shaped adobe hearth. Distributed in different regions: from Central Asia and Northern China to Africa and Latin America. It combines high heat capacity with fuel efficiency, because in the historical homeland of these stoves there has never been an excess of firewood.
Ancient tandoor
A distinctive feature of the tandoor is its single-chamber design with a high round arch. The operating temperature in the firebox is higher than in a Russian stove. Therefore, the thermal regime during cooking is more intense, which affects the range of dishes. The cuisine is famous for its wealth of recipes based on simmering: porridges, grain dishes, various soups and decoctions.
As a heating device for a large house, the tandoor is significantly inferior to Russian stoves. The simple design does not allow maintaining heat for a long time.
Russian stove on the street
Both the construction of a Russian stove outside the home and its operation have their own peculiarities. They are caused by more aggressive effects of atmospheric phenomena during the combustion process and during long winter downtimes. A stove left in the cold for at least a few days without use will warm up unevenly from the sun's rays. And masonry joints are saturated with atmospheric moisture.
When melting for the first time after a break, you need to use a small amount of wood chips. The gases coming out of the pipe should become transparent, which takes an average of one and a half to two hours. After this, you can lay regular firewood.
With barbecue
The primitive design of a stationary outdoor barbecue involves an open brick box on one side with a chimney tapering upward. This option is closer not to a Russian stove, but to an English fireplace.
To build a more labor-intensive but effective Russian-style outdoor fireplace, you will need much more brick. The diagram for laying a Russian stove on the street with your own hands is shown in the figure:
Layout of a Russian stove on the street with your own hands
This device performs the functions of an ordinary hearth structure equipped with a grill for cooking over coals.
In the gazebo under the canopy
For the construction of a stove in non-permanent wooden buildings (verandas, gazebos, covered terraces), fire safety requirements become relevant. A non-combustible belt must be created around the masonry: at least 30 cm from the walls and 60 cm from the door. A heat-resistant material is suitable for this - sheet asbestos cardboard with a thickness of over 4 mm. The top should be sheathed with roofing iron.
Bread baking oven
The construction of a wood-burning baking oven can have a simplified design. Many of the requirements for a traditional hearth are optional for this type of stove.
The most important requirements:
- the combustion chamber is large enough to fit a tray with molds inside;
- a pronounced spherical arch so that thermal radiation is focused in the center of the furnace and maintains the desired temperature.
Placing a bread oven outside allows you to not lay out the outlet channels very carefully. After all, the threat of carbon monoxide poisoning in the fresh air is much less than indoors.
How to build outdoors
The main feature of designing an outdoor stove is the need to provide protection from atmospheric moisture. You will need to build a reliable canopy. A rafter structure is erected for it on wooden or metal poles. You can arrange a power system by welding metal. The main requirement: the ability of the canopy to support both its own weight in windy weather and the snow load in winter.
How to make a Russian stove with your own hands: step-by-step instructions
To lay the firebox, they use refractory bricks made from fireclay clay. Next, the structure is laid out from simple ceramic bricks.
Absolutely every stove has cast iron parts - dampers and doors. They also need to be prepared in the required quantity.
Required tools and materials
- Doors: ash door 250x140 - 2 pieces, combustion door 250x205 mm - 1 piece, cleaning door 130x140 - 2 pieces, as well as ventilation doors of any size.
- Grate size 380x250 mm.
- Valves: 140x140, 180x140 and 260x260 mm.
- The furnace damper measures 450x380 mm.
- The view has a diameter of 230 mm.
- Water heating box dimensions 500x120x280 mm.
- Cast iron stove with 2 burners measuring 400x700.
- Two steel strips: 1430x25x2 and 1000x50x12mm.
For laying vaults and arches, you will need easily disassembled templates made from plywood and wood.
It is better to make the stove from high-quality cast iron
Photo gallery: diagrams and drawings with dimensions
Option for laying a Russian stove with a stove
Masonry of a Russian stove
Furnace laying option
Diagram and dimensions of a Russian stove
Features of preparing masonry mortar
For each type of brick, a mortar is made with its own composition and proportions.
- If the masonry is made with brick grade M150 and higher, then use a clay-sand mortar in a sand to clay ratio of approximately 1:2. The same solution is used for tiling with ceramic tiles.
- If the masonry is made with refractory bricks, then use a mortar based on refractory clay with the addition of sand.
- If the masonry is made with fireclay bricks, then use a solution of fireclay and so-called fireclay powder in a ratio of 1:3 or 1:4.
- When laying brick pipes in the attic, a solution of cement and sand is used.
Clay is a very soft rock from which sculptures, dishes, tiles and much more are made. In nature, clay comes in different types, and can be “fat,” normal,” or lean. It is considered the skill of a good stove maker to optimally select the ratio of sand and clay in order to obtain a good solution.
For each type of brick, its own mortar is prepared
In order to check the quality of the clay solution there are a large number of ways. The most common of them is - clay dough is made, then a thin flagellum is rolled out and then you just need to bend it. The smaller the bending radius (at which the flagellum begins to crack), the better the solution.
How to make a solution from clay
In order to make a masonry you will need about 3.5 cubic meters. m of clay mortar. Accordingly, the required amount of ingredients is taken in relation to each other. For example: 1.1 cu. m of clay you need 0.27 cubic meters. m of water and 2.2 cubic meters. m of sand.
An iron barrel or a tin-lined box is used as a container; the clay is soaked for 2 days. After which sand is added, and the solution is mixed with feet (you need to have boots with high tops) until it becomes homogeneous.
The quality of the mortar and brick will determine how long the stove will last.
How to build a foundation
Since the stove is a heavy and massive structure, it needs a separate foundation. That is why it will be very problematic to start masonry work in an already finished house - you need to think about this in advance.
The most ideal and reliable option is a reinforced concrete slab monolithic foundation. The stove foundation is not connected to the main foundation of the house and is considered an independent structure.
Brick stove laying
The main requirement for masonry is tightness. That is why only solid bricks without any cracks are selected for the stove, and the seams are made thin - no more than 5 mm. In no case is it recommended to achieve airtightness by coating the walls with clay from the inside - this greatly reduces thermal conductivity and also increases soot and soot deposits. In addition, clay has the ability to clog the channels inside the structure and peel off; cleaning them will be very problematic. Laying methods used:
- “in a brick” - this is if the wall thickness matches the length of the brick;
- “half a brick” is when the brick lies flat along the wall;
- “in a quarter” - this is a brick placed on its edge.
When laying, it is necessary to remove excess mixture, especially from the inner wall of the oven. On the outside, the walls are laid “in brick”, on the inside – “in half a brick”.
There are several types of masonry
How to make arrangements with flooding
Orders are so-called step-by-step instructions for correct laying, which indicate the order of actions in each next row. Thanks to them, anyone can master the process of laying a Russian stove.
- 1st row: laid from the so-called burnt brick, which minimally absorbs moisture. The corners of this row are laid from bricks that are cut to ¾ of the length. For the best contact, the inner corners of one of them and the adjacent one are filed. For this, a diamond file, grinder and other similar tools are used. This type of masonry is needed to correctly tie the corners in the next rows.
- 2nd row: this is where the laying of the walls begins, special clearings are laid in front and on the left side. An ash pan is created on the right side of the front of the stove.
- 3rd row: clearings on the left side are laid with bricks without using mortar. Cleaning and blower doors are installed in front. The doors are installed using hardened steel wire, which is placed in the cuts in the bricks and secured with mortar.
- 4th row: the hearth channels are blocked.
- 5th row: a grate is installed for the smallest firebox. In order to lay the interior of the firebox, refractory bricks are used, which are laid without the use of mortar.
- 6th row: a water-heating tank is placed on the left side of the stove and the laying of a firebox made of refractory bricks continues.
- 7th row: the firebox grate of the stove is installed and then the laying of the walls of the stove and the first firebox continues. The right wall is strengthened with a steel strip, which is placed in the seam and tightened with special end caps.
- 8th and 9th rows: the laying of internal channels and walls continues. The doors of the firebox of the stove and a small firebox are installed and secured as described above - using hardened wire.
- 10th row: the arches of the first two fireboxes are connected. The bottom of the furnace is covered. All smoke circulation channels still remain completely open.
- In the 11th row, a special steel angle of 30x30 mm is placed on the front edge, and a plate is placed on top. The right firebox is covered with a removable grate.
- 12th row: laying the front walls of the furnace (fire-resistant bricks are used for this), as well as the side walls of the slab. The furnace damper is installed. From the left side of the stove, the formation of the bottom of the chimney begins. There remains a small hole between the chimney and the furnace, which is closed with a special summer valve. Next you need to make an arch template from plywood and wood.
- 13th and 16th row: the formation of the walls continues. The mouth of the furnace is blocked.
- 17th row: the narrowing of the furnace arch and the gradual expansion of the chimney begins. The rear wall is strengthened with a steel tie.
- 18th row: the roof of the furnace is completely covered and the front wall is placed, which forms a cross-pipe.
- To lay the roof of the furnace, you will need to make a template again - formwork. It is made from 2 rectangular frames, on which rest parts made of plywood with a semicircular top - circles. To make this structure easily disassembled from the outside, the circles are attached to removable pins, and to prevent it from folding inward ahead of time, several spacers are placed between the frames. A flexible flooring is made over the circles, which is assembled from thin boards using belts or ropes.
- 19th row: the front wall of the crucible is strengthened with a screed, the construction of the walls above the crucible continues, while creating free space for bedding.
- 20th row: the roof of the furnace is filled with sand and compacted. This is done to increase heat capacity, as well as ensure high-quality baked goods and other food products.
- 21st row: the stove is being covered, the overpipe narrows towards the chimney.
- 22nd and 23rd rows: narrowing of the chimney and laying the chimney.
- 24th row: a special ventilation flap closes the overpipe.
- 25th and 26th row: the free space above the chimney slowly connects with the chimney and narrows.
Next, the masonry is done depending on the height of the house: from the outside, the chimney begins to narrow in a step just before the ceiling, after which a pipe begins to form, which passes through the ceilings and roof. In the free space between the roof and the ceiling, as well as above it, the masonry is done with cement-sand mortar.
That's all, the oven is done. All that remains is to lay the pipe above the surface of the house and you can heat it.
Russian stoves in pictures and photos
Large Russian stove with a stove, a stove bench and a place for firewood
Variant of a large Russian stove with a deck chair and stove
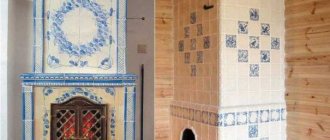
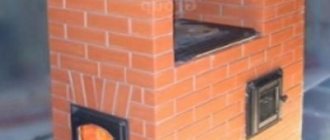
Tiled stove
Variant of a Russian stove with a stove bench and stove
Russian stove with stove and stove bench