Device and elements
The operating principle of this heating system is based on a long, winding chimney, which makes it possible to heat several floors using a single structure.
The Dutch oven consists of a firebox and a long winding chimney. The design also includes a blower and several doors. In total, the Dutch style uses several elements:
- Blower and blower door;
- Firebox and fire door;
- Soot collection chamber and cleaning door;
- Chimney;
- Gate valve;
Each element performs its role and allows the circular structure to achieve maximum power levels by distributing a small amount of smoke throughout the heating system in an even amount.
The design of the Dutch oven also requires compliance with certain rules to maintain fire safety and ensure comfortable operation.
Design example
Order for a little Dutch woman
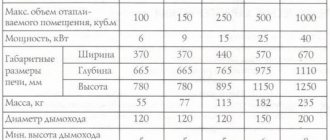
The Small Dutchwoman is ideal for a summer residence (the area of the heated room should not exceed 16-20 square meters). The size of this heating structure is only 520x520 cm. This compactness is achieved due to the fact that the smoke circulation seems to be curled into a ring. The height of the oven can be increased by repeating the group of rows from the 17th to the 22nd.
Brief explanations of the order...
The first 2 rows are solid.
To lay them you will need 8 bricks. When laying the base of the furnace, be especially careful about the geometry: check the equality of the diagonals, angles, and correct ligation of the seams. The 3rd row consists of only 5 bricks; the blower door is installed right there.
In the 5th row, the blower door is closed. Moreover, the building material is immediately trimmed a little so that the grate can be laid on it. Moreover, the niche for the grate should be approximately 5 mm larger than the grate itself.
A secret from an experienced stove maker! Fill the gap between the brick and the grate with asbestos cord, and lay corrugated cardboard on top to protect it from clogging with clay mortar. When you heat the stove for the first time, the cardboard will burn, but the asbestos cord will remain clean.
On the 6th row there is a door through which you will load firewood.
In the 8th, it is recommended to lay a 5 mm sheet of metal approximately 40 mm wide, and its length should exceed the dimensions of the firebox on each side by 3 cm.
In the 9th, a brick is laid on this metal sheet, which covers the fuel door.
From the 10th row , a smoke circulation is formed, that is, channels through which hot gases from the firebox pass. Strictly follow the given order so that your idea of folding a mini Dutchman with your own hands will be crowned with success.
In the 16th, lay two steel corners 50x50 mm, which will hold part of the masonry of the smoke circulation channels. The thickness of the steel should not be less than 3 mm.
The remaining rows are laid out quite simply. All you need to do is follow the order carefully. And only in the 29th row you will have to cut the bricks a little in order to mount the view-latch.
As a comparison, look at the order of the sauna stove.
Fire safety rules
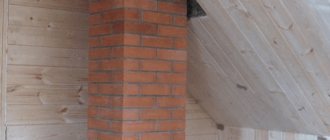
Before construction, study the PPB
Check out the diagram above, which shows in detail and accurately all the features of installing a Dutch oven in a standard-sized room. To ensure fire safety, an asbestos or metal sheet is needed between the stove and the floor, which will prevent unexpected fire in the room from sparks or fallen coals.
Expert opinion
Pavel Kruglov
Stove maker with 25 years of experience
If the system is installed in a wooden house, then a sheet is also needed between the wall and the stove to protect against fire. You should also know that there should be no furniture or flammable objects near the stove.
Design
To create it, solid ceramic bricks are used, among the main elements it is worth highlighting the following:
- Ash pit.
- Firebox.
- Cleaning compartment.
- Chimney.
- A valve with which you can adjust the draft.
The main differences between a Dutch oven with a hob, which distinguishes it from other types of agoregates, is that the design includes specially designed channels for smoke circulation, thanks to this technique the heating efficiency is maximized.
Most specimens have a round shape, but rectangular and curved designs are not excluded. Experts advise always creating a firebox in a rectangular shape so that the filling does not cause inconvenience.
Materials and their quantity
| Name | Qty |
| Blower door | 1 piece each |
| Cleanout doors | 2 pieces |
| Fireclay brick | 50-100 pieces |
| Regular red brick | 200-500 pieces |
| Gate valves/gates | 2 pieces |
| Grate | 1 piece |
| Clay | 90 kilograms |
| Sand | Half a cube |
All doors can be purchased in specialized stores or at a building materials warehouse in your city. Many people order designer doors from local craftsmen so that their stove can become a design element of the room.
Expert opinion
Pavel Kruglov
Stove maker with 25 years of experience
If you decide to install a metal casing on the structure and at the same time make it yourself, then in addition to the above materials you will need several sheets of galvanized or roofing metal. Their number depends on the height of the stove and its width; usually 2-3 sheets are enough to make an iron case for a Dutch oven 3 meters high.
Tools and materials used in the construction of a Dutch oven with stove
A prerequisite for a good stove is high-quality masonry mortar, which is recommended to be mixed from red clay and brick. The main composition for Dutch masonry is sand, red clay and water.
In this case, the ratio of proportions for each type of clay will be different. The less sand is present in natural clay, the correspondingly less is needed for the solution.
Clay
For oily clay we take the proportion: 1 part clay and 2.5 sand.
For medium clay - 1 part to 1.5 sand.
For skinny ones you will need 1 to 1.
Materials for laying a Dutch oven with a stove:
- Fireclay refractory brick for combustion chamber.
- Red ceramic brick.
- Foundation mortar (cement, sand, gravel and water).
- Mortar for laying bricks.
- Roofing felt for foundation waterproofing.
- Boards for the construction of formwork.
- Grate.
- Blower.
- Metal door.
- Damper.
- Metal rods and wire for reinforcement.
- Metal wire 0.8 mm for dressing.
- Asbestos cord.
- Hob.
Prepare the following tools:
- Trowel for laying bricks.
- Building level, protractor and plumb line.
- Construction stapler.
- Tape measure and marker.
- Rule.
- Grinder for turning bricks.
- Shovel and bayonet shovel.
- Bucket for solution.
- Construction mixer or drill with attachment.
- Rubber hammer for laying bricks.
- Construction hammer for erecting formwork.
Required Tools
For easy and quick installation, you need to prepare in advance a certain list of tools that will be useful to you in the construction of the Dutch oven:
- Pickaxe or guillotine;
- Measuring tools: level, tape measure, square;
- A basin for diluting the solution;
- Bucket and shovel for convenience;
- Mason's trowel.
If you make a metal casing yourself, then you will also need tools to assemble it: metal scissors, rivets and a riveting device, or a welding machine.
The difference between a stove and a fireplace
It is necessary to distinguish between a classic, English fireplace and a Dutch fireplace. The Dutch treat everything quite economically, and this can be seen even in the stoves; they reduced the size of the firebox, but accordingly added the above-furnace part, and did not forget about the chimneys. The very difference between a stove and a fireplace is extremely arbitrary. In fact, a Dutch oven is also a fireplace; you just need to open the firebox doors. Built-in grates, or lack thereof, did not affect the combustion process. This is also a big plus for the Dutch woman. The round-shaped Dutchwoman also originated in Russia, although it is more likely of German origin: we owe its invention to I.G. Utermark. Utermarkovka (as it was called) tends to function in the order of smoldering; it differs from the Dutch one by its blind fireboxes.
In historical descriptions of utermarks the word “burak” appears, which meant smoke circulation. The top of the stove was covered with iron, thanks to this it was possible to save on building materials. They were built with 1/4 brick, this provided not only low financial costs, but also enormous heat transfer.
This stove did not cause much delight, because of the hot channels heating the cold ones, because of this, a lot of heat simply went to nowhere. Having drawn conclusions, we understand that utermarking is a stove for low-income segments of the population. It has quite a lot of negative qualities: it smokes, smokes, accumulates soot, makes cleaning very inconvenient, and as a result it is a fire hazard, but its big plus is its low cost. Mostly, hospitals, orphanages, shelters, and prisons were equipped with utermarks. At the beginning of 1927, V.E. Grum-Grzhimailo finally came up with the most true Dutch woman, of the round type. It turned out to be a bell furnace with grates in the firebox. It competed in efficiency with the Utermark furnace. Especially its heat transfer, since the circulation of heat inside plays into the hands. Based on their design, furnaces are divided into two types: two-stage and single-stage.
Stages of making a round Dutchman
Foundation
As with any other design, in order for a round Dutch oven to be stable and to function properly, you first need to make a foundation:
- To do this, you need to dig a recess into which the base for the stove will be installed.
- First, take measurements and disassemble the floor covering, deciding in advance on the future location of the system.
- Dig a hole and fill it with cement mortar of the following consistency: 1 bucket of cement, 3 buckets of sand.
- You need to place a reinforcement tie on top of the resulting future foundation so that the foundation better holds the Dutch structure.
- Let the solution dry for 10-15 days before starting work on the construction of the furnace.
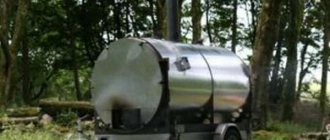
Manufacturing of metal casing
Installing a metal casing on a Dutch oven was invented in the Russian Empire by the German designer Utenmark; such systems are often named after him - “Utenmarking”.
Today on the market of heating systems and products for them there is a wide range of ready-made metal casings for Dutch ovens. They are sold in ready-made sizes, so if you decide to use “utenmarking” purchased in a store, you should compare it with the dimensions of the oven in advance. The finished prefabricated metal casings look like this:
Metal casing
If you decided to make a metal casing with your own hands, then the material you can use is a regular galvanized sheet or roofing iron:
- It is better to prepare the blanks for installation in advance by first making holes for the firebox, valve, vent and door for cleaning. It is important to understand that the masonry is formed by the dimensions of the casing, so take this into account when making it.
Blanks for casing - A sheet of iron is fastened into a round shape using rivets; in extreme cases, the structure can be welded if the thickness of the metal allows this.
Laying and ordering
An important feature in the laying of a Dutch oven is the order of its rows; not every master is ready to undertake the installation of such structures, so the decision to make a round Dutch oven with your own hands is risky. But if you are confident in your skills, then it is important to use a specially invented order of this design.
Appearance
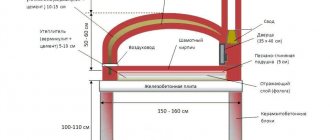
In cross-section, a round Dutch oven with a casing looks like this:
Sectional diagram of a round Dutch woman
Features of brick laying
The installation of the casing is carried out simultaneously with the installation of the Dutch. The section of the system, before covering the firebox, is placed in the floor of bricks - that is, the first three rows. Then, using a plumb line and level, the casing is installed - its first, lower ring. The distance between the wall of the case and the masonry is filled with a ready-made semi-liquid clay solution.
Now the firebox is being formed, and it is important to follow the order and bandaging so that the structure has good stability and high efficiency. When the firebox is formed, you can begin laying the subsequent parts of the Dutch system.
Front rows
Despite the apparent simplicity of the design, the main thing here is the order of the system; without it, the mason will not be able to install the entire system correctly. The first twelve rows begin like this, the diagram shows the dimensions and entire order of the Dutch woman:
Rows 1-12
From 13 to 29, the row and pipe diagram are shown in the following design order:
Rows 13-29
Rows 30-32
Please note that if one row is folded incorrectly, not to mention more errors, smoke will pour into the house and the system will not be able to function correctly.
First test firing of the furnace
It is important to carry out the first fire in accordance with certain rules:
- Test heating of the heating system must be carried out after the entire structure, including the masonry and facing mortar, has completely dried. Premature testing of the furnace can lead to cracking of the structure, which will deteriorate its technical characteristics and lead to operational problems.
- The first combustion is carried out using 1/5 of the fuel. First you need to lay down wood chips and shavings, and then you can add larger logs. In this case, all valves and dampers must be open.
Expert opinion
Pavel Kruglov
Stove maker with 25 years of experience
If you have a thermometer installed, then make sure that the temperature in the system does not reach 600 degrees Celsius - you need to carry out the test firebox carefully, constantly inspecting the entire structure for damage to the system.
Operating principle of the furnace
Dutch is very multifunctional. It functions as a heating device. Can also be considered as an interior decoration - a fireplace. To do this, just open the firebox doors.
Despite the fact that the classic Dutch oven is installed without a stove, if desired, you can add a hob for cooking.
Classic Dutch ovens do not have the usual blower and grate, which only helps to increase the percentage of heat transfer: you can put a lot of firewood in the firebox and “forget” about it for quite a long time.
They will burn very, very, very slowly, since the flow of oxygen that supports combustion enters the Dutch oven only through the only opening present in such a stove - the firebox door.
Thin walls - just one brick - ensure rapid penetration of heat into the room and heating the room in a short period. Small stoves, meter by meter in size, are capable of heating a medium-sized home, for example, a room of 35 square meters will be heated by a Dutch stove in an hour.
A distinctive feature of a Dutch oven is the absence of a cast iron panel, which is used for cooking. The stove is always rectangular and because of this standard shape, some stove makers call it primitive. But this in no way detracts from its ergonomics and economy, which make the stove in demand among developers.
Dutch ovens have two recognizable shapes: rectangular and round.
Externally, the stove is made very simply - the brickwork also serves as a design element (as an option, you can also use tiles).
Inside, the Dutch oven is equipped with a blind firebox of impressive size and six smoke circulation channels located in such a sequence that the heated gases, entering those of them that are called lifting ones, cool slightly, heating the stove structure in parts.
That is, schematically it happens like this:
- The flow of gases in the hottest state into the first lifting channel.
- Gases that have cooled slightly in the first channel enter the second channel.
- The gases that have cooled sufficiently in the first two passages enter the third channel.
This sequence allows the stove to warm up gradually and protects its surface from cracking and cracks that would certainly appear during instant heating.
As the gases rise and fall, they travel through all six revolutions, circulating heat.
When laying such a stove, it is imperative to adhere to parameters that absolutely do not correspond to the parameters of a bulky Russian stove. And the point is not so much in the elegance of the Dutch woman, but in the height of her firebox.
It is located lower than a traditional Russian stove - 25 cm from the floor level. This height ensures uniform heating along the height of the room by shifting the level of the steam balls.
Conclusion
A Dutch oven with a metal casing will be an excellent heating system for two-story country houses, to which gas pipes cannot be connected and a classic boiler heating system cannot be installed. Also, round Dutch ovens are an excellent choice for any agricultural buildings - they do not have enormous power, but are able to heat the room for fairly comfortable living.
The design of round Dutch ovens with a metal casing is the main advantage of these heating systems - despite the complexity of installation, anyone can lay a stove if they use the required order and prepare the solution correctly.
Of course, if you are not sure that you can correctly lay the stove, then it is better to seek the help of specialist stove-makers who will be able to install the entire structure correctly, and the stove will function as it should.
Advantages and disadvantages of a Dutch oven
Like every oven, the Dutch oven has its own advantages and disadvantages.
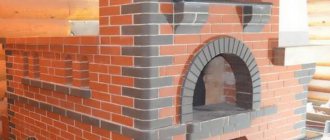
If we compare the design of a Dutch oven with a stove with the traditional design of a Russian oven, then the advantage will be with the former. It warms up much faster due to the small walls, and its dimensions allow it to be placed even in a small dacha or in a country house.
Dutchwoman with a stove
In addition, if it will take you 1200-1300 bricks to build a small Russian stove, then for a Dutch stove of impressive size you will need only 650-700 bricks. This factor alone makes the Dutch oven attractive, especially during times of economic crisis.
Another advantage of the Dutch woman will be especially attractive for dacha owners who visit their country house from time to time. If a Russian stove needs to be heated for several hours before it starts giving off heat, then lighting a Dutch stove will take you no more than half an hour. It can be immediately loaded tightly and given maximum heat.
So, the advantages include:
- Possibility of modifying the stove with various functional additions in the form of a water heating tank, stove bench, oven, fireplace, etc.
- Compact and small in size. If you wish, you can build a good quality stove measuring 50*50 cm.
- Fast heating of the room.
- The efficiency of the furnace does not decrease depending on its height.
- Low construction costs. Only the firebox can be made from expensive refractory bricks, while even used material is suitable for arranging the rest of the structure.
Disadvantages of the Dutch woman:
But it would be unfair not to mention the disadvantages of the Dutch oven.
- Low efficiency compared to a Russian stove. Only 40-45%, subject to proper use.
- The channels are designed in such a way that they can partially draw in cold air from the street.
- Frequent firing of the stove is required - at least twice a day.
- Not the most economical fuel consumption.
- You need to constantly monitor the oven view. If you leave it open, the oven will instantly cool down.
- You should not set the maximum temperature for a Dutch oven. If you overheat it, carbon monoxide will be released, which can penetrate into the room.
Today there are many models of Dutch women:
- with fireplace;
- with oven and heating and hob;
- with water heating tank;
- with a sun lounger.
But basically, this type of design is chosen for its compact size and the ability to place it in a small house. If the room has a large area and many windows, then it is better to give preference to other types of heating structures: a Russian stove, a bell-type stove or a Swedish one.
Historical data
But before we begin to understand the design features of the furnace, its advantages and disadvantages, I would like to plunge into the history of its creation. “Dutch” has been known since the time of Columbus, when the Netherlands, after gaining independence, began to expand its influence throughout the world.
Since the beginning of the 18th century, such stoves began to be used with great popularity, and by the end of the 19th century the “Dutch” stove became dominant, and it remains so to this day. In addition to the fact that the stove is universal, it easily fits into any interior, from simple rural houses to chic interiors of country cottages.
Some encyclopedic data.
In encyclopedic sources, a “Dutch stove” is a rectangular slow-burning stove with multiple vertical smoke circulations and a side chimney.
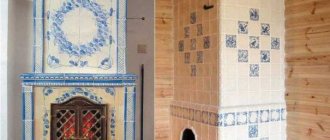
Initially, the stove was lined with tiles and this is one of its services to people. Tiles and the classic Dutch oven are inseparable. Of course, if the stove is used for a summer house or kitchen, you don’t have to worry too much about the aesthetic design, while maintaining all the traditions. However, if the interior of the room implies the presence of a Dutch oven, then a “Dutch stove” without tiles is unacceptable bad taste.
Unraveling three Dutch tangles.
And let’s start, perhaps, with “Russian Dutchwomen”. The first examples of tiles were brought to Russia by Peter I, and Russian tilers quickly studied the peculiarities of making these finishing materials. Then, as now, everything foreign was considered very prestigious, and tiles began to be used to decorate mansions of classic Russian stoves. Later they began to be called Dutch, although in fact they were their complete opposite.
However, it was not only mansion stoves that were decorated to resemble the Dutch style. There are instances where the stove seems to be similar to a Dutch one, but the main detail that reveals its Russian origin is the presence of a view in the upper central part. If you look inside the firebox, you can immediately discover that the stove is a bell-type stove. In the center of the firebox arch, a characteristic narrowing is visible, called hailo.
A bell furnace is more difficult to build. It requires complex calculations, more materials and high quality workmanship. But unlike channel furnaces, the heated gases here are concentrated under the hood and give off most of their heat. The efficiency of such furnaces is an order of magnitude higher and low-quality, high-ash fuel can be used for combustion here. If you do not close the view, then, unlike a Dutch oven, here the cold air will remain in the firebox, and the hot air will gradually cool under the hood.
But a reasonable question may arise. Where did such “Dutch women” come from in Rus'? The answer is simple - out of nowhere. Emperor Peter I, in order to combat numerous fires at that time, prohibited heating “black” and issued a decree to build stoves according to the Dutch model. But since the decree did not clarify the situation with what exactly the Dutch technology was, each stove maker understood this information in his own way. This is how hybrids of Russian and Dutch baking traditions were born.
Outwardly very similar, but inside a completely different “Dutch” of Russian origin migrated back to European countries. The stove could be given a triangular or trapezoidal shape and placed in a corner or in the wall of a room to save living space. It was impossible to create a Dutch oven of this shape. Later, in Holland itself they readily used similar stoves with a bell-shaped chimney and their advantages.