History of creation
The stove runs on wood, pellets and other solid fuels
The first example of such a stove was made in 2002 in the north of the country, in the Novosibirsk region. Just two months after this, the necessary certificates were received, and by 2004 a patent for the invention was issued. Its developer is a specialist in the field of heating engineering E. Yu. Zubkevich, who named the stove in honor of his relative Professor S.E. Butakova.
A year later, the inventor entered into an agreement with the Termofor company, which mastered the production and production of products. For a number of reasons, cooperation with her was suspended in 2008 and the patent owner remained out of business. To date, the production of these furnaces has been established on an industrial scale.
Device and principle of operation
The air in the pipes heats up and rises, ensuring uniform heating of the room.
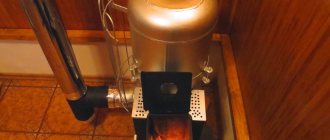
Butakov’s designs are based on a welded housing with pipe channels built into it, inside which convection processes occur. In this case, cold air enters inside through a pipe system, is then heated in the housing and, already hot, comes out through the upper outlet. It then spreads throughout the heated room, bringing the temperature in it to a comfortable level. Such pipes can be located on the front and rear sides of the structure body.
Wood is used as fuel in these devices. In addition, they can be heated with special briquettes called pellets. The upper plane of the body can be used for cooking or heating liquid foods and water. It itself is painted with paint based on organosilicon elements and coated with heat-resistant oils that burn slightly when heated. Therefore, the first firebox must be organized outside the premises, its duration is at least 1-2 hours. The burning smell will no longer spread into all subsequent kindlings.
The design is based on the principle of convection - the property of warm air to rush upward. Stove products of the Buleryan type function similarly, the difference being that they do not have a grate. This well-known design was taken as a basis by Yu. Zubkevich when developing his invention.
The cast iron grate that new products are equipped with reliably protects the bottom of the firebox from burnout, since it takes on the bulk of the thermal impact. When this structural element burns out, it is easily replaced with a new one. In addition, the presence of a grate guarantees uniform distribution of fire throughout the entire firebox, as well as the ability to adjust the air supply. By increasing it, it is possible to speed up the entire process of heating the room. Through the cast iron grate, combustion residues fall directly into the ash compartment, from where they are subsequently removed.
The stove can be cleaned directly during operation, which allows the use of fuel with a high soot content. In addition, intense combustion speeds up the process of its disposal. To control this procedure, the ash compartment is equipped with a valve that allows you to regulate the dose of supply air.
Stoves of this class are used exclusively in smoldering mode and are not intended for prolonged operation at temperatures above +350°C.
Model line
Currently, the manufacturer, and this is a domestic one, offers several models:
- Gymnasium student with power 6-7 kW
- Student – 9 kW. Weighs 70 kg.
- Engineer 15 kW, weight 113 kg.
- Associate Professor 25 kW, weight – 164 kg.
- Professor 40 kW, weight – 235 kg.
- Academician 55 kW, weight 300 kg.
Technical characteristics
As you can see, the range is actually quite wide. But why such names? The thing is that the author of the heating installation is a professor himself, he taught heating engineering at the institute, so he divided the line according to the categories of students and teaching staff.
But this is an incomplete classification. There are subsections that differ from each other in the type of fuel used. For example, “Student” and “Engineer” are available in three modifications.
- Air-heating wood-burning boilers.
- Coal.
- "Hydraulic". These are water-heating wood-burning units.
What are their differences? Let's start with coal stoves. Since coal has a higher thermal output, the temperature in the firebox becomes higher, which negatively affects some metal elements of the unit. So, the convective return pipes here are covered with a special casing that protects them from severe overheating. The casing is made of stainless steel, and they are made as a replaceable element. Due to them, the service life of the pipes and, accordingly, the stove itself increases.
The strength of the grate has been increased. The boiler door is equipped with heat-resistant glass, so it is possible to observe the fire visually. Although it should be noted that in the latest series of production and in wood-burning units, glass doors were already installed.
Furnace "Student-Gidravlik"
In hot water models, convection pipes were replaced with a water jacket. Be sure to install a thermometer with which you can monitor water parameters. There are some options that increase the functionality of the boiler. For example, heating elements can be installed that will maintain the required coolant temperature if the boiler goes out. All water heating options can operate on coal, wood, and peat briquettes.
I would like to dwell a little on the Gymnasium student model. This is the smallest stove in this category, so it is most often chosen by summer residents who visit their country cottage in the winter from time to time. It should be noted that with its help you can heat a small house with a total area of up to 100 m². but this is the simplest model without modifications:
- She has only one option, in which the chimney goes only to the top. For other models, the pipe can come out from above, from behind, and from the back.
- Its design contains only a steel door. Other models may have doors made of steel, cast iron, or cast iron with glass inserts.
Model with hot water boiler
Preparing pipes and parts
The oven has an outlet of 14 convection pipes. The diameter of the chimney outlet is 200 mm; we purchase it ready-made from a corrugated ventilation pipe.
For manufacturing we will need to prepare several parts. From 4 mm sheet steel we cut out:
- 2 side parts measuring 800/950 mm. The second dimension is the height of the structure;
- For the front and rear walls, we use a grinder to cut out parts 1110/670 mm. After final assembly, the protruding metal will be cut off and can be used as reinforcement for the base;
- for the top we cut out a piece measuring 350/950 mm. It is necessary to mark 6 holes of three pieces on the narrow sides and drill or cut them by welding. Pipes with a diameter of 40 mm will come out of them;
- for 2 side jibs, cut the workpiece to a size of 200/950 mm;
- for the base you can use a corner with a 100 mm shelf or a channel. 2 pieces 950 mm and 2 lintels 470 mm each. It is necessary to make holes in the base for the pipes, which must be coaxial with the top ones;
- For convection pipes we use steel parts with a cross section of 40 mm. 6 of them are straight, they run along the front and back walls. There are 4 holes on the jibs. 8 pipes will need to be bent to a certain angle. It is better to do this on a pipe bender.
You will also need to leave a sheet for making a door and an ash drawer. To make a grate, you can use a sheet 10 mm thick, making longitudinal grooves in it with a grinder. You can weld a grid from reinforcement or a rod with a diameter of 8-10 mm.
To install the grate, we will prepare several pieces of corner. It is better not to secure the grate tightly; this will make it easier to replace and maintain the stove. A hole is marked on the top part and made for connection to the outlet pipe. You will need to prepare a section with a cross-section of 180-190 mm and a length of 170 mm.
Oven “Student”
This heating device is the best option for residential premises, as it has small dimensions and attractive appearance
, and is capable of heating a large area. The weight of the structure is 70 kilograms
, the fuel compartment
is 60 liters
.
Traditional units have a double combustion door, the outer door acts as protection. The “Student” design is provided with a special door made of cast iron with a viewing window made of fire-resistant glass. It should be noted that over time the window will turn black, so it may not be installed.
The unit can be purchased ready-made with the necessary components
. Depending on the store, this stove can cost approximately 20,000 rubles
.
Installation of the “Student” stove
The structure can be assembled with your own hands, in several stages
- First of all, it is recommended to prepare an assembly drawing or download a ready-made version on the Internet. This will make the job easier.
- Then you should prepare a place for the structure. The surface of the floor and walls must be finished with fire-resistant materials.
- Decide on the pipe exit area
. Then make a hole in the ceiling, which is covered with non-combustible materials. - Then the unit is installed on the prepared stand
. - All pipes
are installed sequentially using sealant . It is recommended to purchase sandwich pipes that prevent the formation of condensation and the penetration of smoke into the room. - A special “skirt” needs to be made on the outside of the pipe.
If the Student structure is installed at a short distance from wooden parts and surfaces
, then the walls must be covered with asbestos cardboard. It is recommended to fix galvanized sheets on top.
You need to carefully make a hole for the pipe in the ceiling. It should be several centimeters larger than the diameter of the chimney. The hole made must also be covered with fireproof materials, since this area is dangerous. The “Student” stove does not contain a water tank, but if hot water is needed in the house, you can additionally purchase the necessary container. To do this, you need to carefully connect the pipes, container and gate. All joints must be carefully sealed.
After all the components of the “ Student”
will be collected, you need to check the stove and light it. It should be noted that the first ignition implies a lot of smoke in the room
, as paints and various oils will fade.
Therefore, it is recommended to carry out the first start-up of the heating device outdoors
. If no defects are found, then the “Student” structure can be installed in the room.
Manufacturing instructions
All work is divided into several main stages:
- First we prepare the base. To do this, we place the corner with the shelf inward and grab the parts. It is important to place the workpieces on a flat surface and check the diagonal. We make holes in the shelves and display the pipe blank. It should stand in a plane, we grab the pipes.
- Once again checking their correct location, we scald the joints. After welding, the slag must be removed and the quality of the seam checked. Pores or burns will require a second suture. The tubes can be tied together at the top for better stability.
- The bottom is covered with a sheet of metal, which is laid along the edge of the base and scalded.
- Now we move on to sheathing the structure with sheets. We install the sides on the base flush along the outer surface and grab them.
- Then we install the back wall. At the same time, it is important to grab it not only with the base, but also with the sides.
- We fix the corner pieces at a distance of 100 mm from the base and lay the grate.
- We fix the jibs and insert convection pipes into them. For ease of welding, they should protrude slightly beyond the sheets. The jibs are attached to the sides and rear wall.
- We put the upper part on 6 end tubes, connect them and attach them to the jibs and the rear wall. We immediately make 3 tacks to the tubes.
- We join the front part, grab it with all the details. We have a closed box. In the front part we will have an ash drawer and a door for storing firewood. We cut out windows for them with a grinder. The door can be secured with homemade or door hinges and a cam lock installed. For the ash box, you can use metal 2 mm thick. We attach the handle to the front part.
- Using a grinder, we cut off the gussets at the connection of the jib with the front and back. We turn the stove and secure the gussets at the junction of the corners of the base.
- You can start welding the structure. Please note that the joints must be airtight. Having discovered a burn or undercut, these places must be digested. You should not weld the entire structure, immediately going through one of the seams completely and only then moving on to the next face. It is better to weld randomly. Having boiled a small area on one part, we move to the opposite side and cook the entire structure in this way. This welding will cause less deformation.
- On the top part we weld a section to connect to the chimney. We make a small hole in it at the edge and insert a rod with a diameter of 8-10 mm. We will make a gate valve from a sheet 6-8 mm thick by cutting a small groove in it. The gate is welded to a rod, which is bent at a right angle.
After igniting the furnace, closing the damper, we deplete the air in the furnace with oxygen. In this case, the wood will burn longer, providing only 2-3 stacks per day. You can close the damper completely; the groove will allow enough air to pass into the firebox for smoldering.
Professor Butakov's homemade stove is ready. All that remains is to clean the joints and scale with a grinder and a cleaning stone. In hard-to-reach places, scale can be removed with a chisel or file. It is recommended to attach asbestos rope to the door and ash pit lid to seal and prevent smoke from entering the room.
If desired, the oven can be painted with a heat-resistant primer or paint. Having once again checked the quality of welding and assembly of the furnace, you can begin its installation.
Features of homemade structures
The standard design of Butakov furnaces is quite simple: the main structural elements are mounted in a cylindrical body. The body is usually welded from steel sheet, which allows you to form an internal cavity of the desired size. You can use ready-made cylindrical products - metal barrels, gas cylinders, large fire extinguishers, large diameter pipe sections. All this is shown in the drawing of a simple Butakov stove for making it yourself.
The manufacturing process itself includes the following steps.
- A cylinder is welded from a steel sheet about 8–10 mm thick. A bottom made of steel sheet 4–5 mm thick is welded to it. If a steel barrel is used, its top platform is cut off and the edges are rolled.
- A circle is cut out of a steel sheet 4–5 mm thick, with a diameter 20–25 smaller than the bottom of the hull. A hole with a diameter of 100 mm is made in its central part.
- A pipe is attached to the steel circle. A metal profile (channel or corner) is welded in its lower part so that after installation it presses on the fuel. A damper is installed at the top of the pipe. It is made from a steel round bar with a stiletto heel. The diameter of this circle is chosen slightly smaller than the internal diameter of the pipe. It should turn freely inside, but at the same time trap smoke.
- The lid is made from a 4-5 mm sheet or a cut off barrel platform is used. A hole with a diameter of 105–108 mm is cut in the center. A pipe with a diameter of 100 mm is passed through the hole, which is welded to the lid.
- A hole with a diameter of 145–150 mm is cut in the housing cylinder. A piece of pipe is welded to it to connect to the chimney.
- On the opposite side of the body (from the chimney) a hole is made on which the grate is fixed. A metal box is installed at the bottom of the grate, which will act as an ash chamber.
- A window is made on the side for loading fuel, and a door is secured to it.
- The cover together with the pipe is tightly installed on the body. The entire structure is carefully sealed. The body is mounted on legs.
When making a stove with your own hands, you will need the following tools: welding machine, grinder, electric drill, chisel, hammer, sledgehammer, hacksaw, files, pliers, metal ruler, calipers, square, emery cloth.
Classic range
The Butakov stove has a thoughtful design that suits almost any interior and setting. The product range includes the following items:
- Gymnasium student and student;
- Engineer and Associate Professor;
- Professor.
Wood stove Student
The metal air-heating boiler Professor Butakov Student, long-burning, burning wood, stands out among the models in the series with maximum thermal efficiency and efficiency.
Any solid fuel emits a certain percentage of carbon dioxide during the gas generation process. Studies have shown that the largest amount of CO is produced when wood burns. Accordingly, wood-burning stoves of the Student modification have greater heat transfer and efficiency than their coal counterparts.
Wood-burning convection heating stove Professor Butakov Student has the following features:
- Sealed combustion chamber - during design, the volume of the firebox was significantly increased. The door closes tightly, without cracks. Air supply control is improved due to a unique gate valve installed in two modes: normal combustion and gas generation.
- Material – the body is made of thick-walled structural steel. The door and grate are made of cast iron.
- Functional features - Student heating stove with a cast iron door with glass, equipped with a unique system that prevents surface contamination with soot. Even after a year of operation, the glass remains clean, provided that the stove is regularly serviced. The upper horizontal surface is used for cooking or heating water.
- The principle of operation is a solid fuel air heating boiler, Professor Butakov Student, it works using the principle of long combustion. Operating time from one tab, 6-8 hours in gas generation mode.
- Design - a large replaceable grate is installed in the furnace, which ensures uniform distribution of air flows throughout the combustion chamber, which prevents the formation of underburning. The ash box is designed so that during combustion it is possible to clean it without stopping the fire.
The Student stove, burning wood, is designed to heat a small private house with a total area of up to 90 m². For complete heating, convective channels are connected to air ducts distributed throughout the heated rooms.
Student coal stove
Metal heating stoves Professor Butakov Student coal, designed taking into account intense thermal load. Burning coal requires more oxygen than burning wood.
More heat is released. The combustion chamber is designed so as not to burn out over time. The wall thickness of the furnace is 5 mm, which prevents steel deformation and rapid failure.
The thoughtful and sealed design of the combustion chamber reduces coal consumption to a minimum. Model Student coal, suitable for constant heating of residential premises. When heating the entire house, and not just the room with the installed stove, installation of air ducts will be required.
Design
The design of the Butakov stove provides for the presence of several basic elements.
- Furnace body. This is an all-welded element made of high quality steel.
- Convection system pipes. Air ducts allow you to distribute the heat received from the stove throughout all heated rooms. They are placed in the middle of the structure, and they are crossed at the top. The end elements of the air ducts are open.
- Fuel chamber. It is divided into two zones. One is responsible for fuel gasification, and the second is responsible for afterburning. The stove is based on the pyrolysis effect, which ensures more efficient and longer burning of solid fuel.
- Ash pit. It is necessary to collect solid fuel combustion products. Moreover, the design allows you to remove it yourself, even if at this moment the stove continues to work.
- Grate. This damper separates the fuel chamber area and the ash pan.
- Chimney systems. Engineer Butakov's stove involves the use of vertical pipes for smoke removal. This allows the condensate that forms to flow back into the firebox and evaporate. This feature significantly affects the performance of the furnace and solves the common problem of the negative effects of condensate.
How does the stove work
Assembling a Butakov stove with your own hands is not difficult, since the equipment comes with detailed instructions clearly indicating the sequence of your actions. But if you purchase a heating system from a specialized store, it makes sense to contact their specialists. Most companies selling furnace equipment provide assembly, maintenance and repair services.
But before you start assembling and generally give preference to the Butakov stove, it is worth studying the operating principle of this device.
- The operation of the Butakov stove is in many ways reminiscent of the operating principle of a cyclone furnace;
- There is nothing complicated in the process. Cold air enters the oven from below, heats up to a certain temperature and begins to move upward. For this purpose, convection pipes are provided;
- Through holes in the pipes, the heated air enters the heated rooms;
- All Butakov stoves are solid fuel equipment. At the same time, the firebox is not particularly picky about the type of fuel used. This allows the use of coal, firewood, waste from paper production or woodworking;
- Butakov’s design is different in that the fuel does not burn completely, but gradually smolders. This was made possible due to the limited air supply inside the chamber;
- Consumer reviews and visual experiments show that one load of firewood ensures continuous operation of the Butakov stove for 12 hours. The Gymnasium or Student models can work autonomously for 8 hours without “refueling”.
Advantages and disadvantages of the Butakov furnace
Among the disadvantages it is worth noting the following:
- High temperature of the steel casing may cause burns.
- When the unit is turned off, it cools down quickly, and the room temperature also drops quickly.
Now a little about the advantages:
- The ash box is large enough and does not require frequent cleaning.
- Butakov's oven is not large, but roomy.
- The construction is durable, which is facilitated by the materials used (cast iron, steel).
- Durable, unpretentious in use.
- The upper part of the model can be used as a hob.
- The fuel can be anything, from firewood to peat or paper.
- Externally aesthetic.
- Installation is quick.
- Eco-friendly.
- Fireproof.
Butakov’s heating devices are widely used due to the uniqueness of their design. In the manufacture of such equipment, inexpensive and reliable materials are used, so that such a heating installation is designed for a long period of operation. In this case, the user is only required to periodically remove accumulated ash using a special container. It collects all the slags formed during combustion, so maintenance comes down to cleaning a special container.
The heating installation is unpretentious in terms of fuel - you can use wood waste, coal, pellets, and ordinary firewood. The only thing is that you should not use resinous wood, which leads to increased formation of soot - everything else can be burned in this firebox without any problems.
Butakov's universal models provide a convenient combination of heating and cooking system. The outer surface of the heater, which is in direct contact with the firebox, can be used as a cooking surface. Such a panel will be very hot, in particular, the temperature can reach 350 degrees Celsius, so such an installation can easily replace a hob.
Heating and cooking stoves "Gimnasist"
Installation and connection
Installing a stove is simple, but it is important to position it correctly in the room. To do this, follow simple recommendations:
- When carrying and installing the heater, remember that the stove is heavy;
- when choosing a location, you should not install the stove in a narrow corridor or other areas where it will interfere with free passage;
- It is not recommended to install it in a residential area. The best place would be the kitchen or a separate niche in the hallway or hallway;
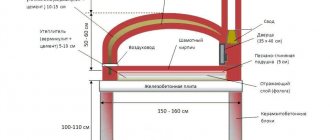
- the shortest distance to the wall from the homemade product is at least 1250 mm, the minimum gap between the ceiling and the top of the stove is 1200 mm;
- if you have to install the stove against a wooden wall, the distance to it is at least 500 mm and it must be covered with additional protection against deformation from heating;
- if the heater is installed in a building with walls made of fire-resistant materials, the gap can be reduced to 350 mm;
- To install the stove, it is recommended to make a concrete foundation if it is placed on a flammable floor. Additionally, it is covered with a sheet of non-combustible material and the gap between the floor and the ash collection compartment must be at least 140 mm.
If the stove needs to be fixed to the foundation, then during manufacturing it will be necessary to weld a piece of corner with holes onto the base and fix it with self-tapping screws or anchors.
When connecting to a chimney, you must follow the basic instructions:
if the pipe is led directly vertically through the ceiling to the roof - the minimum distance from the bottom of the stove to the upper section of the chimney is 5000 mm; When using a corrugated pipe for exhaust, it must be secured to clamps with braces at the turning points; When a pipe passes through floors and roofs, it is important to reliably insulate these places from heat loss and water passage. Condensation does not form in such boilers. A small layer of it flows into the firebox and evaporates
As insulators, you can use industrial sleeves or tightly wrap the hood with mineral wool or fill the cavity with foam insulation.
A small layer of it flows into the firebox and evaporates. As insulators, you can use industrial sleeves or tightly wrap the hood with mineral wool or fill the cavity with foam insulation.
After making and installing Professor Butakov’s stove with your own hands, you need to perform a test ignition. After making sure there is sufficient draft, we put firewood into the firebox. We lay them tightly, but do not close the upper cavity completely. The damper is open, we light the stove.
After making sure that the flame has gained strength, you can close the slide valve. At the same time, gradual smoldering of the firewood begins and heat is released through the convection pipes. At first, smoke may come out of the pipes, do not be alarmed. This burns the oil out of the pipe cavity.
For a more visual aid on how to make a Butakov stove with your own hands, a diagram and drawing cannot provide complete information. Videos with step-by-step instructions for making a stove will help with this.
The work is not easy, requiring time and money to purchase materials. But by making such a stove with your own hands, you will not only gain experience in performing complex work, but also a reliable and economical stove for your premises that will last a long time.
Organizing heat for a country house and cottage can be a difficult task.
Previously, the only way out was to hire a special stove maker to build a high-quality stove, but today many owners prefer to buy ready-made iron stove options.
They easily warm up the house and do not require special skills in installation and use. You can read many positive reviews about Butakov furnaces - this is one of the most popular companies on the Russian market.
Furnace models
- "Gymnasium student." Power 7 kW for rooms up to 100 sq. m. Combustion products are discharged to a height of 5 meters.
- "Student". Power 9 kW, fuel loading up to 20 kg. It is used to provide heat to rooms with an area of 150 square meters. m. Removes gaseous combustion products to a height of 5 meters.
- "Engineer". Power 15 kW. It is used for heating rooms with an area of 250 square meters. m. Fuel loading up to 40 kg. Removal of combustion products - to a height of 5 meters.
Furnace "Engineer"
- "Assistant professor". Power 25 kW, fuel loading up to 100 kg. It is used for heating rooms with an area of 500 sq. m. Removal of combustion products - to a height of 6 m.
- "Professor" with a power of 40 kW. It is used for heating rooms with an area of 1000 square meters. m. You can load up to 200 kg of fuel. Removal of gaseous combustion products to a height of 8 meters.
- "Academician". Power 55 kW, fuel load - up to 240 l. It is used for heating rooms with an area of 1200 square meters. m.
Butakov furnace design
Design of Butakov's stove
Professor Butakov's heating stove has a rather simple design. The structural elements include an ash pan, in which decomposition products accumulate during combustion, an air exhaust pipe, a two-chamber firebox, a damper and a chimney.
There are pipes on the sides of the installation. They go in two rows and intersect at the top. The described design solution ensures rapid heating, especially since special hot air jets, which the designer placed at the top of the firebox, allow secondary gas to be burned - this model is extremely economical.
Standard Butakov stove: its advantages and disadvantages
The Butakov stove is named after its creator, Professor Butakov, and is manufactured in Novosibirsk.
What is the difference between this stove and other heating equipment? Good heat transfer, low fuel consumption and the appearance of the device allow it to win the sympathy of consumers.
Advantages of the furnace created by Doctor of Sciences Butakov:
- Safety - thick and durable walls will prevent fire from entering the room;
- No unpleasant odor;
- Fast heating;
- Easy installation and installation;
- The ability to use any fuel for work: firewood, coal, pellets, pressed paper;
- Fuel economy - one deposit is enough for 10-12 hours of work;
- Possibility to heat a room up to 1500 sq. m;
- Removing ash is easy and simple, thanks to the presence of a special container;
- In addition to heating, the stove can be used to heat food;
- A variety of models will allow you to choose a stove to suit your taste;
- Affordable price.
But, despite all its advantages, there are also some disadvantages.
What are the disadvantages of the Butakov stove:
- After fuel combustion, the stove quickly loses heat;
- Inconvenient to clean pipes;
- During operation, the walls of the oven become very hot, which can cause a burn to a person accidentally leaning against it or cause a fire.
How to make it yourself
To complete the task you will need drawings and diagrams. Their presence will greatly facilitate the assembly process.
To manufacture the mechanism yourself, you must follow the following algorithm:
- Make the base cylindrical. You can use a barrel with a thickness of 10 mm.
- You will need to cut a circle from a metal sheet so that its diameter is 2 cm smaller than that of the main cylinder. A hole with a diameter of 5 cm is cut in the center of the product.
- At the top of the cylinder you need to place a metal lid, having previously cut a hole in it for the pipe.
- Weld the pipe. It must be equipped with a damper designed to trap smoke.
- A hole is made in the cylinder for the future chimney. Its diameter should not exceed 20 cm. Through it, the stove can be cleaned of ash. A door equipped with a handle is installed on the hole.
- Seal the hole with sealant and install the resulting device on a solid and level base.
Important! After installing the stove on the walls, it is necessary to install reflectors that will protect the room from fire.
Rules and technology for constructing a furnace
The laying of a stove for heating a private house most often begins with the arrangement of a brick “pillow”. That is, they lay two continuous rows of bricks on top of the base waterproofing material. In this case, a clay solution is used and care is taken to ensure that the thickness of the seams is 8-10 mm.
Next, they continue laying the stove with their own hands, according to the chosen order. In this case, the following rules are observed:
- Before laying, each brick is immersed in water for a couple of minutes. This is necessary to ensure that cracks do not subsequently form in the pipe and furnace firebox. One of the features of brick is that it is capable of strongly drawing water out of the mortar. And this, in turn, leads to cracking of the seams.
- In the construction of stoves, a trowel is usually used only when laying pipes. When assembling a firebox, the solution is traditionally leveled simply by hand. At the same time, when performing this procedure, they try to feel all the small pebbles remaining in the clay and remove them.
- After laying four rows of the stove, take a trowel and remove the mortar squeezed out of the seams. In this case, the inner surface of the structure being laid out is additionally wiped down with a damp cloth so that subsequently the dried concrete does not crumble and clog wells or channels. The seams on the outside of the stove are unstitched.
- Every 2-4 rows when doing masonry, check the evenness of the corners, verticals and horizontals.
- When laying fireboxes and channels, do not allow fireclay and ordinary bricks to be tied together. These building materials have different coefficients of thermal expansion. Therefore, using them when laying one row can subsequently lead to cracking of the furnace structures.
The pipe is routed through the ceiling and roof in compliance with fire safety rules. That is, they create a layer between the chimney and the wooden roof structures using asbestos sheets and basalt wool.
Furnace installation
Before starting installation, it is necessary to prepare the place where the unit will stand. To complete the task, it is not necessary to install an additional foundation. The stove can be placed on a brick stand.
Note! It is recommended to pre-insulate the installation site. Metal sheets are used for this purpose. The surface must also be flat, without any drops.
The stove mechanism is equipped with special holes with which you can fix the unit in one position.
The walls adjacent to the device must be insulated. Plaster mixture on a metal mesh is an excellent option for thermal insulation.
Important! The device must not be installed close to a wall. In this case, it is recommended to maintain a distance of at least 40 cm. Also, the pipe joints must be treated with a special sealant. Moreover, the space near the unit should not contain flammable materials.
By observing the above requirements, it is possible to avoid a fire.
Installation
There are no particular difficulties in installing Professor Butakov’s stove, but it is necessary to follow certain rules, primarily related to fire safety. The main attention should be paid to the chimney, which must be sealed, level and thermally insulated, as well as the location of the boiler and its isolation from combustible materials. In many ways, the installation is similar to Buleryan’s installation.
So, installation is carried out in the following sequence:
Particular attention should be paid to fire safety.
The place where the heating unit itself will stand is being prepared; this does not require the installation of a special foundation. The boiler is mounted directly on the floor, on a flat heat-insulating surface (metal sheets on 10 mm asbestos cardboard). In addition, the base of the device is equipped with holes for fastening, so if desired, the stove can be fixed to the floor.
- Adjacent walls also need to be thermally insulated to a level 250 mm above the top of the stove. Thermal insulation can be a 25 mm layer of plaster over a metal mesh, or 10 mm asbestos cardboard with a metal sheet. The stove should be no closer than 380 mm from the wall.
- A metal sheet 700x500 mm should be laid out in front of the combustion door. Moreover, the 700 mm side should be adjacent to the firebox.
- It is necessary to determine the location of the passage of the chimney pipe in the ceiling (ceiling), and then make a square hole in it. The hole should be thermally insulated (basalt wool + metal sheets).
- Professor Butakov’s heating stove is placed in a prepared place, preferably on a stand made of bricks or any other non-combustible material.
- Connect the chimney to the stove through a tee and exit through the ceiling.
Important! All chimney pipe joints must be sealed with heat-resistant sealant.
- Determine the location of the passage in the roof.
- Make a hole in the roof and install the remaining parts of the chimney. The chimney pipe should rise 500 mm above the ridge. Moreover, the part of the chimney located outside the heated room (located in sub-zero temperatures) must be thermally insulated with a material capable of withstanding a temperature of +400°C. The ideal option is to install a so-called “sandwich” (thermal insulated pipe).
- Insulate the hole in the roof with basalt wool.
- The space around the stove can be lined with bricks or other non-combustible material.
Exploitation
The Butakov boiler is a gas-generating device for which strict requirements are put forward. Ignoring them will result in a fire. Among these requirements are:
- The moisture content of firewood used as fuel should not exceed 25 percent. Gas generation will not be activated if this indicator is significantly higher. Also, raw fuel reduces efficiency and increases consumption.
- The efficiency of using peat briquettes is higher. In this case, more heat is released than when burning wood.
Note! A stove mechanism that uses wood as fuel cannot be heated with coal.
Furnace structure
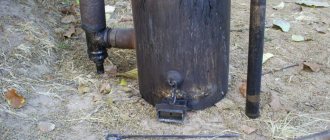
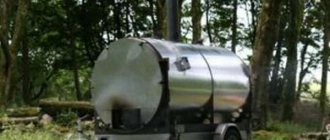
The initial stage is preparing the barrel or gas cylinder itself. You need to cut off the top from it, you can use a grinder, you can use an autogen or another cutter. Try to do this as accurately and accurately as possible, because the bottom (top) will be needed later. If you don’t have a barrel or an empty gas cylinder, you can make a long-burning wood stove with your own hands from a small piece of pipe with a large diameter; this option is perfect for a bathhouse.
Barrel without top
In this case, the bottom is welded to the pipe section - simply a piece of sheet steel cut in the shape of a circle. Some, by the way, do not cut out a round piece for the bottom at all, but a square one, in order to place the finished stove on the floor of the bathhouse in a more stable position.
Following actions
- Cut a circle from a sheet of steel with a diameter slightly smaller than the internal diameter of the main pipe, cylinder or barrel. In it, cut out another circle for another pipe. It is best to take a pipe ∅10 cm, this is the most effective option. Weld a section of this small pipe to an already cut steel “pancake”.
- Now weld pre-prepared sections of channel to the bottom of this “pancake”. Naturally, measured so that they fit normally and freely inside the barrel. They will subsequently press down the fuel as it burns out, when the steel “pancake” goes down.
- You are building the top, the lid of your future oven. This is where the cut part from the barrel comes in handy. Or you will have to cut the metal sheet again. You also cut a hole in the lid for a small pipe.
- To store firewood in a barrel, cut out a hatch in any way, into which you then weld a door. You can buy it, or you can make it yourself. Don’t forget to weld the handle to the door, otherwise it will be completely inconvenient to open.
- Below, make another door, smaller, to remove the remnants of the bookmark - ash and coals.
Foundation structure
A solid foundation is needed, since during operation the metal of the furnace will become very hot. The weight of the structure is not very large, even taking into account the brick lining, but it is impossible to install the structure on a weak or non-fireproof base. The principle of constructing a foundation in the form of a slab is simple, it is not even worth describing. There is no need to deepen it, since the specific gravity of the stove is small. And any novice home craftsman can fill the stove. You can even lay it in one brick and cover it with mortar on top.
Chimney
A chimney is, of course, needed for every stove to remove combustion products. An ordinary metal pipe will do, you need to take ∅15 cm, it’s not practical anymore. The pipe is welded on top and slightly on the side of your miracle stove.
Reflector: necessary or not?
During operation, your unit will become very hot and literally glow. Therefore, it is better to install a reflector, especially for small rooms. Plus, reflectors always additionally redistribute heat flows and help regulate the supply of thermal energy. It is clear that long-burning wood stoves with your own hands with an installed reflector will be even more economical.
Assembly of the structure
Covering the stove with bricks or not is optional. Choose whether it is worth performing additional work if, for example, such a stove is located in a utility room or a separate boiler room.
https://youtube.com/watch?v=sxzLYcdcV8g
How to distinguish a fake from the original?
The “Engineer” model is one of the most popular types of stoves by Professor Butakov. Manufacturers follow construction technology.
How to distinguish a fake? Original designs have oval-shaped nameplates of different sizes not only above the flow door, but also on the door itself.
In all boiler models, the flow door opens to the right. The “Engineer” model has a forced function - using a heat remover, you can change the direction of heat supply. For example, direct heat to another room or to an upper floor. Experts also recommend paying attention to the quality of the seams, the aesthetic appearance of the structure and the set of documentation.