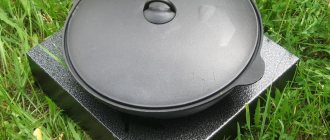
A cauldron is a massive cauldron made of cast iron and having a semicircular bottom. This shape of the bottom ensures uniform heating of all the walls of the cauldron, and in this case the food will not get stuck in the corners. Thanks to the thick walls, food does not burn, as stewing occurs evenly.
Do-it-yourself stove for a cauldron
- 1 Instructions for building a brick kiln
- 2 Laying a brick stove for a cauldron 2.1 We build a stove for a cauldron. Order
- 3.1 Video - Brick stove under a cauldron
- 4.1 Video - Stove for a cauldron from a gas cylinder
Note! Today, a cauldron is mistakenly called a dish that has nothing in common with it at all - a pot, for example, or a cast iron pot. Despite the fact that they are similar in their parameters, their shape is completely different.
Cauldrons are installed both on tagans - tripods (a fire is lit under them) - and on the stove. Today we will find out how to build a stove for a cauldron with our own hands.
Instructions for building a brick kiln
Such a stove is not only a place for cooking, but also a decorative element. For this reason, the choice of location, as well as the shape or decoration of the structure, should be taken with full responsibility. Buy in advance a beautiful stove equipped with rings of different diameters so that you can use different cauldrons, doors for the ash pit and firebox, and various decorative accessories for subsequent cleaning (poker, spatula, etc.).
Required tools and materials
For work you will need:
- fireclay brick;
- floor slab (its thickness should be approximately 2 centimeters);
- Bulgarian;
- steel corners;
- sand;
- grate;
- fireproof powder;
- doors;
- buckets;
- shovel.
The external parameters of the design can be very diverse, but from the inside it must definitely resemble an egg cup. For more convenient operation, it rises by about 80-90 centimeters.
Furnace diagram
Preparing the base
Let us immediately make a reservation that in this case there is no need for a full-fledged foundation, since the mass of the structure will be insignificant. But to prevent the brickwork from warping in the future, it will require pouring concrete and strengthening it with reinforcement. The algorithm of actions should be as follows.
Step 1. First, select a place for construction, clean it of all excess and thoroughly moisten it with water. Level the soil and then compact it.
Step 2. Make formwork from ordinary boards.
Step 3. Mix fireclay powder with sand in a ratio of 1:3, continue mixing until the solution becomes plastic.
Step 4. Fill the formwork with mortar in a layer of 50-100 millimeters. Level the surface, be sure to check it using a mounting level.
Step 5. Place reinforcement bars on the solution - lengthwise and crosswise, in increments of 10 centimeters.
Do not wait for the mortar to dry, but start laying the stove for the cauldron with your own hands immediately after reinforcement.
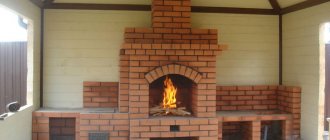
Brick BBQ Oven
photograph of a brick barbecue oven in a personal plot
A brick barbecue oven is built outdoors or under a canopy. It is possible to place such a structure in the house, but in this case it is necessary to have a hood.
The structure itself is quite simple. This is a regular open hearth. During the work process, several rows are laid out with ledges on which grates and braziers will subsequently be located.
For a barbecue stove structure, the foundation is made of small concrete slabs on a sand-crushed stone base
For the technology of cooking food in an open hearth, it is important that the side of the roasting pan warms up well and preserves it for a long time. This is achieved using special refractory fireclay bricks
It is used to lay out the surface of the roasting pan. For this purpose, shaped bricks are used, with a faceted side surface.
On a barbecue stove with a brick cauldron, you can cook dishes with “smoke” in the pot. To do this, you just need to hang it over the fireplace.
It is almost impossible to combine a cauldron and a barbecue in one brick oven, due to the fundamentally different nature of thermal stress flows. So in a cauldron oven, it is heated from all sides, but for a barbecue, the main flow of heat is located in the center.
If, however, someone wants to combine a cauldron, barbecue, and barbecue in a brick oven design, then they will need to build a complex complex. It will be united by a common foundation, but with different functional areas that have their own firebox. Such work can only be performed by a highly qualified specialist with extensive experience. In this case, it is necessary to have a special project in which all the nuances will be taken into account. Often a specification is attached to such a project. It lists all the necessary materials, tools and equipment. You can read more information on building a barbecue oven here. Video on how to build a barbecue with your own hands:
Laying a stove for a brick cauldron
Note! To obtain the most even seams, place thin wooden slats between the bricks. You can pull out the slats after the masonry has set a little. In addition, this technique will allow you to easily unstitch the seams in the future if necessary.
When laying, bandage the seams, that is, start laying one row with 1/2 brick, another with a whole brick, the third with 1/2 again, and so on. Here are other recommendations.
- All iron structural elements must be installed directly during the laying process.
- If cutting bricks is done with a grinder, then a lot of dust will be generated during the work. Therefore, it is recommended to use protective equipment - glasses and a respirator.
- If you did not purchase a special factory stove for the cauldron, then in a regular stove you can cut out a circle of the appropriate diameter and clean the edges with a file (this way, ash will not get into the food, and smoke will not leak out of the firebox).
- When installing pipes, join them at an angle of more than 90 C for better traction.
- After finishing the masonry, you can unstitch the seams or finish the structure with tiles. Then the oven is dried, for which you should light a small fire in it.
How to build a barbecue oven yourself?!
You can see a detailed review, instructions for laying and ordering a barbecue oven here
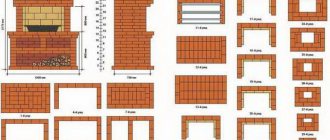
We are building a stove for a cauldron. Order
Row No. 1,2. These rows will serve as the bottom of the future structure. When laying them out, leave a small space that will allow you to clean the ash pan (it will be covered with a lid) and the stove itself. Use wire to secure the door. Clamp the wire with adjacent bricks, then secure with mortar.
Row No. 3. Here you close the ash pan doors and continue forming the walls. Also at this stage it is necessary to install the grate.
Row No. 4. When laying this row, leave a hole through which smoky gases will escape.
Row No. 5. Continue building the walls and install doors for the combustion chamber. The size of the doors depends mainly on what type of fuel will be used. If it is firewood, then it should be about 40 centimeters wide, and if it is coal, then less.
Row No. 6-8. Continue building walls and cover the combustion chamber.
Row No. 9-11. Lay the brick according to the diagram, leaving a small hole for smoke to circulate.
Row No. 12. Cover all the outer walls of the combustion chamber from above by laying a plate with a hole on the steel corners. The hole itself must be located directly above the cylindrical combustion chamber.
That’s it, our do-it-yourself cauldron stove is almost ready, all that remains is to install the chimney pipe.
How to properly make a chimney for a potbelly stove?!
Previously, we talked about how to properly build a chimney; you can see more about this here
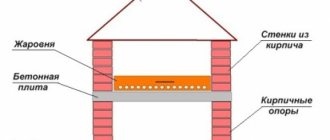
Classic stove design for a cauldron
Stove diagram for a cauldron
- cauldron;
- metal plate about 20 mm thick;
- frame made of steel corners;
- grate;
- firebox door;
- blower door;
- ash pan
- firebox;
- smoke ducts;
- burnouts;
- internal wall of the combustion chamber;
- outer wall.
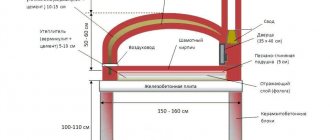
Chimney pipe installation
The chimney is one of the most important elements of the stove. To install it you will need:
- grinder with cutting discs;
- fittings, elbows with the required rotation angles;
- welding with electrodes;
- steel pipe with a diameter of approximately 100-120 millimeters;
- hammer.
The installation algorithm should look like this.
Step 1. Lay out the fittings with the pipe on a flat surface in the desired sequence, then connect them together by welding. Don’t forget about personal protective equipment – welding mask, gloves and overalls!
Step 2. Remove all bulges and scale using a grinder.
Step 3. Install the finished chimney in the required place - the hole of the appropriate diameter that was made during laying. Coat the joints with oven clay.
Step 4. Check the pipe to see if there are cracks on it - light a small flame in the combustion chamber and watch how the smoke moves.
Note! If the structure was built correctly, the cauldron will heat up evenly. To test this, pour water into it. With uniform heating, air bubbles will completely cover the inside of the vessel.
There are several possible options for further finishing:
- jointing;
- painting surfaces with special heat-resistant paint;
- plaster.
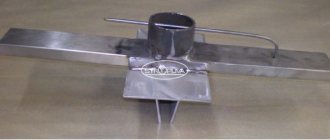
We also note that the stove for the cauldron is multifunctional, because you can not only cook various dishes in it, but even boil water or fry shish kebab. For the latter, by the way, an iron rod is laid across the slab on which skewers are hung. As a result, the hot coals will cook the meat as evenly as possible.
Note! The construction of a chimney is, at first glance, a simple procedure, but in reality it is not so. Therefore, it is advisable to entrust this matter to specialists.
Video - Brick stove under a cauldron
Construction of a stove with a barbecue under a cauldron: step-by-step instructions
P
Before you start building a stove, you need to find an appropriate location, take measurements of the area and draw up a sketch of the stove. A schematic drawing is usually done independently, since it is quite difficult to find a standard design for an individual option. A drawing is necessary to clearly distribute all the elements and not get confused during the construction process.
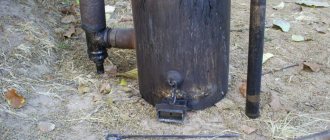
Making a metal stove from a cylinder
As noted earlier, the easiest option for creating a stove is a tripod. We will not consider it, since in this case everything is extremely clear.
And we’ll talk about a portable metal stove, which is advisable in cases where people do not live at the dacha permanently, but, for example, only on weekends. An excellent option for this is an unused, but still usable gas cylinder with a volume of 50 liters. At one time, such cylinders were extremely popular in the village, but not so long ago they were replaced by electric stoves and natural gas. In addition to the cylinder itself, prepare a grinder for work.
The sequence of actions is as follows.
Step 1. Empty the gas cylinder - open the tap and wait at least a week.
Step 2. Mark the cut line. For our design we will need the part of the cylinder with the bottom. Step back about 25 centimeters from the bottom and draw a straight line.
Step 3. Make a neat cut with a grinder, then try on the cauldron. As noted, it should go in about two-thirds of the way. If the cauldron is too large, then make several 5-centimeter cuts on top in increments of about 15 centimeters.
Step 4. Cut a window 20 centimeters from the bottom for loading fuel. The width of the window should be large so that no difficulties arise in the future.
Step 5. Try it on again to make sure that the cauldron fits tightly enough.
Step 6. Next, you should calcine the stove for the cauldron with your own hands. To this end, remove the cauldron, load the firewood and heat until the odors completely disappear.
That's it, the design is ready, and you spent a minimum of materials and tools to make it!
Video - Stove for a cauldron from a gas cylinder
Which material to choose
A barbecue oven with a cauldron made of river stone will look very beautiful; ordinary red brick or expanded clay blocks are also often used. It is better to use clay mortar as a fastening mixture - cement will not withstand high temperatures.
For complex design
Let's look at an example of building a complex brick oven with a barbecue and a cauldron. To build it you will need:
- Red brick - 1000 pcs;
- refractory brick - 300 pcs;
- clay - 100 kg;
- sand - 0.2 m3;
- fireclay mortar - 100 kg;
- cement - 300 kg;
- firebox door - 1 piece;
- stove for a cauldron - 1 piece;
- insulation for stoves - 1 piece;
- view - 1 piece;
- small steel corner - 5 m;
- cauldron - 1 pc.
Tools:
- Trowels;
- seam remover;
- a hatchet for cutting bricks;
- Bulgarian;
- drill.
Foundation
- The required space for the construction of the furnace is marked with pegs with a stretched thread.
- A pit up to half a meter deep is dug in the designated area.
- It is filled with crushed stone or gravel to a depth of 10 cm, in a tightly compacted layer.
- Reinforced with metal lattice.
- Fill with a solution of cement and sand in a ratio of 1:2. Wait until the slab hardens.
- Apply 2 layers of roofing material.
Order
For ordinary bricks, you need to prepare a clay-sand mixture. The width of the seams should be about 10 and 5 mm. When laying bricks on fireclay mortar -3 mm.
Order scheme
Laying order in rows:
- You need to lay out the bricks and leave 3 seams without mortar to install the cleanout and blower doors.
- Bricks are laid out on which the frame of the firewood compartment will rest.
- A plywood support for the vault is installed.
- The arched element is laid out on it using ground bricks or a semicircle.
- The combustion chamber is formed.
- The firebox is covered with refractory bricks to form the ash chamber.
- The next row of the combustion unit is laid out with bricks sawn on one side.
- The next layer of the node is laid out.
- Using sawn refractory bricks, the base of the lining is laid out.
- Next row.
- Laying out the lining in a new row of circles along the walls inside the compartment continues.
- The ceiling is laid under the cauldron, fireclay bricks are used.
- You need to leave a gap of a centimeter between the body and the lining.
- The fireproof part must be wrapped with foil-coated basalt cardboard.
- When the firebox is ready, you can lay out the next row of the base structure.
- The blower door is installed with the interlocking brick laid on top.
- In the next row, the firebox door is installed.
- A horizontal smoke channel is created.
- The rear firebox is formed with bricks placed on edge.
- The next two rows are laid, the last one is to close the opening of the firebox door with a locking brick.
- The base of the grill is formed. The vertical and horizontal levels are laid out with thin bricks.
- The next row is not laid out completely. It is better to make the edges of the tabletop rounded for a more aesthetic appearance. Its top is sanded.
- A cast iron plate under the cauldron is installed on the washed and sifted sand at the same level as the bricks.
- The perimeter is laid from refractory bricks and covered with insulation. Formation of the barbecue unit.
- After the mortar has hardened, refractory bricks are laid on dry and sifted sand.
- A pit for coals is formed in three rows; it should have grooves for attaching skewers.
- The next row completes the barbecue pit.
- The grill is covered and a smoke barb is created with two arches made of refractory bricks. The rear arch should be 2 rows higher than the front.
- The wall of the grill is formed. There must be a thermal insulation gap between it and the arch.
- The smoke collector is laid out in three rows of bricks on edge.
- To eliminate turbulence in the last row, it is necessary to saw down some of the bricks.
- 12-14 rows of the body are laid out, thermal gaps are left between the casing and the lining. Also, during laying, it is necessary to form a gas outlet channel from the firebox and the heel under the front arch of the grill.
- Using a circle, the front arch is laid out.
- Rows 15-23 - facing the grill unit. The plate valve for the cauldron is installed between the 17th and 18th rows.
- An inclined smoke collector is laid out; the angle of inclination can be controlled with a ruler and a protractor.
- The laying of the smoke collector is completed.
- Laying out the pipe.
The stove for the cauldron is ready, all you have to do is wait until it dries well, decorate it with decorative elements and you can start cooking.
Do-it-yourself oven for a cauldron made from car rims
This is probably one of the simplest, fastest and most original ways to make a stove for a cauldron. Let's look at it in more detail
Photo of the finished structure
First of all, we saw off the partition on one of the disks with a grinder; we won’t need it anymore
We install one disk on another, so that the remaining partition of the second disk is at the bottom, it will act as the bottom of our oven. We weld the disks together
Next, you just need to cut out the door of our improvised stove, weld the handles and stand.
Is it possible to combine incompatible things?
Some home craftsmen strive to make a universal design that will allow them to cook a wide variety of dishes. For example, pilaf, shish kebab or barbecue.
Of course, there are quite simple solutions. For example, if you have a barbecue in your garden, you can simply make a device for hanging the pot over the brazier. But creating a full-fledged complex, including a grill for roasting meat and a stove for installing a cauldron, is as difficult as building a good Russian stove.
Combining a metal grill with a stove to install a cauldron is somewhat easier. Any ready-made cauldron stove is attached to the grill and the problem is solved. During the cooking process, you do not need to use separate types of fuel to prepare each dish. You just need to periodically rake hot coals under the cauldron. However, true gourmets are unlikely to like pilaf cooked in such a combined oven, despite the presence of “smoke”. Since it will be almost impossible to provide the required temperature for cooking pilaf.
Making a stove for a cauldron from sheet steel
This is also one of the simplest options for making a stove, which will require:
- the cauldron itself to measure the diameter of the combustion chamber;
- welding, electrodes for it;
- steel sheets - the thicker they are, the better for the structure;
- hammer;
- corners for making handles and supports;
- electric drill;
- Bulgarian.
Note! Work should be done outdoors, near a source of electricity. At the same time, safety rules must also be followed.
Step 1. Measure the circumference of the cauldron - according to the obtained size, further work will be carried out.
Step 2. Using a grinder, cut a rectangle from a sheet of steel, the length of which would be equal to the circumference of the cauldron. Make a hole in the rectangle.
Step 3. In the upper part of the future structure, mark and make several vertical slits so that the smoke can subsequently escape freely. Next, cut a rectangular hole at the bottom for loading firewood.
Step 4. Roll the sheet into a cylinder. To do this, use the appropriate form, wrap the steel around it and achieve extreme precision with a hammer, or (if possible) use special sheet bending equipment.
Step 5. Cut out supports and handles for the structure from the corners.
Step 6. Using welding, connect the sheet into a cylinder, then weld the bottom, handles and support elements to the structure. Although the latter can be screwed using ordinary bolts, having previously made holes in the steel.
Note! To protect the stove from corrosion, paint it with heat-resistant paint in several layers. That's it, you can put the cauldron in, load the fuel and start the fire!
Let's improve the design
For this purpose, we equip the stove with a chimney pipe, grate, ash pan and doors. The manufacturing procedure is the same as described above, but you will have to add a few points.
Step 1. Cut not only the firebox hole, but also another, smaller one located below, for the blower. At the top, cut a third hole for the chimney.
Step 2. Install a grate between the combustion and blower cutouts by welding supports - pieces of corners - inside the housing. To make a simple grate, you can use steel wire - fold the pieces of the required length and connect them together by welding. There is no need to attach the grate to the supports.
Step 3. Weld the chimney to the corresponding hole in the housing. It is important that the height of the chimney exceeds human height, otherwise smoke will get into the eyes.
Step 4. Equip the chimney with a spark arrester - a tin can with numerous holes made in it.
Step 5. You can cut the doors from the same sheet steel, although you can purchase ready-made ones.
As a result, you will get this kind of stove for a cauldron with your own hands, which is convenient to clean from soot and where it is convenient to load fuel. Smoky gases will be discharged into the chimney, and draft adjustment will be carried out by the blower door. Although it is not so convenient to transport such a structure, since it is larger.
Build or buy?
Not every picnic lover will decide to make a fireplace for a cauldron with their own hands, but now there is an opportunity to purchase a ready-made model. Let’s figure out in what cases a ready-made stove for a cauldron is better suited, and when it’s worth trying and making a fireplace with your own hands.
If you just want to cook boiled and stewed dishes outdoors, then a ready-made metal stove for a cauldron is perfect for solving your tasks. A simple stove for a cauldron is inexpensive, and even the most inexperienced craftsman can install it with his own hands.
If the owner and his guests are true connoisseurs of food cooked “with smoke,” then, of course, it is better to make a fireplace for the cauldron with your own hands. In essence, this design is simple and if you get to the bottom of it, its construction will not take much time.
But even owners who are not inclined to build with their own hands will be able to treat their friends to “smoky” food; they just need to choose the right ready-made structure. To prepare such food, you need a cast iron stove for a round cauldron, which has burnout holes and a pipe with a plug.
That is, models such as “Piknichok” or “Hephaestus” are not suitable in this case, they are simply cookers that do not allow you to cook food “with smoke.”
True connoisseurs of Central Asian cuisine will not make any compromises. To cook real pilaf, you need a stove for a cauldron, made of brick. How to build such a slab for a cauldron is described below.
Distinctive design features
The design of a stove for a cauldron is almost the same as a regular one, and the main difference is the hole located in the stove - it is in this hole that the cauldron itself will be installed. According to the requirements, the hole must be of such a diameter that 2/3 of the cauldron is located below the cast iron stove. If it is smaller, then the heating will not be uniform, and if it is large, then you can forget about conveniently removing the cauldron.
Note! Nowadays, plates with rings of such diameters are produced so that any utensil can be installed.
The oven itself can be:
- clay;
- brick;
- converted from another metal device.
Construction of a clay oven requires appropriate skills, but options No. 2 and No. 3 can be done with your own hands.
Stove for a cauldron made of disks or pipes
The design of a stove made from a pipe for a cauldron is quite simple.
For manufacturing you will need a pipe or the remains of a pipe having a diameter of 250-300 mm. and a wall thickness of 3-5 mm., a sheet of metal with identical thickness and a strip of 20 mm. thick (using an old propane cylinder is also acceptable). A metal sheet is needed to close one end of the pipe by welding, which will create the bottom of the firebox. Afterwards, a cutout is made for the opening under the door and cone-shaped slots necessary for the exit of combustion products. The strip is used to make the legs and handle. The door is attached, and that’s basically it - the oven is ready for use. In order to improve the stove, home craftsmen make an ash pit, grate bars, and even a mini-chimney from a pipe. Modernization can be done as you like, the main thing is that the weight of the stove does not turn out to be too large.
To make a small stove for a cauldron, you can use old rims from a car, similar to a stove made from a pipe. Of course, the stove turns out to be heavy and bulky, but thick-walled metal significantly increases its service life. To implement, you will need two disks that need to be welded together. The bottom is cut out of one disk. Simple manipulations - and the body is ready.
We attach the door, handle and legs at our discretion. To prevent ash from spilling out through the bolt holes, it is better to make and weld a solid bottom from a metal sheet. It is best to use old Soviet copies
When deciding to make a stove for a cauldron, you should pay attention to the following points:
Making a portable metal stove from a pipe is much easier than making one from brick, because in the second case you will have to tinker. But cooking with a brick version is more convenient, and aesthetically it looks more attractive. A stove made from a pipe can be called the most mobile option.