Causes and localization of leaks in the heating system
Leaks in the heating system occur for various reasons and in different places in the circuit: in straight sections or at pipe joints.
Leaks on straight sections
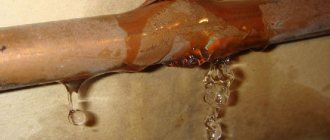
The cause of leaks in metal heating pipes that have been in use for more than one year in more than 95% of cases is corrosion (rusting) of the metal.
Even thick-walled galvanized pipes in heating circuits are eaten away by rust over time. The destruction of metal upon contact with water is a natural process that has not yet been completely overcome.
The trigger for metal destruction can be:
- mechanical, chemical internal damage to the pipe;
- changes in temperature or pressure;
- damage to the protective outer layer.
Note! If a leak occurs in an old heating pipe, then most likely this is a warning about total wear and tear of the entire system.
In autonomous heating systems, which are installed from modern polymer materials, leaks are caused by the wrong choice of pipes.
When the owner, out of ignorance or for reasons of saving money, purchases pipes for cold water or pipes not intended for use under pressure for hot water supply systems or a heating system. In this case, simply sealing the leak is not enough; often a complete replacement of communications is required.
Leaks at connections
Leaks in the connection area occur if the thread has become unusable (for example, it has become stuck and was torn off).
If there is a leak at the fitting installation sites, the prognosis for effective local repair is more favorable. Here you can fix a leak in the heating system by replacing a worn gasket that has lost its elasticity.
In more serious cases, it may be necessary to replace the connecting (adjustable) fitting or valve.
How to fix a leak in a heating pipe under pressure
The most difficult thing is to eliminate a leak in a pressurized heating system. That is, hot water circulates in the heating radiators, and there is no way to shut off the riser or a separate line to which they are connected. At the same time, it would be advisable for residents of high-rise buildings to immediately contact the organization servicing their building and call an emergency team. Then you should try to shut off the heating riser or a separate radiator until specialists arrive. The easiest way to eliminate a leak in a pressure pipe is to install a clamp with a bandage. As a winding, you need to use any rubber that is not too thick, which is wound around the pipe, completely covering the damaged area. It’s better to immediately put a clamp on top of the rubber, and if you don’t have one at hand, you can use a wire with which the rubber is firmly attracted to the pipe and crimped with pliers.
If you close off a section of the main line with a damaged pipe, it is possible that the methods for sealing the leak may be different, and the whole work is significantly simplified. The materials you can use to eliminate a leak in a pipe are: fiberglass, a bandage, or just thick fabric in the form of burlap.
Before you wrap the fabric around the pipe, you need to apply epoxy or waterproof adhesive sealant to it. The drying time of such a bandage largely depends on the room temperature. If the temperature is above 20-25°C, then the bandage dries for several hours; at lower temperatures, its drying time increases to 2-3 days.
Stages of installing a bandage on a pipe
The sequence of work for installing a bandage on a heating pipe looks like this:
- After the riser or main is closed and the coolant has stopped flowing from the pipe, the damaged area is cleaned of paint, rust and dirt.
- Then the material is prepared. For this purpose, the bandage or fabric is cut to such a length that it is enough for 8-10 windings around the pipe (25-30 cm). In this case, the width of the material should be sufficient to cover the damaged area with some margin (2-3 cm).
- Then the pipe is coated on all sides with epoxy glue, after which a bandage or cloth is wrapped around it. After each turn, a layer of adhesive-sealant should be reapplied.
You can increase the strength of epoxy by adding aluminum or bronze powder to it. After the fabric is wound in several layers on the heating pipe, a metal clamp should be placed on top of it, tighten it tightly with bolts, and leave the bandage until completely dry. If you don’t have epoxy resin on hand, you can try using oil paint, liquid glass, or pre-diluted zinc white.
Methods for eliminating leaks in a straight heating pipe
A local leak of a metal pipe in its straight section (fistula) is the easiest option for self-remediation. There are several ways to deal with the problem without draining the water.
Mechanical method for eliminating leaks
The classic way to seal a leak is to install a crimping device on a rubber gasket while the heating system is running.
- The damaged section of the pipe is wrapped in soft rubber (for example, a bicycle inner tube). Secure the patch with metal wire, tightening it well in several turns along the length of the rubber.
- The rubber patch is secured with two narrow crimp clamps of the appropriate diameter.
- If there are several leaks, they are localized in close proximity to each other, then you can seal the leak in the heating pipe by installing a metal clip. This is a wide clamp with a built-in rubber gasket that tightens in two places.
Note! In this way, the leak is sealed temporarily, eliminating the problem for the period until a repair specialist is called or until the end of the heating season.
If the fistula has formed in a thick-walled pipe, then it can be repaired by installing a special self-tapping screw with a rubber seal in front of the cap. To do this, clean the leak area and screw in a self-tapping screw using a hand drill.
Note! You can use an electric drill only if there is no coolant in the system. Otherwise, you risk getting electrocuted if water comes out of the pipe.
Chemical methods for eliminating leaks
Manufacturers of repair sealants offer a lot of materials for sealing leaks in heating systems with metal or polypropylene pipes.
From available means, you can use automotive sealants for high-temperature operating conditions. The fabric is impregnated with this composition and the pipe is wrapped where the damaged area of the heating circuit is found.
This method of eliminating leaks is used not only in straight sections, but also in places of threaded connections or joining pipes of different diameters. This is justified if it is impossible to turn off the heating at the time of repairing the joint.
To seal leaks in heating pipes, the following chemically active substances are used:
- Two-component sealing resins based on epoxy.
- Adhesive silicone mixtures that quickly “set” (cold welding).
- Heat-resistant mixtures based on rubber.
Note! It is possible to seal a leak in a heating pipe using chemical sealants only when the heating is turned off and the system is empty.
The algorithm of actions is as follows:
- The damaged section of the pipe is degreased, dried and a thin layer of sealant is applied to it.
- Wrap the repaired area with a special fiberglass tape. It serves as a reinforcing element in the mass of hermetic coating.
- The chemical composition is again applied to the serpyanka. The action is repeated.
How to fix a pipe body leak
How to repair a leak in a pipe if there is a crack in the body? To resolve the problem, you can use one of the following methods:
- install the clamp;
- apply a bandage;
- use cold welding.
Installation of the clamp
The easiest way to eliminate a leak on the pipe body is to install a repair clamp. The special device consists of:
- metal case;
- rubber seal located inside the housing;
- fixing bolts.
Special device for eliminating pipe leaks
You can install the clamp yourself in the following way:
- the leak site is cleaned of dust and rust;
- the pipe is wrapped with a clamp;
- The device is fixed.
Eliminating leaks using a clamp
The choice of clamp should be based on the size of the crack. To completely eliminate the fault, the clamp must be 1.5 - 2 times larger than the size of the leak.
Applying a bandage
How to seal a leaking pipe if there is no clamp? To eliminate a leak, you can use a rubber, adhesive or cement bandage.
The rubber bandage is:
- piece of rubber. A cut from a bicycle inner tube or a medical tourniquet used to stop bleeding is ideal. Use a rubber cut to wrap around the cracked section of the pipe;
- small clamps, wire or other fastening straps for securing the rubber to the pipe.
Pipe bandage made from scrap materials
The adhesive bandage is installed according to the following scheme:
- the section of the pipe where the leak has occurred is cleaned of dirt using a solvent;
- fiberglass or medical bandage is impregnated with special glue;
Special composition for eliminating leaks
- the pipe is wrapped in prepared material in several layers;
Installing an adhesive bandage at the leak site
- the applied composition is expected to dry completely.
Instead of special glue, you can use epoxy resin or, when using metal pipes, ordinary table salt.
Watch the video to see how to cover a leaking pipe with epoxy resin.
A cement bandage is an analogue of an adhesive bandage. The bandage or fiberglass is impregnated with cement mortar prepared in a ratio of 1:10.
Sealing leaks at joints
You can seal leaks at the connection points of the heating circuit in the following ways:
- Install a classic crimp clamp, first eliminating any unevenness with additional rubber bands.
- Seal the leak at the joint by wrapping it with several layers of soaked elastic fabric. As impregnation, you can use waterproof adhesives or ordinary nitro enamel.
- Minor damage can be repaired using baking soda and instant glue. Lightly moistened baking soda is rubbed into the gap or fistula until it fills the entire space. Super glue is poured on top. The substances instantly react with each other, forming a strong plug.
It is convenient, just in case, to have a ready-made kit at home for local repairs such as Siloplast. The kit includes an acrylic fistula pad and a tape impregnated with a special compound for sealing the leak. It is enough to wrap it around the pipe and moisten it with water. For such repairs it is not necessary to drain the water from the heating system.
Note! High-quality repair of threaded connections requires mandatory dismantling and diagnostics.
Methods for eliminating leaks in the pipe body
If you need to fix the leak in the pipe directly, then the problem is solved differently. Depending on the circumstances, you can choose one of the methods suggested below.
Installing a bandage at the leak site
If a pipe is leaking, you can temporarily fix the leak by installing a bandage. First of all, they determine the cause of the leak (fistula or leak) and find the location of the emergency area. Then a rubber bandage is applied to the damaged pipe.
The procedure is performed in the following sequence:
- a rubber gasket is placed on the emergency section of the pipe;
- it is pressed tightly against the pipe and secured with a clamp.
Clamps are sold in stores, but if in a critical situation this necessary product is not at hand, then you can make it yourself.
Bandage with rubber gasket on a pipe
In emergency situations, if a pipe is leaking and the leak needs to be eliminated very quickly, the clamp can be replaced with flexible wire, a bundle, a rope, or a hose.
As rubber for the bandage, you can take a piece of the top of a rubber boot, part of a rubber hose, a thick rubber glove, part of a watering hose, a bicycle inner tube, or anything similar that is at hand. The width of the bandage is determined based on the diameter of the water supply (or sewer) (1.5 diameters or more).
Seal a leak with a wooden wedge
But what to do if the pipe is leaking, but the water pressure is strong, the tap cannot be turned off, the bandage cannot be installed, or it does not hold water? The situation, of course, is not an enviable one.
If the cause of the leak is a fistula, then in this case a small, conical wooden peg can help out. Its tip should be the size of the hole in the pipe.
By inserting the sharp end of the peg into the hole, hammer it into the pipe and thus eliminate the leak. This is, of course, a temporary measure. Having eliminated the leak temporarily, you can think more calmly about who to call if a pipe is leaking?
Sealing the leak hole
It is also possible to eliminate pipe leaks using an adhesive bandage.
In this case, proceed as follows:
- turn off the water with a tap;
- dry the area requiring repair using a hairdryer;
- select a suitable dense flexible material for sealing the hole (a piece of rubber, plastic, fiberglass, etc.);
- glue the selected material to the emergency section of the pipe using epoxy glue.
How to fix a pipe leak with an adhesive bandage
If fiberglass is used, its length should be such that it can be wrapped around the pipe at least five times. The width of the bandage is determined based on the diameter of the pipe (at least 1.5 diameters). The glue should be applied to the bandage material using a spatula or brush.
After winding the bandage fabric onto the pipe, until the glue dries completely, it is pressed with ties or clamps. The glue must dry for at least a day (at room temperature) or up to three days (at a temperature of 15 degrees).
Fixing a leak in a plastic pipe
How to fix a leak in a plastic pipe, how to fix a leak in a plastic water supply or sewer pipe? In this case, it is best to use the glue method. To do this, select a piece of pipe of a suitable diameter and cut it to length.
Then they cut off about 1/3 of the entire length of the pipe surface and, through the resulting cut, place the workpiece on the damaged section of the pipe, having previously applied the required amount of glue to its surface, cleaned with sandpaper. Pressing with a clamp, allow the joint to dry.
Screwing a bolt into a leak hole
To the question “what to do if the pipe is leaking due to the presence of a fistula in it?” the answer may be quite simple, since this method has been known for quite a long time. A small hole is drilled in the pipe at the site of the fistula and a bolt is screwed into it using oil paint.
Remember that this method is applicable only to large-diameter pipes, and new ones at that. It should not be used for old pipes: the bolt will not hold water, and it will not be possible to screw it in well. All your attempts will only lead to an increase in the hole.
Replacing a damaged pipe section
How to fix a leak in a pipe? Simply replace the damaged area
If a pipe leaks, what should you do in case of emergency with metal pipes?
- First of all, they turn off the water supply.
- Then cut off the problematic part of the pipe using a hacksaw or a grinder (30 cm above the damage site).
- Disconnect the threaded pipe connection closest to the cutting site.
- A thread is carefully cut into the cut-off fixed end of the pipe (the end of the pipe is held with a pipe wrench).
- A coupling is screwed onto the formed thread.
- Determine what length of pipe should be installed instead of the cut one, taking into account the threaded section.
- Threads are cut on both sides of the selected new section of pipe.
- Connect the new selected section of pipe to the water supply using a coupling, holding it with a second pipe wrench.
Advice!
Before screwing in the coupling, the threaded connection of the nipple must be sealed using flax and sealing putty or a special “fum tape”.
Although the described method is intended for use in metal pipes, it can be used in other types of pipes. And yet, if the question arises of how to fix a leak in a pipe, it is better to seek help from a master plumber.
Did you like the article? Subscribe to our Yandex.Zen channel
How to eliminate leaks in hidden wiring pipes
To quickly seal hidden heating pipelines, use mustard powder or a ready-made special sealant. The existing substance is added to the expansion boiler and the system is put into operation. After a few hours, the sealant (or particles of mustard powder) will seal the damaged area, eliminating the leak.
Such repairs will give time to prepare for a complete restoration of the heating circuit. However, if a large damage has occurred in a hidden area, then the internal sealant is unlikely to help. The heating circuit will have to be drained and repaired immediately.
Note! If your heating has become unusable due to the natural aging of materials, then dismantling the hidden section of the circuit may not be economically feasible.
Affordable repairs begin with the correct design and installation of the heating system. All detachable connections must be accessible for inspection. Hidden areas must be made of high-quality, durable materials and not have detachable connections. Timely replacement of worn-out equipment will allow you to live peacefully in cold weather, enjoying warmth and comfort.
Source
Signs of depressurization
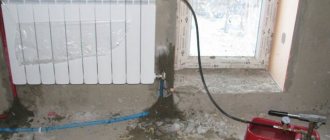
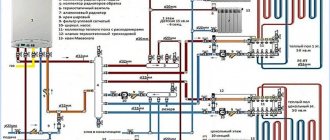
The heating systems are all built according to the same scheme - boiler - supply pipes - appliances - return pipes - boiler. It's looped. The pressure and circulation of the coolant in central heating systems is maintained using pumps. In private sector houses with an autonomous open heating system, pressure and circulation are provided by the boiler when heating. The cottages have an autonomous closed heating system, the coolant is always under pressure.
In heating systems, pressure control occurs using instruments, but small leaks are still difficult to detect; automation equalizes a slight drop in pressure. Pressure gauges are not installed in private houses. Therefore, in both cases, residents have only one way to control the tightness - visually.
When inspecting heating appliances and pipes suitable for them, pay attention to damp places. In areas of obvious leaks, water will drip or flow, leaving traces of rust. But those who hid metal risers in boxes that one of them is leaking will most likely find out from the neighbors to whom the water flowed
Causes and locations of leaks
There are only two reasons for leaks. The first is mechanical damage. Everything is clear here, but the second reason is corrosion. The cause of corrosion in heating is poor water treatment. In central heating, water treatment equipment purifies water from mechanical impurities and salts. This is not the case in private houses and cottages.
The presence of salts and electricity leads to increased rust formation.
The places that rust the most are threaded connections, welds, and bends made by heating. Often the fistula appears in straight sections without welds or threads. Perhaps these are pipe defects or a pipe installed that is not intended for heating.
When is the best time to repair heating pipes?
During the inspection we saw that the heating pipe was leaking, what should we do? Once some confusion passes, the answer will become obvious - fix the leaks immediately. But how and when to start a thorough renovation? Of course in the summer. When it’s warm and you can safely stop the heating and drain the water.
But you shouldn’t delay fixing leaks. If it really breaks through, the damage will be significant. It is necessary to temporarily repair the damage and begin repairs after the end of the heating season.
In modern systems that are designed and installed in houses, it is possible to completely turn off one or several branches, without stopping the boiler or riser. In this case, you can carry out repairs without waiting for the end of the heating season.
Repair methods
There are several types of heating repairs without draining the water, but with releasing pressure in the system, but all of them are only a temporary solution:
- welding repair using welding and brazing of steel and polymer pipes
- mechanical repairs using various devices: clamps, bandages, etc.
- chemical method using various chemical compositions (adhesives, sealants, cold welding, mixtures based on epoxy resin, etc.).
If circumstances force you to fix the problem yourself, then with some ingenuity and dexterity you can use other methods. Using available means - wire, rubber, screws, wooden choppers, etc.
On a running system
An operating heating system is always under pressure, even in open systems in small houses where expanders are used. Therefore, you need to understand how to seal a leak. And one method is suitable here - using a clamp and rubber or bandage.
The sequence is like this. Having found the location of the damage, measure the diameter of the pipe. You make or buy a clamp according to this size. It is necessary to take into account that the clamp covers not only the damage, but also several centimeters of the pipe in different directions. Be sure to put rubber under the clamp.
If the damaged area is small and the pipe diameter is more than 50 mm, it is better to use a factory bandage. It fits tighter than a clamp.
On heating systems with low pressure, you can use a rubber band and wire. Wrap it with a tourniquet, stretching it as much as possible, and secure it with wire.
On a stopped system
It is easier to work with the heating turned off. The pumps are turned off or the supply is cut off. The pressure needs to be relieved. Find the location of the leak and, depending on access to the damaged area, choose the most suitable repair method.
Repair of cast iron and steel pipes
The choice of one or another method for eliminating a leak depends not only on the location of the defect, but also on the material of the pipeline. Let's look at each of them.
How to fix leaks in cast iron pipes
Cast iron pipelines are most often found in sewer systems. Since the pressure in them is low, eliminating the leak will not be difficult. You can temporarily solve the problem on your own until you completely or partially replace old pipes and fittings using one of the methods below.
Applying a bandage
It’s quite easy to make a bandage with your own hands, using a regular bandage and cement. This procedure is performed in the following sequence:
- Cement is mixed with water until the consistency of thick sour cream is obtained.
- The bandage is soaked in the resulting solution.
- The leak site is carefully wrapped in several layers. It is necessary that each subsequent turn of the bandage overlaps the previous one by about a quarter.
It will be possible to use the sewer system after about a day - during this time the solution should harden.
Due to the high reliability of the cement bandage, this method of eliminating water leaks is widely used both in the repair of cast iron pipes and steel water pipes. However, it is not recommended to use it in places of threaded connections, since disassembling them in the future will be very difficult.
Applying a patch
Before eliminating the leak, drain the water from the damaged pipeline and thoroughly clean the defective area from corrosion, various contaminants or paint. To do this, you can use a grinding machine or a wire brush.
After drying and degreasing the surface, a layer of epoxy resin is applied to the leak site and a fiberglass patch is applied. It is important that this material is well saturated with glue. For greater reliability, you can wrap mounting tape over the patch. It is advisable to use the pipeline no less than 24 hours after repair.
Caulking
One of the effective ways to get rid of cast iron sewer leaks with your own hands is to drive lead cones into leaks and cracks in pipes. Due to the plasticity and pliability of this metal, it is easily flattened, filling all kinds of voids.
When connecting pipes of sewer systems with sockets, “caulking” is carried out using cement and packing. If a water leak occurs in this place, then to do the repair yourself you need to:
- Clean the gap between the outer surface of the pipe and the inside of the socket.
- Wrap oiled tow around the pipeline and drive oiled tow into the crack using a special spatula, which should tightly fill the space to 2/3 of the height of the socket.
- Lay the top layer of tow without any impregnation in order to improve adhesion to cement.
- Seal the pipe connection using asbestos compound or cement mortar. The use of modern materials such as silicone or mastic is allowed.
- To avoid cracking, the sealing layer should be covered with a damp cloth for a day to allow it to harden slowly.
Fixing leaking steel pipes
On a straight section, you can repair a broken water pipe by analogy with cast iron - by applying a bandage or patch. But since steel pipes are usually used in the construction of pressure mains, attention should be paid to more reliable repair methods.
Required tools and materials
Depending on the method of repair, the set of tools and materials will change.
- Set of welding equipment and electrodes. Welding repair.
- Box or open-end wrenches ranging in size from 8 to 24 mm. When installing bandages and clamps.
- Latex gloves.
- Pliers and knife.
- Annealed steel wire 1.5-2.2 mm.
Leaks at pipe joints
Caulking method for cast iron products
If the pipes were sealed with cement, then the following steps should be performed:
- Remove any remaining solution. A hammer and chisel are suitable for this.
- Clean the gap.
- Hammer the tarred strands and cover with cement mortar (1:10 – water and cement).
If the pipes are caulked with lead, then you need to do the following:
- Clean the joint area until clean metal is visible.
- Caulk the gap with lead cones. You can use a dull chisel for this.
Repairing leaks
Sealing the joint with cement
If you only have cement on hand, then you can do the following:
- Remove old coating, clean connection areas.
- Make a solution of cement and dip a bandage into it.
- We wrap a bandage around the pipe joint.
- When the solution dries, you can sand it with sandpaper and paint it.
Sealing a leak with cement
Leak in the pipe body
If a defective location is found in the body of the product, then you need to act differently.
Bandage
Bandage is an excellent temporary solution:
- We place a rubber gasket on the defective area.
- We clamp it with a clamp.
If you don’t have a ready-made clamp at hand, you can use one you made yourself. To do this, you can use a piece of hose, rope or wire. The width of the bandage must be greater than 1.5 times the diameter.
Repairing leaks with an adhesive bandage
Wooden wedge
If you can’t install the bandage and the pipe is leaking heavily, what should you do? If the cause is a fistula, then you can take a wooden peg, the size of which should correspond to the size of the defect. We insert the sharp end of the wedge into the hole and hammer it in with a hammer.
Seal the hole
You can also use an adhesive bandage:
- The water needs to be turned off.
- Dry the area, you can use a hairdryer.
- We select flexible material to seal the hole. Apply it to the damaged area using epoxy glue.
When using fiberglass, you need to wrap it around the pipe five times. The width should also be greater than 1.5 times the diameter. Until the glue dries, the bandage must be pressed with clamps. You will have to wait up to three days (depending on the composition of the glue).
Sealing with bolt and rubber
Plastic pipe
If the pipe is made of plastic, the adhesive method is suitable. You can use a pipe with an internal diameter that will match the external diameter of the damaged product. The joint must be cleaned, glue applied and pressed with a piece of pipe previously cut to length. You can clamp it with a clamp.
How to seal a leak
In connection, on threads and joints
All heating elements are assembled into a single system using threaded, welded, soldered and fitting connections. Any of them is the least reliable place and it happens - they leak. Leaks in pipe joints, whether metal or polypropylene, can be eliminated using epoxy resin-based glue. To do this, the surface of the metal pipe along with any damage must be cleaned of old paint and rust. You can clean it with a wire brush, sandpaper, or scrape it off with a knife.
If the water is still leaking, it is better to wait until it stops.
Prepare fiberglass or medical bandage. If the pipe has a diameter of 15 to 32 mm, the length of the fabric is approximately 30-35 cm. Then add a hardener to the glue base in the proportion specified in the instructions. You can add more hardener to increase the hardening speed. The main thing is not to overdo it, otherwise you won’t have time to finish before the glue hardens. Soak the fabric with glue and wrap the damaged area. Once hardened, the heating can be started. Work with rubber gloves. Leaks at the joints of polypropylene pipes can be eliminated in the same way.