In that article I will tell you what a cauldron is and why it should be round in shape; it is used for preparing pilaf, meat, shurpa and other dishes. There are many varieties, but a real cauldron is made of cast iron.
And so, you purchased a cauldron, but the question arises: what kind of oven can you cook in it on? The easiest way, of course, is to make a fire and cook on a tripod, but there are special stoves: cast iron, brick and others.
And if you want to surprise everyone and make a stove for a cauldron on your own site, you will find a lot of useful information for yourself by reading this article.
How to choose a cauldron with an oven
A cauldron is a thick-walled cast iron cauldron with a semicircular bottom, convenient for cooking food over a fire.
The spherical bottom is made in such a way that the flame heats all the walls of the container, and not just the bottom of the cauldron, and food does not get stuck in the corners of the dish. Thick cast iron walls prevent food from burning, and all ingredients simmer slowly.
It should be noted that nowadays a cauldron is mistakenly called for dishes that are not related to its varieties, for example, a cast iron pot, a duck pot, a cauldron. Although they are similar in their properties and appearance to a cauldron, they do not meet the main requirement - a rounded bottom.
Modern types of cauldrons can have a non-stick or ceramic coating, and be made of aluminum or steel. However, a thick-walled cast iron cauldron is still considered the best. It can be placed on a special tripod (tagan), under which a fire is lit, or placed above the hearth - a stove for a cauldron.
The cauldron is intended for:
- Cooking soups, stewing, boiling water.
- Preparation of traditional dishes “with smoke”: triple fish soup, grenadier kulesh, tourist konder, etc.
- Cooking traditional oriental dishes.
The cauldron has thick walls and a spherical bottom. Naturally, don’t expect stability on a flat surface from it.
The round shape implies a ring-shaped stand. Do not try to install it on a regular grill grate, or on an outdoor barbecue grill.
If a cauldron with a flat bottom heats up faster from below than along the walls, then the heat spreads evenly throughout the cauldron. Moreover, the material used for its production is thick steel or cast iron.
For various dishes and cooking methods, it is advisable to use cauldrons of a specific shape.
The depth is equal to the largest diameter of the container along the edge (Asian dishes in stone ovens). The ratio of depth to diameter is about one to three (Asian dishes in factory-made metal ovens). Almost a cylinder with a rounded bottom (thick tourist dishes with smoke). A shallow container with sloping walls and a small plane at the bottom (cooking, boiling).
As for sizes, there are no restrictions. But based on the materials – very much so. Cast iron is ideal. Due to its massiveness and heat capacity, it provides uniform heating; the pores of its walls “self-heal” over time with a fat layer. Products in such a cauldron glide and do not burn.
Material for making the cauldron:
- Cast iron is ideal.
It is massive and has a high heat capacity. Due to this, the food is heated evenly. As it is used, “self-healing” of the pores on the walls occurs due to the fat layer.
Due to the layer of fat, the products in the cauldron do not burn. In the East they say that in an old family cauldron, the taste and aroma are transferred from one dish to another.
- The only alternative to cast iron is thick-walled aluminum.
- Copper, stainless steel, and modern products with non-stick coatings are not suitable. It is unlikely that a traditional oriental dish will turn out in such a cauldron.
A cauldron stove is an indispensable item in everyday life for lovers of delicious foods cooked in a cauldron for a number of reasons:
- Firstly, of a technical nature: a cast iron cauldron most often has a convex bottom.
- Secondly, it is the cauldron oven that ensures uniform heating of the cauldron from all sides.
- Thirdly, and no less important, nothing can replace an open, live fire - dishes prepared in this way have a unique taste and aroma.
Such an oven will comfortably accommodate not only a cauldron, but also a pot and a frying pan - enough to throw a real holiday and cook many magnificent dishes right at the place of rest.
Thanks to its collapsible design, the stove is indispensable for fishing, at the dacha, on a hike or in nature; it can easily be placed in a gazebo or outdoors.
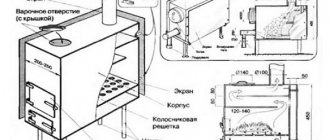
It does not take up much space in the trunk and is easy to assemble (the firebox, or the “body” of the stove, the legs, the “tongue” - holds the ash, ensuring order in the area, and helps when cleaning the stove, and the pipe - removes smoke from food).
The design of a cauldron stove may be similar to any other stove, but its main difference will be the hole in the cast iron plate where the cauldron itself will be placed.
The fact is that, according to the rule, this hole should have such a width that the cauldron fits 2/3 below the level of the stove. If the hole is made wider, the cauldron will be inconvenient to take out. If you do it narrower, the surface of the cauldron will not heat up evenly.
Today there are special plates with rings of different diameters, thanks to which you can use dishes of any size. But the main purpose of such a stove is to cook food in a cauldron.
We also note that the stove for the cauldron is multifunctional, because you can not only cook various dishes in it, but even boil water or fry shish kebab.
For the latter, by the way, an iron rod is laid across the slab on which skewers are hung. As a result, the hot coals will cook the meat as evenly as possible.
The oven can be of several types:
- made of brick;
- converted from another metal device;
- sculpted from clay.
Before you begin, complete the following preparations:
- draw on paper all your thoughts regarding the design of your cauldron stove;
- determine the exact dimensions of the structure;
- decide on the form;
- Decide what material you will build the stove from - metal (pipe) or bricks. It is worth noting that a brick-based structure will be safer; this is an important characteristic if you have children;
- Decide whether the oven will be portable or stationary.
Like a regular barbecue, these stoves come in two types. The portable one will be convenient and transportable, and the stationary model will fit perfectly into the exterior of your site.
In addition, a stationary oven-barbecue under a cauldron will work more efficiently and is economical in terms of maintenance. If you plan to organize gatherings mainly on the site, then it is better to choose this option.
At the preliminary stage, it is important to decide what kind of cauldron stove you want to have on your site.
The stationary option is suitable for those who often use such a device and have the opportunity to allocate a large area for it.
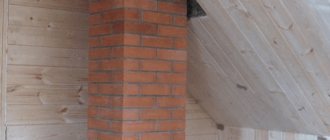
Moreover, it should be distant from the main buildings. In this case, a solid brick foundation is laid for the cauldron, or more precisely, for the stove, on which the huge vessel stands as if on a pedestal.
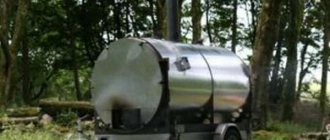
For a mobile version, you can make a stove out of metal.
Its design is extremely simple. The role of the pedestal in this case will be played by the upper part of an ordinary iron cauldron. A large cast iron pipe or a heat-resistant steel pipe will be suitable as the main material.
A mobile oven creates conditions for rare culinary forays and allows you to make the most of the possibilities of a compact outdoor patio.
Both options are easy to assemble with your own hands.
If you are planning to build a barbecue stove for a cauldron made of brick, then the work ahead will be very difficult. However, if you choose a metal pipe structure, the work will be much easier.
If you have a ready-made grill, but you want to adapt it for cooking dishes in a cauldron, then place a special stand on it in the form of a mini-stove, which you can assemble with your own hands or purchase in a store.
No special fuel is required, but the maximum amount of coals should be raked under the cauldron. However, it is worth noting that on the grill oriental dishes like pilaf will not have the traditional “zest”, but dishes with smoke in a cauldron on the grill will turn out excellent.
↑ What is the difference between a barbecue and a grill?
Grill, barbecue, barbecue - these devices are designed specifically for cooking meat over coals, but there are still differences in them.
↑ Brazier
The simplest and most common device for preparing meat delicacies, mainly shish kebab. The design of the barbecue consists of a rectangular metal box, which is supported on legs. There are holes on the walls for the traction to work, as well as recesses for skewers. In a barbecue, smoldering coals lie right at the bottom of the structure, and from them the heat rises from the bottom up. The barbecue is considered the most popular device due to the fact that you can easily take it with you on a hike or when going out into the fresh air. Assembling the grill is not difficult and is done in a matter of minutes.
↑ Grill
A distinctive feature of this device is the presence of a grate where coals are poured out, and a lid. A lid is needed so that the heat comes from all sides, and not just from below, as in the previous case. The grill also has the ability to regulate the air supply thanks to special dampers. They are located at the top and bottom of the structure. Another important feature of the grill is faster cooking. Due to the closed lid, the food turns out to be stewed rather than fried. If you put the lid aside, the grill can be used as a classic barbecue.
↑ Garden fireplace - barbecue
The principle of operation of such a device is very similar to a barbecue, but a barbecue is a more complex device. Unlike a classic barbecue, a barbecue has two grates, one for coals and the other for food. The origin of the name barbecue is still debated.
The most acceptable: “barbe et queue”, which means “from beard to tail” in French. The thing is that initially it was not pieces of meat that were fried on the grates, but whole hams of pigs or whole lambs. Among Russian-speaking barbecue fans, this design has an affectionate name - “barbecue house”.
Barbecue is a more expensive device compared to barbecue and grill.
Some models have the ability to adjust the distance between the grate where the dish lies and the coals, which allows you to control the heat level. In a barbecue, the heat is directed from the bottom to the top.
A barbecue is often called a “garden fireplace.” This is due to the fact that a barbecue is a large structure made of brick or stone. The structure includes an equipped table for cooking and a roof over your head. And also an inserted cauldron and a sink to which water is supplied so that it is possible to wash meat, vegetables and fruits.
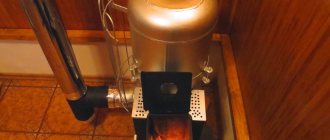
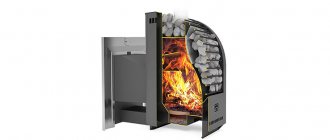
Cast iron stove for cauldron
Cast iron, as the best material for such stoves, allows you to save fuel due to the rapid heating of the stove, as well as slow cooling.
A cast iron stove is more stable due to its weight, which is important. Also, it is much less susceptible to corrosion.
A cast iron stove will not burn out, as it has high heat resistance. And the appearance of cast iron stoves pleases with variety.
A cast iron stove for a cauldron will help you not only prepare wonderful, aromatic dishes of oriental cuisine, but will also last for many years, passing in your family from generation to generation.
A cast iron stove is the most suitable option for installation on site, since it combines the following features:
- easy movement of the unit from one place to another;
- stability and safety during operation;
- saving on fuel (wood) due to a closed firebox.
On a cast iron fireplace, in addition to traditional dishes cooked in a cauldron, you can cook fish, kebabs and other delicious foods.
The design of a cast iron stove is similar in appearance to a cylinder with a bottom, but with an open top. The cast iron unit is equipped with legs and a door for easy combustion.
Chimneys for cast iron structures can be of three types:
- pipe;
in the form of small triangular cutouts in the upper part of the cylinder;
grate
The price of a cast iron unit directly depends on the thickness of the material and the complexity of the purchased structure. The most expensive on the market are metal and cast iron products, slightly cheaper are those made of stainless steel, and other types are quite inexpensive.
It is not recommended to purchase very cheap devices, since their metal quickly burns out, making further use of the product impossible.
Cast iron stoves are the most popular because they retain heat for the longest possible time, and their only drawback is their heavy weight.
This material practically does not warp from high temperatures, does not burn out, and is not subject to corrosion. Thanks to these properties, a cast iron cauldron stove will serve you faithfully for many years. And a cauldron made of such material, with regular use, is gradually covered with a thin layer of soot, protecting it from burning. Impregnation with oils and fat extends life.
However, stoves are also made of brick or thick metal. They can be gas - a good option for hiking and more. However, you certainly won’t get the characteristic smoky aroma from a gas fire.
To do this, the smoke should hover slightly over the food being prepared, and the cauldron should be deep enough with a rounded bottom.
Craftsmen make brick ovens with their own hands. For those not inclined to such creativity, it will not be difficult to purchase a ready-made cast iron stove for a cauldron. Nowadays there are many of them sold, in a wide range. And don’t forget to buy a cast iron cauldron for it.
A cast iron stove under a cauldron allows you to prepare a variety of dishes, ranging from simple boiling water and cooking soups, to traditional smoky dishes, such as triple fish soup, tourist conder and others.
Many oriental dishes are also prepared this way, but always in a brick oven. The combustion part in it should heat up quickly and release heat slowly. This is the only way you can cook, for example, real Uzbek pilaf.
Cast iron stoves for cauldrons are good because they allow you to make your favorite dish, using fuel economically, since the fire inside them is well protected from the wind. In such conditions, the cauldron warms up quickly and evenly, and the food in it turns out to be finger-licking.
If you want to cook your favorite dishes not only at the dacha or your home plot, but also somewhere on a camping trip, you will need a collapsible cast iron stove for a cauldron. Although it is a little heavy, it will fit perfectly in the trunk and will reach the right place, where you will collect it and delight the company of fellow travelers with aromatic dishes.
↑ Construction of a barbecue oven with a cauldron
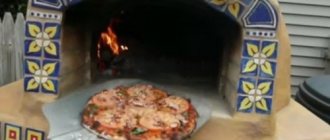
A cauldron is a round cast iron cauldron for cooking. Sometimes cauldrons are made of aluminum. But this cookware will not last long and will not give the same effect as a cast iron boiler. In addition, aluminum products burn out quickly. If you are planning to cook food over a fire, then you should choose a cauldron made of cast iron, because... the alloy holds temperature well. Any dish can be prepared in this vessel; you can not only boil and stew in it, but also fry.
The most common dishes cooked in a barbecue cauldron are pilaf and kebab cauldron with potatoes. It is best to prepare such dishes outdoors, since cooking at home can greatly affect your well-being due to the unpleasant odor during calcination of the oil.
Such a barbecue oven with an installed cauldron is considered a universal structure. If you remove the cauldron, you can fry shish kebab on the stove. If you cover it with a special cast iron sheet, you can create something like a burner and place ordinary pots and pans. Often, when building a garden fireplace, owners put a roof over such a stove and place special tables for cooking. This allows you to cook your favorite dishes in any weather.
You can build such a stove yourself without any construction skills or professional help. They use the ordering method for this.
Pipe cauldron stove
Initially, you will have to solve the problem - what to choose for what, a pipe for a cauldron or a cauldron for a pipe.
To ensure that the dishes do not fall through or stick out more than normal, you will have to work hard.
The cauldron should be lowered into the circumference of the stove either completely (with the exception of the upper rim and “ears”) or by 3/4 of its height.
A very “shallow fit” will prevent the dishes from warming up. As a result, it will take a lot of firewood and time for cooking.
Keep in mind that making a stove for a cauldron made from a pipe with your own hands is convenient for the owner. Based on this, select the height of the rack. If legs are not planned, the segment can be made longer.
A very high base is irrational; the heat will not reach the bottom of the dish very well. The optimal distance from the fire to the boiler is 20–30 cm.
The structure without legs will be placed directly on the ground. In this case, the fire is lit directly on the ground.
If you are going to mount the legs, then you will have to weld a bottom made of grating or sheet of metal to the bottom of the pipe. In this case, the fire will be raised above the ground.
Consider the design, shape and dimensions of the stove for a cauldron made from a pipe - the drawing should be detailed, with measurements and calculations.
When making calculations for clarity, use the cauldron that you will use in the future so as not to miscalculate.
Decide whether you will make a portable or stationary structure.
The portable option is convenient - you can have a picnic outside the site. With a stationary model there is less fuss, no need to fold and unfold, or take it to the utility room. Plus, you can use it to decorate the exterior of your dacha; it is more economical and easier to maintain.
The simplest, and therefore most common, option is a metal stove for a cauldron with a pipe, which is a cut cylinder on the ground.
Sometimes a stand (made of bricks or a tripod) is used. The ratio of the height to the length of the product is 3 to 4. The opening of the firebox is of the same proportions; there is no door on the firebox.
A more complex stove for a cauldron made from a pipe is a model cut crosswise along the edges. You can also cook only smoky dishes with this design.
Progress:
- The section is made with a grinder on both sides, the resulting petals are moved outward.
- Holes are drilled in the lower petals for L-shaped pins with sharp lower ends (they can be made from scrap materials). On them, the product will be attached to the soil or mini-foundation for stability.
- A window for the firebox is cut out at the bottom.
- Legs and handles are made from corners or scraps of reinforcement, then welded.
- The finished product is coated with heat-resistant paint to protect against corrosion.
Installation of a chimney
The chimney is one of the main elements of the stove. To carry out the work you should prepare:
- grinder;
- welding with electrodes;
- fitting;
- pipes;
- hammer.
The angle grinder must have cutting discs. The pipe must be made of steel, and its diameter must vary from 100 to 120 mm. It is necessary to lay out the fittings with the pipe on a flat surface. The elements are connected by welding. It is important to remember that you need to use personal protective equipment, namely:
- workwear;
- gloves;
- welding mask.
All irregularities are removed with a grinder. The chimney is installed in the desired location of the outdoor stove with cauldron. During laying, you need to make holes of the appropriate diameter. The resulting joints are coated with oven clay. The pipe should not have any cracks. To check, you need to light a flame in the combustion chamber and watch how the smoke moves. If the structure was built correctly, the cauldron should heat up evenly. To check, you can pour water into it: if heating is carried out evenly, then the bubbles should completely cover the inside of the vessel.
Having looked at the photo of the stove under the cauldron, you can understand that they are all finished either with plaster, or paint, or by the jointing method. In the second case, it is necessary to purchase a heat-resistant paint and varnish composition.
Stove for a cauldron made from wheel rims
Making a stove for a cauldron from car wheels with your own hands takes just a few minutes - this is one of the most simple, but nevertheless original designs.
The whole process can be divided into several stages.
To make a cauldron stove you will need:
- two rims from a domestic car of the thirteenth radius;
- 1 meter of rectangular pipe;
- three large bolts with nuts;
- 4 nuts for 10;
- wire 8 mm thick;
- Bulgarian;
- welding machine;
- electrodes;
- welding helmet and welding gaiters.
We purchase a rectangular pipe, wire, nuts and bolts at any building materials store or market.
Of course, you can also buy rims, but it’s easier to go to several tire shops where they can give you them for free or for a nominal fee.
You need stamped wheels that are made of steel; cast wheels will not work. They are made of aluminum alloys that are resistant to high temperatures, and they can only be welded in an argon environment.
Main stages of work:
- Using a grinder, we saw off the partition on one of the disks.
- We install one disk on another. In this case, the remaining partition of the previous disk should be at the bottom.
- The partition for attaching the disc to the wheel is welded to the main rim using spot welding. We need to find the welding points and cut through the metal of the partition to the rim. Don't overdo it, the rim should remain intact.
- You need to cut the partition at a distance of 1.5-2 centimeters from the weld spot. After the cut, the metal of the partition is easily removed; you need to pry it out with a screwdriver.
- It is important to leave fragments of the partition at the welding points. They provide a gap between the walls of the cauldron and the stove, which creates draft in the stove, and the heat evenly envelops the cauldron from all sides.
- We place one disk on top of the other so that the disk with the sawn partition is on top. In the lower disk, the fastening partition remains intact; this will be the bottom of our stove. We align both disks relative to each other and weld the disks along the entire perimeter.
- Now you need to make the door. We make a vertical cut in the welded disks to the size of the door. It is very important to leave a strip of metal at the bottom; it will act as a threshold that will hold the coals inside the stove.
- After the cut is made, we put bolts on it with nuts screwed on them, they will act as hinges for us.
- We weld the bolts on one side of the cut, the nuts on the other.
- All that remains is to cut the door around the entire perimeter and weld a long bolt, which will serve as a handle. The edges of the door and the opening must be cleaned of burrs with a file or grinding disc.
- Now we make handles for carrying the stove. We bend them from wire in a vice. Wire of this thickness bends without much effort, and right angles in the bending areas are given to the handles using a hammer. We put nuts on the handles and weld the nuts to the stove body opposite each other.
- We turn the stove over and weld three legs. The length of each leg is 30 centimeters.
- It is also necessary to weld a large hole for the hub, which is located in the center of the disk. This can be done using any piece of metal of a suitable shape.
- We load the stove with wood and heat it well. During this process, the remaining paint on the discs burns out, and the oven can be painted using any heat-resistant paint.
Brick fireplace: how to build it yourself?
It is extremely important to correctly calculate the required amount of materials and strictly follow the instructions so that the masonry turns out smooth. If you make a mistake, the barbecue with a cauldron will heat up unevenly, and the taste of the food will deteriorate.
A stationary brick oven has a number of advantages over a mobile metal oven, since it has a long useful life and is intended for frequent cooking over a fire. The structure will also complement the interior of the garden plot. However, it is worth considering that a homemade structure requires a large area cleared of branches and uneven areas. If you are planning rare outings, it is recommended to opt for a simpler metal mobile version. Step-by-step instructions will help you make both types of stoves yourself, even without special skills.
Preparatory stage
The first step is to search, level and clear the site where the brick kiln will be installed. After the unevenness has been eliminated, the surface should be moistened generously with plain water. Also at the first stage it is necessary to prepare and lay the solution according to the following scheme:
- Fine sifted sand and fireclay powder are mixed in a container in a ratio of 1:3.
- Water is added in such a volume that the solution resembles thick sour cream.
- The mixture is poured onto the base of the stove. The optimal thickness of the platform is 5 cm.
- Using a building level, it is necessary to level the base. It is extremely important to monitor the horizontal axis, since an uneven base will lead to uneven heating of the grill.
- While the mixture has not hardened, a reinforcement grid with cell divisions of about 5-10 cm is placed on top to strengthen the oven and protect it from temperature surges.
Tools and materials
Before you start building a stove for a cauldron with your own hands, you need to prepare the following materials:
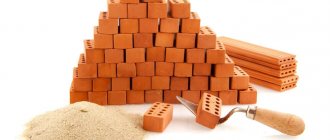
- refractory fireclay brick;
- angle grinder;
- fireclay powder;
- sifted sand;
- shovel;
- cast iron grates for the stove;
- buckets (2 pcs.);
- doors (2 pcs.);
- steel corners;
- barbecue order.
Making a stove for a cauldron from sheet steel
This is also one of the simplest options for making a stove, which will require:
- the cauldron itself to measure the diameter of the combustion chamber;
- welding, electrodes for it;
- steel sheets - the thicker they are, the better for the structure;
- hammer;
- corners for making handles and supports;
- electric drill;
- Bulgarian.
Note. Work should be done outdoors, near a source of electricity. At the same time, safety rules must also be followed.
Main manufacturing stages:
- Measure the diameter of the cauldron - according to the obtained size, further work will be carried out.
- Make a rectangle out of a steel sheet. Its length must exactly correspond to the calculations made earlier. You also need to cut a small hole in it.
- After this, you can begin to make the slots for smoke removal - they must be made at the very top of the stove. Roll the sheet into a cylinder. To do this, you can use a special form and a hammer or equipment.
- Make a support and handles.
- Connect all elements by welding. Some elements can be screwed onto regular bolts.
- After construction, such a stove must be coated with heat-resistant paint. And after it dries, you can start a fire and cook your favorite dishes.
To improve the design, it can be supplemented with the following elements:
- Another hole for the blower.
- Grate – it is placed between the combustion and ash holes. To install it, you will need to weld metal corners inside the stove as a support.
- The chimney is taller than human height: this way the smoke will not get into anyone’s eyes.
- Doors. You can make them yourself, from the same sheet of steel, or buy ready-made ones; they are quite inexpensive.
- Spark arrester. It is a metal can with a large number of small holes.
All of the above devices greatly facilitate the process of laying firewood and cleaning the stove.
However, such a structure will be more difficult to move from place to place, so it’s up to you to decide what’s better – maneuverability or functionality.
Installation and operation
From the point of view of ease of use of a cauldron, any free area in the open air, located in a summer cottage or simply in the forest, is considered optimal. When choosing it, it is important to ensure that there is no tall vegetation nearby that could accidentally catch fire and lead to a fire. In winter, to arrange a cauldron, it is most convenient to lay out a brick fireplace within an area cleared of snow. Such a structure must be located in an open area and must have a high-quality chimney with good draft.
Proper operation of the cauldron requires its obligatory calcination before first use, as well as cleaning after cooking. Before using it, you need to take a rag moistened with detergents and walk it over the surfaces of the new product - this will wash off the factory grease that has become embedded in the body. After this, you can place the cauldron on an open fire. Upon completion of the calcination, you should once again use a rag (but this time soaked in oil) and again thoroughly wipe the entire product.
After each cooking, it is necessary to scrape off the remaining food particles from the surface of the frying pan, and then pour clean water inside and put it back on the fire. When the water has boiled, it is left until it cools completely, after which all burnt particles can easily be removed on their own. The final step is to wipe the surfaces with a dry cloth.
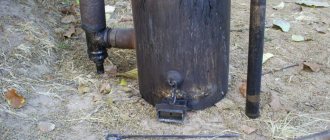
Stove for a cauldron from a cylinder
We offer one of the most basic ways to create a stove for a cauldron.
This stove is transpontable and is perfect for outdoor recreation.
If you have an old gas cylinder with a capacity of 50 liters, you can build this version of the stove. In addition, when performing the work, you will need to have an angle grinder.
Initially, you should prepare drawings for the cauldron stove by hand.
Next, follow the instructions below:
- The gas cylinder is being emptied. To do this, just open the tap on it and leave it in that position for at least 5 days.
- Next, marking is done along the line on which the cut will be made. To make a stove, you will need the section of the cylinder on which the bottom is located.
- Cut off the required part of the oven. Place a cauldron in it; it should be located hermetically in the oven. If the cauldron is too large, cuts should be made on the surface of the stove at intervals of 12-15 cm.
- Step back approximately 20 cm from the bottom of the stove. Cut out the door through which fuel will be supplied to the stove. The door width must be sufficient to load one or another fuel option.
- Place the cauldron again, making sure that its connection to the stove is tight.
- Next, preheat the stove for the cauldron, remove the cauldron, heat the stove and wait for the wood to split.
- Place the cauldron and check that it is heating evenly.
Design options from car wheels
A simple option for making a stove for a cauldron is a model made from several rims. In this case, only disks from stock wheels are used, since the material from which they are made and their shape are most suitable for these purposes.
Two disks are installed on top of each other. In this case, the front side of one disk should be facing up, and the similar side of the other should be facing down. Thanks to this arrangement, free space is formed between the disks, sufficient to fill it with fuel material. In this position, the disks are welded together. It is important that the line of their contact is well welded.
A combustion hole is cut out in the side of this structure. Given the special design of the wheel rims, there is no need to equip a wide hole. A sufficient size will be one that will allow one log to be placed inside the oven.
As an addition, iron handles can be welded to the disk body, which will help hold the stove during transportation. If necessary, this stove is equipped with spacers that prevent it from tipping over during operation.
A cauldron stove made from wheel rims can be used in the country, in the yard of the house or in camping conditions. Thanks to its versatility, it can be equipped with other cooking equipment, such as a disc harrow converted into a wok.
Complex-barbecue with a stove for a cauldron
A metal grill with a stove for a cauldron and a smokehouse is a very useful complex, since it allows you to cook not only barbecue, but also fish soup, tourist condiment, cook soups and even take on the preparation of Asian dishes.
In most cases, this complex includes a structure of:
- Braziers.
- Stoves for cast iron cauldron.
- Support
- If it is built of brick, it may also include a fireplace.
The stove can be inserted into the grill, placed on it or attached to it.
As a result, it can be either removable or tightly fixed. In both cases, the owner of the cottage and the fireplace near it, in order to create a high temperature in the stove, needs to move the coals from the open part of the brazier under the stove.
Initially, it is necessary to select a project that is in harmony with the appearance of the house and garden.
A made barbecue with a cauldron will give the garden plot a new look and will be a favorite relaxation area.
We determine the location for installation in the area where the grill with a roof and a stove under the cauldron will be installed.
For the effectiveness and safety of the barbecue, you need to position it correctly in your yard. Usually the desired location is located next to the house and replaces the main kitchen in the summer.
The space where the grill with a roof and a stove for a cauldron will be installed should not be far from the house and kitchen, since you always need to bring cutlery, dishes and water.
According to safety requirements, you cannot construct a barbecue next to wooden buildings and fences. They may be damaged by smoke and fire.
Barbecues with a stove are made of fireproof material:
- bricks;
- metal;
- stone
There are stationary structures and portable structures.
The barbecue under the cauldron can have a unique project and inimitable design:
- Combined grill - equipped with a metal box and a cauldron base made of iron of the required thickness.
It is very popular. A portable version of the design is possible. A barbecue with a cauldron is easy to make with your own hands.
- A barbecue with a brick cauldron is a massive stationary building that can be built by craftsmen who know how to work with such fire-resistant material.
The disadvantages of such a structure are its cost and the impossibility of moving it to another place. A properly made grill with a roof will decorate any area.
- The camping cauldron grill is made from car rims connected to each other until the required height is obtained.
Equipped with a furnace and holes in the bottom to provide air.
A metal box with a grill grate and skewers is hung on the side walls of this design.
A barbecue made from disks requires pre-treatment of their surfaces. Suitable for a summer house with a gazebo roof.
- Forged barbecue stands out for its strength, functionality and durability.
It belongs to professional products and is made manually or by machine.
The wrought iron grill is decorated with a pattern. More expensive models have a sink.
The professional forged barbecue is equipped with wheels.
You should choose a grill for a cauldron based on the functionality of the design and financial costs. Having the skills of a builder, you can easily solve the problem of how to make a brick cauldron with your own hands.
A brazier with a stove under a cauldron allows you not only to fry meat, mushrooms or vegetables, but also to cook fish soup, or even real aromatic pilaf.
In other words, with such a device you can go hiking for several days without fear that you will quickly get bored with the monotonous menu, and soon you will irresistibly want to go home to your usual food.
Features of brick stoves
A special recess is made from brick in the oven.
Brick hearths are built using a special technology from fire-resistant material that maintains a constant shape regardless of changes in temperature and humidity. Since the hearth is located on the street, these qualities are put at the forefront.
Classic designs are used only for cooking food in a cauldron. A recess of the appropriate shape is made under the container. There is a plate for fixing the rim, corners for the plate, and internal walls through which heat is evenly transferred to the entire area of the dish. Everything else corresponds to the design of a standard hearth - firebox, ash pan, ash pan and chimney.
Universal complexes have separate fireboxes and outlets (stoves) for each device that can theoretically be used for cooking. To collect and remove combustion products, a common chimney is made in the form of an arch. It is expensive, complicated, but justified in terms of convenience and practicality.
Construction of an oven with a smoking chamber
If you like multifunctional designs, then you should like a device that will serve as a stove and smokehouse. The latter will be made from stainless steel. The walls should be thick, because then they will be more durable.
The design should be supplemented with stainless steel hooks, where products for heat treatment will be hung. The chamber can be closed using a sealed door with a viewing window. For the laying of such a device, red brick is used. You can also use refractory bricks, but you must remember that they are not as resistant to temperature changes. When installing a smokehouse stove under a cauldron, you cannot use sand-lime brick with cavities inside, since this material is not suitable.
The first row is laid out without mortar. This way you can make markings so that in the future you don’t have to adjust the bricks to the desired size. The solution is made from sand, slaked lime and cement. The first row takes a running start. The next row should begin to be installed from the corner. For such work, it is necessary to maintain horizontality, which is checked by the building level.
You can use steel corners for the roasting pan. There will be free space between the walls, which is filled with reinforcement. To ensure that the installation of the grille is not accompanied by difficulties, it is necessary to lay out several bricks that will protrude inward. When forming the stove, you must provide a base for the countertop and installation of the exhaust pipe.
Once the 15th row has been laid, the formwork can be formed to create a firebox overlap. In this case, fireclay bricks are used for masonry. Between the 20th and 24th rows, the bricks are trimmed. This will allow you to make masonry in accordance with the dimensions of the chimney. When building a smokehouse stove under a cauldron, you will need to lay a pipe of the required height. This stage will be the last. Decorative work may include laying facing tiles to imitate brick.
Projects, drawings, diagrams and dimensions of barbecues with a brick smokehouse
Before you build a barbecue smokehouse made of brick, it is recommended to think carefully about what and how you plan to cook - fry, smoke, or put a cauldron. It is also important to think about what support structures need to be added to the cooking area. For example, will the smokehouse be equipped with a niche for firewood, shelves, a sink and a table.
Advice! To save space and consumable building material, experts recommend building a universal structure with a stove, barbecue, and smokehouse made of brick.
The universal design allows you to prepare any dishes, saving space and building materials
When building a brick grill with a smokehouse with your own hands, a brazier should consist of the following components:
- A barbecue in which coals will be placed, with provisions for skewers or a grate.
- Hearth and smoking compartment.
- Fireboxes with a cooking surface. It is recommended to make the burners removable. The cauldron should fit in them at 2/3 of its depth.
- Chimney.
Measurements of the assembled stove will help you roughly determine what the final result will be.
After discussing all the above-described nuances regarding the design and ease of use of the cooking area, we proceed to drawing up a drawing with a detailed description of the location and dimensions of all parts of the building. Based on the project, they calculate the amount of material needed, the approximate weight of the barbecue and the parameters of the foundation.
A barbecue with a smokehouse will evenly heat the meat, completely saturate it with smoke, so that in the end you get a safe and tasty dish
Barbecue stoves with a brick smokehouse are shown in the photo below:
It’s easy to build a simple grill-hearth yourself with your own hands according to the drawing
Thanks to the detailed instructions for the barbecue fireplace, you will be able to build a luxurious cooking space
With two countertops on the grill with a smokehouse it will be much more convenient to cook