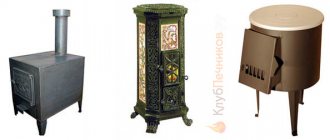
Option two - homemade potbelly stove
If you have a welding machine, potbelly stoves, proven and simple designs, can be made in one day. To fire a potbelly stove, you can use thick-walled pipes, barrels and gas cylinders. A rectangular potbelly stove can be welded from a metal corner and steel sheets (3 mm thick).
Important rules for locating a potbelly stove in the garage
In order to avoid fire, you must follow the following fire safety rules when installing a homemade potbelly stove:
- distance to walls and flammable objects - a meter, distance to a brick wall - 0.5 meters;
- the walls and ceiling around the stove are additionally sheathed with sheets of metal;
- a thick metal sheet is placed under the stove - 10 mm or a cement screed is made - thickness 20 cm;
- It is necessary to install ventilation (forced or natural) so that if there is smoke there is no trouble. A 5 cm gap under the garage door or two exhaust vents under the roof will ensure sufficient natural ventilation of the room.
The distance from the stove to the car must be at least two meters. If you come into close contact with the hot walls of the stove, there is a risk of damage to the paint or ignition of the fuel.
An additional protective casing made of brick walls will not only create a convection flow of warm air and increase heat transfer, but also ensure safety.
Note. Only square or rectangular potbelly stoves can be covered with bricks
A furnace in the form of a cylinder requires a special design of the casing, in the form of side metal ribs. A brick casing for the cylinder will reduce heat transfer and lead to rapid burning of the walls.
How to make a simple square potbelly stove
For a standard garage, a heating device 30 x 30, 50 cm high is quite enough. The diameter of the pipe for a potbelly stove is at least 30 cm, the wall thickness is at least 5 mm. For a chimney, a pipe with a diameter of 12–15 cm and a thickness of 3 mm is suitable. To prevent the chimney pipe from quickly becoming frozen, it is wrapped on the outside with a layer of mineral wool.
Work order:
- First, we draw the cutting of the stove parts, determine all the dimensions;
- we cut out the necessary parts from sheet metal to size;
- First, we weld the walls and bottom of the oven together, but only grab them. To be able to set all sides strictly according to level;
- after checking the vertical and horizontal lines, you can weld all connections using a T-weld;
- We install the lower partition into the finished housing. You immediately need to drill holes in it to remove ash (the step between the holes is one and a half centimeters, from the walls - 5 cm);
- the partition is located no lower than 10 cm from the bottom;
- cut out a circle in the back wall to install the chimney pipe;
- firebox and blower doors - distance from the wall - 5 cm;
- when attaching the door curtains, you need to take into account that they will sag due to temperature, so we attach them 2 cm higher;
- The last to be installed are the legs of the potbelly stove - the height is at least 15 cm and the top sheet of the stove is installed.
In order to obtain maximum heat transfer, the stove pipe should not be straight. It is necessary to install pipes with two 30-degree turns and lead them through the wall of the garage. Then the combustion products will give off all the heat not to the street, but to the room.
The video shows how to make a simple potbelly stove from a metal sheet and corners and from an old gas cylinder.
Why modernize?
The potbelly stove is a very simple heating device, although today it is deeply modernized. Such a stove, which has become a favorite solution for heating small country houses, can have not only a single-chamber, but also a two-chamber design. A modernized potbelly stove can provide heat even to houses where residents live permanently.
The simplicity of design and manufacture makes it accessible to purchase and use. In addition, a significant advantage for the construction of such a structure is the absence of a foundation. But, despite so many positive properties, the potbelly stove also has significant disadvantages:
- Its efficiency is quite small, the simplicity of the design carries with it an inherent drawback - a huge part of the heat from the potbelly stove “flies into the chimney”.
- To work with such a stove, strict safety requirements must be observed, since falling combustion elements can damage nearby premises and even lead to a fire.
- To heat a room with a potbelly stove, it is necessary to consume a significant amount of fuel elements, which is due to the fact that this type of heating is used only for short-term operation.
But this is not a reason to be discouraged; over the years, our “Kulibins” have found several simple but effective ways to increase the efficiency of a potbelly stove. In this article we will look at the modernization of the stove design itself.
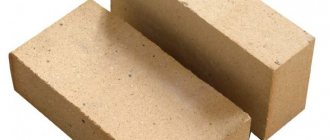
Which brick to choose?
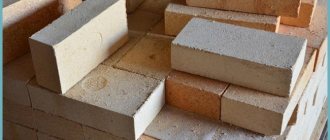
In order to cover a potbelly stove, ordinary brick will not work. You need to choose between special stove and solid ceramic. Kiln brick will withstand temperatures up to 1000 degrees, while solid ceramic bricks can withstand temperatures up to 800 degrees. Every stove maker will say that laying bricks on edge is strictly prohibited, although you can hear similar advice in order to save material. Heat-resistant bricks are placed in water before laying so that they do not draw moisture out of the mortar and provide maximum adhesion.
Use only heat-resistant bricks
To calculate the consumption of bricks, you need to measure the stove and take into account the 10-15 centimeters of gap between the metal wall and the brick. The potbelly stove is placed on one or two brick rows, and the top is laid as desired. The area of the proposed masonry must be divided by the area of the narrow side of the brick. This is a rough calculation without taking into account seams and air circulation holes in the masonry, but it gives an idea of the maximum amount of material required.
For example: to cover a metal stove “Gnome” you need 83 bricks if you lay it according to the technology and 45 bricks if you lay the brick on its side. This amount will be needed provided there is a foundation in two rows and a lining on top.
There are craftsmen who fill the space between the brick and the stove with sand. But a potbelly stove with sand rarely lives up to expectations - the sand becomes a heat insulator without increasing the useful time of the firebox. The same can be said about gravel, which is used along with sand.
Finishing a potbelly stove with brick: tips and tricks – Working with Brick
The potbelly stove is familiar to all summer residents. It is not profitable to buy expensive heating devices for change houses and country houses, but an old potbelly stove will cope with the task and will not ruin the owner. This stove does not require fuel, has a cooking surface and is small in size. In some cases, you can line the potbelly stove with bricks.
Potbelly stoves come in cast iron and metal. The first ones are, of course, more economical. The problem with all metal stoves is rapid heat transfer. As soon as all the fuel has burned out, the potbelly stove instantly cools down, and with it the heated room.
Fast heat transfer helps when you need to quickly warm up a room, but requires constant loading of fuel. The potbelly stove got its name for such “gluttony” - no matter how much fuel you put in, it’s not enough. To increase the efficiency of a potbelly stove, during the October Revolution the chimney pipe was lengthened.
Burning gases passing through a long pipe heated it, so the length of the chimney could be equal to the perimeter of the room.
An easier way to retain some of the heat is to line the stove with bricks. The heat emanating from the stove heats the brick, and as it cools, it releases the accumulated heat. The brickwork will allow the stove to remain warm for a couple of hours after it has cooled down.
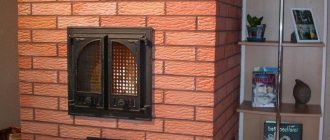
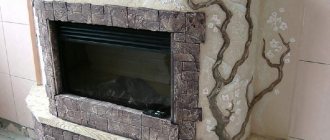
Covering a potbelly stove with bricks in this way not only increases efficiency, but also externally transforms a cheap stove. For greater beauty, you can use special heat-resistant tiles.
So a potbelly stove can become visually very attractive and resemble a Dutch or Swedish stove.
Cover example
How to cover a potbelly stove with bricks at the dacha
To heat a room in a country house or country house, a potbelly stove or fireplace is often used. A cast iron or metal stove is easy to manufacture, easy to maintain and affordable.
The furnace material - metal or cast iron - has both negative and positive properties.
So, while promoting rapid heating of the room, a metal stove, on the other hand, cools down quickly with the same “success”.
You can find a large number of videos on the Internet with instructions for lining a stove or fireplace, but we propose to consider this problem in detail in the article.
To begin with, let us list the main qualities that distinguish a potbelly stove with a lining from the original stove:
- The structure, made from brick with your own hands, allows you to retain heat inside for a long time, distributing it evenly throughout the room.
- After turning off, the stove will maintain a high temperature in the room for a long time, eliminating the need to reheat the cold house after the next turn on.
- The design of a brick-lined potbelly stove or fireplace is safe to use. as it relieves the owner from the possibility of getting burned when in contact with a hot metal body.
Selection of material and tools
You can cover a potbelly stove with a brick casing with your own hands and on your own. The main problem is the correct selection of the necessary tools and bricks of a certain quality.
For lining a potbelly stove or fireplace, classic bricks, clay stove bricks, are used. characterized by heat resistance qualities.
When exposed to high temperatures, such a brick will not undergo deformation, and, most importantly, will retain its performance properties.
The surface of the brick does not affect the functionality of the final structure. This can be a smooth solid ceramic brick or a brick with a textured surface.
For decorative aesthetic purposes, it is better to use textured brick. which will perfectly complement the interior of any room.
You cannot use brick with voids, as high temperature will lead to its destruction.
The entire arsenal of tools necessary for lining a stove and fireplace with bricks with your own hands includes. trowel, spatula, pick or rubber hammer, grinder, level, angle, plumb line and fishing line for laces.
How to line a potbelly stove with bricks?
A potbelly stove is a device for heating a room. Easy to use and affordable price make it attractive to dacha owners. True, it also has its drawbacks. Since a potbelly stove is an iron stove, it heats up quickly, but it cools at the same speed. Due to maintaining the required temperature, a lot of raw materials are needed. It was because of its uneconomical nature that the stove was nicknamed the “potbelly stove.”
How to properly fold a potbelly stove?
Even a beginner can correctly assemble a brick stove-stove on his own. To do this, you need to know and follow the simple rules that pechnoy.guru will provide below.
Scheme and drawing
Below we will look at how to build a potbelly stove out of brick with your own hands. The drawing and dimensions can be seen in photo No. 1:
Photo No. 1 - do-it-yourself drawing of a potbelly stove made of brick
The sequential layout of bricks from a potbelly stove is shown in photo No. 2:
Photo No. 2 - sequential layout of bricks (diagram)
We have decided on the materials and design of the furnace, and the solution is ready. This design does not require a foundation. For comfortable and safe operation, heating must be placed in compliance with all fire safety standards. Having chosen a place, lay two layers of waterproofing. On top we make a preparation of sand, 10 mm thick. Let's start laying:
- We lay a brick on top, without mortar (see photo No. 2, first row). We strictly control horizontality using a level.
- We install the door for the blower. We secure it with wire and wrap it with asbestos cord.
- We continue laying (see photo No. 2, row No. 1).
- Next comes fireclay brick (see photo No. 2). Grate bars will be installed above it.
- We place grate bars directly above the ash pit.
- We place the next row on a spoon. We put the wall at the back without mortar (knockout bricks).
- Installing the firebox door. We secure it with wire and bricks.
- On top we place a row on the bed along the contour of the fourth.
- The next one is again on a spoon. We put 2 bricks at the back.
- The row at the top should overlap the combustion door and end 130 mm above it.
- We continue laying, moving the bricks back a little. Before this, we lay an asbestos cord on which we will install the hob.
- Let's start forming the chimney from the next row. The design provides for the installation of a mounted pipe made of tin or corrugated aluminum. The pipe should not be heavy. Otherwise, the center of gravity may shift.
- On the eleventh row we install a valve to regulate the air flow. Don’t forget to seal it with asbestos cord and cover it with clay.
- Next, we place a chimney pipe in the quadrangle, which we connect to the metal one. The pipe must stand strictly vertically and not lean to the side. For greater stability, it should be covered with three rows of bricks.
- We remove the knockout bricks that we placed on the 4th row and clean the chimney of debris.
- Now the stove should be whitened. Any lime will do. Experts recommend adding blue and a little milk. This way the whitewash will not darken and fly off.
- We install a metal sheet in front of the firebox.
- We install the baseboard.
An example of a finished brick stove
Drying
The cause of cracks is excess moisture in the bricks, so the oven must be thoroughly dried. There are two stages of drying: natural and forced.
- Natural drying lasts at least five days. All doors must be fully open. To increase the intensity of the process, place a fan in front of the firebox or stick it into it and turn on a regular electric incandescent lamp (not an energy-saving one). It will not be possible to completely dry the oven using this method, so we move on to the next step.
- Forced drying is carried out by burning dry wood. This type of fire is carried out once every 24 hours. You should only heat with small dry logs. Open the blower door slightly and open the plug halfway.
When the wood burns out, loosely cover the ash pit. Close the top plug, leaving 1-2 cm. When the coals burn out, open all channels. Carry out this fire for a week. On the first day, about 2 kg of wood is burned. Then add 1 kg every day.
Making a firebox door
This element is the most complex in the entire structure. The following table shows the standardized dimensions of oven doors:
| Size | Blower, cleaning doors, mm | Openings for fire doors, mm | |||
| length | 25 | 25 | 25 | 30 | 25 |
| width | 130 | 130 | 250 | 250 | 250 |
| height | 70 | 140 | 210 | 280 | 140 |
We make the door for the firebox according to the drawings shown in photo No. 3:
Photo No. 3 - drawing of the door for the firebox and cleaning chamber
Metal cladding
A brick potbelly stove can be additionally sheathed with metal. We will get a metal potbelly stove with all the advantages, but without the disadvantages (except for weight). This design will protect the stove from cracking and chipping. This will significantly increase service life. This will require sheet metal 4-6 mm thick. The process is not particularly difficult. The metal sheet is marked, the necessary parts are cut out with a grinder or a cutter. Next, the cladding is carried out and connected using welding and a metal corner.
This design is not only durable, but safer. However, it requires additional costs and labor.
Do-it-yourself brick stove
A do-it-yourself brick potbelly stove, made for heating in a country house or garage, is the best option for such premises.
Do-it-yourself brick stove
Usually, in such conditions, small metal stoves are used, as they are compact and convenient. However, they have one significant drawback - they heat up very quickly, but also cool down quickly. Therefore, it is constantly necessary to maintain a fire in them throughout the day, which means that a large supply of fuel must be prepared.
Craftsmen have figured out how to get out of this situation and retain heat for a longer period - the stove will remain hot much longer if it is made of brick or lined with brick.
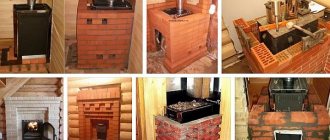
There are different options for potbelly stoves, which are made using brick:
- a stove made entirely of brick;
- a combined potbelly stove, when its lower section is brick, and a gas cylinder or metal pipe is fitted for the upper section;
— a cast-iron stove-stove, which is lined with brickwork on the outside;
- a brick stove covered with metal sheets on top.
To choose the appropriate option for use in a country house, outbuilding or garage, you need to know how much work needs to be done in making each of them, and what tools will be needed for this.
Tools for building a potbelly stove speech
To make brickwork for a potbelly stove, you will need the following tools:
- Spatulas of different widths.
- Trowel and trowel.
- Rubber, regular hammer and hammer with a pick.
- Grinding machine with wheels for stone and metal.
- Plumb and building level.
- Joining.
- Container for solution.
- Electric drill and mixer attachment for mixing the solution.
- In addition to the above, to make the metal part of a potbelly stove, you need to prepare other tools - a metal welding machine and consumables for it, all the necessary equipment for a welder - metal brushes, a cleaver hammer, etc. It’s good if the farm has equipment for cutting metal - this will simplify the task of working with workpieces.
To make each of the stove options, you will need your own list of materials, depending on the shape of the potbelly stove, its design and its size.
Brick stove
A brick potbelly stove does not belong to the work of the highest category of complexity
Any potbelly stove should be small in size - this is its main advantage over massive structures, for which there may not always be room in small rooms. A potbelly stove made of brick is an ordinary stove, only it has a very compact size. Like any heating structure, a brick potbelly stove can have different designs and serve only to heat the room or also include a cooking function. The latter will not be superfluous both for a country house and for a garage.
A bold sketch by the master - in principle, everything is clear in the diagram
Making such a stove is worth considering as the best option.
Materials for work
To build a brick potbelly stove, you will need the following materials:
- Red and fireclay bricks.
- Grate (ready-made cast iron or homemade steel rod).
- Valve.
- Fuel and vent doors.
- Single burner hob.
- Pipe for chimney.
- Waterproofing material – roofing felt.
- Asbestos material - it is most convenient to use asbestos cord
- Steel wire.
- Steel plate, 4 ? 5 mm to separate the afterburning zone, if provided.
- Heat-resistant building mixture for masonry mortar or clay, cement and sand.
Cast iron parts can be purchased at a special store
When all the materials are prepared, you can start working. It begins, naturally, with preparing the foundation.
What should I use to lay the furnace?
Any stove must be installed on a rigid, reliable base.
If in the room where the potbelly stove will be built, there is a good concrete screed on the floor, then it may well serve as a foundation for such a stove, since the structure, in principle, is small and relatively not heavy. If the flooring is wooden, but made of thick boards, then it can also sometimes support the weight of the stove, but it is better, of course, to play it safe and go the other way - as indicated below.
- It is not recommended to lay floors made from thin boards. In this case, you will have to build a reliable foundation before building the stove. Should it be a size 10? 12 cm wider on each side than the oven base.
- In order to pour the foundation, you will have to dismantle the section of the floor in the place where the potbelly stove will be installed.
- A pit is dug in the subfloor soil, 300 ? 350 mm, into which a layer of p1ka is poured and compacted - its thickness should be 50? 70 mm.
- Crushed stone of the middle fraction is poured on top of the sand cushion, which is also compacted.
- A reinforcing mesh is laid on the crushed stone, and then a formwork is made from boards for pouring concrete into it. It is best to build it so that it rises 70° above the wooden floor. 100 mm.
- The next step is to pour a rough concrete mixture consisting of cement, crushed stone and sand into the formwork. After the concrete has been poured, it is necessary to free it from internal air bubbles - this is done by “bayoneting” using an ordinary shovel, which pierces the solution in several places.
- The surface of the foundation is leveled and left to dry. This process lasts from two weeks to one month, depending on the thickness of the poured structure. To ensure uniform ripening and to avoid drying out and cracking, the surface must be moistened with water every day during the first week, starting from the second day.
Poured foundation for a small stove
- After the foundation has dried, before laying out the first row, a sheet of waterproofing material - roofing material - is laid on its surface with mastic.
If the floor seems reliable, and the decision is made to build a stove without laying a foundation, then the foundation for the masonry needs to be prepared early.
- In this case, an asbestos sheet is laid on the boards, on top of which a plastic film is laid.
- A layer of sand 8 ? thick is poured onto the film. 10 mm, on which the first row of the oven will be laid out.
Furnace laying
- When laying out the first row, the mortar is applied only to the ends of the bricks - the brick is not bonded to the sand sprinkled underneath. However, to begin with, it is better to lay out the entire first row dry in order to determine its placement and level it. Only after this, mortar is applied to the ends and the bricks are fastened together.
The order and general diagram of a compact brick potbelly stove
- On the second row, the installation of the blower door begins. It is installed on a layer of thick clay mortar and secured to a wire, which is screwed to the ears using special holes. It is recommended that before installing the door, wrap it with asbestos rope or a strip cut from a single sheet. A blower chamber is formed behind the door.
Installing the blower door
- On the third row, the blower chamber is covered with a grate.
The grate is in place
- On the fourth row, the combustion chamber and smoke exhaust channels begin to form. The bricks are installed at the end. Stands are installed inside the channels on which the next rows will be laid, since there must be a hole for the smoke to escape. The back wall is laid without mortar.
- Having laid out the fourth row, the combustion chamber door is installed above it. installation is carried out according to the blower type, and the door is also temporarily secured using wire, which is fixed with bricks installed on the sides.
- The fifth row is laid out according to the diagram. All bricks are laid flat, except for those that form smoke exhaust channels with the inner walls.
- On the sixth row, the brick is installed on its end, and this row is the last when the brick is placed in this way. The back wall is laid with bricks installed at the end in two rows.
- The seventh row is placed according to the diagram.
- On the eighth row, the fire door is covered with a masonry of two bricks on top. In this row, a hewn brick is installed on the back wall, which will guide the flame towards the burner.
- On the ninth row, asbestos strips are placed in the place where the hob will be laid, which will ensure a tight seal between the bricks and the metal part. The masonry proceeds according to the diagram.
- On the tenth row, the hob is laid and the formation of the chimney begins.
- On the eleventh row, a valve is installed on the smoke exhaust duct. It is laid on asbestos strips and coated with clay mortar.
Installation of a valve on the chimney channel
- Next comes the laying of a chimney for two? three rows, into which a metal pipe is then attached, which is subsequently routed through the wall or attic floor and roof. We must not forget about its heat-resistant insulation when passing through flammable wall or ceiling materials. The pipe is insulated with mineral wool, the thickness of which should be at least 170? 200 mm.
- The folded stove is left to dry; it is not recommended to heat it immediately. To speed up the drying process, it is recommended to temporarily install an ordinary electric light bulb in the firebox at 100? 150 W and leave it on.
- When drops of condensation stop settling on the cast-iron closed doors, or such evaporation is reduced to a minimum, you can begin to gradually heat the oven, which will help it dry completely. The firebox must be dried with the doors and valve open.
- You should not rush into finishing a brick potbelly stove - you need to let it work for at least a season, as cracks may appear on the seams, which will need to be repaired before finishing.
- The surfaces of the stove are finished with clay mortar. It is applied with a spatula and leveled well. Instead, you can use heat-resistant compounds for stoves and fireplaces.
- Next, the surface can be whitewashed or covered with decorative tiles.
It is very important to properly design the base of the stove so that the sand poured under it remains in place. Therefore, it is recommended to lay tiles on the floor around the potbelly stove or fasten a metal sheet extending onto the masonry of the stove. Another way to cover the sand under the stove is to install a plinth around this structure, preferably ceramic.
Brick stove covered with metal
This version of the potbelly stove is made of two main materials - metal and fireclay bricks, which can withstand temperatures reaching 950? 1000 degrees. This stove is very durable and economical to operate, thanks to its well-thought-out design.
An effective solution for heat preservation: metal on the outside, brick on the inside
Materials for production
To make it you will need to purchase the following materials:
- Steel sheet, at least 3 ? 4 mm.
- Steel angle approximately 40? 40?3.
- Fireclay brick.
- Grate.
- Chimney pipe.
Preparing metal parts
Drawing of the metal component of a complex stove
Based on the drawing, all the details of the future stove are drawn on metal sheets, and then they are cut out using a grinder, gas or plasma cutting machine, or welding machine. To transfer the drawing to metal, use a ruler, square, compass and tailor's chalk.
On the sheets you need to place two side walls, a bottom plane, an upper hob, as well as the front and back walls.
The combustion and vent holes are marked and cut out on the front panel. You can also immediately cut out the shape of the legs on all walls.
A round hole is cut in the top panel for installing a chimney pipe.
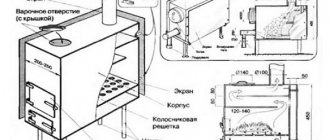
A cross-section of the stove - this makes it easier to correctly understand its structure
In this schematic section, the parts that make up the potbelly stove are indicated in the following order:
1. — Metal body.
2. — Blower door.
3. — Firebox door.
4. — Grate.
5. — Fireclay masonry.
Installation of a potbelly stove
Installation is carried out alternately - either welding or masonry work
The manufacture of a metal case is carried out as follows:
- From the inside, one of the side walls is welded with a continuous seam from the front and back.
- Next, a mark is made of the place where the bottom of the structure will be welded, and then welding is carried out, also with a continuous seam.
- When the three panels are welded, it is necessary to arrange supporting elements for laying bricks. They are made from a metal corner, which is welded to the walls along the entire internal perimeter of the body, at the level of the upper edge of the blower hole. Two metal strips are welded to the corners installed on the rear and front walls at a distance from each other that is equal to the width of the grate.
- The next step is to transfer the welded structure to the prepared foundation, since later, with bricks laid inside, it will be much more difficult or even impossible to move it.
- Having moved the body to its “standard” place, you can begin laying fireclay bricks.
For masonry you will need a brick of the following sizes:
Bricks for the internal masonry of a potbelly stove
1. - Solid brick with a size of 230? 113? 65 mm - 36 pieces.
2. - Half a brick, divided lengthwise, measuring 260? 62? 65 mm - 4 pieces.
3. - Half a brick, divided crosswise, measuring 172? 113? 65 mm - 2 pieces.
- On the bricks intended for laying the grate, you need to make grooves along the edges, and recess them deep into the masonry so that the grate is installed tightly and flush with the surface of the combustion chamber. Unfortunately, this point is not clearly indicated in the figures.
- Next, the first row of masonry is made on stands arranged from a corner; it should seem to hang over the blower chamber.
Start of interior masonry
- The following actions are carried out along the back and side walls, and a hole for the firebox is left on the front panel. The brick is installed on its end and flat - its correct installation is very clearly visible in the figure.
Laying out the side walls of a potbelly stove
- Before further masonry is carried out, a grate is installed in the square opening left in the middle.
An opening is formed under the combustion door
- Next, laying out the brick walls to the top is completed. To keep the brick firmly above the opening for the firebox, it is covered with a metal strip.
- Then, it is necessary to cover the upper part of the structure. This is done using ten bricks, from two of which ? parts. The cut bricks are laid at the back of the structure - they form a hole into which the chimney pipe will be mounted. To stiffen the floor under the ceiling bricks, a metal strip is also laid in the middle of it.
Completion of masonry - complete covering of the combustion chamber with bricks
- The laying should be done without mortar, but it can also be used. For this, a heat-resistant mixture is used, specially designed for laying fireplaces and stoves.
- After the masonry is completed, the second side wall and the roof of the stove are welded into which the pipe is mounted. A pipe leading to the street will be welded onto it. External welds must be made as carefully as possible.
Fire door
The next step is to make the firebox door according to the diagram below.
Drawing for making a firebox door
- Ears with a hole are cut out of steel sheets and welded in the designated places of the cut door. These devices will play the role of canopies.
Combustion chamber door
- On the opposite side of the ears, a handle is installed in the drilled hole, to which a tongue is welded on the inside of the door. When you turn the handle, it will also turn and will not allow the door to open spontaneously.
The simplest lock for closing the door
- Elements with holes, which can also be called eyes, are welded on the wall. The door eyelet will be inserted between them. The holes are aligned, and a fastening pin is installed in them, which will hold the door, but will not interfere with its opening and closing.
Door suspension on the stove body
- The blower door is manufactured and installed in the same way. For door panels, you can use pieces of metal previously cut from the front panel, pre-processing their edges to make them look more aesthetically pleasing.
The ash pan door differs, in principle, only in linear dimensions
- After the potbelly stove is ready, it is worth cleaning the external welding seams and then painting it with heat-resistant paint.
This potbelly stove design has a number of undeniable advantages over other types of these compact small stoves:
- It does not require a large amount of fuel to heat the room, as it retains heat for a long time.
- A layer of heat-resistant fireclay bricks protects the metal from burning through.
- The compactness of this stove allows it to be installed even in a small room.
- For this design, you can use metal of different thicknesses.
- The body does not require finishing with expensive materials - it is enough to apply heat-resistant paint to the metal, and the stove will look quite aesthetically pleasing.
Cast iron stove lined with brick
To increase heat transfer and increase fuel economy, conventional cast iron stoves are often lined with brick. This process is especially relevant for a metal sauna stove, because when it gets hot, there is a risk of getting a very serious burn.
Another option is a metal stove lined with brick.
Potbelly stoves installed in other residential premises are also covered with brick, since well-made masonry looks very respectable and aesthetically pleasing.
The diagram clearly shows the air circulation around a cast iron stove lined with brickwork. A powerful convection flow of hot air contributes to very rapid heating of the entire volume of the room.
Scheme of created convection flows
Since the lining of an already installed furnace is being done, it means that the foundation will no longer have to be poured, and this greatly simplifies the work. There will also be no problems with masonry mortar, since specialized stores sell dry mixtures for making heat-resistant mortars, with which bricks are fixed. All that remains is to prepare the area around the building and begin work.
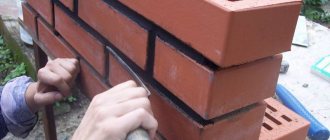
Laying bricks around a metal body
- When laying the main first row, it is necessary to adjust one brick to another in level, since it will determine the evenness of the entire masonry. It is best to carry out this process dry first, and, if necessary, adjust the row to an ideal horizontal level using shims. As the latter, you can use old ceramic tiles or other hard, non-flammable and non-moisture-absorbing material.
- Having verified the dry masonry of the first row, you can prepare the mortar and lay bricks on it, placing leveling elements.
- The first row is placed close to the metal surface. The bricks should not lie along the side wall of the furnace, but perpendicular to it. Thus, an even, rigid base is created for further masonry - a kind of foundation.
- Next, markings are carried out along the laid first row, since the remaining rows are not laid out close to the metal surface of the oven, but at a distance of 50 to 100 mm. If this rule is not followed, the brick will not warm up well or the effect of long-term heat preservation will not be achieved, for which, first of all, this technological measure is carried out.
The optimal gap between the two surfaces is 50? 70 mm. By arranging it, you can be guaranteed to achieve your goal.
Marking is carried out using a meter ruler and chalk. It is recommended to measure the required distances and draw the place where the second row will be laid out.
- You can set the direction of the wall while maintaining the required gap by laying prepared pieces of brick with the required gap width on the first row, close to the cast-iron body.
These “calibrating” pieces of brick are laid on the mortar, and the facing wall begins to be erected next to them.
- The brick in the wall can be installed either on the end or in the usual way, flat, at the discretion of the master. However, you need to take into account that when laying bricks flat, you will need twice as much of it.
- Having completed the laying of two rows, on the third it is necessary to leave several holes between the bricks to ensure air circulation in the gap between the metal and brick surfaces.
- When making masonry, it is necessary to control the vertical of the wall and the horizontal of the rows, constantly checking these parameters using a plumb line and a building level.
- If you need to get a beautiful, neat masonry, the seams between the rows are made using jointing, but this must be done immediately before the masonry mortar has set. It is also important to maintain the same distance between rows and bricks in a row so that the seams are even. Sometimes marking strips that have the necessary parameters are used for this purpose.
Stove before and after covering it with bricks
When there are two rows left before the completion of the masonry, in the penultimate one it is also necessary to leave gaps between the bricks in several places - through them heat will flow into the room during the process of convection air circulation.
It is much easier to build a brick stove than to build one of the models of massive stoves. If you have at hand a diagram of the design of a compact potbelly stove, the necessary material and the necessary tools, you can get down to business without hesitation.
Video: DIY compact brick stove
+
The volume and complexity of work when covering a ready-made and installed metal potbelly stove also seems quite accessible even for a beginner. The main thing is to take your time and not be lazy to check the laid wall and rows for level, since if one of the rows goes to the side, further laying will also not be level, and most of the work will have to be redone.
Brickwork
Image 2. Stages of bricklaying.
According to the markings, start laying the brick. Try laying the first row without mortar first, just to check the fit of the bricks and the possibility of somehow fitting them, sawing it if necessary. The entire first row is laid completely, while in the second row small holes should be made - 2 on each of the 4 sides, keeping to the size of half a brick. They will act as ventilation holes, which can be made in the shape of circles or polyhedrons to give your stove a beautiful and original appearance.
During the laying process, do not forget that to ensure better adhesion of the bricks to the mortar, it is recommended to pre-wet them in water. All subsequent rows are laid out without making holes, but with constant checking of the evenness of the masonry. Every 3-4 rows, wipe the bricks with a wet cloth so that it is easy to remove excess mortar. Try to maintain the same thickness of the seams, making it no more than 5 mm.
Diagram of a cast iron stove.
You can make the hole that will need to be made for the potbelly stove door according to your personal desires and fantasies. Even if you are not making a wide opening, in order to organize a lintel over it, you will need to use a metal corner or brackets, under which you will need to make a small hole in the brick. Do not forget that, as with any other construction, brickwork is carried out in half a brick (image 2).
The top of the oven can be laid out however you like, according to your personal wishes, since it will not bear any special load. By applying the most sophisticated design ideas here, you can get a truly unique, beautiful and rich stove for your home.
How to cover a metal potbelly stove with bricks?
How to cover a metal potbelly stove with bricks
There are a great many options for performing this work, since two identical metal potbelly stoves made on your own do not exist in nature. But, in any case, when deciding what to cover a potbelly stove with, you should follow certain general rules.
The brickwork is laid at a distance of ten to fifteen centimeters from the metal wall of the furnace and special ventilation holes are provided in it in the lower and upper parts of the masonry.
The air, heating up inside the screen, begins to circulate. Warm air exits into the heated room, and cold air, in the process of flowing around the walls of the metal furnace, reduces their temperature, thereby increasing their durability.
Features of operation and installation of a brick potbelly stove
If you are planning to build a stove like a brick stove with your own hands, in the country house or in the garage, do not forget that it will require a good ventilation system and preliminary implementation of fire safety measures:
- arrangement of firewood;
- moving flammable materials and liquids to places that exclude the possibility of their ignition during operation of the potbelly stove.
How to cover a potbelly stove with bricks is not an idle question. Carrying out the masonry in a checkerboard pattern, or without leaving the gap mentioned above, is an incorrect solution, from a technical point of view. “Checkerboard” masonry prevents air from circulating normally. In addition, such a wall has a significantly smaller surface area, which speeds up cooling.
Thermal radiation overcomes such a wall in transit, giving it a minimum of thermal energy and losing up to half of its value.
In the absence of a gap, the time to warm up the room increases significantly, and there is excess heat. Formed in the firebox. Literally “flies down the drain.”
If desired, and in cases where your qualifications allow it, a brick potbelly stove can be equipped with smoke circuits and doors can be installed that allow you to regulate the draft in the stove, which will allow you to achieve significant fuel savings.
How to line an iron stove with bricks?
Finishing the stove in the bathhouse is not at all difficult. Let's divide the process into four stages, you need to:
- Select materials.
- Pour the foundation.
- Cladding a metal stove.
- Perform decorative work.
Let's look at each point in more detail.
Selection of materials for work
What kind of brick is best to line a stove? It is necessary to take into account that the facing brick will be constantly exposed to high temperatures and must withstand all loads. Therefore, it is better to line the stove with a refractory solid material that copes with the assigned tasks and retains its properties for many years. In addition, you can line the bathhouse with both smooth and textured bricks.
For brick lining of the furnace, you need to use refractory material
In addition, for lining the furnace you will need:
- sheet asbestos;
- bonding solution;
- grout;
- tools.
Pouring the foundation
First of all, you will need to mix the solution. A traditional mixture of clay and sand is perfect for this purpose. In addition to it, cement-based solutions with various impurities are used. They may seem like they are more reliable (because they are more expensive), but in reality their durability differs little.
Scheme of pouring the foundation for the furnace
Once you have decided on the facing mortar, you can begin pouring the foundation. If the plane used does not inspire confidence, then you will have to pour a foundation under it. Additionally, you can reinforce the floor with boards or metal guides. In other cases, the process is simpler.
The foundation is poured in the following way:
- Determine the size of the base.
- Place the formwork.
- Prepare the solution.
- Fill it up.
- Wait until it dries.
Brick laying
When the foundation has completely set, you can begin laying. Before starting this stage, in order to properly line the stove, mark the location of the brick.
First of all, calculate the required space from the stove to the walls. Too large a space will interfere with high-quality heating and heat transfer, too small will significantly reduce the service life of the brick. The optimal space is 3-5 centimeters.
Place an iron sheet along the edges of the markings. Such a sheet will protect the material from overheating. Place asbestos cardboard on it. This refractory material will additionally protect the brick from wear and tear.
Scheme of brick lining of a metal stove
Upon completion of all these preparatory work, you can line the bathhouse. To get the desired result, follow these instructions:
- Soak the brick in water. Don't forget to soak it before styling.
- Shake it, the first row should be laid solid.
- You can use reinforcement to strengthen the masonry.
- Tie wire around the corners of the mesh.
- Start laying the second row in a staggered pattern.
- Apply the mortar into the space between the bricks.
- Reinforce the top edge of the hole with a metal corner. This is done to construct the firebox opening. Please note that the opening should be comfortable, the firebox should open without touching the walls.
- To ensure air circulation, special holes are made in the penultimate row. To do this, one row is laid across the previous one and four holes are made on each side.
- Laying the finishing row does not require anything specific - you can do it the way you want. You can make it decorative, cover it with tiles or simply pour stones.
As for the laying technology, keep the seams within 3-5 centimeters, do not forget to bandage the brick.
Decorative works
Before starting decorative work, clean off any remaining traces of mortar. If you don’t want to additionally finish the brick, you can make a so-called “fur coat”. To do this, sand it with a brush dipped in soapy water.
Most often, a sauna stove is decorated with:
- smooth multi-colored brick;
- textured brick.
You can also tile or paint it, or decorate it with some kind of decoration.
In conclusion, we would like to say that the first firebox must be done very carefully. Do not heat the oven too much; allow the solution to completely harden. After covering the stove, wait three days. If you do everything right, your bathhouse will serve you for many years.
Features of the operation of a brick potbelly stove
To ensure that the operation of the potbelly stove does not pose a threat to surrounding people, certain fire safety rules must be observed during its operation:
- Use only dry wood or coal as fuel.
- To ignite the installation, you need to open the chamber damper and place the required amount of firewood there, and only then set it on fire.
- When the fuel burns relatively well, the stove’s performance can be adjusted by opening/closing the ash drawer.
- To clean the stove from ash deposits, you need to completely cool the device, remove the ash drawer and take it out.
- Absolutely all flammable materials and household items must be located at a distance of at least 100 cm from the stove.
- It is prohibited to place more than 3 kg of fuel into the combustion space at a time.
- The firebox door must always be closed.
- It is forbidden to light a potbelly stove made of bricks if problems are detected in the smoke exhaust system.
- It is prohibited to leave the oven without adult supervision.
- While the oven is operating, you must not touch the walls of the oven to avoid skin burns.
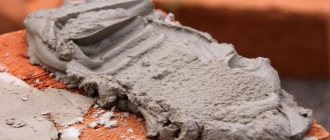
Preparation of the solution
Let's start by preparing the solution. For masonry work we use a special ready-made mixture. Sold in construction stores. It is a yellow-gray powder in 25 kg bags. All that remains is to dilute it with water in the correct ratio and mix. Detailed instructions are always indicated on the packaging; you need to follow them step by step. This solution is the best choice. It has only one drawback - its high price.
You can prepare the mortar for masonry yourself. For this we need clay and sand. First, let's determine the quality of the available clay and the content of impurities in it. We follow the following instructions:
- Roll the clay into a rope. Thickness - 10-15 mm, length - 150-200 cm.
- Take a rolling pin with a diameter of 50 mm and wrap a rope around it.
- The tourniquet should stretch smoothly and break, stretching by about 15-20%.
Expert opinion
Pavel Kruglov
Stove maker with 25 years of experience
If the rope stretches more, the clay is “fat”; if it breaks earlier, the clay is “skinny.” In the first option, the solution will shrink greatly under the influence of temperature, in the second it will crumble.
The next step is to prepare the sand. First, sift it through a fine sieve. The cell should not exceed 1.5x1.5 mm. Next we follow the instructions:
- using a handle and burlap, we arrange some kind of net;
- pour sand into it and begin to rinse it under running water;
- Rinse until the draining water runs clear.
Thus, we have rid the sand of impurities.
We do the same with clay. Now it should be soaked. To do this, pour the clay into a previously prepared container. Pour water so that the entire surface of the clay is covered. After 24 hours, mix thoroughly. We repeat the process until the clay has a consistency similar to toothpaste.
There is no universal proportion for a solution. Everything is installed by trial and error, depending on the characteristics of the materials used. The main thing is that the solution is convenient to work with.
To increase strength, experts recommend adding a little cement or salt.
Expert opinion
Pavel Kruglov
Stove maker with 25 years of experience
Here is a basic recipe for masonry mortar:
Take 2 parts of clay. Add one piece of sand to it. Using a construction mixer, mix until smooth and thick. We will need approximately 40 liters of solution.
Plating sequence
Diagram of an iron stove lined with bricks.
Before covering the stove with bricks. you need to make sure that the floor can withstand such a load. Without a foundation, stoves weighing up to 800 kg can be installed on a wooden floor. Of course, this is provided that the beams and joists are in good condition. A sheet of steel is placed on the floor, a layer of brick is placed on it, and then a stove is installed. If the floor is wooden, then a sheet of asbestos must also be placed under the metal. The steel sheet lining should protrude 30-40 cm in front of the front wall of the stove to prevent hot coals from falling onto the unprotected floor. Metal sheets with an asbestos cement backing also need to be attached to the walls of the room located next to the stove. It is necessary to take into account that a gap must be left between the stove lining and the wall of the room.
There must be a gap of 30-50 mm between the metal wall of the stove and the masonry. This must be done because metal and brick have different temperature coefficients of linear expansion. When heated, metal expands much more than brick, so if you place a potbelly stove closely, without a gap, the stove may collapse. Free space between the metal wall and the brick is also necessary for air convection.
As a rule, they line the stove with 1/2 brick. It makes no sense to make the wall thicker, since it will take too much time and fuel to warm up thick brickwork. Before you start covering the potbelly stove, you need to make markings, taking into account the gap. Mark the outer contour of the furnace. The first row is made continuous. You should try to make the thickness of the mortar between the bricks no more than 0.5 cm. In the second row, 1-2 holes are made on each side of the stove, depending on the size of the stove. The length of the holes is 1/2 of a brick. All subsequent rows are continuous, like the first row.
The front wall of the stove on the firebox side must be lined with ease of use in mind - the door must open and close freely. Here you can show your imagination and perform figured masonry. At the top of the opening above the door you need to lay a metal corner on which the top rows of bricks are laid. The upper part of the stove can be covered at your discretion, since technically it does not play a significant role, performing mainly a decorative function. The top of the oven can be made in the form of a vault or made flat.
After the lining is completed, the mortar in the joints should dry. This will take 1-2 days. After this, the surface of the masonry must be cleaned from excess mortar using a drill with a brush attachment. Then the masonry is washed with a soapy solution and a brush with stiff bristles.
Nowadays there is a large selection of metal stoves of various designs and price categories on sale. Metal stoves are used for heating private houses, temporary structures, at construction sites for heating workers, security guards and other purposes. The use of metal stoves in home baths and saunas is also increasingly gaining popularity, although in this case a brick stove is considered more traditional, but it cannot always be used for a number of reasons. The main advantages of metal stoves are their compactness (since not every room can install a brick oven), ease of installation, fast heating. The main disadvantage is that after stopping the fire, it cools down quite quickly. This drawback can be eliminated by lining a metal stove with bricks. This will greatly extend the heat transfer without increasing the size of the stove too much. If you made a metal stove yourself, then by lining such a stove with brick, you will give your stove a decorative look.
Having basic construction skills, you will be able to line an iron stove with bricks yourself; for this you will need the following materials and tools.
How to cover a potbelly stove with bricks: general rules
Before covering a potbelly stove with stone, it is important to make sure that it has a reliable base. For a stove weighing 800 kg, pour the foundation on the floor. A sheet of asbestos is placed under a sheet of metal. The steel sheet should cover the surface on which the stove is located, plus 30-40 cm in front of it, to avoid coal getting on the floor or carpet. The walls are also covered with this material. It is worth remembering that there should be a small distance (30-50 mm) between the metal sheet and the masonry. This measure is necessary for air convection. since the coefficients of linear expansion of the metal and the bar differ.
There is no point in building thick brickwork, since it will take a long time to warm it up.
Usually a potbelly stove is lined with ½ brick. Before starting work, you need to carefully measure everything and transfer the data to the diagram according to which construction will be carried out, taking into account the gap. The thickness of the binding material is no more than 0.5 cm. The first row is continuous. Several holes are made in the second row. And all subsequent rows are the same as the first.
It is necessary to cover the front part of the stove with bricks so that later it will be convenient to use. The door should function without problems - it should be easy to close and open. A round door requires, accordingly, round masonry. A metal corner is laid above it for further rows of brickwork to further line the stove. The top of the fireplace serves a purely decorative function. And the appearance depends on the imagination of the owner of this device.
Facing
Before you line a metal stove in a bathhouse with bricks, you need to prepare for work.
Preparatory activities
You can start laying only after the concrete and brick base has dried. A metal stove is installed on it, and future cladding is marked around it.
But first you need to install a fireproof shield made of any fire-resistant materials on the wooden walls around the fireplace.
Insulation of wooden walls and floors with mineralite
If you decide to prepare masonry mortar from clay, then you need to fill it with water for several days and carefully sift the sand. Since it is difficult to cover an iron stove with bricks and not stain its body with mortar, before starting laying it should be protected with paper, cardboard or film, securing them to the walls with tape.
To prevent water from the solution from being absorbed into the brick, it is soaked in water about half an hour before starting work.
Soaking the brick
Masonry
When deciding how to brick a cast-iron stove, it is better to choose half-brick masonry. A thicker screen will take longer to heat up, and a thinner screen will cool down faster.
The laying of the first row begins from the far corner, laying a whole brick
It is very important to lay it out evenly and neatly, since all subsequent rows will be aligned with it. They are laid out alternately, with an offset of half a brick. Don't jump over the row, first raising the corners and then filling the space between them.
Laying is done offset
- The permissible thickness of the horizontal seam is 8-10 mm, vertical 3-5 mm.
- The seams are filled completely with the solution, its excess is immediately removed from the surface with a trowel.
Bricks that go beyond the plane are knocked down with a hammer or mallet
During the laying process, you need to constantly monitor the verticality of the walls and corners using a plumb line or building level.
A cord stretched along the upper edge of the row will help to keep the row strictly horizontal.
Auxiliary vertical stands will make work easier
To strengthen the masonry, reinforcing mesh can be placed in the seams every two or three rows.
The photo shows the reinforcement of the masonry with metal mesh
Also, every two or three rows you should unstitch the seams until the mortar loses its elasticity, and wipe the surface from any remaining mortar with a wet rag.
Joining seams
When laying out the walls, it is necessary to leave ventilation holes in them: at least two at the top and two at the bottom. Cold air will flow into the lower ones, protecting the oven from overheating, and heated air will come out through the upper ones.
Furnace ventilation diagram
- As an option, you can line the stove with bricks laid in a checkerboard pattern with holes between all adjacent elements.
- Around the doors of the firebox and ash pit, masonry should be carried out taking into account their full opening.
The brick will have to be cut if it prevents the doors from opening
Where to finish the masonry is up to you. If you have a stove with a stove or heater, it is only brought to the top of the body. You can raise it to the ceiling. Or you can make figured masonry with a vault and chimney lining, turning an ordinary potbelly stove into something like a fireplace.
Metal stove for a bath, lined with bricks up to the pipe
Option with full height masonry and pipe lining
The brick portal turned an ordinary stove into a real fireplace. Now you need to let the solution dry for at least a day. It is desirable for this to happen in natural conditions, so it is better not to heat the stove for now.
Making an ash pit
An ash pan is a grate near a potbelly stove, on which fuel will subsequently be placed to heat the room.
A good ash pan provides the combustion chamber with a sufficient amount of air (that is, oxygen), and also provides good draft, thereby ensuring better combustion. In most cases, ash pans in potbelly stoves leave “much to be desired,” so upgrading the ash pan will help improve the performance of the potbelly stove.
An effective ash pit should be made of heat-resistant material and have a door, thanks to which you can avoid smoke in the room. Improving the ash pan will help turn an ordinary potbelly stove into something like a fireplace.
Materials and tools
- a metal sheet,
- fittings,
- welding machine,
- metal working tool,
- ash door.
Instructions
Making an ash pan yourself will require certain skills from you, and the production must be in accordance with the instructions:
- First you need to weld the box to the size of the potbelly stove, without the top wall and leave a rectangular cutout in the end wall. Steel is most often used in production. The dimensions must correspond to the width and length of the potbelly stove itself.
- Make holes in the bottom of the stove. The diameter of the holes should be about 20 mm.
Drilling holes for the ash pan - Weld the box to the stove.
- Install the door into the ash pan.
This design will give better and more uniform operation of the potbelly stove.
Laying bricks around a metal body
The work is carried out in this order:
- We lay the first row so that all the bricks are on the same level. To begin with - dry.
- We prepare the mortar and begin laying, using leveling pads if necessary. The first row should be close to the metal.
- The next rows are 50-70 millimeters away from the metal. We set the direction of the wall, maintaining the required gap, for which we lay pieces of brick close to the metal, providing the required gap.
- The brick can be laid either end-on or flat. However, in the latter case, you will need twice as much material.
- On the third row, you need to provide a hole for the circulation of air flows along the gap between the metal and the bricks.
Do not forget about the level and plumb line, which we use to check the verticality and horizontality of the rows. If you want the masonry to have an aesthetic appearance, you can use jointing. However, this must be done before the solution has dried. You can also use slats. Two rows before the end of the masonry (that is, in the penultimate row), it is necessary to provide gaps between the bricks to supply warm air into the room due to convection.
If you have the material and brick laying pattern, building a brick potbelly stove does not seem to be a difficult task. Success is guaranteed if you don’t rush and carefully follow the instructions, since if the evenness of the masonry is disrupted, a significant part of the work will have to be redone.
Increasing the number of pipe bends
Increasing the bends of the potbelly stove chimney
The tank at the outlet of washing machines will retain a certain amount of heat, but it will not be able to retain all the heat. A large amount of heat will continue to escape into the chimney.
Therefore, one of the improvements that provides additional heat retention is to increase the length of the outlet pipe. A long pipe running through the room, but with good exhaust, ensures the transfer of heat from its surface, which was previously lost.
Materials and tools
- several elbows that can be easily placed in the room after the potbelly stove,
- brackets for fastening pipe elbows,
- welding machine and metal processing tools.
Instructions
- First you need to mark the location of the pipe. It can pass with a large number of bends and zigzags, thereby ensuring maximum heat retention, without forgetting about the loss of exhaust draft.
- After marking the pipe laying location, it is necessary to install the pipe mounting brackets. Particular attention should be paid to the joints of pipe elbows and corners. Brackets must be made of heat-resistant materials.
- Lay the pipes to ensure a tight, hermetically sealed connection, and, if necessary, modify the elbows to ensure the pipe is laid along the marked route.
- Firmly secure the elbows in the brackets, check the working draft (burn newspaper in front of the pipe), check the tightness of the connections, connect the inlet elbow to the stove.
Why cover with bricks?
Potbelly stoves come in cast iron and metal. The first ones are, of course, more economical. The problem with all metal stoves is rapid heat transfer. As soon as all the fuel has burned out, the potbelly stove instantly cools down, and with it the heated room. Fast heat transfer helps when you need to quickly warm up a room, but requires constant loading of fuel. The potbelly stove got its name for such “gluttony” - no matter how much fuel you put in, it’s not enough. To increase the efficiency of a potbelly stove, during the October Revolution the chimney pipe was lengthened. Burning gases passing through a long pipe heated it, so the length of the chimney could be equal to the perimeter of the room.
An easier way to retain some of the heat is to line the stove with bricks. The heat emanating from the stove heats the brick, and as it cools, it releases the accumulated heat. The brickwork will allow the stove to remain warm for a couple of hours after it has cooled down. Covering a potbelly stove with bricks in this way not only increases efficiency, but also externally transforms a cheap stove. For greater beauty, you can use special heat-resistant tiles. So a potbelly stove can become visually very attractive and resemble a Dutch or Swedish stove.
Cover example
Washing machine tubs
Many have noticed that when the stove is burning, sheaves of sparks often fly out of the chimney. This means that the fuel did not burn out completely and left the working chamber, taking with it most of the thermal energy. So, one of the first ways to improve a potbelly stove is to create a working chamber where small coals will burn out and heat will be retained.
A common method of such an improvement is to install two washing machine tanks welded together, which will act as a kind of car muffler.
Materials and tools
To make this structure we will need:
- first of all, two whole tubs from old washing machines,
Washing machine tubs - welding machine,
- tool for working with metal.
Instructions
To properly attach 2 tanks from a washing machine welded together, you must follow a simple guide:
- First, you need to weld two washing machine tanks together so that after welding they form a single container resembling a large cylinder.
- After welding, clean the weld seams and bring the single tank to a marketable condition.
- The next step is to make one hole at opposite ends of the tank, the size matching the diameter of the furnace outlet pipes. Carefully clean out the holes made.
- Insert the outlet pipe elbow into these holes, but so that the pipes inside the tank are at different levels, as if overlapping each other.
- Seal one connection between the pipe and the tank and clean it. Make the second hole in such a way that it fits tightly around the pipe, which will be directly inserted into the potbelly stove. There is no need to weld the second hole, as it will later be useful for removing carbon deposits inside the tank.
Upgrade with washing machine tanks
This simple improvement will allow you to retain a large amount of heat, which previously simply flew away into the chimney.