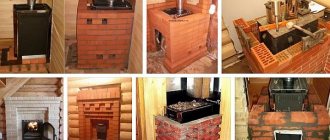
Why should the stove in the sauna be surrounded by stones?
Quite often in any discussion of a Russian bath you can find comments or questions where users express bewilderment about the method of heating the room.
Many people are confused by the fact that the stove firebox is surrounded by a large number of stones. This question arises from a misunderstanding of how a sauna stove works.
It is no coincidence that the firebox is surrounded by stones. This is not a tribute to tradition, but a necessity that must be observed for the proper operation of the stove.
To begin with, we note that the conversation will focus on stoves that are intended for Russian baths. It should not be confused with a Finnish sauna or Turkish steam room. According to standards, a normal Russian bath will require about a ton of stones that will be heated to the required temperature. One hundred kilograms is not so much, don’t be alarmed. Stones have a large specific gravity with a fairly small size.
It is quite difficult to place all one hundred kilograms of stones in a steam room. The more difficult task is to place them so that they heat properly.
If you take the simplest method, as it seems at first glance, and place these stones inside the oven, then imagine what size the oven should be. In addition, it is worth considering that in this situation, those stones that are closer to the firebox will heat up. Therefore, such a scale of bathhouse will not suit us.
But if you line the stove with stones, placing them around the firebox, you can quite easily place a large volume of stones in a small area. In addition, the layer of stones will be uniform - thanks to this they will heat up evenly and warm up the room. In addition, when the stones are placed around the firebox, they will be able to absorb the maximum amount of heat from the stove. In this way, the efficiency of the furnace will be used to the maximum.
With this option, a minimum amount of heat will go into the pipe, and the remaining amount will be used to heat the bath space.
Another reason why to line the firebox with stones is that the hot stove will give off all the hard radiation from the stone wall, and the air will be soft and not dry - which is important for those who plan to stay in the steam room for a long time.
So, at the end of the article, let’s collect all the arguments in favor of why the stove is lined with stones:
-With this method, you can effectively place a large number of stones in a small area and heat them to the required temperature.
-The maximum amount of heat will be taken by the masonry and then transferred to the steam room.
-Thanks to the stonework, the air in the steam room will not be too dry.
That is why any stove in a Russian bath will be lined with stones.
Source
Stone
Most often, this method is used when facing fireplaces, and less often - stoves in steam rooms. When choosing a stone as a decoration, it is necessary to take into account that depending on the rock and type of stone, its thermophysical properties vary within a very wide range. For example, when using attractive and beautiful labradorite as a cladding, it will be possible to achieve the required heat transfer only after prolonged heating of the furnace (i.e., fuel consumption will be significantly increased), since this material has a fairly large heat capacity. On the other hand, a “stone” stove looks more attractive and takes longer to cool down - because it has a high thermal inertia.
If funds allow and imagination works well, you can show your creativity in such decorative decoration
The most suitable rocks for finishing stoves with natural stone are marble, slate, shell rock, sandstone, travertine and tuff. It is undesirable to use granite, basalt, labradorite and some other materials due to their not entirely suitable physical properties.
Recommendations for working with stone:
- First, to better select the required fragments, it is necessary to lay out the material, then use chalk to mark on the floor the outline of the surface to be finished, taking into account its size.
- Line the outlined area with stone. In this case, it is necessary, if possible, to try to ensure that the stones fit together as tightly as possible.
Before carrying out work, it is advisable to “try on” individual pieces on the floor, like puzzlesTip: in order for the mosaic to be the same, the resulting “sketch” can be photographed in order to use the drawing as a reminder puzzle during finishing.
- For the heaviest stones, it is necessary to make hooks from wire, the ends of which are inserted into the seams between the individual stones. When the bottom of the stone is rounded, two hooks are needed to fix it to prevent it from falling out to the side.
- Special glue is applied to the side to be fixed, after which the stone is laid in accordance with the sketch photograph.
- Depending on the glue used, it takes time to completely harden - from 3 to 20 days.
Finishing the stove with stone (video)
Why do you need to line a stove with bricks?
A further description of the process of installing a brick casing is made using the example of a metal sauna stove - Sahara 16. The advantage of this unit is that heating occurs in about half an hour. However, there is no need to talk about uniform heating of the air. Therefore, the air in the room near the stove can be both warm and scalding hot.
In fact, in the bathhouse you need to get soft air, which will provide deep warming and have a beneficial effect on the human body. The reason for such poor heating is the difference in the time it takes to heat the stones and the stove itself.
The metal structure heats up to the limit, but the stones themselves do not create the required steam. Solving this problem turns out to be quite simple: you need to line the metal stove in the bathhouse with bricks in order to improve a number of operational characteristics.
Advantages of metal furnaces
A metal sauna stove is a fairly common choice. Compared to other alternative options, it has a whole list of advantages:
- Ease of installation. You can make such a stove with your own hands.
- Easy to use.
- Possibility of quick melting.
- Good traction.
- Economical fuel consumption.
- Affordable price.
- Good performance.
But in order to appreciate all these positive qualities, you need to learn how to use the stove correctly. Of course, a stone stove for a sauna is ideal. But it takes a long time to melt. Before it starts giving off heat, you will have to burn a lot of wood. Not everyone is happy with this scenario. In addition, a brick structure will cost several times more than a metal product covered with stone cladding on the outside.
To get the full benefit from your stove, you need to know how to use it.
It will not be possible to build a brick stove for a bathhouse without having the initial skills. It is important to take into account a number of nuances here. As for metal products, you can buy them ready-made. It will be possible to line the stove in the bathhouse with bricks on the outside without extra financial costs. You can create a stone apron around such a stove.
By itself, it will play the role of a kind of highlight in the interior. An apron is also required to improve productivity. This will also provide comfort to people in the immediate vicinity, because it is easier to get burned from stone or brick than from metal.
There are certain parameters that a metal sauna stove must have. First of all, this concerns its dimensions. It should not be allowed to clutter up the space. Other requirements:
- compliance with fire safety standards;
- not too high power.
In this video you will learn the pros and cons of a metal stove:
Large structures cannot be controlled by selecting them in accordance with your preferences and temperature conditions.
The place where the object stands is also important. In accordance with generally accepted standards, the metal unit must be located at a distance of at least 15 cm from wooden floors. It is better to add fuel in small quantities, but often.
What should be the brick and mortar for masonry?
For laying, you can only use solid refractory bricks and in no case standard construction bricks. The brick can have either a regular red surface or an original textured one, which is used for decorative purposes.
Typically, the lining of a bathhouse stove with bricks is carried out using the following types of binder mixtures:
Construction of the foundation
The strength of the structure and how long it will last depends on the foundation. It also happens that the old foundation fully meets the requirements. But if this is not the case, it is better to spend time and effort building a new structure. It should be taken into account that its weight after finishing work will increase significantly. Under no circumstances should you connect the foundation for the furnace to the main foundation of the building. The base should not be subject to deformation.
If the total mass of the furnace with brickwork is no more than 700 kg, no foundation is required. If there is an old metal stove in the room, it will need to be dismantled. After determining the location of the object, draw a rectangle along the floor surface with a marker. Boards are cut according to its contours. They need to be put aside for a while and work on arranging a pit 40 cm deep. For this you will need a bayonet shovel. Form the formwork necessary for the foundation.
Floor boards and pieces of plywood are suitable here. They must be connected and placed inside the recess. After this, waterproofing is started. This is one of the most important stages in the work. In the presence of wet and soaked soil, the foundation will be constantly exposed to adverse effects and will sooner or later collapse.
As soon as the formwork is waterproofed and fixed, a cushion is installed. It will retain moisture. Pour medium-fraction crushed stone and sand onto the surface of the pit, pour in cement mortar and lay a metal mesh. Level with building level. Next, the foundation is left to cool. This process may take up to 3 weeks.
Algorithm for laying rows of bricks
The masonry is created in a standard way with the placement of bricks in a checkerboard pattern: each next row is shifted by half a brick. To save money, you can place the brick for lining a metal stove in a bathhouse on an edge, but in this case the wall will be thinner and its efficiency will decrease. It is best to lay the brick completely across the entire width.
It’s worth explaining right away that lining a sauna stove with brick is done in such a way that a gap of 1 to 10 centimeters thick is maintained between the screen and the stove structure. Naturally, when choosing a thickness value, you can only focus on the availability of free space in the room.
If the gap is less than the designated range of values, then the furnace will become excessively hot during operation, which will reduce its service life, and if it is larger, then the brick will not warm up well enough.
During the process of laying bricks, each product must first be soaked in water, which will significantly improve the adhesion of the mortar used. The joints in the masonry must be grouted using the same solution.
In some rows, small holes should be left to ventilate the gap between the brick screen and the walls of the oven. Usually four small windows are enough for each of the brick walls.
Speaking about how to line an iron stove in a bathhouse with bricks, it is worth considering the method of strengthening the masonry. To do this, cut metal mesh for reinforcement is laid on even or odd rows of bricks.
However, this precaution is not necessary, since properly executed masonry will last a very long time without reinforcement.
How to clean masonry from excess mortar
After covering an iron stove in a bathhouse with bricks, you need to wait a day until the solution initially hardens, and then begin removing stains. Although the stove is essentially a technical structure, it will look clumsy against the backdrop of the beautiful interior of the bathhouse if the brickwork is dirty.
You can use a regular drill with a brush attachment for cleaning, but only to remove excess, but stains can be washed off with a stiff brush and soapy water. As a result, you will get not only an effective, but also a very beautiful sauna stove, with which you can take photos and post them on specialized construction sites!
Basic rules for working with tiles
Since tile is one of the most popular materials for cladding a stove (not counting brick and plaster), I will dwell a little more on the nuances of working with this material.
- Prepare the surface. Clean the walls of the heater from dust and dirt. Deepen the seams between the bricks by 5-10 mm. Wipe the entire surface of the oven with a damp cloth.
- Mount the frame. To prevent the finish from cracking due to sudden changes in temperature and due to the unequal linear expansion index of brick and tile, it is better to install a frame in the form of metal corners. The corners are quite thin, so they will not protrude beyond the masonry. Complete the preparatory stage by attaching a metal mesh to the walls with snipes.
- Plastering. Before applying the plaster, you need to light the stove so that its walls warm up to about 50 degrees. Moisten the hot surface generously with water, and then apply the plaster solution over the metal mesh from top to bottom.
- Tiling. Proceed with this stage only after the plaster has completely dried. Moreover, start finishing from the bottom corner. Grind the seams after the adhesive has completely dried.
For a double-circuit oven with uniform heating, you can use any finishing material and any solution. But if you have a single-circuit heating structure with uneven heating, you need to choose the solution wisely. A strong cement composition is not always suitable, since the solution can tear the cladding due to movement in the brickwork. Weak cement will not work either, since the tiles simply will not stick to it. The optimal solution is silicone sealant, which retains mobility and at the same time holds the cladding well.
After grouting, clean the tiles from dust and adhesive residues. Cover the tiled walls with heat-resistant impregnation.
If the oven gets very hot, you will most likely have problems with the cladding. This is due to the fact that brick walls and tiles have different rates of linear expansion when heated. This will eventually cause the facing layer to separate. Moreover, neither expensive adhesives, nor wrapping the heater with mesh, nor additional frames will help solve the problem.
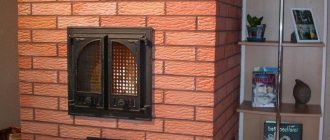
There are several key tasks in arranging a bathhouse. The main one is the installation of the stove. The comfortable atmosphere in the room and the effectiveness of the bath procedure depend on how quickly this object heats up. Both cold and overheating can have a negative impact on the health of the owners. You can line an iron stove in a bathhouse with bricks to preserve heat.
Advantages of metal sauna stoves with a brick casing
A metal sauna stove lined with brick has the following operational advantages over open structures:
An increase in the heating time of the entire complex can be considered a disadvantage, but in fact, even an hour is a fairly short period of time for such a procedure as lighting a bathhouse. In a modern bathhouse there is somewhere to spend this hour. You can arrange gatherings in the relaxation room, or prepare everything you need for tea after visiting the steam room.
The article describes in detail the process of creating a brick screen for a metal furnace. If you act correctly, the performance of the heating unit will increase, and visiting the bathhouse will become a much more enjoyable process. If you wish, you can entrust the construction of the screen to a specialist who will take responsibility for all stages - from purchasing the necessary materials to their installation and putting the furnace into operation.
Leave feedback:
How to properly brick a metal stove in a bathhouse
A bathhouse is an obligatory attribute of a country house, cottage and even dacha. Many people try to make a small, but still real bathhouse or sauna in order to relax in it on the weekends and relax. Since rarely anyone bothers to lay a stove, metal finished products are mainly installed in the bathhouse. There is no doubt, these are high-quality units that cope well with the assigned tasks, but are fraught with great danger. We will tell you how to properly brick a metal stove in a bathhouse so as not to get burned when using it.
Why cover the oven with bricks?
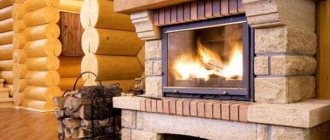
It is unlikely that anyone will argue that a brick stove for a bathhouse is the best option. Such a heater gives a milder temperature, pleasant steam, retains heat for a long time and is externally more suitable for the room itself. But such units have two big disadvantages - price and time for kindling.
If we talk about the price, even a small oven completely made of brick will cost at least 15 thousand rubles, taking into account the cost of materials and work. As for the time, it will take 4-5 hours to heat it up completely and warm up the steam room. It is clear that many are not satisfied with this option and have to look for others. A ready-made metal stove will cost up to 5 thousand rubles, and it heats up in just a couple of hours. Moreover, you can make such a heater yourself, without much experience and knowledge, and then the savings will be even more obvious.
But metal has a number of disadvantages that are not typical for its brick counterpart:
All these problems can be avoided if the stove in the bathhouse is properly bricked.
Some metal stoves have a convection casing installed, which reduces radiation and increases comfort, but in general, even with this device, metal is quite dangerous for a bath.
How and what to cover a stove in a bathhouse
Objectively, you can use any brick, since they are all safe even when heated and accumulate heat to a greater or lesser extent. It could be:
Sand-lime brick
It is often used for cladding the external walls of buildings due to its durability, strength, resistance to precipitation and temperature peaks. But for contact with metal, this is the worst option of all those proposed above. Sand-lime brick is made from slaked lime, which reacts extremely negatively to the temperature range in the bathhouse. Silicate begins to deteriorate after the first year of operation. In addition, it is very unpresentable in appearance and requires decorative finishing.
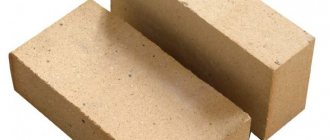
Fireclay (fireproof)
This is the best brick for a bathhouse, which fits perfectly both in composition and in its reaction to high temperatures, but its appearance also leaves much to be desired. Requires additional decorative cladding.
When choosing between fireclay and ceramic material, give preference to the latter. With the same price and characteristics, ceramic will become a decoration of the bathhouse in itself.
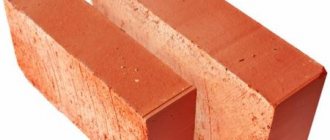
Red hollow
Not the worst, but not ideal either. Here the “pros” are the price and visual appeal, the “cons” are the low heat accumulation compared to a full-bodied one.
Ceramic red solid
An ideal option for lining a sauna stove with brick, since it combines all useful characteristics, including resistance to temperatures over 500 degrees, aesthetics and, most importantly, price.
How else can you line a brick stove in a bathhouse?
Some homeowners use more expensive, but no less high-quality materials. For example, granite or marble. Both options are very presentable, but also incomparably more expensive than ceramics.
Masonry mortar
In general, the requirements for the mortar are exactly the same as for laying a stove. It is best to use fireclay (fireproof) clay that is resistant to temperature changes. It will not crack over time, if laid correctly, it will not peel off and will not allow carbon monoxide to enter the room.
The only condition for choosing such a solution is to control the fat content. Fireclay clay is, in principle, a very fatty product, which can neutralize sand. Typically, a composition of clay and sand is mixed in a ratio of 1 to 3 so that the solution is strong, dense and plastic.
In order to line an iron stove with bricks in a bathhouse, experts recommend adding M400 cement to the solution in proportions of 1 to 4. Even at such high temperatures, cement will only increase the strength of the protective casing.
Recommendations from the experts
Brick kilns
Let's start with traditional brick ovens. Of course, the ideal option is to use facing refractory bricks; in this case, neat masonry does not require additional decoration. However, let’s be realistic: many stoves in use in private homes are already decades old, and reinstalling them is not a cheap undertaking .
In addition: high-quality facing bricks made of kaolin clay are also, to put it mildly, not cheap. The price of one product of 50-60 rubles will inevitably force you to look for other solutions.
So what are the alternatives?
Plaster
The simplest way to give an old stove a decent appearance is to plaster it, leveling the surface and filling in seams, chips and other minor defects. Since we are talking about a stove that gets quite hot when lit, a special approach is needed here. (See also the article How to finish a brick oven with your own hands.)
Plaster mortar is a mixture of one part medium-fat clay and one part sand. It is diluted with salted water to the consistency of thick sour cream and applied to the walls of the oven with a regular spatula.
Attention: the surface of the brick must be moistened before coating. The plaster will stick much worse to a dry oven.
Before plastering the entire stove, test the solution on a small area. After drying, the surface should not get dirty or crumble.
If this happens, there are two possible solutions.
- Re-knead the solution using richer clay or less sand.
- Instead of salted water, use skim milk (without cream). Milk protein casein is an extremely reliable organic glue that retains its properties even after calcination.
Whitewash
From the point of view of implementation, whitewashing is an even simpler solution.
The stove is plastered and whitewashed.
However, even such a simple DIY stove finishing has its own specifics. Lime is not resistant to heat; all kinds of synthetic paints - and even more so. So how to decorate the stove?
The recipe for permanent whitewash has been known for many centuries. It uses the same skim milk as a binder and crushed chalk. Whitewash is applied 2-3 times with a wide brush and lasts for at least 10 years.
If you are gifted with artistic talents, you don’t have to limit yourself to simple one-color painting. By adding heat-resistant pigments (blue for linen, potassium permanganate or even ordinary watercolor) to the whitewash, you can paint the stove at your discretion.
Tile
Finishing the stove with low-quality tiles intended for walls or floors is, of course, not a good idea. Given the significant heating of the surface, its service life will not be long. (See also the article Features of finishing stoves with ceramic tiles.)
Specific materials will be required.
- Terracotta tiles are kaolin (white heat-resistant clay) fired at a temperature of about 1200 - 1300 degrees. It has a very moderate coefficient of linear expansion, is not afraid of heating in the range of up to 1100 C and is undemanding to care: absolutely all cleaning products are applicable, including acidic and abrasive ones.
The lining of the heating and cooking stove is made of terracotta tiles.
- Finishing heating stoves with clinker is no less popular. The raw material for clinker tiles itself has less heat resistance than kaolin; however, thanks to sintering at 1300 C, clay particles form a very strong monolith, in no way inferior to a solid stone.
Attention: tiles no larger than 12x12 centimeters in size are used for cladding. The reason is different linear expansion coefficients for the lining and walls of the furnace. Large tiles will fall off much faster due to greater displacement during heating.
Due to the peculiarities of the temperature regime, it is clearly better not to use the tile adhesives we are used to.
What to replace them with?
- Already familiar to us clay-sand mortar. It does not crack even with strong heat.
- Factory-prepared heat-resistant adhesives (“Plitonit Superfireplace” and analogues).
A natural stone
Finishing the stove with decorative stone of natural origin is quite possible and enjoys deserved popularity.
Stove-fireplace finished with natural stone.
As always, there are a couple of nuances.
- The stone is pre-laid out on a surface template and selected according to size. Then it is transferred to the walls of the furnace in the same order, with the same relative position.
- Since the stone has a fairly smooth surface, it is better to use heavy artillery to lay it - mastic based on stone flour. The author testifies based on his own experience: any cladding fixed with this mastic, after it hardens, is removed only with a fragment of the wall. Resistance to temperatures up to 1300 degrees completes the picture.
Heat-resistant mastic based on stone flour.
Useful: finishing stoves with artificial stone is undesirable. At least, highly heated surfaces: the heat resistance of all its types without exception is limited. But decorating around the stove with its help is a great idea: a massive stove will improve the room and protect the walls from dangerous overheating.
Finishing the stove rough is also an important and responsible process.
Here, artificial stone is used to decorate the wall behind the stove and the floor underneath it.
We line the metal stove with bricks in the bathhouse. 7 secrets of successful work
“The soul of any Russian bathhouse is a broom, and the heart is a stove!”
Hello lovers of hot steam and ordinary inquisitive readers!
On this Spring holiday, first of all I want to congratulate beautiful women! Let all your dreams turn into reality! And remember that this is true happiness. (quote at the end of the article).
Today we’ll talk about how to line a metal stove with bricks in a bathhouse. Of course, an iron stove has its advantages, the main one (and perhaps the only one) is fast heating. However, this is not such a virtue, but quite the opposite. For those who don't understand, I'll explain:
The first disadvantage of an iron sauna stove is its low inertia. It heats up quickly and cools down even faster. This leads to increased fuel consumption and worries about replenishing them.
The second disadvantage is uneven thermal comfort. You go into a steam room somewhere in the country, and there is scorching heat from the stove, you sit on a bench, your head is hot, and a chill flows down your legs from the dressing room. This is similar to the feeling created by a car heater turned on in a frozen car. Your face already feels warm, and your feet are still frozen to the pedals.
The third drawback is the danger of fire (since the walls of the “iron heart” have a temperature an order of magnitude higher than brick ones), and the consequences of getting a burn from hot metal with a temperature of several hundred degrees are much more serious than from those lined with brick.
The red-hot walls of a steel furnace “work” in the short-wave spectrum of infrared radiation, which leads to increased “burning out” of oxygen. The result is headaches, increased blood pressure and, instead of vigor, lethargy.
And lastly, an unlined stove burns out faster, and sometimes the appearance is rough. So, 7 main points that should be taken into account when doing this creativity.
Tiles (including ceramic)
Glazed tiles have an attractive appearance; maintaining their surface in proper condition is not difficult. A significant disadvantage of this finish is that during use, the geometric parameters of the stove change during heating and cooling. This means that if installed incorrectly, the tiles will either crack or come off completely. To eliminate such shortcomings, tiles are applied exclusively to plastered surfaces. The firebox must be lined, that is, the inner surface of the furnace is lined with refractory baked bricks, which leads to a decrease in the temperature difference across the outer surface of the furnace.
To cover the stove, you can use both ceramic and tiles: both types of finishes will be an excellent decor for the stove
Recommendations for finishing the stove surface with tiles:
- To reduce the influence of temperature changes, it is advisable to use smaller tiles.
- On the plastered surface, using self-tapping screws and wide washers, you need to attach a metal mesh with 10x10 mm cells.
- To attach the slabs, you should use special adhesives designed for use in such conditions. The price of such adhesive compositions is higher than usual, but they have the necessary properties for operation under the required temperature conditions, while possessing sufficient ductility.
- Grouting the joints between the plates can be done with a regular mixture with the addition of a selected inorganic dye.
When working with tiles, the main thing is to be careful when laying them.
Video: example of decorating a stove with tiles
Surface marking
It must take into account the “backlog” for the brickwork.
Before laying the first row, you need to measure the distance from the walls of the stove to the bricks. By the way, if you bought a factory-made stove, then the installation instructions should indicate the tolerances for the gaps necessary for air circulation between the stove and the masonry. The approximate range is 5-10 cm. This is an important point that determines the efficiency of heat transfer.
Advice: If the oven is factory-made and equipped with a convection protective screen for the oven (casing), it is recommended to remove it. Now, this brickwork function.
Masonry mortar
Durability depends on its quality.
Sand . It should be fine without impurities and poured through a sieve with a mesh of 1.5 mm.
Clay. Pour into a container and fill with good water (not musty), then stir. After kneading, the water should cover the clay. The mixture is left to “sour” for 2-3 days. Then filter through a sieve, rubbing out lumps. Add a new portion of fresh clay to the container and soak again. And so on until the required volume of paste-like consistency is formed.
Clays have different fat content. Particularly oily ones are “neutralized” by adding sand (otherwise they dry out and crack). The proportion of added sand ranges from 0.5 to 1.5 by volume. A good solution is to use fireclay clay. Some craftsmen add heat-resistant glue. However, I will not recommend it because the results may vary.
The resulting solution should easily slide off the surface of the tool (trowel or shovel). Try putting a layer of mortar on the brick, and then after 5 minutes. lift. If the bottom brick stays in place (doesn't come off), then the mixture is correct.
Bricks for lining furnaces
Not everyone is suitable for a heater. Sand-lime brick is not suitable. It will collapse very quickly due to temperature.
If you want a long-lasting stove, use a fireproof one (made from fireclay clay). It is more expensive than the usual one (red), and it doesn’t look very good. But for decorative masonry, the outside can be lined with ordinary brick with a textured surface (hollow brick will be somewhat preferable, since it accumulates heat better). There are two types of fireproof: hollow and solid. Choose a full-bodied one.
But if fireclay is not affordable, take red (and also full-bodied).
Testing artificial stone in a muffle furnace
Artificial stone is undoubtedly suitable for cladding fireplaces. The fireplace does not heat up; you can even use gypsum stone there. But we will now find out whether cement stone can be used for a furnace with fully heated walls. Tests in two stages: 700 C and 300 C.
Cement stone with mesh and glue in an oven at 750 C
Prepared a sample
Place the sample in the oven
Oven temperature
Everything looks intact, but it’s not.
The mesh crumbles in your hands
The longitudinal, thicker fibers retained some of their strength, much like sewing thread. The transverse fibers have completely lost their strength and crumble when touched.
The stone is covered with small cracks
Furnace lining with bricks
The craftsmen say that the stove must be covered with half a brick.
This is the optimal solution. You can do it in brick, but it will take longer to warm up. The masonry is done in such a way that the bricks must be tied. Each top one should lie on the two bottom ones, overlapping their vertical joint in the middle of its length. The same order is followed when bandaging the corners.
If you have doubts about the foundation, you can ensure the strength of the masonry with reinforcement mesh. Just cut the pieces to the desired size in advance. It is laid on the surface of each new row, but so that it does not protrude beyond the boundaries of the masonry.
You cannot tie fireproof and ordinary ceramic bricks together. They have different coefficients of thermal expansion, which leads to destruction of the masonry. Good quality fireclay bricks will last for 5-7 years. Then repairs will be required.
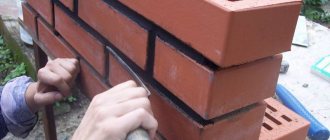
The oven is lined in rows. First, each brick is laid out dry. In this process, adjustments are made (trimming, trimming) so that the vertical gaps are within 5-10 mm and ensure the evenness of the outer row, the verticality of the corners and the symmetry of the smoke and ventilation ducts.
Each brick is numbered and a sequential diagram of the future masonry is formed. After numbering and fitting, the ceramic bricks are soaked in ordinary water. This is done until the release of air bubbles stops. After which they begin laying.
Fireclay brick, immerse in water for a moment. The task here is not to moisten, but to wash away dust from the surface. It must be laid quickly, since fireclay quickly absorbs the moisture of the solution. During work, a plumb line and a building level are used.
Laying stone on the surface of the furnace
The back side of the stone will be dusty after brushing. It should either be coated with a primer or glued “to scratch”.
Apply glue
We remove the applied glue
Then apply again. This way the glue adheres securely to the surface of the stone.
Next, we place the pebbles on the stove wall under a level, starting with the corner elements. The stove is not a large, flat wall of the room; the stove has four corners, which makes the work a little more complicated. We use wedges to level the stone.
Below the first row we leave space for future tiles
Stone tiles have a large error in size. We even out the gaps with wedges, choosing the middle position. If possible, we use a disk to push the stone against the concrete.
Selecting the middle position of the stone
Ventilation windows for convection of air leaving and entering the oven
This is an important option that allows you to stabilize the air flows “washing” the furnace and improve the uniformity of heat transfer. If it is round (stove), then the ideology of ventilation ducts is preserved. Try to arrange them symmetrically, on three sides (conditionally), with two windows at the top and bottom, as it would be approximately in a rectangular masonry.
Classic option: two windows in the second row from the top and the second row from the bottom. So, on each side. The lower openings will provide suction of cold air, and the upper ones will provide the release of heated air. In addition, circulation will have a beneficial effect on the metal of the furnace.