Drawing with order
Designed by the famous stove master of the last century, V. Volodin, the combined heating and cooking stove-baby, with a minimum occupied space of 0.47 m2, allows not only to fully heat a room of 30 m2, but also:
- Cook;
- Dry vegetables, berries, mushrooms, herbs;
- Use for drying clothes and shoes.
A distinctive feature of the design is a separate hood for the brewing compartment. The smell from cooking food or drying clothes does not penetrate into the room.
The stove is not very economical in fuel consumption (based on firewood) - 4–5 kg per firebox. Capable of retaining heat and maintaining a comfortable room temperature for 6–8 hours.
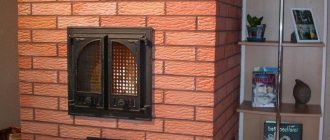
The finished oven looks like this:
KROKHA OVEN, version N3 improved
IDEAS FOR THE HOME > PROJECTS OF STOVES, FIREPLACES, MANGALS
This heating and cooking
stove is a crumb, version 3 (improved).
was published in the magazine “Dom” No. 10 for 2008. The author of the article is A. Sushkov from St. Petersburg. The furnace has good heating in the lower part, and in the upper part there is a “hood” that slows down the cooling of the furnace mass after firing. Among other things, the design provides for a “summer” operation, which makes it easier to light the stove and allows you to use the stove for cooking without heating the room. The stove is equipped with a single-burner cast iron stove. The firebox and cooking chamber in this version of the stove are located on the wide side of the stove. The depth of the firebox is 50 cm. When building a furnace, the best available brick must be selected for the firebox, since there is no additional lining here. This is understandable, because this stove will not be heated every day, but only from time to time, when you visit the dacha and in appropriate weather. The stove has dimensions at the base of 64x77 cm or 2.5x3 bricks, and its height is only 203 cm. Moreover the height can either be reduced or increased depending on how much the ceiling in your home allows. At the same time, we should not forget that at least 35 cm must remain from the top of the stove to the ceiling. With the indicated dimensions, the heat transfer will be approximately 1760 W with a one-time firebox, and 2940 W with a two-time firebox. The size of the heated room at this power will be 18-22 m2.
MENU
×
- PROJECTS: FIREPLACES, STOVES, BBQ, BBQ
- Brick stove for a bath
- Simple heater stove for a bath
- Heater stove with water boiler
- DIY barbecue in the gazebo
- Barbecue complex for a summer residence part 1
- Barbecue complex for a summer residence, part 2
- Barbecue complex for a summer residence part 3
- Making a barbecue with a kitchen stove
- How to calculate the heat loss of a room
- How to calculate the heat output of a furnace
- Chimney diagrams
- Mini fireplace for a country house
- Corner fireplace “Annushka”
- Double bell oven
- Double-bell oven with oven
- Heating and cooking stove 2.5 x 6 bricks
- Heating and cooking stove 1020 x 770
- Heating and cooking stove for 65 70 m2
- Stove with water heating boiler
- Oven with drying chamber
- Heating and cooking stove "Shvedka"
- Stove "Swedish" for 2 floors
- "Swedish" stove with a stove bench
- Shvedka stove with three combustion modes
- Swedish stove with fireplace
- Oven crumb options 1 and 2
- Baby oven option 3
- Small-sized heating stove 2x3
- Heating stove 1880x640 “Ya.G. Porfiryev"
- Heating stove 51x89 cm “V. Bykov"
- Heating stove 51 x 140 cm “V. Bykov"
- Heat-intensive furnace
- Compact stove with fireplace
- Small stove with fireplace
- Stove with fireplace “E. Doctorova"
- Fireplace stove for a summer residence
- Homemade long-burning stove
LIKED THE OVEN PROJECT?
YOU CAN BUY ITS DRAWING IN WORD and PDF FORMAT FOR ONLY
75 RUBLES
! OR
ALL 35
PROJECTS OF STOVES, FIREPLACES, BBQ AND BBQ, DRAWINGS + ORDINARY LAYOUT FOR ONLY
490 RUBLES
!
BUY A FULL SET - 490 RUBLES (click - buy, then place an order)
BUY THIS PROJECT FOR 75 RUBLES (click - buy, then place an order)
Still have questions? Feel free to ask them, we’ll solve them!
Choosing a location for the oven
Despite its very modest size, the stove is ideal for heating rooms with an area of 14–50 m2. It cannot be called the most economical in terms of fuel consumption, but 3.5–5 kg of solid fuel is usually enough for the stove to fully warm up and begin to heat the room.
Such an oven heats up evenly on all 4 sides. This must be taken into account when choosing the place where it will be installed. In wooden buildings with fire-protected walls, the distance from the stove to the wall of the house should not be less than half a meter. And also you should not install the stove in the center of the room. With such an installation, the circulation of heated air will be extremely unfavorable, and the corners of the room will freeze.
The best option is to install the stove to the right or left of the front door, at a distance of at least 0.5 m from the door jamb. In this case, the cold air entering through the door will not spread along the floor across the entire area of the room and create dangerous drafts.
Oven Kroshka
A convenient, beautiful and practical stove is the dream of every country resident. For absolutely all fans of garden beds or country holidays, a small stove was invented. Positive qualities of the hearth-baby:
- Small size;
- Excellent heat transfer ( 1700 kcal/hour );
- Low fuel consumption; you can use chips and firewood of poor quality . which is great for a summer residence;
- Cooking;
- Quick construction with your own hands: the first kindling can be done a few hours after the installation work (but for a short time, with paper or wood chips);
- Light weight, the hearth does not require a foundation . If the oven is larger and very small in size, then it is better to make a foundation.
The arrangement of the oven is the most common and can easily be done independently. The ideal dimensions for a summer house are height 1.9 m, width 0.75 m, depth 0.63 m.
To increase its capabilities, the baby can be improved. Add a cast iron stove, exhaust system, oven. She will become an excellent helper at her summer cottage, especially since baking crumbs with her own hands is very profitable in terms of money.
- With a long, regular hearth, there is no need to preheat the oven during cooking. to start cooking immediately when lighting, the heat will warm the stove and escape through the pipe. The oven should not get hot.
- To prevent steam from dishes from entering the room, an exhaust system should be designed when ordering.
- When using an oven, two modes can be provided - hot air flows through the channels to the oven, or air enters through the kindling stroke. In another option, the temperature is higher, and it is possible to remove the samovar door.
Material for construction
Depending on the area of the room and the functional purpose of the small stove: heating, heating-cooking, or a stove with a heater for a bath/sauna, the number of red ceramic bricks can vary from 210 to 370 pieces. Fireclay bricks (for laying out the firebox) may require from 16 to 73 pcs. – also, depending on the project.
In addition to the brick you will need:
- Fireclay clay (fireproof) or red local clay – 50 kg;
- Construction sand – 10–15 buckets;
- Doors for the blower and firebox;
- Grate;
- Valves – 2 pcs;
- Reinforcing rod (d 8–10 mm) – 10 linear meters;
- Cement grade M300-M400 – 1 bag;
- Ruberoid – 1 linear meters;
- If the stove is planned to be improved - plastered or tiled - the need for finishing material is calculated based on the area of the external walls of the finished stove.
Materials for a mini stove
Of course, when thinking about building a mini stove, first of all, you need to choose the right materials necessary for this.
The base will be brick, so let's look at which one is used and where:
| This brick will be indispensable when laying the firebox. After all, there will be direct exposure to fire. And if you use coal for the fire, then only this material will withstand this temperature. If you use firewood, then you can simply use ordinary material. |
| The price of clay brick is not high, but the largest quantity of it will work. It cuts perfectly with a grinder and is durable. It has good performance, but is not suitable as a front material. |
| The self-name says that this material is intended for exterior decoration. Therefore, this will be an excellent choice. There are also different brick configurations that will help make corners and arcs. You can also choose the desired color. |
Attention: If you are limited in size, then you can do the cladding with materials other than the facing material. And just apply the tiles. Clinker is especially suitable for these purposes.
So:
- To build a mini stove, you will need about 60 pieces of red stove brick, you also need to purchase 40 fireclay bricks, you will also need a clay mortar of about twenty liters, which is usually enough to hold the masonry together.
- As a rule, these materials are enough to make it possible to build a mini-stove, which in turn will be of high quality, reliability and durability.
- You will also need special stove tools, for example, a combustion door, a comfort stove; it is best to purchase cast iron grates, as they are durable and reliable.
- For a stove, it is best to use a metal valve; in general, the design of the stove is simple, which means that if you really want to build it yourself, then you will succeed.
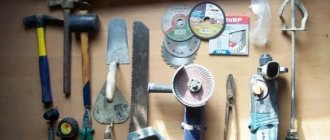
Tool
A small stove is extremely simple to install, so any owner of a building can try himself as a stove maker. You just need to stock up on some simple tools in advance:
- Pickaxe;
- Hammer;
- Level;
- Plumb;
- Mastercom;
- Trowel - for external corners;
- The rule.
The skills of chipping a brick of the required length or chipping it at an angle come with experience. Therefore, in order not to experiment and not waste bricks purchased individually, it is better to use an angle grinder (grinder) with a disc for brick or concrete. This will allow you to get perfectly even workpieces, and not have to worry about trimming protruding uneven ends.
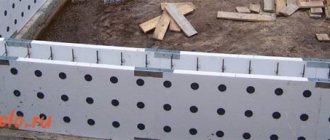
Foundation arrangement
By building a foundation, you will provide your future structure with a reliable foundation. If you use any unprepared floor covering, then over time you cannot avoid its deformation. This will lead to damage to the integrity of the masonry, which may require complete disassembly of the stove to restore. However, the small mass of the device cannot but affect the requirements for the foundation; they are much less stringent than for traditional models.
Good to know: How to build a Russian housekeeper stove, Podgorodnikov model
A pit is necessary, but its depth can reach only 45 cm. The pillow is made of sand, which must be compacted tightly. You can use water for these purposes, only then you will have to dry it. The foundation volume is reinforced with metal wire and filled with cement mortar. To prevent cracks from forming during the long period of cement hardening, its surface is covered with porous material and gradually wetted over the first few days.
Foundation structure
Despite its modest size and light weight, a small stove requires a foundation. It can be done unburdened - just remove the fertile layer of soil.
But, it is imperative to bring the cement pouring plane “horizontally”. This is important because the furnace support area is very small: from 0.47 to 1 m2. At a height of 2000-2200 mm, the slightest misalignment of the base can lead to the collapse of the stove.
The arrangement sequence is extremely simple:
- A hole is dug, 300=450 mm deep. The perimeter of the pit should exceed the perimeter of the furnace by 100-150 mm.
- A layer of sand 100–150 mm thick is poured onto the bottom.
- The sand is moistened and compacted.
- The next layer is broken brick or construction waste (stone) – 200–250 mm.
- The top layer is fine crushed stone (fraction 5–20 mm).
- After this, formwork is arranged (plywood, boards, slate, drywall scraps, metal sheets) - whatever you can find. The height of the formwork should be 50 mm higher than the level of the finished floor, so that there is no leakage of cold air from the subfloor.
- Pre-cut reinforcement bars are laid out on the crushed stone and fastened with annealed steel wire or welding.
- The solution for pouring is prepared from a cement-sand-crushed stone mixture in the proportion: 1:1.6:3.2. After pouring, the foundation slab is allowed to “mature”. In the first week after pouring, the surface is moistened by covering it with sackcloth or burlap, and watering it with water as the fabric dries. At the end of the first week, the fabric can be removed and the surface of the foundation slab can be covered with polyethylene or roofing felt.
Full strength gain occurs 30 days after pouring.
Preliminary work
Tools for work.
Choose a suitable place for the baby. To prevent heat loss, the rough walls should not come into contact with the outer walls of the house. It should not be placed in the center of the room, as this will not promote uniform heat flow.
A baby does not need a powerful foundation like a large stove. It is possible to build a brick kiln without a foundation. A rectangular hole is cut under it using a grinder. If the floor is equipped with water or electric heating from the inside, then the screed must be removed. The hole must be deepened by 350 mm and ensure that the hole has as smooth edges as possible. Then they begin to create the pillow. To do this, the hole is filled with sand to a height not reaching 70 mm from the boundary of the floors, filled with water and left. Wait a few days until it dries completely. Then the pit is covered with roofing felt or roofing felt sheets.
Next you need to make the sheathing. You can take large cross-section rods and lay them in one layer. But experts recommend making it two-layer, using thinner reinforcement. Place 7 rods with a length of 800 mm at a distance of 100 mm from each other. 8 rods 700 mm long are placed on top strictly perpendicularly in the same way. They can be secured with wire or welding. Next, a second similar crate is placed in a similar manner. At the end, 9 rods are taken with a length of 250 mm. 4 pieces are placed in the corners of the frame, 4 on each edge and 1 in the center. The net is hidden in a cushion of sand.
Foundation diagram for a brick oven.
Cement mortar is prepared for the foundation. The hole is filled with it, not reaching the floor location by 50 mm. This condition further prevents cold air masses from entering the lower part of the stove. When the concrete is completely poured, it needs to be pierced with reinforcement or a special tool to get rid of air. This procedure helps to increase the strength qualities of the foundation.
Next, the concrete must dry completely for at least 30 days. At 1 week you need to water the solution with water so that it does not crack. Cover the layer with burlap and pour water on it. After drying, remove the burlap and replace it with aluminum foil so that its reflection is at the top. This concludes the preparatory work. Next comes the furnace laying diagram.
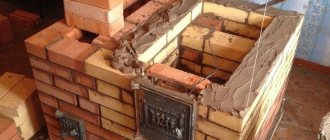
Masonry
Before starting masonry, do not forget to cover the concrete foundation slab with sheets of roofing felt, placing them crosswise. The edges of the roofing material should protrude beyond the perimeter of the foundation by at least 50 mm.
The layout of each subsequent row is done “dry” - that is, laid out in accordance with the diagram. If necessary, the brick is chipped or cut with a grinder. Only after this the solution is applied and placed in place.
Given the simplicity of the design, even an inexperienced craftsman will take 1–2 days to lay a small stove.
A small stove is the most economical option for creating comfortable conditions in a room not used for permanent residence.
Foundation
For this small stove you will need a base 5-10 cm wider than the size of the future side elements and double waterproofing. The structure must communicate with the wall chimney through a root or cap pipe.
So, to build a foundation you will need to dig a pit to the depth of solid ground. Then it is filled with broken bricks and rubble stones, and the top is filled with M-400 cement in a ratio of 1:5. The base should be completed 1-2 rows to the floor level.
Furnace laying diagram
The popularity of the model is proven by the fact that detailed instructions for carrying out construction work are always freely available on many resources. Additionally, it is possible to make certain changes without worrying about performance disruption. The basic design is quite simple, so you can experiment even without proper work experience.
The finished project contains a drawing from which it is easy to estimate the external dimensions of the device and determine its place in the room. With the help of ordering, you can begin to cock the structure.
Order example
The first row should be laid out so as to ensure horizontal alignment on the formed plane. The second row is duplicated taking into account the presence of a dressing. In the third row, an ash pan door is installed, playing the role of a blower, and cleaning doors are installed. They have steel mustaches for fastening, but with the help of an asbestos rope it is necessary to ensure the tightness of the fastening. The perimeter harness is wrapped around the door body in 2-3 layers. The space between the ash pan and the chimney wall is filled with sand after the formation of the channel is completed.
In row 5, the ash pan is covered by installing a grate. For it, you need to cut out a seat in the bricks with a grinder. The dimensions of the recess should be slightly larger than the dimensions of the grille to provide it with the possibility of thermal expansion.
Row 6 is where the metal oven body is installed. The housing and the future stove are heated with hot air. Rows 7-9 do not differ in features, since the construction of the furnace walls is underway. In the 10th row we install a hob and form a ceiling for the firebox. A detailed diagram shows that in rows 11-16 a niche is formed above the stove, and a smoke channel continues to form.
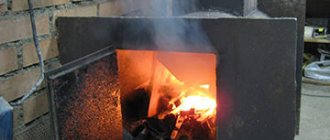
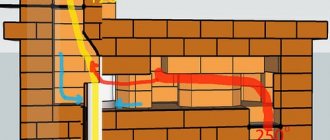
Construction of the firebox
The presented project is not the most primitive, since smoke from the firebox does not immediately enter the chimney, but descends into the lower chamber and then only rises through vertical channels. The idea of such a device is to increase the length of passage of warm air along the route, since with the small dimensions of the furnace, the direct exit of gases would give too low an efficiency.
Good to know: How a convection oven is used to heat a house, what types it comes in
What is
A baby brick stove is a compact mini-fireplace that can be placed in a small area of only 0.4 square meters. meters. It has the simplest possible design, in which the fuel cap replaces an entire system of heating channels standard for stoves. It does not need an additional foundation, and the total heating area can reach up to 35 square meters. meters.
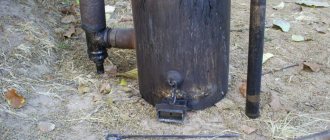
A baby brick oven does not need a large amount of high-quality fuel. For its operation, the most common firewood, anthracite, coal or other materials are sufficient. It can easily replace a potbelly stove for a summer residence and at the same time be much more functional. If you add a cast iron stove to the main structure, you get not just a heating stove, but also a cooking stove.
But the main advantage of this design can be considered the high speed of laying. One day is enough for detailed projects. This time is enough to build and start heating the stove with paper and wood chips. True, it will be possible to throw in logs no earlier than the masonry mortar is completely dry, otherwise there is a risk of cracks appearing.