Potbelly stove - an unfair stamp
So why did this design get such an unflattering name? It appeared in the 1920s against the backdrop of total famine, civil war and general devastation. Large cities, cut off from supplies from villages, experienced a huge need for firewood, which was practically worth its weight in gold.
Original potbelly stove from the Civil War
Lyrical digression
Readers of the older generation remember the Soviet film “Officers”. It contains a very eloquent moment: post-war years, the main character brings a girl a present for her first date - a bundle of firewood. Today we cannot understand this, but in those years this was the harsh reality.
The desire to heat one's home led to the appearance of compact stoves that consumed any wood waste as fuel. And since at that time all manifestations of individualism were labeled a “bourgeois relic,” the “personal” stove was dubbed a potbelly stove.
The best solution for temporary heating
Now the scope of use of potbelly stoves is quite diverse:
- garage heating,
- cottage heating,
- heating of construction sites,
- heating of other rooms where centralized heating is impossible or not connected.
With its help you can both heat the room and cook food. A big plus is the ability to make a potbelly stove with your own hands from any old milk flask, barrel, gas cylinder, several pieces of sheet iron and pipe scraps.
It almost instantly gains temperature and quickly releases it into the surrounding space, but the latter fact has little effect if the room is sufficiently insulated.
Features of homemade potbelly stoves
The main feature of both purchased and homemade potbelly stoves is their increased fire hazard. Therefore, you should not leave the device with burning fuel unattended for a long time.
The design can be made in the form of a barrel, a rectangular parallelepiped, a vertical or horizontal cylinder.
Among the countless advantages of such a nondescript but useful potbelly stove, the main advantages are:
- complete autonomy and energy independence;
- can work on any solid fuel, as well as waste fuel and even dried plant residues;
- multi-purpose use of the device: space heating, cooking, water heating;
- the simplicity of the design makes it easy to build such a stove in the garage with your own hands from the materials available in it;
- does not require the construction of a monolithic foundation and the installation of a capital pipe for the chimney.
However, one cannot help but note some of the disadvantages of a potbelly stove for a summer residence:
- the high degree of thermal conductivity of the metal contributes not only to the rapid combustion of fuel, but also to the rapid cooling of the stove;
- if the walls are made of thin metal, then they will quickly burn out and the potbelly stove will fall apart;
- constant monitoring of the combustion process is necessary, control of draft, need to add wood or oil resources in a timely manner;
- when using waste, as well as damp and resinous firewood as fuel, you will have to frequently clean the chimney of difficult-to-remove soot.
There are many good options for stove designs for summer cottages using wood and other types of fuel. Therefore, everyone can choose a model that is ideally suited to a specific room with a set of appropriate technical parameters. A potbelly stove for a garage can be made from any available material - a metal barrel, a pipe of sufficient diameter, a tank, a can, an empty gas cylinder or iron sheets.
The main requirement is strong and reliable walls with a thickness of at least 3 mm. As practice shows, metal sheets that are too thick (over 8 mm) are very difficult to heat up, reducing the efficiency of the structure. And if the metal is excessively thin, then under the influence of high temperature it becomes deformed and quickly burns out. Therefore, the best thickness is considered to be 3-4 mm.
How to make a potbelly stove in a couple of hours
Homemade potbelly stoves come in round and rectangular sections.
A popular option for a homemade device is a stove made from a milk flask. Such a device can be made with a minimum of tools and materials on hand. Dimensions may vary depending on container volume.
schematic diagram of a milk flask stove: 1 – milk flask, 2 – metal chimney, 3 – supports from a metal corner (optional)
Materials you will need:
- used milk flask,
- metal fittings or rod D = 6 mm,
- chimney.
Tools:
- Hammer,
- Chisel,
- File.
- The first thing to do is make a blower. For this purpose, a hole(s) are made below the neck or in the lid, the edges of which are carefully filed with a file.
- A chimney channel is cut into the bottom of the flask. First, markings are applied. Using a hammer and chisel, make a hole according to the markings. The edge of the hole is ground with a file (it is better to use a semicircular or round file). At the end of processing, a chimney is driven into the hole. If the hole is not widened enough, it should be finished with a file.
Let's start manufacturing.
On a note:
It is not necessary to use an exclusively round pipe for the chimney duct. You can install a pipe with a rectangular cross-section.
- The grate is made of metal reinforcement (rod), bent in the form of a coil. Bend the lattice so that it can be brought inside the flask through the neck. Align the grid after inserting it into the flask.
- If desired and materials are available, you can equip the manufactured device with a stand and a damper for the blower. In the latter case, you will get a stove with adjustable draft. Making a damper is not difficult; you just need to have a drill (screwdriver), four metal screws and a door hinge on hand.
The potbelly stove made from a milk flask is ready!
How to make a stone stove with your own hands (with photo)
Before you make a stone stove, you need to decide which barbecue shape to choose: round or rectangular.
You need to decide for yourself whether stone wood-burning stoves should be small or, conversely, quite large. If desired, you can attach a cutting surface to the stone barbecue oven for preparing food.
First, you should inspect the site and choose a suitable place to place the future stone stove and barbecue for the dacha, since this is what will determine its size.
The area most suitable for placing a stone barbecue stove is located next to an artificial pond, gazebo or alpine slide. This design will look great in such a composition. In addition to aesthetic factors, wind direction and soil conditions should be taken into account. Look at the stone stoves in the photo, which illustrates the excellent aesthetic properties:
Before making a stone oven, we advise you to think about the need to add a cutting surface; if the decision is positive, then you should first lay a water supply system. This will make the cooking process easier. Then you can begin laying the foundation. When creating a stone hearth, its installation is mandatory. Otherwise, a home-made stone stove may fall apart.
Master's advice. Before you start building stone stoves with your own hands, it is recommended to draw a plan for the future structure. This will help not only to design it, but also to calculate the required amount of consumables. After this, you can begin construction directly.
What else are potbelly stoves made from?
Boxes and barrels, cans and gas cylinders - everything will do.
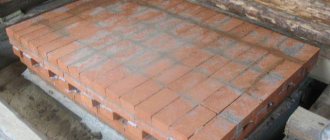
Drawing of a potbelly stove from a barrel
You can make such a unit from an old barrel. Similar to the method described above, a grate is made, which must be welded to the body. The blower and firebox are equipped with separate doors. The resulting potbelly stove can be used for heating and cooking. To create a heat generator using the described method, expensive material and tools are not required. All that remains is to install the stove in a suitable place, and it will perfectly heat the room until stationary heating is installed.
Homemade potbelly stove from a gas cylinder
The gas cylinder has a good shape, almost ideal for a potbelly stove. This design is suitable for heating small rooms, such as a bathhouse.
Let's look at how to make a stove from an empty gas cylinder:
- First of all, cut off the top part of the cylinder with the tap, and weld a plug in this place.
- Next, cut a square opening at the bottom of the cylinder, which will serve as the entrance to the firebox in the future. The cut-off part can be used as a door, having first boiled it to the required size.
- Then weld the hinges, install the doors and attach the handle-lock to it.
- Make holes in the part of the cylinder that will serve as the bottom. They will perform the task of the grate.
- Make a box from thinner metal and secure it under the grate. This box will serve as an ash pan, which serves to collect combustion residues, while at the same time acting as a blower. Attach the door to the ash pan.
- The entire stove structure needs parts such as legs. To make them, you can use a pipe and a metal corner. Using welding, attach them to the fuel tank.
- In the upper part opposite the ash pan, cut an opening and weld a chimney pipe into it.
You can make a cooking panel at the top of the stove. It's quite simple - weld a frame of steel reinforcement. The completed panel turns out to be quite roomy, capable of holding two items.
Video example of creating an inexpensive heater from a cylinder:
High thermal conductivity of a potbelly stove - minus or plus
The most significant advantage of a potbelly stove is its high thermal conductivity, which ensures rapid heating. This characteristic also acts as the main disadvantage, since it not only warms up quickly, but also cools down quickly.
This is a common “disease” of all metal heating devices.
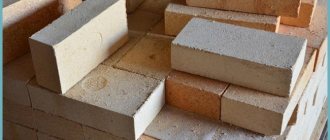
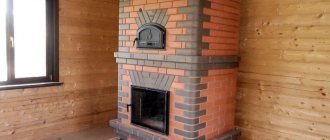
You can solve the problem of rapid cooling. To do this, it is enough to cover the resulting structure with bricks. This material, unlike metal, is a wonderful accumulator of thermal energy. True, such a design will require a longer firebox to heat the room. Burning time and fuel consumption are successfully reduced by installing a brick screen equipped with ventilation holes. Such systems are widely installed in bathhouses.
Schematic diagram of a brick screen device
It is most rational to install a brick screen at a certain distance from the stove walls. In this case, the heat emitted by the stove is used as efficiently as possible.
How to properly arrange a brick screen
The brick screen is laid at a distance of 10-15 cm from the stove walls, ventilation holes are located in the upper and lower parts of the screen. When the unit heats up, the warm air located between the masonry and the walls of the furnace rushes upward, quickly warming up the room. At the same time, the cold air that replaces it cools the metal walls of the device, preventing them from quickly burning out.
A properly equipped brick screen completely solves the problem of quickly cooling a potbelly stove. The brick perfectly accumulates the thermal radiation of the furnace, subsequently evenly transferring it into the air space of the heated room.
Note
The brick screen will continue to heat the room for a long time after the fire is completed.
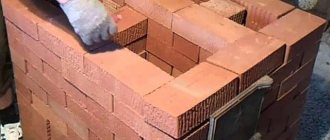
Common mistakes when building a brick screen
- Installing a brick screen close to the stove.
Laying bricks close to the walls of the stove will slow down the heating of the room, causing excess heat to be released into the atmosphere through the chimney.
- Laying bricks in a checkerboard pattern.
This option does not provide the proper air circulation described in the previous section. And since the screen area in this case is much smaller than with solid masonry, its cooling occurs much faster.
Thermal energy from the stove passes through such a screen as if through a sieve, so the room heats up faster, but cools down faster.
The efficiency of heat use in this case is reduced by almost half.
Summary
The facts listed above convincingly prove that, with a minimum of time, materials and tools, you can easily design and make a potbelly stove with your own hands. Brick remains are also found in abundance at construction sites or summer cottages. You can even use broken bricks if the stove you are designing is intended for temporary use.
To make a more solid device, you can use sheet metal or metal boxes. If desired, you can provide smoke circulation and draft control doors in the stove design, which will significantly reduce fuel consumption.
Factory-made potbelly stove
Despite the fact that it is easy to make a simple potbelly stove from an old milk flask, barrel, gas cylinder and similar waste with your own hands, this option is only suitable for a temporary solution to the heating problem for the most unassuming rooms. The efficiency and appearance of such a device leaves much to be desired. Having decided to install a potbelly stove at home for a long time, it is better to turn to specialists who will make it “beautiful” and of high quality.
Permanent address of the article
How to make a rectangular potbelly stove with your own hands?
Most experts believe that this model is the most aesthetic, compact and optimal option compared to the above. This design is very suitable for heating a living space, for example, a country house.
The primary function of a rectangular potbelly stove is to heat a room whose area is no more than 15 m3. The standard design has fairly good heat transfer, but it also cools down quickly after the wood has burned out and the metal has stopped heating.
This disadvantage can be partially reduced by lining the stove with bricks. But this is not a very correct decision, since after this the rate of heat transfer will decrease quite significantly, and the heat will not be retained for quite a long time.
There are two types of rectangular potbelly stove.
The first option is the Gnome stove. A fairly simple, compact design, which consists of two chambers, a firebox and ash pan, a chimney pipe and legs.
Drawing of a potbelly stove Gnome:
The second is more complex, allowing you to retain heat for quite a long period. This is a Loginov stove. That is why it should be considered in more detail. Some changes were made to the design of the potbelly stove; a different method of fuel supply made it possible to improve the performance properties.
At the same time, it has not lost its main positive aspects: fast heat transfer, ease of installation, which does not require the construction of an additional foundation and the creation of a capital pipe, small size.
What's the secret? In the fuel tank itself, in the upper part, two plates are welded in, which form a labyrinth. Because of this, the path of warm gases is increased, which means that more heat remains in the oven. And thanks to the expansion of metal surfaces, heat exchange between gases and the walls of the container becomes more efficient.
Do-it-yourself potbelly stove, drawings, the most effective - photo of Loginov’s stove diagram:
To make your own multifunctional potbelly stove you will need:
- sketches and a simple drawing of the structure indicating all the main dimensions;
- sheet metal (its quantity depends on the desired dimensions of the furnace);
- steel corners (thickness 4-5 mm);
- metal tube 25-30 mm;
- pipe 180 mm;
- welding machine;
- working hand and electric tools.
It is worth noting that you can set your own dimensions based on the materials available. We took a steel sheet with a thickness of 3 mm and dimensions of 200x450 cm.
To assemble such a potbelly stove, you need to perform the following operations:
- Weld the walls of the structure together.
- Weld the lid on top.
- After inserting the labyrinth plates and the grate, attach them by welding. To maintain the distance between the plates and the grate, place wooden blocks between them. There is no need to specifically remove them after everything is done, as they will burn out during the fire. Many experts advise making the grate not from rods, but from a sheet with 20 mm holes drilled in it.
- Make the bottom along the contour.
- Install the chimney pipe. A thick-walled steel pipe is well suited for this purpose. An important point: throughout the entire area of the house, the pipe must be all-welded. If the pipe is straight, this is quite simple. If the pipe needs to be led through the wall to the street, then we advise you to make a template from wire and weld the pipe and bends using it.
- Then weld the potbelly stove door handles, curtains and latches. It is better to make the curtains yourself, using a thick rod and a steel tube. There is no need to worry too much about the size of the doors. Their main criterion should be the convenience of supplying firewood and removing ash and ash through it.
- After everything is assembled into one structure, you need to think about how to install it on the legs. The best option would be to make them from a metal tube with a diameter of 2-3 cm and 8-10 cm long, onto the end of which a nut is welded and a bolt is screwed in. This trick will allow you to adjust the height. Many may not understand the essence of these parts, but upon installation everything will fall into place.
This work will not cause any special problems.
Some craftsmen use cast iron blanks to increase the service life and efficiency of the structure.
For garages, exhaust furnaces are in quite high demand. We talked about it in one of the articles.