Any private house, cottage, bathhouse and sometimes even a garage require heating in the winter season. But any prudent owner is faced with the question of how to reduce fuel costs and use the heating device more efficiently. One of the modern promising directions for increasing efficiency is the use of heat from hot exhaust gases.
I welcome my dear reader and bring to your attention an article about what a heat exchanger for a chimney pipe is and how to make it yourself.
What is it and what is it for?
Heat exchanger is a device for transferring heat from a heated medium to a colder one. One principle, many designs. A heat exchanger for a chimney allows you to select part of the energy of the exhaust gases and use it to heat an adjacent room or heat hot water.
The gases coming from modern gas and pellet boilers are not hot – about 200 °C, so you won’t be able to get a lot of heat from the chimney. Solid fuel boilers emit hotter gases - up to 600 °C, and the recuperator allows you to obtain a fairly significant amount of heat for heating or heating water.
The maximum amount of heat from exhaust gases can be obtained by using not very modern traditional stoves, fireplaces, and homemade potbelly stoves. The efficiency of these heating devices is low, the temperature of the flue gases is high, so a considerable part of the wasted heat can be captured using a heat sink. The use of heat collectors on the chimney of a homemade potbelly stove allows you to capture up to 30-40% additional energy.
The main reason for installing a heat exchanger is that it allows you to maximize the use of fuel combustion energy and save on heating costs. In addition, sometimes when heating small houses it is not economically feasible to purchase a heating device with a heat exchanger and install a heating system.
A modern fireplace or stove heats well houses with an area of up to 70 m² and even more; only some rooms need heating - bathrooms or back bedrooms, second floor rooms or attics, so for their heating you can use the heat from the recuperator for the chimney. Sometimes a chimney heat exchanger is used to heat water.
Using a boiler for a water supply system to heat a house
One of the frequently asked questions regarding the use of a boiler in a heating system is the following: can a boiler, which is designed to simply heat water for domestic needs, be used in a heating system. There is no definite answer to this question - it all depends on how extensive the heating system itself is and what additional equipment is used.
A boiler for a water supply system is different in that it has both holes (both the cold water inlet and the hot water outlet) located at the bottom, and both of these holes have a small diameter (most often it is 0.5 inches or approximately 1.2 cm ).
This arrangement of holes eliminates the possibility of water moving through the heating system on its own, since here cold water will not constantly “drive” hot water out of the tank and force it to move through the pipes. But, in general, such a boiler can be used in a heating system if it is supplemented with a circulation pump, which will be “responsible” for the movement of water through the heating system. The effectiveness of such a system depends on several factors:
- depends on how powerful the boiler itself is. Suitable power is usually determined at the rate of 1 kW per 10 square meters of heated area.
- depending on how powerful the circulation pump is
- depends on how extensive the heating system of the house is. It is best if it does not have many branches.
As for the type of boiler, you can use both instantaneous and storage water heaters.
So, heating a house with a boiler is not a fantasy at all, but a completely viable option for installing a heating system. The main thing when creating such a system is to accurately calculate the required boiler power, based on the size of the house. In some cases (for example, if the house area is large enough), the efficiency of the system can be increased by expanding the water inlet and outlet, as well as by upgrading the boiler itself to increase its power.
07/07/2013 at 20:07
Types and designs
Heat exchangers are primarily divided according to the coolant into air and liquid (water). In principle, it is allowed to fill in oil and antifreeze, but not in homemade designs, since antifreeze is poisonous and expensive, and the oil can catch fire if leaks occur.
By design, water devices are usually made in the form of a coil or register (pipe) with water (water jacket); air ones are a cap with warm air removal or a wide insert into the chimney with welded transverse elements.
When deciding how to remove the residual heat of flue gases, it should be borne in mind that heat extraction in the chimney reduces draft, and condensation may fall on the heated walls of the chimney. This drawback is especially noticeable in gas boilers, in which the temperature of the exhaust gases is low. But on inexpensive homemade stoves you can ignore condensation.
Water
The advantage of water for recovery is that it has a high heat capacity and more efficiently removes the heat from the flue gases. But water recuperators require higher quality manufacturing - the system cannot leak; When operating it, it is necessary to ensure that there is no overheating, since boiling water can rupture the pipeline.
If water structures are used in a garage, workshop, “weekend cottage,” or a free-standing bathhouse, the water will have to be drained in the winter, since frozen liquid can also rupture the pipeline.
A circuit with water is heated through the metal walls of the chimney; when heated, the water rises up, then into the batteries, cools, falls down in the battery, goes into the return line and is sucked back into the heat exchanger.
To optimize the operation of the system, an expansion tank is included in it - this reduces the possibility of boiling. Some craftsmen install a pump, which creates a complete small heating system.
Water systems are used for heating using radiators or hot water supply. A serious drawback is the inability to regulate the heating temperature of the water; if it overheats, it simply has to be drained. It is impossible to pour cold water into the system while the heating unit is running - the water can boil, rupture the pipes and damage the chimney, while condensation settles on the inner walls of the chimney pipe.
- Homemade coil
The easiest design to make. The coil is usually made from a tube that is wound in a spiral around a steel chimney. Tubes use copper, ordinary steel, stainless steel, and aluminum. Aluminum should not be used for solid fuel boilers - its melting point is 660 °C, and the temperature of the exhaust gases of solid fuel heating devices reaches 600 °C.
When winding (bending), the pipe should be filled with sand and sealed on both sides - this will avoid defects (kinks, folds, kinks). To improve the heating of the coil, there should be a small distance between the turns - up to 1 diameter.
Corrugation is sometimes used, but this is not the most durable material for a coil (especially galvanized carbon steel).
- Register
Register - a casing with a larger diameter than the chimney. The register is placed on top of the chimney body and welded, the ends are welded with plates with cut holes corresponding to the diameter of the chimney. A pipe is welded or screwed in at the bottom for water supply, and at the top for discharging warm water. Otherwise it is used in the same way as a coil. The casings are made not only round, but also square.
Air
This option is more suitable for local heating of premises - one room, bathroom, dressing room. Air structures are easier to assemble. Sometimes a coil or register is used, sometimes a Kuznetsov or bell-type heat exchanger is used. The coil has too much resistance from the pipe walls; it should not be too long. Because of these difficulties, it is rarely used. Air recuperators cool the chimney less, so there is less chance of condensation forming on its walls.
Sometimes they do not build complex structures, but use available materials - they weld ribs from corners or bent strips to the chimney, pipes open on both sides, attach “skirts” or strips (aluminum or thin steel) bent into a corrugated structure.
- Kuznetsov heat exchanger
The Kuznetsov heat exchanger is an expanded cylinder, across which pipes are welded. The cylinder is mounted in the chimney, hot flue gases flow through the inside and heat the transverse elements. The air from the cavities exits into the room and heats it or is collected in an air duct and enters the adjacent room.
- Bell type
If a small house does not have a heating system and there is a need to heat a room in the attic or second floor, a bell-type heat exchanger is used. A cylinder is installed around the chimney, open at the bottom; at the top, air from the cylinder enters pipes going to the second floor. Warm air is released in the lower part of the room on the second floor - this way the hot air is better distributed in the room and heats it as much as possible.
Sometimes, instead of a cylinder above the stove, a hood is installed under the ceiling; air heated by the stove rises into it and flows through pipes into the room on the second floor. You can install a fan, in which case it is easier to heat the room on the same floor with the stove with warm air.
Which type is better
Which type is better is determined by what exactly needs to be heated and in what way. The efficiency is better for water recuperators - 50-60% (for a register parameter it is higher, for a coil it is lower). Air devices have lower efficiency.
For hot water supply or radiator heating systems, it is better to install water heat exchangers. Air heaters are more suitable for heating closely spaced individual rooms.
How to make an electric water heater with your own hands
The problem of hot water in a country house is always relevant, and the problem of organizing hot water supply can be solved in different ways.
One way is to connect the boiler to gas or electricity. But the best way is to make an electric water heater with your own hands. A homemade water heater will cost much less, and its manufacture will require very little effort. How to make a water heater with your own hands is described below.
This homemade device allows you to save money and eliminates the worry of how to provide a private home or cottage with cheap hot water, especially in winter.
There is a washbasin on sale with a built-in heating element and a 10-liter plastic tank at a quite “affordable” price, only you need to pour water into it through the lid. This means that you will again have to use various ladles and jars, but this is not very convenient.
Currently, it is not difficult to install a 120-liter tank and a pump in the kitchen (with an autonomous water supply, all these structures are always available).
The pump allows you to fill a tank of a similar volume in 10 minutes without any hassle. This amount of water can be enough for a family of 4-5 people for 2 days without following a strict economy regime. In this case, water from the tank should be supplied to the sink “by gravity”, i.e. the tank can be installed in a room adjacent to the kitchen on a high rack. For “gravity” such pressure should be quite enough.
DIY electric water heater
For a water heater with your own hands, you need to complete the automatic tank filling system. For these purposes, it is necessary to cut a corresponding hole - a toilet valve with a float - and slightly alter the design. Inside the tank there are stiffening ribs that the float will touch, so you need to shorten the rod on which it is supported, slightly bending it “in place” for the system to work.
Before you make your own water heater, consider where the tank will be installed. In order not to clutter the kitchen, place it in a utility room connected to it, where the storage tank is located, connecting it to the sink mixer using a hose from the washing machine.
The heating element recommended for the system is a 1.2 kW Ariston with a built-in thermostat. Under it, you should make a corresponding mounting hole in the tank and cut out gaskets from rubber. The recommended electrical circuit involves installing a circuit breaker and two indicators in the kitchen, placed in a neat box.
One indicator should show that the homemade electric water heater is on, and the second should light up (only when the thermostat turns on the heating). The corresponding connector is located on the heating element body. At night, you can turn off the toggle switch of the circuit breaker, thereby turning off the entire system.
It is recommended to wrap the water tank with insulation and make a plywood box on top. Then the structure will retain heat and look more neat, and the top of the box, in addition, can then be used as another shelf.
Insulating the tank will keep the water warm until the morning, so in the morning the heating element can be turned on for a short time.
You can also use a plastic tank, but it is unreliable. It is better to use a stainless steel tank as a tank, for example from an old washing machine. This container is quite suitable and durable.
Such a system usually works for quite a long time. The problem can occur in winter due to freezing of water in the system. Therefore, the water must be drained in the winter if you do not plan to use it regularly.
Power calculations
Independently calculate the power of the recuperator in the absence of initial data (furnace power, temperature and amount of exhaust gases per unit of time, contact area of the heat exchanger and the metal of the chimney, speed of passage of air or water through the device). You can measure the power of an already installed heat exchanger.
Roughly, you should expect that the heat exchanger on the chimney of a solid fuel stove or fireplace will warm up a couple of small radiators, increase the temperature in the garage, or make a room in the attic or a dressing room in a bathhouse warmer.
Buy or make it yourself
If you want to increase the heat transfer from an expensive purchased boiler, it is better to buy ready-made high-quality devices - the industry produces them in a sufficient range. But if you want to modernize a potbelly stove in a bathhouse or garage, or increase the efficiency of a fireplace with a steel pipe in the country, you can save a lot of money by making and installing a heat exchanger on the chimney yourself. Installing a heat exchanger by a hired specialist will cost the same as the structure itself.
The simplest option - a coil - can easily be made by a home hobbyist even without much experience, but a home craftsman with at least some welding skills can handle more complex designs.
approximate price
The cost of industrially manufactured chimney heat exchangers varies depending on the design and manufacturer.
Running heat exchanger tanks for a chimney with a diameter of 115 mm and a capacity of 6 liters cost rubles; those with a capacity of 12 liters cost rubles.
Heating containers on the chimney
A tank for heating water on a tube has been installed since ancient times; just remember the legendary Russian samovar, a kind of symbol of our people. This principle was used for the first time; for this reason, such systems are also called samovars.
Advantages of samovar designs
- When the stove in the bathhouse is heated, the pipe in it will heat up in any case; not using this energy is stupid and it can safely be considered completely free.
- Depending on the type of fuel, the temperature of this part of the structure ranges from 300 to 700 ºС. Moreover, a significant advantage is that the pipe heats up evenly over the entire contact area.
- The volume of such a tank can be quite large, because the distance from the firebox to the ceiling will be at least one and a half meters and such a heater can be installed along the entire length of the pipe.
- In most cases, such a heater does not need an additional pump, heat exchanger or electric heating element.
- A normal stove for a small steam room has an average pipe cross-section of about 115 mm. Taking into account the thickness of the container, the transverse dimensions of the entire structure will be within half a meter. This allows it to be placed in any, even small, steam room.
- Installation does not require fundamental knowledge of heating engineering or being a super mechanic. Almost any owner can install such a container on a pipe with his own hands.
- And finally, when compared with a boiler, the price of such a miracle will be quite affordable, and the investment will be a one-time one.
Disadvantages of this type of heaters
The most significant disadvantage is that the tank for heating water on a pipe can only be installed on metal structures
Ceramics or pipe bricks do not have this level of heat transfer. Designs in which water is poured through the top, directly into the steam room, will increase the level of humidity in the room. Hot metal walls of the tank are a source of danger; careless touching can lead to injury.
Selecting the right container
Material for container
In the old days, the most popular material was cast iron. Of course, it will take a little longer to heat up, but the temperature will be maintained better. An important factor is the resistance of cast iron to corrosion and its long service life. But cast iron is a heavy material and such a container will need powerful support.
Ferrous metal is now practically not used for these purposes due to its tendency to corrosion and the high probability of deformation due to sudden temperature changes.
Stainless steel is deservedly considered a universal material. This metal is not afraid of corrosion and is relatively lightweight. In order to weld a large-capacity tank, a sheet 1.5 - 2 mm thick is enough. During temperature changes, such containers do not deform.
The video in this article shows the opinion of a specialist.
Conclusion
Our country is rich in craftsmen, but the bathhouse is considered a highly dangerous object. Based on this, we do not recommend installing homemade tanks. There are now enough certified products on the market, the price of which is quite affordable.
How to make your own device
It’s easy to make a simple coil yourself from a copper tube. For a chimney with a diameter of 100 mm, a copper pipe with a diameter of ¼ inch and a length of 3-4 m is suitable. Threaded fittings should be soldered to the ends of the pipe. Then the tube is filled with fine sand, twisted and wrapped around the chimney.
It is convenient to do this work with an assistant. The sand is then washed out of the pipe with water under pressure. Connect the pipes leading to the radiators and expansion tank.
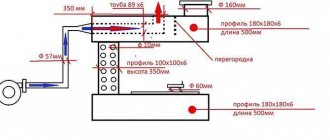
The Kuznetsov heat exchanger is made using welding. The simplest option is to make a housing from a gas cylinder or large diameter pipe.
For manufacturing you will need the following materials:
- Gas cylinder, large diameter pipe (300 mm) for the housing.
- Pipe with a diameter of 32 mm (it is better to take one piece with a larger diameter - up to 57 mm). The length of the blanks is 300-400 mm, the total quantity should be sufficient for cutting the blanks.
- Two small pipes of the same diameter as the chimney; It is advisable to use a chimney pipe - if the chimney is prefabricated, then on one side of the structure the pipe will have a socket, which is necessary for installing the heat exchanger.
- Two pieces of steel sheet, sufficient to cut out the end caps of the housing.
Air heat exchanger manufacturing technology:
- A large pipe or cylinder is cut to the required size.
- 9 blanks of the same length are cut from thin pipes.
- Circles are cut out for the plugs.
- 9 holes for small diameter pipes are cut in the circles; if one tube of larger diameter is taken, then a hole for it is cut in the center.
- Thin pipes are inserted into the holes of the plugs, attached by welding, and then welded.
Holes with a diameter equal to the diameter of the chimney are cut in the sides of the body.
A structure of thin tubes and plugs is inserted into the body and welded at the junction of the plugs and the body of a large pipe.
The pipes are inserted into the holes on the sides of the body and also boiled.
Alternative option:
What materials can be used
The ideal option is (for example, food grade austenitic stainless steel 08Х18Н10 or AISI 304) or copper. Industrially produced products are sometimes made from titanium. But the price of these materials is quite high. But they are durable, do not rust, are reliable and durable. If you have a potbelly stove in the garage or a homemade heater from scrap materials in the bathhouse, it is quite possible to use ferrous metal (carbon steel).
You can use a high-quality corrugated stainless steel pipe. Aluminum pipes can also be used for the coil (just not for chimneys of solid fuel stoves).
Sometimes galvanized steel is used, but it should be borne in mind that during welding work the zinc layer evaporates, and all the advantages of galvanizing (corrosion resistance) come to naught. At temperatures above 400 °C, zinc begins to evaporate (zinc vapor is toxic), so you should not use galvanization for heat exchangers on the chimneys of solid fuel boilers.
Heat exchanger for chimney
When using a furnace to heat your home, the question arises, how to increase the productivity of the heating device? This can be done by installing a heat exchanger on the chimney. It will use the energy of fuel combustion products to heat the room.
Types of installations
This unit uses thermal energy from the chimney pipe, which it transfers to the coolant. The configuration of the device depends on the type and design of the chimney and the material from which it is made. The coolant can be:
- plain water;
- air;
- any liquids that do not freeze;
- oil.
Heat exchanger options for chimneys
All heat exchangers are divided into air and liquid. Air installations have a fairly simple design. You can make them yourself using available materials. The disadvantage of this unit is its low productivity.
A heat exchanger that uses liquid as a coolant has a more complex design. For this installation to work effectively, you need to follow some installation recommendations. But if everything is done correctly, a chimney with a heat exchanger can serve as a full-fledged heating system for a small country house or bathhouse.
Air heat exchanger design
The air heat exchanger for the chimney is a hollow body that is connected to the heating system using special pipes. A special braking device is installed inside the housing for gases that are formed during fuel combustion. Most often this is a specific damper system with small cutouts for air flow. In some models of heat exchangers, it is possible to regulate the draft force in the smoke exhaust channel, which affects the productivity of the unit.
Air heat exchanger (convector)
This device works thanks to the principle of convention. There is a hole at the bottom of the heat exchanger through which cold air enters the body. It quickly heats up from the high temperature of the chimney, after which it returns back into the room. Thus, in a few minutes the room where this unit is installed becomes noticeably warmer.
The advantage of this design is a significant increase in stove performance. When using the same amount of solid fuel, you can obtain several times more thermal energy.
Liquid heat exchanger design
This unit is a regular coil with water, which is in contact with the outer surface of the chimney. Thin tubes are inserted into a metal casing and insulated with basalt wool. Copper is used as a material for the manufacture of coolant tubes. It has a high thermal conductivity coefficient, which makes it possible to minimize the diameter of the pipeline.
The coil is directly connected to the heating system and installed on the chimney. At the top point of the unit there should be a special tank, which is designed to collect liquid that has expanded from heating.
Liquid heat exchanger
HOW TO MAKE A HEAT EXCHANGER (COIL)
Operating principle of liquid heat exchanger:
- due to the high temperature that forms inside the chimney, the liquid in the pipeline heats up;
- hot water expands, causing it to move along the coil and flow by gravity into the heating radiator;
- in a heating device, hot liquid displaces cold liquid;
- the process is repeated from the beginning. Cold water flows back into the heat exchanger, where it is heated again.
Despite the high productivity of this unit, it has many disadvantages. First of all, a liquid heat exchanger is quite difficult to install; you need to constantly monitor the operation of the heating system and monitor pressure indicators. This installation cannot be used in winter, when the liquid in the coil may freeze. You can also get the opposite effect when, due to the reduced temperature in the chimney, the draft decreases, which entails an increase in the volume of firewood to obtain a certain amount of heat.
What materials can be used?
A high-quality heat exchanger for the chimney is made of food-grade austenitic stainless steel. It works great under constant exposure to high temperatures. Nickel, which is contained in the alloy, forms a special film on the surface of the pipeline that is resistant to aggressive environments.
Tensile strength and elongation values for galvanized steel
Galvanized steel can be used as a material for the heat exchanger pipe. With strong heating above 200°C, the zinc contained in the metal begins to evaporate. At a temperature of 500°C, its concentration in the air becomes dangerous to human health. But if your heating system operates in a smaller temperature range, this material is completely safe.
How to make this device yourself?
Making a heat exchanger for a chimney with your own hands is quite simple. To do this, use the following materials:
- metal sheet measuring 0.35 m x 0.35 m - 2 pcs.;
- pipe with a diameter of 0.032 m and a length of 2.4 m - 1 pc.;
- pipe with a diameter of 0.058 m and a length of 0.3 m - 1 pc.;
- cylindrical metal container with a volume of 20 l – 1 pc.
Water heat exchanger made of stainless steel
Step-by-step instructions for making a heat exchanger:
- Cut two circles with a radius of 0.15 m from sheets of metal. They will act as plugs.
- On a sheet of metal, mark the locations for placing the pipes. The largest circle with a diameter of 58 mm should be in the center, and along the contour there should be eight small circles with a diameter of 32 mm.
- A pipe with a diameter of 5.8 cm must be cut into eight equal parts using a grinder.
- Weld a plug to one end of the largest size pipe.
- Weld each pipe with a diameter of 3.2 cm to a metal circle one by one.
- Place another plug on the opposite side of the pipes, then weld it.
- Using a grinder, cut off the bottom of the metal container.
- On the side surface of the metal casing, cut two holes on opposite sides. Their diameter must correspond to the parameters of the chimney.
- Weld pipes to the prepared holes, with which the unit will be connected to the chimney.
- Insert the prepared core into the casing with pipes. Carefully secure the structure using welding.
- Connect the heat exchanger to the chimney.
- Treat the finished unit with heat-resistant paint.
Homemade heat exchanger
DIY copper tube heat exchanger
Copper tube heat exchanger
This unit is a coil of copper pipe that wraps around the chimney. It heats up quickly, and the air that moves inside becomes warm. To ensure high efficiency of this system without the use of a pump, the length of the coil should not be more than 3 m.
This design can be made using argon welding. The option of fastening using tin is allowed. In this case, all surfaces must be degreased with phosphoric acid.
The ends of the copper pipe must have an external thread for connecting an external water tank. It must be located above the coil, which will ensure maximum productivity of the system.
We use corrugation
This heat exchanger option is the simplest and requires the minimum amount of material costs. To do this, use a long corrugated pipe. It needs to be wrapped around the chimney.
Application of corrugated pipes for the manufacture of heat exchangers
The air inside the corrugation will heat up very quickly. It is enough to simply redirect it to the next room. To increase heat transfer, wrap food foil around the corrugation.
For safe operation of a heating system using heat exchangers of different configurations, it is necessary to constantly check the connections to the chimney. If you detect the slightest gaps, immediately restore the tightness of the seams.
Step-by-step instructions on how to install a heat exchanger with your own hands
The Kuznetsov heat exchanger is installed instead of one of the chimney sections - for this part of the chimney will have to be dismantled. If a chimney is installed from one long pipe, you will have to cut out part of the chimney and install the structure using welding.
Installation methods
The heat exchanger is installed at a certain distance from the heating unit - 200-500 mm, more is possible.
If the chimney is prefabricated, then it is necessary to disassemble part of the chimney. The heat exchanger pipes are cut so that the length of the heat exchanger structure is equal to the dismantled chimney section. The heat exchanger is mounted in the chimney and sealed using heat-resistant sealant. The top of the heat exchanger is painted with heat-resistant paint.

