No matter how profitable and simplified the modern option of heating a bathhouse using a metal stove may seem, experienced experts unanimously advise: it is better to use traditional brick. Gentle heat, aesthetic appearance, rich but not scalding steam - only a brick oven can provide these advantages. And if you want the device to heat not only the steam room, but also the adjacent room, there is an even more profitable option - a stove with a firebox from the dressing room, equipped with a water tank. It will not be easy to build such a structure with your own hands, but with step-by-step instructions, drawings and photos of installation, anyone with basic construction skills will be able to complete the task.
Material selection: types and sizes of kiln bricks
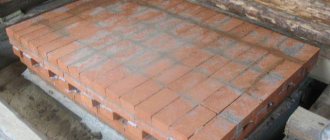
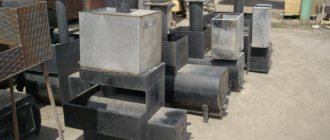
The first step is to purchase the main building material - brick. If your budget is limited, you can choose ordinary ceramic bricks. Its dimensions are standard - 25 x 12 x 65 mm. But here you need to take into account one nuance: in order for the material to withstand difficult operating conditions caused by high temperatures and humidity without negative consequences, you will need to treat it with special protective compounds. An excellent option is heat-resistant varnish for a brick stove.
Brick for the stove
A more suitable raw material for a bathhouse is yellow-straw-colored fireclay bricks. They are made at high temperatures by pressing and firing, so they are extremely reliable. As a rule, products are sold in three size variations:
- standard – 230 x 125 x 65 mm;
- narrowed – 230 x 114 x 65 mm;
- narrowed with reduced thickness - 230 x 114 x 40 mm.
Bricks must be free of voids, that is, solid.
Advice. It is not recommended to use silicate and unfired adobe bricks: the former are not heat-resistant, and the latter are so hygroscopic that they simply turn limp from the steam and heat of the oven.
Masonry mortar
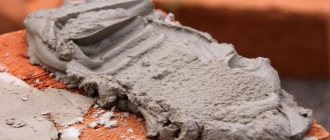
Kiln brick laying up to the chimney is done exclusively with clay mortar, without cement. To prepare it, you need to take the same amount of sifted sand and clay purified from impurities (that is, the proportion is 1: 1), mix and add water. A good consistency is when the solution slides off the shovel easily, but there is no excess water in it.
Advice. It is better for a novice master to purchase a ready-made building mixture for laying stoves.
You can also take clay from a nearby ravine and prepare it yourself. It will need to be soaked in a trough for 2-3 days, and then mixed thoroughly and manually pushing the mixture through a sieve, separating stones and other foreign fractions. The amount of water for soaking is taken in a ratio of 1: 1 to clay. As for laying a firebox made of fireclay bricks, you will need an equally fire-resistant mortar. To prepare it, instead of sand, chamotte chamotte is added to the clay in the same proportion.
Preparation of tools and consumables
To lay the stove you will need not only bricks, but also many auxiliary materials and tools. The most important ones that will need to be purchased in advance:
- grate bars – 6 pieces of standard size 300 x 220 mm;
- firebox door – 250 x 280 mm;
- door for the blower - 200 x 250 mm;
- quartz or river sand;
- fireclay clay;
- door for compartment with stones;
- steel corners – 4 pcs;
Required Tools
- steel sheet for firebox;
- steel corners for the ceiling - 10 pcs;
- fireclay elements for the ceiling - 6 pcs;
- heat-resistant varnish for a brick stove;
- construction mixer;
- level.
Now you need to prepare a clay mortar that will serve as a binding material for the bricks. First, soak the clay for 2 days - dry material is difficult to process. Then mash it with a special spatula, add water and mix with a construction mixer until you get a composition that resembles sour cream. Then add sand to the mixture. The ratio of clay and sand should be 1:1. Then knead the mixture again until a homogeneous solution is obtained.
Advice. If the clay is too oily, add a little fireclay mortar to it along with sand.
Tools
If you decide to make a stove for a sauna with a tank with your own hands from brick, then you will need several standard stove-maker tools:
- pick hammer,
- special trowel,
- mallet,
- level,
- roulette,
- construction cord,
- plumb line
Innovative technologies are gradually coming to the area of stove laying. Some builders use laser levels and a sander. To make a tank you will need a welding machine, electrodes, and a sheet bender. Making a sealed stainless steel container with your own hands is quite a difficult task for a novice welder. Therefore, it is better to buy the material and turn to professionals for help.
Formation of the base
One brick of standard sizes with mortar weighs approximately 4 kg, so the entire structure of the stove is very heavy - you cannot do without a high-quality base. The foundation is arranged as follows:
- in the area where you plan to install the stove, dig a hole 70 cm deep;
Important! When digging a hole, keep in mind that the base should protrude beyond the boundaries of the future stove structure by 5-6 cm on all sides.
- Fill the bottom of the depression with 15 cm of sand and moisten the layer so that it sinks well;
- lay a 15 cm layer of gravel (you can mix gravel with broken bricks);
- install the formwork;
- lay a reinforced metal frame on the base;
Furnace base
- prepare cement mortar and fill the hole with it;
- level the base and leave to harden;
- when the cement is completely dry, remove the formwork and fill the remaining cracks, if any, with sand;
- check the level of the foundation - if there are any unevenness, level the base using concrete - it is important that the surface is perfectly flat.
The finished foundation must be waterproofed. To do this, lay sheets of roofing felt on it.
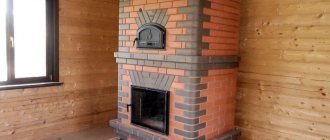
Next, you can begin laying the stove. Let us conditionally divide this process into two large stages: before lining and after.
Manufacturing process
Order
In order to understand in general terms how to make a brick stove for a bathhouse, you need to clarify for yourself that the task ahead is not an easy one. Even in villages where stove heating is a common feature and, without exaggeration, part of life, only a few take on the production of stoves. The secrets of the process are passed down orally and require much practice. Although, on the other hand, it is in principle possible to make a simple stove with the proper amount of knowledge and experience. The work can be divided into several stages, which should be performed sequentially.
Preparation
Fireproof brick
One of the most important aspects of any business is preparation. In the case of installing a stove in a bathhouse, we are talking about the need to purchase all the necessary materials and prepare the tools. Everything here seems simple, but there are some nuances:
- First of all, it is important to note that several types of bricks are required to make a stove. So, to install a firebox you need a heat-resistant (fireclay) brick, but to make chimneys you can get by with ordinary ones.
- At the same stage, it is necessary to prepare all the metal elements of the oven, such as doors, plugs, grates, etc. It is important to check that the parts do not have cracks, as this will shorten the service life and create a risk of fire hazards.
- If you plan to install a heating boiler for water, then this should also be taken into account at the preparatory stage, since depending on its location the actions will be slightly different. By the way, in order to provide visitors with hot water, you can do without the equipment of a heating tank.
- Also at this stage, you need to decide on the location of the future stove and dismantle the floor covering, as well as cut out the joists if the floor is already installed.
Base installation
Foundation for a brick oven
In order for the stove to stand for a long time and perform its functions efficiently, you cannot do without installing a strong and level base.
- To do this, the floor covering and logs are dismantled at the site of the proposed installation, and the earthen base is slightly buried in the shape of the future furnace.
- Then a cement-sand screed is made in the recess. It is necessary to take into account that the thickness of the screed must be at least 30 cm, and its layer must be reinforced with steel reinforcement, the thickness of which must be at least 10 mm.
- After the screed has dried, it is necessary to lay the first layer of bricks, which will serve as the foundation for all subsequent masonry.
Here we can add that work related to cement mortar can hardly be called clean, therefore, if there is a desire to protect surfaces, for example, floors, from contamination, they must be covered with film.
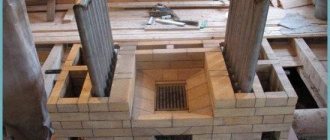
Further installation
Laying a sauna stove
Once the base is ready, you can begin laying subsequent rows of bricks. By the way, the complete and detailed arrangement of a brick stove for a bathhouse will differ depending on the chosen design. Its detailed description is a separate material; below only an approximate procedure will be given.
- First, the first row of bricks is laid. Already at this stage it is necessary to reflect all the design features of the furnace. Here we mean air ducts, the firebox itself, the future pipe, and so on. The bricks are laid close to each other on the mortar. The remains are removed with a trowel.
- Next, subsequent layers of brick are laid in rows in a similar manner to the installation site of the first duct door (blower). After installation, brick laying continues. Here we can add that if you make not just an air duct, but leave some free space above the ashpit, then with its help you can solve the issue of supplying hot water to the washing compartment. A corrugated metal hose is placed inside this space, which is brought out at its ends. When the stove is heated, the hose will heat up accordingly. If you run water through it, the output will be hot water. Thus, there is no need for a heating tank, which is especially important for rooms with modest dimensions.
- So, moving gradually along the rows, the “body” of the stove is formed. When it’s time to install the grate bars, for convenience, you can select some space in two bricks equal to the thickness of the grate bars and install them in this place.
- After the combustion space has been formed, in accordance with the furnace design, you can either cover it with bricks or lay a metal base on which stones will be laid in the future.
- Next, in approximately the same way, an exhaust pipe is laid out, at the very top of which, to save material, you can attach a metal pipe and lead it through the roof.
Laying a stove with your own hands: the first stage
The most difficult thing in arranging a stove is the first rows. They must be perfectly even, since it will be necessary to focus on them in the process of further laying. Let's get started:
- Starting from the corners, lay the first row of bricks around the perimeter. Once the edging is complete, fill in the inside. The layer of clay mortar for a bunch of bricks should be approximately 3-5 mm.
- Lay the second row offset - the seams of the first row should be located directly in the middle of the second.
- Lay the third and fourth rows with similar offsets, leaving space for the ash pan.
- Install the blower door: secure it with galvanized wire. To prevent the latter from interfering during further installation, cut grooves in the adjacent bricks and hide it there. After this, fill the grooves with clay mortar.
- Lay the fifth row of bricks and install the grate. Install a steel corner so that you can easily change the grates later - they sometimes burn out.
Next, begin to build the lining - an internal screen made of bricks that will protect the furnace walls from high temperatures. Lining is performed only at the level of the combustion part of the structure. In this case, a distance of 22 mm must be maintained between the protective screen and the outer walls of the firebox in order to compensate for the difference in the expansion of the internal layers.
Furnace laying: second stage
Once you have completed the construction of the internal and external walls of the combustion chamber, proceed to installing the combustion door. To fasten it, you can use the same galvanized wire, but it is better to twist not one piece, but three at once.
Next, lay another row of bricks and begin to build a chamber for the stones. Its size should be such that all the cobblestones are heated evenly, that is, there is no need for a structure that is too large - in this case, the heat will not reach the top stones. It is believed that the optimal height is 40-50 cm. When the chamber is laid out, finish it with steel sheets that reflect heat.
The next step is to install the second grate. After this, continue to build rows, leaving an opening for steam. Its average width is 50 cm. This is absolutely enough to replace stones or repair the internal walls of the stove. The height of the opening is 5 rows. After laying them, you need to close the holes - for this you will have to order a special door for the dimensions of a specific structure.
When the oven reaches the size you need, cover the structure with a steel sheet with a pre-cut hole. Then install the corners for the ceiling and cover them with bricks. Then start building the chimney.
After completing the laying of the stove, install a water tank nearby and connect the structures with metal or metal-plastic pipes.
As you can see, laying a brick stove with a firebox from a dressing room consists of a lot of procedures that cannot be called simple construction work. Therefore, in order to successfully cope with them, strictly follow the technology and do not neglect safety rules - there is no place for amateur performance, because every step must be thought out to the smallest detail.
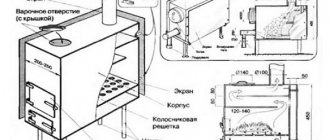
Design and operating principle
Before you begin construction work, you need to draw up a diagram of a brick stove for a bathhouse. Classic furnace equipment contains several elements:
- chimney for gas removal;
- combustion chamber;
- grate;
- ash box;
- heater.
Doors are fixed over the combustion chamber and ash hole. Additional elements include a water tank.
Firewood is loaded into the combustion chamber and the fire is lit. When the stones are hot, a little water is poured over them to create steam.