The lack of land suitable for building cottages did not become a problem.
In areas with flooding and shifting problem soils, houses are built without paying attention to the low strength characteristics of the soil. Today, developers have come to the aid of screw piles, which solve all these problems one hundred percent.
But such a foundation has one big disadvantage - the open space from the ground to the floor of the house. This results in large heat losses that affect heating costs.
We will tell you in the article how to insulate the base of a pile-screw foundation.
Why is it necessary to insulate a house on stilts?
In the absence of insulation, the floor in the room in such a house will be quite cold. There are two ways out of the situation:
- Insulate the floors.
- Insulate the pile foundation.
It is optimal to carry out thermal insulation of both the floor base and the foundation base.
A pile-screw foundation is steel pipes screwed into the ground, parts of which protrude above the soil surface. They are tied along the upper edges with either a metal profile or a wooden beam. The strapping gives rigidity to the foundation structure.
It is the space between the ground and the harness that remains open. It must be closed to prevent cold air from penetrating under the house.
You can do this in two ways:
- using bricks;
- using modern thermal insulation materials laid on the frame.
Work on the base of a pile-screw foundation. Part 2 insulation
19.09.2017
When building a house on screw piles, an unheated area is formed under the floor of the first floor.
Therefore, insulating the foundation on screw piles is an important and necessary process, which is carried out in several ways, based on the type of structure and material of the base.
With the help of an insulated base, an optimal microclimate in the room is ensured, and energy costs are also significantly reduced.
Thermal protection technology is a simple process that can be done independently.
To know how to insulate a foundation on screw piles, it is important to study the technological process and follow some recommendations
Features of insulation
When wondering whether it is necessary to insulate a structure of this type, it is worth considering a number of problems that may arise if the work is refused:
- Freezing of water supply and sewerage pipes located under the building;
- sweeping snow, which melts underground in the spring and forms dampness, which will lead to mold;
- strong cooling of the floor due to constant drafts.
To make your stay more cozy and comfortable, it is important to provide thermal protection, which will help eliminate the above problems. What to know, how to close the foundation, it is recommended to follow the instructions below
Insulation methods
The foundation of a wooden house is insulated with the following options:
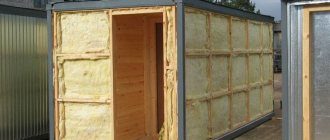
- Insulation of the base from the outside along the entire length. First, the plinth frame is constructed from the ground to the base of the walls, then the screw foundation is insulated.
- Lining the base with insulation from the inside. Thermal insulation is performed on the outside of the floor.
- Continuous insulation of the wooden floor of the first floor.
Before insulation, a number of specific features of the structure are taken into account, including the location, height of the pile pillars and the material used.
Process technology
The work is performed in the following sequence:
- Arrangement of a brick plinth or installation on a frame with cladding.
- External or internal insulation of the base.
It is important to have ventilation ducts, the functional purpose of which is to constantly ventilate the ceiling
Material used
To insulate a pile-screw structure, polystyrene foam is often used due to its high thermal insulation and sound insulation. The thermal protection technology provided by panel ceilings using this material is produced as follows:
- Elimination of cracks from the surface, treatment with a primer mixture for reliable fixation of insulation sheets.
- Then you need to sew up the sheets from the inside, using adhesive or foam glue.
- Carefully “foaming” the joints of the sheets.
- In order to ensure better insulation, the panels are glued in several layers.
- Installation of a metal mesh that will protect the material from various rodents.
If you don’t know how to cover the area under the house to prevent the possibility of blowing, you can pour soil or expanded clay under the insulated base. In addition, foundation insulation with penoplex, foam glass, polystyrene foam and polyurethane foam is widely known.
Practical advice
Experienced experts advise following some recommendations on how to properly insulate the base:
- upon completion of the insulation work, it is advisable to wait at least 7 days and only then begin installation of waterproofing;
- equip ventilation with a hole distance of 1.5-2 m;
- in order to protect the structure from permitting, the pile supports of the insulated foundation should not be moved or unscrewed;
- to increase the level of strength and reliability of the base, you need to additionally seal a layer of reinforcing mesh;
- if the work is carried out properly, the space in the middle of the SVF can be used for your own needs;
- work on cladding a pile-screw foundation must be carried out in strict compliance with technology.
When wondering how to insulate a pile-screw foundation, an experienced builder will answer that strengthening the foundation through thermal insulation is a simple procedure that everyone can do. There is no need to use specialized equipment or learn special skills.
Materials for thermal insulation
To insulate the base of a pile-screw foundation, the following is usually used:
- Board materials (expanded polystyrene, mineral wool, polystyrene foam). Durability and ease of installation are the main advantages of slab materials. For the base of a pile-screw foundation, the light weight of the structure will also be an advantage.
- Liquid (polyurethane foam). This modern material can be used to insulate the base of a pile-screw foundation, but only with the participation of specialists, because requires special skills and abilities. Provides a good level of protection from the cold, since there are no joints, the material covers everything in an even layer without transitions.
- Brick. It has been used for these purposes for a long time. A base in the form of a wall is formed from it. In this case, the material itself is laid in at least one brick, preferably one and a half. This thickness will provide the necessary thermal insulation characteristics.
Do-it-yourself insulation work
The correct sequence and accurate execution of all work will help achieve maximum results.
To understand how to insulate a pile foundation yourself, you will need to carefully study all stages of the work and prepare the tools:
- A spatula or brush for applying a protective layer to wooden structural elements.
- Hacksaw. Required when cutting the required size and amount of material.
- Drill or hammer drill for installing insulation.
- Level for measuring the angle of inclination of a surface.
- Insulation material.
After all the preparations, you can begin installing the insulation. All work is carried out according to the following scheme:
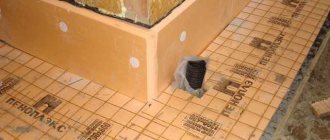
- First, the joints of the grillage are waterproofed, since it is through them that moisture most often penetrates. Because of this, condensation forms inside, which promotes the development of mold and metal corrosion.
Waterproofing grillage joints - Exposed metal areas are insulated with liquid bitumen, wooden areas are coated with an antiseptic to protect against mold.
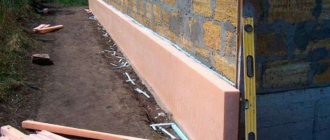
- Next, a protective structure is constructed. It can be made from a single-row brick wall, which is insulated on the outside with foam plastic and decorated with finishing material.
Covering the base with bricks - A sheathing for rolled or tile materials is mounted on the base.
- Insulation is placed between the guides. For a better fit, leave the distance between them 1 cm less than the size of the insulation.
- Longitudinal guides are mounted at an equidistant distance from the central part of the pile.
- Wooden guides are attached to the prepared frame with self-tapping screws in increments of the size of the insulation plate.
- After laying the insulation, the joints between the plates are sealed with polyurethane foam.
Sealing joints between slabs - Final work is carried out using finishing materials. The cladding is attached to the top of the insulation, screwed into wooden guides with self-tapping screws.
When you think about how to insulate a pile-screw foundation yourself, you can try the option of constructing a base from warm decorative panels.
Suspended structure made of panels for the base of a pile foundation
Creating a false base from panels is much easier than laying bricks. First, you should take care of the structure on which the panels will be attached. To do this, a metal frame with wooden guides is created around the entire perimeter. The distance between the guides is calculated according to the height of the foundation. All wooden elements are treated with an antiseptic.
Insulation is installed to the erected structure. It should not protrude beyond the grillage.
A decorative fence is attached to the structure using special glue. The fixed panel is connected to the grillage with its upper part, while the lower part should enter the ground 4-5 cm. At the point of their contact, it is necessary to remove the soil and sprinkle it with expanded clay or sand.
Since the panels have zero air permeability, you will need to create ventilation holes to provide air access. 4 vents are enough, one on each side. With the onset of cold weather, they are covered with a regular rag.
To drain rain and melt water, make a drainage system, then the soil around the house will remain dry.
What to choose?
The brick wall turns out to be low, but massive. Therefore, a thin strip foundation of concrete is poured under it. The thickness is within 10 cm. It must be taken into account that the brick plinth will be finished on the outside with some kind of material, for example, ordinary plaster. And this will also increase the thickness of the wall, but also the thermal insulation characteristics of the basement part of the foundation.
Bricklaying is a costly business. You can reduce costs by reducing the wall thickness - half a brick. But for this it will be necessary to carry out additional thermal insulation work either outside or inside.
On moving soils, the brick plinth is subjected to heavy loads, especially during frost heaving. Hence the constantly appearing cracks, which reduce the decorative qualities of the front surface.
It is difficult to deal with this problem, so most developers prefer the second option. Thus, brick insulation of the base for a pile-screw foundation is not advisable.
The modern building materials market offers a wide selection of different types of insulation. For the base of a pile-screw foundation, it is better to use slab foundations . They are more reliable, and for such a base this is an important factor.
This thermal insulation option requires a frame structure to which the insulation will be attached. For the frame, either profile pipes or profiles for fastening drywall are used. You can use wooden blocks or boards, but this option has a low service life.
Of all the proposed thermal insulation materials, the best option is polystyrene foam (foam) boards and extruded polystyrene foam. A prominent representative of the latter is the Penoplex brand. Here are its characteristics:
| Characteristics | Unit change | Meaning |
| Thermal conductivity | W/m K | 0,03 |
| Water absorption | % | 0,5 |
| Density | kg/m | 25-32 |
| Compressive strength | MPa | 0,2 |
| Fire resistance | Class | G3 |
| Operating temperature | °C | -50…+75 |
For example, we can compare it with the thermal conductivity of brick, which is 0.4 W/m K. That is, the thermal insulation qualities of Penoplex are 10 times higher. Therefore, this material, laid with a thickness of only 50 mm, guarantees complete insulation from the cold.
The only negative is flammability. But since the insulation is laid outside, and it is also decorated, there is nothing to worry about.
Another commonly used thermal insulation material is basalt wool in mats. Here are its characteristics:
| Characteristics | Unit change | Meaning |
| Thermal conductivity | W/m K | 0,04 |
| Water absorption | % | 1 |
| Density | kg/m³ | 55-75 |
| Flammability | Class | NG |
| Operating temperature | °C | -50…+50 |
| Compressive strength | MPa | 0,05-0,8 |
Mineral wool is inferior in thermal conductivity, but it all depends on the density of the product. The denser the material, the higher the thermal insulation properties. But the price also increases. A big plus is that this material is non-flammable.
There is a wide range of basalt wool mats on the market . There are for walls, for foundations, for roofs, for floor bases, for chimneys. It is clear that in our case we need to purchase for foundations.
You can simply choose from the two proposed insulation materials. The first is usually used for external insulation, the second for internal. To make it clear what we are talking about, let’s consider the two thermal insulation processes separately.
conclusions
A pile-screw foundation with a high grillage is popular due to its low cost and high practicality. Its downside is that it is a ventilated underground space.
To protect the house from the penetration of cold and simply to give it beauty, the technology of creating a false base is used. It can be done using insulated brickwork, but it is better to use the technology of an insulated panel base. Compared to brickwork, panel plinth is much cheaper and more efficient.
Necessary materials
To carry out the work, you need insulation and a profile pipe with a cross-section of 50x30 mm and a thickness of 2 mm.
From the tools:
- welding machine,
- screwdriver,
- building level.
Calculations
An important point is to correctly calculate the required amount of insulation and profile pipe. If there are surpluses left, it doesn’t matter. Well, if it’s not enough, you’ll have to go to the hardware store again.
As for the thermal insulation material, it is calculated taking into account the area it covers. This is the distance from the ground to the piping multiplied by the perimeter of the house.
Eg:
- house 10x10 m - perimeter 10x4=40 m;
- plinth height – 0.5 m.
The area of the covered surface is: 0.5x40 = 20 m. This means that this amount of insulation must be purchased. It is better to be 5-10% larger, because it is often necessary to trim to the required dimensions. You can save a lot if you choose a material with a width equal to the height of the base.
The profile pipe is laid on the piles in two rows . Accordingly, its quantity is determined by the double perimeter of the house. That is, in our case we will need 80 m of this material.
How to insulate a pile structure?
Let's consider the algorithm for insulating the base of a pile-screw foundation.
Frame installation
There is no need to be clever here. The pipes are laid horizontally, for which you need to use a building level. There are no strict standards for the location of frame elements relative to the frame of the house and the ground.
Optimal - 5 cm . That is, the pipe will not touch the ground, which will increase its service life due to the absence of metal corrosion.
It is better to weld the profile pipe to the screw piles. Some people try to fasten them with self-tapping screws, others with clamps. In this case, a more reliable method than welding cannot be found.
Laying insulation
As mentioned above, there are two options for laying insulation:
- From the outside.
- From the inside from the side of the organized basement.
Option #1
For this purpose, more durable polystyrene foam is used. The slabs are simply laid on the frame and secured to it with self-tapping screws with press washers or simply wide washers. For example, like in the photo below.
The distance between fasteners is 20-30 cm . Self-tapping screws in length are selected taking into account the thickness of the insulation, the wall thickness of the profile pipe, plus 5-10 mm.
There is no need to screw in fasteners much. That is, there is no need to embed the washers into the plate. The main task here is to fix the thermal insulation material. And since there are a lot of screws, the quality of fastening will be high.
It is recommended to choose slabs with a tongue-and-groove connection . When laying on the surface of the heat-insulating layer, there are no gaps or cracks.
If ordinary slabs with smooth edges were purchased, then they try to lay them in such a way that there are no gaps between them. If any are formed, they are filled with polystyrene foam or a special sealant for polystyrene boards. It is very similar to foam, but does not expand in volume when exposed to air.
Video instructions for insulating the base of a pile-screw foundation:
There is another option . To do this, a flat material is first installed and secured to the frame. For example, an OSB board or flat cement-asbestos slate can be used. And the insulation is already attached to it either with self-tapping screws or with an adhesive composition for polystyrene foam boards. The latter is sold in cans. The fastening is reliable.
Option No. 2
The situation is that facing material is installed on the outside of the mounted frame. There is a huge variety of options offered, for example, corrugated sheeting. Since the base becomes decorated, the insulation process is transferred inside, that is, under the house. This often happens when thermal insulation was not part of the home owner's original plans.
After living one winter in such a house, even with insulated floors, many decide to insulate the foundation. You can also use Penoplex for this.
The process is carried out according to the following scheme:
- mineral wool mats are cut to the required dimensions for the height of the foundation base;
- trimming is done so that the material fits tightly between the frame of the house and the ground;
- Fastening to the frame is carried out in exactly the same way as in the previous version: with self-tapping screws and wide washers.
Here it is again important not to leave gaps between the insulation boards, which turn into cold bridges.
Option #3
It is based on the use of the most effective thermal insulation material - polyurethane foam . This is foam that is applied under pressure to the surface to be insulated. In air it polymerizes, becomes strong and monolithic, that is, without a single crack.
This insulation is applied only from inside the premises. For this, professional equipment is used. That is, we are not talking about carrying out the work independently. The thermal insulation layer can be applied to any surface; it has maximum adhesion properties. Polyurethane foam itself is an expensive material, plus the cost of work. But the insulation efficiency is the highest.
It is precisely because of the high cost that pile-screw foundations are not insulated with polyurethane foam. It will be cheaper to use mineral wool, plus insulate the floors.
Insulation of a pile foundation: step-by-step instructions
Any owner of a site, when planning to build his own house, tries to minimize the total cost estimate as much as possible. Fortunately, the abundance of modern technological developments makes it possible to choose the least expensive approaches to construction, naturally, without losing the performance qualities of the future building.
Insulation of a pile foundation
One of the most material-intensive, expensive, and time-consuming stages of construction was usually considered to be the construction of the foundation of a house. However, for many types of residential and ancillary buildings, pouring a strip or monolithic slab base is not required at all. It is enough to confine yourself to installing piles, which are tied on top with a grillage - this will become a reliable basis for raising the walls. This approach is good for everyone, but very often the house, especially with very uneven terrain, turns out to be “floating in the air,” that is, below the floors of the first floor there is a space blown by all the winds. It’s okay - you need to properly insulate the pile foundation, and the building, even externally, will not differ at all from those buildings that are installed on a “classical” concrete base.
A few words about the pile-screw foundation
The pile-screw foundation has a number of significant advantages.
- First of all, it becomes the most profitable solution if the house is being built on unstable, waterlogged soils that tend to swell in winter. The lower screw part of the pile reaches depths below the freezing level, stable layers of soil, and seasonal fluctuations in the surface do not have any negative impact on the constructed house.
- Such a foundation is the most economical and easiest to construct when building houses on sites with rugged terrain - achieving horizontal bottom trim with this approach is the easiest way.
- The construction of a pile-screw foundation is less dependent than others on the season and weather - construction can be carried out at any time of the year.
- In terms of construction time, such a foundation also has no equal.
- The technology for its arrangement is quite simple and, subject to certain conditions, can be implemented on its own.
- From a cost point of view, the construction of a pile foundation is the most economical.
The entire technology for creating a pile-screw foundation for building a house can be briefly presented as follows:
| Illustration | Brief description of the operation performed |
| Piles are pipes with a diameter of 100 mm or more made of high-quality steel, with a wall thickness of at least 4 mm. Specific parameters of piles, including their length, are calculated by designers depending on the level of planned loads, the general picture of soils and topography at the construction site. The lower end of the pile has a sharp point with one or more spiral-shaped cutting blades welded on. | |
| A set of piles usually consists of pile heads to which mounting platforms are welded. The diameter of the heads is such that they fit tightly onto the pile pipe. | |
| After marking the pile field, pits with a depth of about 300 ÷ 500 mm are usually dug in the places where the supports are installed. They are often shed with plenty of water to facilitate the initial screwing of the pile into the ground. | |
| The pile is placed vertically in the pit, and a pin is inserted into the hole in its upper part. pipe-levers are put on it for screwing. | |
| With the efforts of two people (sometimes more are required), the pile rotates, gradually plunging deeper into the thickness of the soil. At this stage of work, the most important thing is strict control of the vertical screwing of the support. Screwing continues until the pre-set depth mark is reached. Many construction organizations have specialized equipment to mechanize this most labor-intensive operation. | |
| After all the piles are installed, using a laser or water level, an accurate mark of the common protruding part of the supports is made on each pipe. It must be below the hole where the pin was inserted. | |
| Next, all piles are trimmed to a single horizontal level. | |
| The concrete solution is mixed, and through the funnel the pile is completely filled to the top with it. | |
| The consistency of the solution should be sufficiently liquid and fluid so that the pipe cavity is filled completely, without air bubbles. It is typical that there is no need to wait for the concrete to set. They immediately move on to the next operation. | |
| The standard caps are placed on the piles until they stop, so that the installation sites are oriented correctly. The heads are tightly welded with a continuous seam | |
| To completely eliminate any vibrations of the supports, it is recommended to provide an auxiliary strapping made of a metal profile, which is welded into the piles below the head. If the piles protrude to a considerable height, sometimes several rows of strapping are welded. This operation is especially important if the crown beam will be directly attached to the mounting sites of the piles. | |
| There is another approach - installing a common belt (grillage), for example, from a channel of the appropriate size. The grillage will become the basis for the further construction of the walls of the house. | |
| The installation of a pile-screw foundation must be completed by cleaning the weld seams from slag and high-quality treatment of all metal parts with anti-corrosion compounds. |
The table focuses on creating a grillage from rolled steel. However, the options may vary.
Several options for piping (grillage) of a pile-screw foundation
- Figures “A” and “B” show a welded grillage made from an I-beam and a channel, respectively.
- Fragment “B” - the grillage is not used at all, and the lower crown beam is attached to the mounting sites of the piles.
- And finally, option “G” is pouring a reinforced concrete grillage. In this case, a kind of “symbiosis” is created between the pile and strip foundations.
This option is the most labor-intensive, and is most often resorted to if it is necessary to create a reliable foundation for building a house made of brick or gas silicate blocks.
Expert opinion: Afanasyev E.V.
Chief editor of the Stroyday.ru project. Engineer.
In this case, at the stage of pouring concrete into the piles, a reinforcement structure is installed in the pipes - it should protrude from above. After the piles are installed, the formwork for the grillage is installed, and a reinforcing belt is laid, which must be connected to the internal reinforcement of the piles. The solution is poured, and the created structure will be ready for further construction operations only after the concrete has fully matured (no earlier than a month).
Structurally, such a grillage can be raised above the ground, located on the surface, or be an analogue of a traditional shallow foundation strip. But in any case, it rests not on the ground, but on piles.
Various options for the location of a reinforced concrete grillage
1 – screw pile;
2 – internal reinforcement in the pile;
3 – grillage reinforcement belt;
4 – reinforced concrete grillage.
Such close attention was paid to the types of pile binding because the technological approach to the insulation of a pile foundation directly depends on this.
Why is it necessary to insulate a pile foundation?
It would seem, what is the point of insulating a pile foundation? It rests deep in layers of non-freezing soil, that is, it is not in danger of swelling. If high-quality anti-corrosion preparation of the structure has been carried out, then there is no particular fear of the destructive effects of soil and atmospheric moisture.
However, very vulnerable areas remain, as well as a number of other unresolved issues:
- If a reinforced concrete grillage is poured, then regardless of its position relative to the ground level, this structure becomes a very powerful cold accumulator. Naturally, a massive grillage will “pull” heat from the walls and ceilings resting on it, which will lead to significant heat losses and increased costs for replenishing them with the heating system.
A reinforced concrete grillage is always a powerful “cold accumulator.”
In fact, the goals of insulation in this case largely coincide with the task of thermal insulation work on a conventional monolithic strip foundation - reducing heat loss, and protecting the reinforced concrete structure itself from the effects of temperature changes.
- If the walls are installed on a wooden or metal grillage, then there is space under the house that is blown by the wind. During the cold season, this will also lead to cooling of the ground floor floor and the lower part of the walls. Of course, it is possible to provide very reliable multi-layer thermal insulation of the ceiling, but it is still better to eliminate heat loss completely by covering the gap with an insulating structure.
- If the house is equipped with at least minimal “conveniences” - running water and even the simplest sewerage system, then engineering communications will pass through this underground space. Insulation of the pile foundation will increase the level of protection of communications from freezing and from mechanical damage.
Insulation and protection are required by utility lines running in the underground room.
- Just from an aesthetic point of view, the house will look much more advantageous if the basement part of the pile foundation is insulated and beautifully finished externally. In addition, garbage and dirt will inevitably be blown into the open space by the wind, which in itself is unpleasant and will require additional efforts to put things in order.
- The house will receive maximum protection if a blind area is installed around the perimeter of its walls. An integrated approach to the insulation of any foundation also implies the creation of a high-quality blind area that is not subject to swelling, that is, thermally insulated from below.
Now that the reader is apparently convinced of the need to insulate a pile foundation, we can proceed to consider some typical cases of work.
Insulation of a pile foundation with a reinforced concrete grillage
This is one of the most difficult cases, since the goal is not only to block access to cold air into the underground space, but also to provide thermal insulation protection for the grillage itself so that it is not subject to destructive influences and does not become a powerful bridge of cold.
There may also be several options, and they will depend on the height of the basement part of the pile foundation, the position of the reinforced concrete grillage, the features of the first floor ceiling, etc.
Let's look at one commonly used scheme:
The first option for insulating a pile foundation with a reinforced concrete grillage
1 – soil at the construction site.
2 – installed foundation pile, which ends at the top with a massive reinforced concrete grillage (item 3). The grillage itself is the basis for the construction of an aerated concrete (brick) wall (item 4).
On the outside (this is a prerequisite) there is a layer of insulation of the required thickness (item 5). As a thermal insulator, the best solution would be to use extruded polystyrene foam, for example, Penoplex-Foundation boards. This material is resistant to high static and dynamic loads, is not afraid of exposure to atmospheric and ground moisture, and has excellent thermal resistance.
Penoplex slabs - comprehensive home insulation
The Penoplex range of thermal insulation boards covers literally all areas of private construction. Read more about the advantages of Penoplex insulation and the technologies for its use in a special publication on our portal.
A layer of horizontal insulation (item 6) is tightly joined to the grillage insulation, without gaps, which will prevent freezing and swelling of the soil around the walls and thereby ensure the integrity of the concrete blind area poured along the perimeter (item 7). Often the blind area is not poured, but laid out, for example, from paving stones.
On top, also without a gap, the façade insulation (item 8) is joined together as in the diagram, or, better yet, overlapped, so as not to create a “cold bridge” at the border of the base and the wall.
Prices for Penoplex insulation
Penoplex insulation
With this approach, floor insulation is solved in the following way:
Expert opinion: Afanasyev E.V.
Chief editor of the Stroyday.ru project. Engineer.
Sand filling is made inside, about 500 mm thick (item 9). Instead of sand, the pillow can be made of loose insulation - expanded clay, or a complex, layer-by-layer option can be used. From above, this backfill must be covered with a waterproofing layer (item 10) - this role is usually played by a couple of layers of roofing material laid with overlapping overlaps.
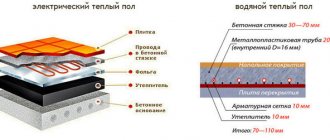
A rough screed with reinforcement is poured on top (item 11). A layer of insulation (item 12), for example, the same Penoplex, is laid on top of it. Well, above that there will be a finishing screed with a thickness of 60÷70 mm, in the thickness of which a water or electric “warm floor” can be provided.
This scheme almost completely blocks access to the cold to the grillage and walls, and there is simply no underground space as such.
Another option is when it is impossible to do without an underground, for example, when the first floor floor slab is laid on the grillage.
And in this version, the grillage is also insulated from below, from the ground
At the beginning, everything is the same - soil (item 1) with a screwed-in pile (item 2) and a reinforced concrete grillage (item 3). Differences - from the grillage comes the base brickwork (item 4), which already becomes the basis for the construction of walls made of bricks or blocks (item 5)
Vertical insulation of the base is carried out with the same extruded polystyrene foam (item 6). But in this case, horizontal insulation of the grillage itself is also provided from below. To do this, first lay out a gravel layer (item 7), then a compacted sand cushion (item 8), and then a layer of the same insulating material (item 9). The best solution is to carry out such a design even before pouring the grillage, that is, the horizontal layer of insulation in this case will act as the lower surface of the formwork. Thus, the foundation tape received reliable insulation from the outside and from the bottom.
Decorative cladding is provided on the outside of the plinth and facade wall (item 11) - these can be panels, siding with a ventilated gap, or a plaster layer using “wet facade” technology.
The diagram shows a blind area (item 10) without its own insulation, but such thermal insulation should not be ignored. This will significantly increase the viability of this structure, since the freezing of the soil under the blind area has not been canceled.
The floor slab (item 12) is laid on the grillage, and an underground (item 13) inevitably remains below it. Next, thermal insulation of the floor is carried out in the usual way. First, a layer of roll or coating waterproofing (item 14), then a layer of insulation (item 15), and then a finishing screed or “warm floor” system.
The entire grillage (tape) must open to the base. There will be no problem if the lower part of the insulation is below ground level - as already noted, Penoplex is not at all afraid of such an impact.
Before attaching the insulation to the grillage, all surfaces, concrete and metal, are first carefully waterproofed - for this, special bitumen-based mastics are usually used, and to obtain a guaranteed result, it is also recommended to use high-quality roofing felt.
It is recommended to fix the insulation on a concrete waterproofed surface using a special glue designed specifically for thermal insulation work. It can be in the form of a dry construction mixture, a ready-made paste composition, or in tubes like polyurethane foam.
One of the types of glue for insulation work
Penoplex panels have lamellas for easy joining without leaving gaps. But if the gaps still remain, then they are filled with polyurethane foam. If foam is used, it is recommended to coat all seams with bitumen mastic on top, after trimming off the excess.
There is no provision for fastening the panels to the concrete strip below the ground level, but in the basement part, if necessary, you can use “fungi” dowels.
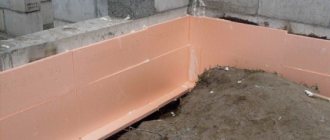
As already mentioned, in the case under consideration, it is imperative to provide horizontal thermal insulation along the perimeter of the building, under the blind area. To do this, a trench is dug in advance, about 400 mm deep. A sand and gravel cushion is poured into the bottom and compacted, and then the insulation boards are pricked so that they fit tightly with the vertical insulation.
Joining vertical and horizontal insulating belts and installing reinforcing mesh
Reinforcing mesh is laid on top of the insulation. Formwork is installed along the outer perimeter of the future blind area. Then you can pour concrete so that a small difference in height is ensured - about 30÷50 mm with a slope from the wall.
Pouring the blind area with concrete
In fact, at this point the insulation of the pile foundation with a reinforced concrete grillage can be considered complete. It remains only after the blind area has completely hardened to provide external cladding of the base - panels, tiles, plaster, etc.
The question of the thickness of the insulating layer, vertical and horizontal, remained unresolved, and this is also of great importance in this case.
It is easy to calculate this parameter, guided by the normalized values of heat transfer resistance for building structures calculated for a specific construction region. These indicators can be determined, for example, on the attached map diagram - in this case we are interested in purple numbers - for the walls.
Map diagram with normalized heat transfer resistance values
Knowing the thermal conductivity coefficients of building and insulating materials and the thickness of the foundation tape (grillage), it is easy to calculate the required thickness of thermal insulation. We will not give calculation formulas, but rather suggest using a convenient calculator:
Calculator for calculating the thickness of vertical insulation of a pile foundation with a concrete grillage
Other materials that can be used as a layer of thermal insulation include ordinary polystyrene foam (foam), polyurethane foam in the form of panels, or applied by spraying. All this is also taken into account in the calculator.
The resulting value is rounded and reduced to standard thicknesses of insulating materials.
Go to calculations
Without much error, you can use another tabular method for determining the thickness of insulation.
By the way, it allows you to determine the recommended dimensions of the horizontal layer of thermal insulation in terms of thickness and width from the wall. In addition, it is recommended to thicken the insulation in the most vulnerable areas - namely in the corners of the house.
Thickened areas of horizontal insulation at the corners of the building
The parameters of such reinforcement - the total thickness of the layer and the length of the section from the corner of the house, will also be obtained from the table.
First, you need to determine approximately (rounded to 500) the so-called “frost index” for your region. To do this, you can use the following map diagram:
Schematic map with frost index isotherms
Now all that remains is to enter the table and determine the necessary parameters for the vertical and horizontal thermal insulation of the foundation:
| “Frost index”, MI (degree-hours) | up to 35000 | 35000 | 40000 | 50000 | 60000 | 70000 | 80000 | 90000 |
| Vertical foundation insulation: | ||||||||
| — thickness of the vertical insulation layer (mm) | 84 | 91 | 98 | 112 | 126 | 140 | 154 | 168 |
| Horizontal insulation along the perimeter of the foundation: | ||||||||
| — thickness of the horizontal insulation belt (mm) | not necessary | 18 | 32 | 49 | 63 | 81 | 102 | 133 |
| — S — width of the horizontal insulation belt (m) | not necessary | 0.3 | 0.6 | 0.9 | 1.2 | 1.5 | 1.8 | 1.8 |
| — thickness of the thickened section (mm) | not necessary | 25 | 44 | 69 | 95 | 121 | 152 | 200 |
| — L — length of thickened sections from the corners of the building (m) | not necessary | 1.2 | 1.2 | 1.5 | 2 | 2.5 | 3 | 3.5 |
The obtained values, if necessary, can be rounded in one direction or another (depending on the more accurate value of the “frost index”), and brought to the standard thicknesses of manufactured insulation materials.
Insulation of a pile-screw foundation with a metal grillage or timber frame
The main difference between this option is the absence of a massive cold accumulator that would “pull” heat from the walls. And therefore, the main efforts should be directed not so much at external thermal insulation, but at ensuring the most efficient basement floor of the first floor.
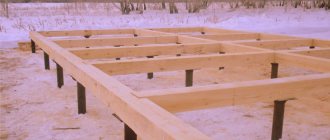
As usual, a pile-screw foundation with a similar piping implies a fairly high location of the “zero level” above the ground surface, which can also be aggravated by uneven terrain. Filling the entire internal space with soil, and then creating a sand-expanded clay insulation cushion is possible in principle, but in most cases it is absolutely not justified from the point of view of uneconomicality and too much labor. Therefore, the basement floor is usually raised above the ground, leaving a ventilated space below. This satisfies certain requirements for high-quality thermal insulation of the floor.
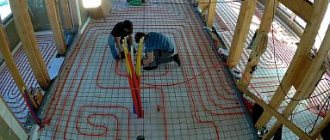
Insulation of the basement floor
Most often, in such construction, floors are used on floor beams. The insulation diagram for such a floor is shown in the figure:
Scheme of the insulated basement and floor of the first floor
1 – floor beams made of wooden beams of calculated cross-section. Usually – at least 100×200 mm.
Skull bars (item 2) with a cross-section of approximately 50×50 mm are attached to the bottom of the beams. They become the basis for laying subfloor boards (item 3) about 25 mm thick. For the subfloor, you can use not the highest quality material. Often, for the sake of economy, it is not even made continuous, with gaps between the boards, but in such a way that the insulation material is guaranteed to be retained.
Waterproofing (item 4) is laid on the subfloor boards, extending onto the floor beams. This may be a special high-density waterproofing film, but it is quite possible to use inexpensive roofing felt. Overlaps of adjacent waterproofing strips must be taped.
Insulation boards are laid on top of the waterproofing (item 5). In this case, the best option would be mineral basalt wool with a density of 35÷40 kg/m³. The thickness of the insulation is determined by calculations or is taken equal to 200 mm.
Please note that the diagram shows logs for laying the finished floor (item 6). This is a high-quality timber of the required cross-section (for example, 75×75 mm). But they are usually mounted perpendicular to the floor beams. And at the same time, insulation is performed in two layers. The first row of thermal insulation mats is laid between the tanks, and the second - already between the joists, perpendicularly. This ensures an almost complete absence of cold bridges through the wooden parts of the ceiling.
How to install floor beams and joists
The quality of the floor and the duration of its operation directly depend on the correct selection and installation of load-bearing elements. How to choose the required section and how to install floor beams and joists - read in a special publication on our portal.
A layer of vapor barrier film (item 7) with a vapor permeability of no more than 1 g/m²/24 hours is laid on top of the insulation. It is fixed with counter-lattice boards (pos. thickness from 30 to 50 mm - this will create the necessary ventilation gap.
Prices for thermal insulation adhesive Ceresit
thermal insulation adhesive Ceresit
And finally, the finishing floor covering (item 9) from high-quality boards with a thickness of 35÷40 mm is installed along the counter-lattice boards.
Before installing such a floor structure, all wooden parts (with the exception of only the top “finishing” board) must undergo thorough treatment with special compounds that will prevent biological decomposition of the wood, its infection with fungus, and give the material the necessary fire resistance.
All wooden parts must undergo careful preparation
You should not skimp on impregnation - it is better to carry out the treatment in several layers. Under the conditions under consideration, this will be extremely important; attention will be focused on this below.
If a slab was used as the basement floor of the first floor, it is recommended that in addition to the internal insulation of the floor of the first floor, it is also recommended to provide an external layer of thermal insulation. The fact is that with such a scheme without external insulation, the dew point will inevitably be shifted into the thickness of the internal insulation, which will lead to its gradual saturation with moisture. The outer layer of thermal insulation will bring the dew point outside.
Insulation of the basement around the perimeter of the building
The next question is what to do with the gap between the soil surface and the frame, that is, with the uncovered base part of the pile foundation.
Opinions on this matter vary quite a lot.
- Many builders argue that high-quality insulation of the floor is quite enough, and the lower space should remain ventilated, and it is enough to simply decorate it with decorative cladding.
- Opponents of this approach are of the opinion that insulation is still necessary, since unnecessary heat loss, especially on extremely cold winter days, will be very significant, and it is better to avoid it completely.
Probably the truth lies somewhere in the middle. Insulation in any case will not hurt, but it must be done in such a way as not to harm the entire structure of the floor.
How can you perform vertical insulation of the basement part?
Brickwork
One option is to build a brick basement wall. With careful laying, this will achieve a certain insulation of the underground space and at the same time create a decorative cladding.
To lay a brick wall (usually half a brick), it is necessary to prepare the base. This can be a shallow foundation strip, approximately 200 mm wide, poured around the perimeter of the house. True, there is a certain danger in this option.
The fact is that, as already mentioned, a pile foundation is usually installed on unstable soils, that is, the immobility of the building itself is ensured. But a shallow strip foundation for brick cladding will not have such stability, and winter swelling of the soil will inevitably lead to its deformation. How long will such brick cladding of the basement last?
This means that it is advisable to connect the base for the brickwork with stationary piles. This can be achieved, for example, by welding a channel to the piles along the perimeter, aligning it exactly horizontally.
For brickwork, a base has been prepared from a channel welded to the piles
The size of the channel is selected so that the brick fits into it. The metal profile, after anti-corrosion treatment and creation of a waterproofing layer, becomes a kind of “strip foundation” for the brickwork. A clear example of this approach is shown in the video:
Video: How to cover the basement of a pile foundation with bricks
Closing the basement opening with a fence
Another solution to the problem is to install a wall (fence) made of sheet material or special panels. This involves installing the partition on a frame structure.
In principle, there should be no issues with the frame - reliable vertical posts are already there - these are the piles themselves. If, even during the construction of the pile foundation, additional piping with a metal profile was immediately carried out (as was shown in the table above), then we can say that the frame is already completely ready.
Approximate diagram of fastening the pick-up to the metal frame of the piles
1 – soil surface.
2 – screw pile.
3 – strapping beam.
4 – Two rows of welded additional pile piping – profile pipes.
5 – Pickup. It can be, for example, sheets of flat slate, cement-bonded particle boards (CSP), and often even simply insulating boards of extruded polystyrene foam.
6 – External decorative cladding.
The metal frame is not a dogma at all. It is quite possible to limit yourself to a wooden structure, having thought through its fastening to vertical piles, for example, by welding small gussets-brackets into the pipes for screwing boards or beams. Of course, all wooden elements of such a structure must first undergo appropriate processing.
You can also use a wooden frame
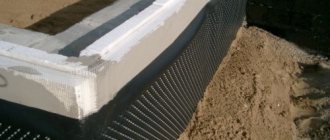
Insulation of the fence can be carried out both from the outside and from the inside. The photographs below show that DSP sheets can be mounted on top of the insulation layer for further finishing, or the insulation itself (extruded polystyrene foam) itself is the basis for finishing work.
Various options for the location of insulation boards
An option is possible in which the thin, strong wall of the intake is insulated from the inside, from the underground space. For example, you can use sprayed polyurethane foam for this.
Thermal insulation is made from the inside by spraying polyurethane foam
Often, special panels are used as a material to create such a false base, which combine the properties of both insulation and decorative finishing. They are made of polystyrene foam or polyurethane foam, and on the outer surface they have imitation stone or brickwork, or even clinker tile cladding. As a rule, such thermal panels have a well-thought-out system of fastening and joining to each other, which allows the work to be completed in the shortest possible time - issues of insulation and finishing are resolved simultaneously.
Base thermal panels - both insulation and finishing at the same time
If a regular insulated fence is installed, then its finishing can include a very large number of options - all at the discretion of the homeowner. At the same time, during finishing, the issue of basement flashings is immediately taken into account.
Finishing the base and flashings
A well-designed basement always affects the “solidity” of the entire house. What options exist for finishing the plinth - read in a special publication on our portal.
What should be the thickness of the insulation? In principle, you can use the same calculation system as given above - just enter a zero value in the “grillage thickness” field in the calculator. You can also use the data from the table given there, including to create an insulated blind area.
The blind area can also be joined to a false base, as shown above. True, sometimes they prefer another option - the lower edge of the fence is not covered with soil and does not meet the blind area, but a ventilation gap is left there. True, the thermal insulation qualities of such a false base are significantly reduced. But for regions with mild winters it is a very good option.
Options for the relative position of the basement fence and blind area
On the left is a diagram with complete closure of the basement clearance, on the right - with leaving a ventilated gap.
1 – soil.
2 – pile.
3 – frame for fastening the pick-up.
4 – pick up.
5 – a layer of waterproofing that ensures the outflow of atmospheric moisture into the drainage. Please note that it is located differently.
6 – external decorative finishing of the false base.
7 – sand cushion.
8 – blind area (paving slabs can be used).
9 – basement ebb.
10 – drainage pipe.
The blue arrow in the right figure shows the remaining ventilation gap (about 30 ÷ 50 mm).
If it is planned to completely close the space between the soil and the piping, then one extremely important point must be taken into account. In the insulated underground space there will be increased humidity and dampness will certainly begin to accumulate. This can have the most negative impact on the condition of all wooden parts of the basement floor and frame structure - another important argument in favor of their conscientious preliminary preparation.
Prices for popular insulation
To avoid the destructive effects of dampness, it is necessary to provide ventilation vents - one on each side of the house. They are equipped with closing windows, and in winter, when heat conservation comes to the fore, the vents can be kept closed. With the onset of the warm season, the vents open and the underground space receives the necessary ventilation.
The total area of the vents must be at least 1/400 of the area of the resulting basement room. For example, for a house 7 × 10 m, that is, with a basement of 70 m², the total area of the vents should be at least 0.175 m². If you make, say, 6 vents, then the area of each will be about 0.03 m², and you can choose a size of 20 × 15 cm. However, only the area is important, and the specific dimensions and shape of the vents can be arbitrary.
Video: What are the consequences of mistakes in insulating a pile foundation?
In order to always maintain dry soil around a house on a pile foundation, it is recommended to install a drainage system - one of the diagrams shows its pipe. But this is already a topic for detailed consideration in a separate article.
Errors during work
The biggest mistake is leaving gaps in the thermal insulation layer . Even 1 mm will negate all efforts. In the defective area under the floor, the temperature will be lower. This means that one of the rooms will not warm up as needed.
Frost will begin to form under the floor. Condensation will appear, which will negatively affect the technical condition of metal and wooden products and insulation. That is, their service life will decrease.
You will find a lot of important and useful information about basement insulation in this section.