Why is it better to choose polystyrene foam?
Existing construction technologies today enable developers to use several types of insulation: liquid (foam), polystyrene foam, loose expanded clay or slag, expanded polystyrene. Why do we recommend polystyrene foam?
- Low thermal conductivity coefficient with relatively high physical strength. Production technology involves the use of special innovative additives to improve the performance characteristics of the material.
- Versatility of use. Expanded polystyrene can be used to insulate not only foundations (outside or inside), but also walls, ceilings, floors, etc. This greatly simplifies the building construction process and minimizes unproductive losses for insulation of the entire building. You can purchase the same type of insulation for all structures, including ceilings, walls and floors, and then use it based on the needs for each element of the building.
- Manufacturability. Expanded polystyrene is easy to cut and process; there is no need to purchase special tools and equipment for work. The slabs can be fixed with dowels and large caps or glued. The shelf life under proper conditions is practically unlimited. If for some reason the insulation of the foundation is postponed to a later date, the quality of the material will not deteriorate.
- Low price and long service life. In terms of the totality of these characteristics, polystyrene foam has no equal among all insulation materials.
XPS TECHNONICOL CARBON ECO
Unfortunately, there are also disadvantages: flammability, risks of damage by rodents and insufficient environmental performance. But these shortcomings can be easily eliminated by simple construction operations.
Insulation Penoplex Foundation®
We will describe how this is done below.
Penoplex prices
Penoplex
What is attractive about insulating the foundation of a private house with polystyrene foam and why?
Thermal insulation of the base of house construction completely solves two important problems: it reduces heat loss and protects the structure from deformation at low temperatures. These factors are of decisive importance, since most of the soils in our country are of the heaving type. They are characterized by freezing to great depths, after which, during the process of thawing, the soil changes its original volume. The result is deformation phenomena that adversely affect the integrity of the foundation.
Effective insulation of the outside of the foundation of a house with polystyrene foam is widely used in private construction. This is mainly due to the following material parameters:
- Availability and low cost.
- Absolute hydrophobicity.
- Durability and stability.
- Resistant to temperature changes.
- Low thermal conductivity coefficient.
The only, but also quite significant, drawback of polystyrene foam is its fragility. To prevent damage, the insulation layer should be covered with a finishing mixture in a short time and a blind area of paving slabs around the building. By the way, they often do thermal insulation and blind areas with their own hands, when an expanded polystyrene belt is placed under the ground backfill. This reduces the risk of soil heaving with subsequent destruction of the foundation.
Types of materials
In order to insulate the foundation of a house from the outside with polystyrene foam to achieve the desired effect, you should know the features of these materials. Both insulation materials belong to the same group, so the installation methods are similar. However, the slabs have different characteristics and different prices.
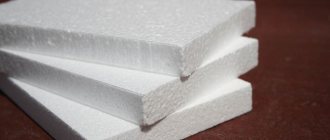
Polystyrene foam is foamed polystyrene; industry produces it in slabs of 500x1000 mm and 1000x1000 mm formats. The thickness of the products varies from 20 to 100 mm. When choosing foam plastic, do not forget about its density. After installing the heat insulator, you will need to additionally install a rolled hydrobarrier or treat the foam with waterproofing mastics.
Important! The strength of foam materials is significantly lower than that of extruded polystyrene foam.
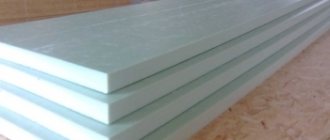
Low cost and ease of installation make extruded products one of the most popular among similar insulation materials. All this thanks to the following characteristics:
- Low coefficient of vapor permeability.
- Does not allow or absorb moisture.
- Suitable for thermal insulation of any type of base.
- The thickness of the slabs is from 100 to 120 mm.
Where to start with insulation
It is advisable to insulate the foundation during construction; such work is best done immediately after removing the formwork. The process is greatly simplified, safety is increased, and the amount of excavation work is minimized. In addition, the risks of reducing the load-bearing characteristics of foundations are eliminated.
The photo shows the process of dismantling the foundation, after which it is advisable to carry out insulation
If insulation is done in a residential building, then the list of works increases, their complexity and cost increase. Before starting insulation, you should analyze the condition of the building and take into account plans for the use of basements.
- Proximity of groundwater . If the house is located on a waterlogged area, then before starting work on insulating the foundation, you need to do reclamation. We'll tell you how to do this a little below.
- Purpose of basements . If they are planned to be used only for storing food products or small household equipment, then insulation is done according to one algorithm. Completely different work needs to be done for foundations, the basements of which will be used for recreation rooms, gyms, etc.
Depending on these parameters, not only the depth of insulation is selected, but also the characteristics and technology of laying the insulating layer.
After the preparatory issues have been resolved, you need to calculate the nomenclature and quantity of building materials. At the time of purchase, the quantity increases by approximately 10% to cover various waste and errors.
Calculation of the quantity of materials
Insulating the foundation with foam plastic from the inside
Internal insulation is carried out using a similar technology, excluding trench digging. But it has a number of features.
- mandatory fastening to an umbrella dowel (fungus). The dowel is attached to the corners of the sheet and one in the center;
- insulation is carried out along the floor (if it is planned to adapt the basement into a living space). In this case, polystyrene foam is placed between the joists;
- the need to use a membrane that will protect the base of the foundation from moisture;
- mandatory ventilation device, through a system of ventilation ducts, through a through hole in the foundation or forced. Otherwise, moisture will accumulate in the basement, which will ultimately lead to the destruction of the foundation base, the appearance of mold and rot.
In general, insulating the foundation with foam plastic with your own hands does not require special knowledge and tools, but will entail time and physical costs.
Preparation for insulation of foundations located on waterlogged soils
Builders use polystyrene foam boards to relieve the thrust loads of the soil during its freezing/unfreezing. But after this, the polystyrene foam receives significant damage, which reduces its heat-shielding properties. In our case, it is necessary to take special measures to ensure that the slabs fulfill their main task - to serve as reliable and effective insulation. This can be achieved by removing excess moisture; the lower the relative humidity of the earth, the lower the coefficient of its expansion during freezing. Accordingly, the less compression force on the plates.
The task of the preparatory work is to drain groundwater. How to do it?
Foundation drainage diagram
Foundation drainage device
Step 1 . Dig a trench around the perimeter of the house to the depth of the foundation. Width ranges from 40–50 centimeters.
Important. Never undermine the ground under the foundation strip, dig very carefully. If the ground is numb and has insufficient load-bearing properties, then let the depth of the trench be 5–10 cm less than the depth of the foundation.
Ditch for drainage system
One more tip. Are there concerns about the strength of the foundation? Do the work in stages, each wall separately. You can dig a second trench only after the previous one has been filled. This complicates the whole process, but it is not worth risking the stability of the building. The use of earth-moving equipment is not recommended. It may be more difficult and difficult to do by hand, but the risk of damage to the house’s structures is completely eliminated. It’s hard to dig on your own - invite neighbors or friends to help. If this is not possible, use the services of construction crews. Just don’t forget to control the quality of their work; there are often outright hacks. Especially in such low-skilled jobs.
Step 2. Consider a method for draining groundwater. They can be taken directly outside the site or into special containers. It all depends on the terrain and the depth of the drainage pipes. Please keep in mind that the angle of inclination of the drainage system should be within 2–3 mm per linear meter. Immediately dig a trench to lay the pipe that drains water away from the house. If possible, do drainage throughout the entire area, and not just near the house. It's expensive, but it greatly improves the comfort of living in a country house.
Compacting gravel at the bottom of a ditch
Step 3. Lay drainage pipes around the perimeter of the foundation, making sure that they have the required slope in all places. Drainage pipes have holes for receiving water, do not allow them to become clogged. Cover the pipes with geotextiles and pour sand 20–25 cm thick on top. Then the water is drained using ordinary plastic ones.
Laying pipes and connecting drainage wells
Drainage well
Pipes are covered with rubble
Step 4. Compact the sand well and fill the remaining space with soil. Remove large stones, they can damage the pipes.
Wrapping the ends of the geotextile and backfilling the soil
Practical advice. In order to further reduce the lateral soil pressure on polystyrene foam, it is recommended to make a sand layer up to 30 cm thick between the material and the ground. If the house is located on a hill and there is no groundwater problem, then insulation is done faster and easier.
Prices for impact-ramming machine models
Impact ramming machine
Insulation of a pile foundation
Now let's look at how to insulate a foundation on stilts. In essence, this operation consists of arranging a “warm” base.
The insulation technology in this case also includes several stages:
Stages of foundation insulation
Preparation of materials
To insulate a pile or columnar foundation, you will need the following materials:
- boards and beams for assembling the sheathing;
- polyurethane foam;
- antiseptic impregnation for wood;
- material for covering the sheathing - this can be plinth panels, aceid or other suitable covering.
Insulation scheme for a columnar foundation and blind area
Arrangement of the blind area
You can start work by arranging a blind area, which is performed as follows:
- along the perimeter of the house you need to dig a trench about forty centimeters deep and a meter and a half wide;
- then the bottom of the trench must be covered with a layer of sand about 10 centimeters, and it must be compacted thoroughly;
- then fill in the same layer of crushed stone and compact it too;
- a trench should be dug along the outer edge of the blind area and drainage should be made according to the scheme described above;
- after that, lay waterproofing, for example, roofing felt, on the crushed stone. As in the previous case, the joints need to be glued with bitumen mastic;
- then penoplex is laid on top of the waterproofing, and then the screed is poured.
This completes the installation of the base.
An example of attaching a sheathing to a pole
Frame assembly and insulation
First of all, you need to make the crate with your own hands. I must say that there are quite a lot of options for its manufacture.
Most often, the sheathing is done like this:
- Boards or beams are attached to the posts around the perimeter of the house. If the piles are metal, you can weld planks to them and secure the boards with bolts. Also, bars are often attached to the piles using clamps. The boards are attached to these bars using self-tapping screws. In some cases, the sheathing is attached directly to the walls. In any case, the sheathing should be positioned vertically. Keep in mind that all wooden structural elements, including the foundation grillage, must be treated with antiseptic impregnation;
- then the horizontal boards need to be connected to each other by vertical posts;
Penoplex can be fixed to the inside of the frame
- Now you need to secure the penoplex to the frame. For these purposes, you can use ordinary nails, the only thing is that washers should be placed under the heads so that the penoplex is securely attached to the foundation;
- The gaps between the plates must be filled with adhesive foam or even regular foam.
If the house is built on heaving soil, a gap of about 10-15 centimeters must be left between the base (sheathing) and the blind area.
At this point, the insulation of the pile foundation with penoplex is completed.
Aceid sheathing
Base covering
The final stage is covering the frame. To do this, you can use plinth panels. They are attached to the sheathing or walls of the house with screws that are screwed directly through the foam.
The only thing is that a starting strip will first be installed along the perimeter of the sheathing from below, into which the lower edge of the panels is inserted. The foam is on top and the upper edge of the panels is covered with a shimmer.
In the case of finishing the base with aceid, the sheets are attached to the sheathing using nails. Subsequent finishing of the aceid can be done with decorative stone, tiles or other material.
Step-by-step instructions for insulating the foundation of a house from the outside with polystyrene foam
First of all, it must be said that it is advisable to insulate foundations only in cases where the basement is planned to be used not only for storing food products. The fact is that all houses must have vents for natural ventilation of underground spaces, otherwise wooden structures will quickly lose their original load-bearing characteristics.
Vents in the foundation
Without effective ventilation, the tree is damaged by fungi and rot, and this is fraught with very unpleasant consequences. Impregnation with an antiseptic helps, but there must be ventilation in any case. On the other hand, the constant movement of air under the floor makes it unnecessary to insulate the foundation; no positive result in saving thermal energy is achieved. To make the rooms on the first floor comfortable, carefully insulate the floors - that’s all you can do to save heat in these cases.
Step 1. Dig a trench around the foundation to its depth.
Dug ditch
Dig carefully, taking into account the structure of the soil, follow the recommendations described above to prevent a decrease in the load-bearing characteristics of the structure. You can also insulate one basement part, but don’t expect any noticeable savings from this operation. The loss of time and money will never be worth the benefits gained.
Step 2. Clear the surfaces of the earth, check the linearity of the planes. All protrusions larger than one centimeter must be removed with a hammer drill. The surface of concrete is easier to clean once it has dried. You can use an ordinary hard plastic brush. The result is slightly better after using a metal brush, but such work requires a lot of physical effort.
Step 3. Measure the surfaces and think over a sheet cutting scheme. Try to minimize the amount of waste, make the pieces as large as possible.
Cutting polystyrene foam. Adaptations
Making a device for cutting foam plastic with your own hands
Important. Do not use small pieces of insulation at the corners of the foundation; they can be inserted at the joints. The foundation surface is uneven and, accordingly, the adhesion strength is insufficient. Small pieces are more likely to fall off, while larger pieces are more likely to stay in place.
Step 4. Choose a method for attaching the slabs to the foundation. You can use both cement-based adhesives and polyurethane foam. If the foundation plane is flat, then it is more advisable to use polyurethane foam. If there are large irregularities, then use glue; it can be used to level out problem areas, however, leveling will take a lot of material.
The technology for applying glue and foam is somewhat different.
1. Fixing sheets with foam
It is advisable to immediately purchase a professional pistol; it costs little, but makes the work much easier. In addition, the material in the gun is suitable for further use for a long time. Without it, the remaining foam hardens the next day. The material is applied along the entire perimeter of the slab and along two diagonals, the thickness of the foam is approximately 1 cm. Keep in mind that the increase in volume can be threefold or more.
Applying adhesive to insulation board
Application of polyurethane foam
Important. The foundation walls should be thoroughly cleaned of dust and dirt, and the concrete surfaces must be moistened before applying polystyrene foam. You can use a wet roller or any spray bottle. The foam container must be shaken vigorously, after application you should wait five minutes and only then glue the sheet onto the wet surface of the foundation.
Fixing the plates is done one by one, using a straight ruler to check their position. At the junction points, the protrusions of the plates should not exceed 0.5 cm.
Prices for polyurethane sealant
Polyurethane sealant
2. Fixing sheets with glue
Any brand is suitable, the cheapest ones can be used - the slabs will then be pressed against the ground.
Adhesive for polystyrene foam
What compounds can PENOPLEX be glued to the foundation?
Pay more attention to the above-ground part of the foundations - the plinth. External surfaces will then have to be plastered or covered with decorative tiles. For the above-ground part, increase the amount of glue; it should be over the entire surface.
When preparing the glue, water is first poured into the container, and then the dry mixture is added. Be sure to follow this sequence, otherwise you will never be able to completely mix the solution to the same consistency; dry material will remain in the corners of the container, and this creates difficulties during work.
Mixing construction adhesive for polystyrene foam
Step 5. Saturate the surface with primer or bitumen mastic. If the area is very wet, it is better to use mastic; for normal conditions, a primer is sufficient. This operation improves the adhesion coefficient and serves as a reliable water barrier.
Bitumen mastic
Coating waterproofing
Step 6. The thickness of the thermal insulation is selected taking into account the climatic zone of residence. For the middle zone, five centimeters is enough; for cold zones, the thickness increases to 10 cm. As practice shows, it is better to use two 5 cm slabs than one ten centimeters thick. The work time will increase slightly, but the quality will improve noticeably.
Indicators of Penoplex slabs
Glue the slabs in a checkerboard pattern, the second layer should cover the joints of the first. In addition, this method makes it easier to level the foundation surface.
Step 7. Whole sheets should be adjacent in the corners, and the gaps between them can be sealed with pieces to fit. The corner of the foundation itself must be covered with insulation.
Step 8. After the boards are firmly glued, foam the joints. On the base part of the foundation, the protruding foam is trimmed after drying; it can be left in the ground as is. You can find recommendations to additionally fix the sheets with dowels, but this is unnecessary. The adhesion strength, if the recommended technology is followed, is quite enough to withstand the finishing of the base, and in the lower part the insulation will be pressed to the foundation with earth or sand.
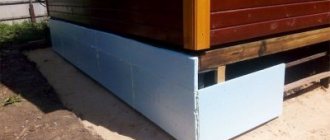
Do-it-yourself insulation of the base from the outside with Penoplex
Foundation, insulation process
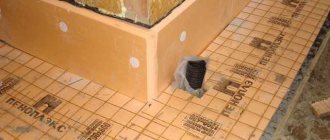
The main insulation work has been done, then you need to start gluing the corners and edges of the sheet with metal corners and puttying the reinforcing mesh .
Step 1. Prepare corners from a perforated metal profile; buy mesh for reinforcement. Any composition can be used as glue; there is a wide selection on sale today. They differ only slightly in quality; you should not purchase the most expensive materials.
Perforated aluminum corner with reinforcing mesh
Reinforcing mesh for foam plaster
Step 2. Prepare the adhesive mixture according to the instructions, avoiding the presence of dry lumps. It is very difficult to mix the solution manually; use a drill and a special device. If you do not have such a factory-made device, you can make it yourself. To do this, cut a flat piece of reinforcement about 40 cm long, and weld to it on several sides small pieces of mixer bent in the opposite direction of the shaft rotation. If you are preparing the solution in plastic containers, then remove all sharp edges on the fittings, otherwise any carelessness will cause the formation of through holes.
Preparation of the adhesive mixture
Step 3. Apply glue up to 0.5 cm thick to the corner of the sheet. Prepare a piece of reinforcing stack and a corner of the required size. The materials are cut with an ordinary construction knife.
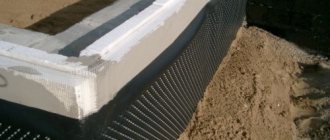
Step 4. Place the mesh with a corner on the prepared areas, press the materials firmly and apply another thin layer of glue on top. In this way the corners are protected from mechanical damage. In the future, it is recommended to plaster the entire surface of the polystyrene foam, this will protect them from damage by rodents.
Gluing the mesh
Laying the mesh
Step 5. After all the corners are strengthened, you can begin to reinforce the surfaces. The mesh is sold in rolls approximately one meter wide. If your foundation height is less than this value, then it is easier to cut the entire roll at once without unwinding. Use an ordinary hacksaw for metal. Place the roll of mesh on a flat surface and carefully cut it, constantly turning the roll a little.
Step 6: Apply glue to the surface. Do not prepare a large area of the foundation at once; you should have some time to glue the mesh and cover it with a second layer of glue. The area of the prepared surface depends on your practical skills and the properties of the glue. Some dry within 30 minutes, while others will take an hour to cure. Read the instructions for your specific brand.
Step 7. It is better to press the mesh with a large spatula. You should not try to completely remove all traces of the tool; small grooves will improve the adhesion of the finishing material for finishing the base. Besides, why sand the screed if it will be invisible in the future.
Penoplex plaster, process
Further work continues depending on the chosen technology. After the glue has cooled, the underground part can be carefully covered with earth or a sand layer can be made. Thoroughly compact the soil every 10–15 centimeters. Do not rush to start making the blind area, give time for the earth to completely shrink.
Choice of insulation
Not every material, even the most effective one, is suitable for working in or near the ground. When choosing a material you need to be guided by:
- moisture-proof. When saturated with water from the soil, the product loses its insulating properties. Expanding when freezing, moisture violates the integrity of the coating, nullifying all work;
- strength. Seasonal movements of soil masses create noticeable pressure on the material. It is especially noticeable on rocky soils. Sharp edges can push through the product, leaving cracks or breaks in it;
- resistance to aggressive environments. Soils are often chemically and biologically active. Groundwater may contain increased concentrations of salts. All these factors lead to premature destruction of the insulation.
When installing insulation inside a building, the material must be non-flammable. If there is a possibility of fire, no harmful substances should be released that could cause suffocation.
With all this, the service life of the insulation must be no less than the service life of the finishing material. In this case, you will not have to change it before the coating becomes outdated. Otherwise, you will have to dismantle the finishing fabric that still complies with the standards.
Often, extruded polystyrene foam is used for zero-cycle work. Insulating the foundation slab with expanded polystyrene, done according to all the rules, allows you not to worry about the safety of concrete and heat conservation.
Characteristics of expanded polystyrene
- The service life of the slabs is 30 years if the coating is installed correctly. The indicator decreases if: the surface before gluing is not leveled;
- the plates are not protected from ultraviolet radiation;
- Before installation, the products were exposed to atmospheric precipitation for a long time.
Insulation materials Extruded polystyrene foam Penoplex Technoplex Europlex Stirex Ursa xps Primaplex
- bitumen;
Expanded polystyrene is used for thermal insulation of the foundation slab:
- outside;
- from the inside;
- in the body of concrete
The final stage of insulation of the basement part of the foundation
There is one important point here. The walls of the house should always be slightly wider than the basement. Otherwise, water will flow from them into the cracks, which will cause not only excessive moisture in the structure, but also a breakdown in strength.
Types of base
If a mistake was made during the design or construction of the house and the base part of the foundation is wider than the wall, then additional measures will have to be taken to drain rainwater. The easiest way is to use metal canopies around the entire perimeter of the base.
Protection of the base from precipitation
Flashings for the foundation plinth
If the excess thickness is insignificant, then it is eliminated after insulation of the facade walls. And in the vast majority of cases they will have to be insulated; these are today’s state requirements for the thermal protection of buildings. And not only public, but also private houses. Building a residential building without a project is prohibited by regulations, and no one will sign the project if the latest building codes and regulations are not followed.
As for the use of dowels to fix the insulation on the base part, there are two opinions among professionals.
Dowels for thermal insulation
First, if you wish, you can drill holes and use special dowels with large heads. The practical effect in terms of the strength of the insulation will be insignificant, but it will take a lot of time and labor. We don't even take into account the cost of materials.
Second. Carefully fix all slabs protruding above the ground. If in the lower part air pockets are allowed between the slabs and foundations, then on the base part the fit should only be continuous. Is the concrete surface on the plinth too uneven? You will have to carefully scrape off all the protrusions or pre-plaster them.
Prices for popular types of plaster
Plaster
Insulation of slab foundations
This type of base is called an insulated Swedish plate. The foundation is a complex structure consisting of layers of thermal and waterproofing, reinforcement, stiffeners, concrete and a built-in heating system. Expanded polystyrene slabs are laid on a compacted bedding made of drainage materials. Insulate the outer surfaces of the base and blind area.
Insulated Swedish stove Source mosarmprof.com
The resulting “bowl” is an energy-saving base on which the house is subsequently mounted. This design simultaneously serves as the floor of the first floor, part of the heating system and a heat accumulator. Saving fuel resources compared to other types of foundations reaches 30%.
We begin excavation work and leveling of the foundation
First of all, you will have to arm yourself with a shovel and expose the foundation. This is perhaps the most difficult part of the job.
The depth of the trench should allow working with the lower layer of the foundation. And the width ensures the convenience of working in it.
After completing the excavation work, it is advisable to leave the foundation and plinth open for 24-48 hours (in hot, dry weather, 10-12 hours is enough). The stuck soil should dry out - then it will be easier to remove. Taking a coarse synthetic brush in your hands, walk over the entire surface, removing not only the soil, but also crumbled concrete (this often happens during long-term use).
After this, you need to level the working surface. Expanded polystyrene is a sheet material. Therefore, applying it to a surface with protrusions will not work - the sheets will not fit tightly to each other, forming cracks.
For leveling, a regular solution is suitable. You should take high-quality cement (grade M400 or higher) and sand in a ratio of 1:4. Having diluted them with water to the consistency of thick sour cream, the solution must be applied to the surface, eliminating all irregularities. If a very thick layer is needed for leveling, then the solution will have to be applied in several passes, giving each layer 2-3 days to dry. When applying a thick layer at a time, there is a high risk that it will simply slide off.
After completing the leveling, it is advisable to allow the solution not only to set, but also to dry completely - 28 days. But if this is not possible, you need to wait at least 10-14 days for most of the moisture to evaporate. Otherwise, in winter, the temperature of the foundation will drop below zero and the water will freeze, which contributes to the rapid destruction of concrete.
Harmful or harmless
There are supporters and opponents of this material. Those who are in favor of it talk about the environmental friendliness and safety of polystyrene foam, citing scientific research as evidence.
Due to the stability of the molecular structure under normal conditions of use, it is absolutely safe for human health, which has been proven in experiments.
The use of the material in the temperature range from -40°C to +40°C also does not affect the environment in any way.
Opponents insist that when burned, polystyrene foam releases styrene, which is a poison and can worsen your health: dizziness, pain in the eyes, the possibility of poisoning, and more.
Styrene can only be released at high temperatures. It is found in small quantities in coffee, strawberries, tea and other foods.
Its harm and harmlessness depend mainly on the conditions of use, and not on the quality of the material itself.
Professionals choose extruded polystyrene foam
For example, it cannot be used to insulate a metal roof. The metal heats up from the sun's rays, and the material can begin to melt, releasing styrene. Mineral wool is a more suitable option for this.
Many people insulate the walls of the house from the inside, which is also not recommended. This situation is fraught with the formation of mold and mildew on the walls, which will negatively affect the health of people living in such a room. This is caused by moisture accumulation in the polystyrene foam.
It is best suited for insulating the outside of a house, including the foundation.