X
Despite the popularity of energy-saving structures made of metal-plastic profiles, there are still many adherents of wooden windows. A number of reasons force one to make a choice in favor of wooden structures: a healthy indoor microclimate, environmentally friendly material, high decorative qualities of the product.
A positive property - the ability of natural material to “breathe”, has another side - increased heat loss indoors. Owners of wooden windows need to take timely care of reliable insulation for the cold season.
Helpful information:
- Ventilation valves for plastic windows
- Installation of wooden floors on joists
- 7 ways to make a plastic window not sweat
- Wall insulation technology
- Which profile for plastic windows is better?
- How to choose suitable curtains for windows
Experts have calculated that an apartment loses 30% more heat through the window perimeter than through the same wall area. Which, by the way, can also be insulated. Read about insulating an apartment from the inside.
Places on windows with poor seals can be detected with a burning candle. On a windy day, we will carry it along the window frame, where the flame will fluctuate, there is a place for heat leakage. Such areas must be insulated from the inside and outside of the room.
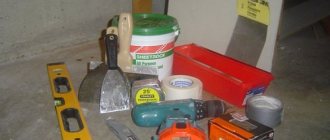
You can invite specialists to do the work, but it won’t be difficult to do it yourself with the help of improvised materials and special materials.
(1 method) Insulating wooden windows using paper and fabric strips
The simplest, rather primitive, but very economical way is to insulate wooden windows using paper and paper or fabric strips. Completing of the work:
- we tear paper, newspapers, wallpaper into pieces, twist them into strips;
- soak in water and clog the cracks between the window frame and sashes using a knife or ruler;
- Carefully glue strips of paper or fabric of small width (4-5 cm) along the joints, coat them with a solution of laundry soap or make a special glue (paste) from flour or starch.
Paste recipes:
- Flour paste: take flour and water in equal proportions (1:1), mix well until lumps disappear and bring to a boil, stirring constantly.
- Starch-based paste: 2 tbsp. Dissolve the starch in water and add a glass of boiling water in a thin stream, keep it on the fire for a short time.
Plastic or wooden windows: which is better?
It is not easy to clean a window from this insulation; sometimes the paint is removed along with the paper, and pieces of it and prints of printing ink remain on the surface of the window frame.
Simple and forgotten insulation also includes window putty and even children's plasticine.
Cover with film
If you have done all possible types of work, but the room is still cold, you will have to use an extreme method - cover the window with film. Yes, it's ugly. But it’s better not very beautiful, but warm. This method is usually used for windows facing the backyard. We take a thick transparent plastic film, stretch it from the outside onto the window, securing it with strips from the street. Not the most aesthetically pleasing window insulation, but effective.
Ugly? But it's warm...
Why does this method work? Because an additional insulating layer of air is created between the film and the outer glass. This is the first point. The second is this. Since the film is usually nailed to the walls, it turns out that cold air does not penetrate to the frame.
Energy saving film
The same effect - an additional insulating layer - also works in the case of the recently advertised insulation of window glass using film. As you know, any room loses heat through walls, windows, roof, floor. Windows account for up to 40% of heat loss. Previously, this problem was solved by installing additional winter frames. Heat-saving film is essentially a modern substitute for such a frame. Thin double-sided tape is attached to the window frame, and a film is glued to the tape. How smooth is not the point. It needs to be heated with a hairdryer (a regular one, not a hair dryer), after which it will level out and be unnoticeable.
Special energy-saving films are sold
This simple method allows you to raise the room temperature by several degrees. The same film will prevent overheating in the summer - prevent the sun's rays from passing through the glass. The only disadvantage of this method is the inhumane price. A square meter of film costs from 350 rubles, plus you will need double-sided tape.
Is this energy efficient film different from regular film? It's hard to say until comparative tests have been carried out. Will anything change if you cover the window with regular plastic film? Hardly. The advantage of this film is that it is crystal transparent and, after heating, is invisible on the window. So this is a relatively inexpensive and easy way to raise the temperature in the room without ruining the view from the window.
Cheaper way
Almost the same effect can be achieved if you stick packaging film with air bubbles on the inside of the glass. Of course, using this film we lose transparency, but the price is not so high. The film is generally very easy to install. We moisten a piece of film cut to the size of the glass with water (from a spray bottle). Water is applied to the smooth side. We spray it on the glass. We lay the film, align it, press it, straighten it with our hands. That's it, the film is glued.
You can do it easier - stick bubble wrap on the inside of the glass
It can last for months. It can be removed without any problems - they pulled the edge and it all came off. The same piece can be used for several years, since nothing happens to it. This is a simple method that makes insulating wooden windows more effective.
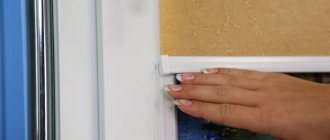
(3rd method) Self-adhesive foam tape - convenient and reliable insulation for a wooden window
You can buy such insulation in any store; it is easy to work with, although the whole process takes a lot of time.
The procedure for laying elastic, resilient material - foam tape, for insulation and insulation:
- we measure along the perimeter the joints between the window sashes and the window frame;
- we take into account the width of the gaps, and buy foam tape a little thicker than what is required when measuring;
- We clean the mounting points from dust and dirt and degrease the surface with alcohol or acetone;
- We remove the protective base and glue the insulation onto the pre-designated area.
For better sealing, it is necessary to cover the top with self-adhesive paper, which is best removed in the spring, but the foam rubber can be left and used for several seasons.
Features of thermal insulation of window openings in a wooden house
A wooden house is a movable structure; over the course of several years, shrinkage processes take place in it, as a result of which the structure is deformed, the height of the walls and the geometric dimensions of the house change. In this regard, windows are not inserted directly into window openings, but into a special floating frame (casing), which compensates for geometric changes in the house and prevents distortions in the window structure.
Thermal insulation of window openings
Since the casing frame moves relative to the window opening, the joints between it and the logs must be caulked with natural insulation. Previously, special moss with long fibers was used for this; today, caulking of cracks is usually done with jute or flax.
Due to the mobility of the wooden structure, cracks often appear between the opening and the window block through which the cold penetrates. The main reasons for this are:
- incorrect choice of window unit;
- poor sealing of the structure in the window opening.
To reduce heat loss, it is necessary to seal the joints of the opening and the window frame during installation. There are special seals for this (made of rubber, PVC, polyurethane and others).
If problems did not arise immediately, but appeared some time after installation, you can insulate the windows in a variety of ways.
Before insulating window blocks, it is necessary to find areas through which heat escapes. The most vulnerable places in window structures in which “cold bridges” appear are:
- joints between the sashes and the window frame;
- the wooden frame itself;
- slopes;
- window sills;
- low tide.
Insulation of slopes and ebbs is carried out both outside and inside the house, the remaining elements of the window structure are thermally insulated from the inside.
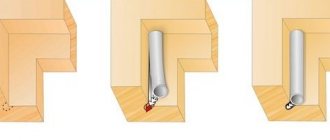
(4 way) Tubular seal for a wooden window
The tubular seal does not lose its quality for a long time, is durable, and does not limit the ability to open and close the window.
Rubber seals are convenient to use, especially if the gap has different widths along its entire length. When purchasing, make sure that the rubber is soft and elastic.
- Polyvinyl chloride (PVC) gaskets are suitable for even openings, are considered the most reliable, and are often laid in two layers;
- Rectangular polyurethane seals are suitable for openings of equal width; insulation areas can be covered in two layers.
- Seals come with a self-adhesive base - it is convenient and easy to attach, so that there are no problems with use, you need to pay attention to the expiration date.
- Seals are also available without self-adhesive tape; they are attached to the base using silicone sealant.
(5th method) Insulation of wooden windows with polyurethane foam
Modern insulation that hermetically seals all cracks and cracks, both on the outside and on the inside of the window - polyurethane foam.
Removes gaps and cracks:
- between the frame and the slope (pay special attention from the outside);
- under the windowsill is the place where warm air leaks the most;
- between the window and the beam located above it;
- between the slope and the window sill.
Insert the end of the tube into the crack and start blowing out the foam by pressing on the cap. Having filled all the cracks, wait until it hardens and remove the excess with a knife. The foam on the outside of the window must be plastered or painted, since polyurethane foam (the composition of polyurethane foam) is subject to the destructive effects of ultraviolet rays.
TechnoNIKOL insulation: technical characteristics
Need to remember:
- You can work with polyurethane foam if the air temperature is not lower than +5° – (+30°);
- foam can expand, so the frame must be secured with spacers, otherwise distortion is possible;
- fill the cracks with polyurethane foam to 1/3 of the width, because it, having increased in volume, will occupy the necessary space;
- the filling goes from the bottom up along the seam to prevent the seal from falling out.
A cheaper, but more troublesome method of insulation is a putty made of plaster and chalk (2:1) with the addition of water. With this mixture we can easily seal the cracks, and the surface has an attractive appearance. By the way, there was a time when plaster bandages were used to insulate windows, which were used in medicine to fix bones during fractures. They were moistened with water and applied to joints and along cracks and crevices.
No. 11. How to insulate wooden windows from the outside?
Internal insulation is sometimes not enough. Slopes often need additional thermal insulation . Work on their insulation begins with the dismantling of the old finish, after which the surface is primed. The cracks can be filled with polyurethane foam; another option is to cover the slopes with polystyrene foam. After hardening, excess foam is cut off and the surface is treated with plaster. A polymer mesh is attached to the foam on top, perforated tape is placed in the corners, after which plaster is performed. All that remains is to prime and paint the slopes.
The window sill area is also sealed with polyurethane foam. A mandatory requirement is the installation of a special strip for drainage of rainwater. It should be inclined and have rolled edges so that moisture does not get on the walls or through the window. It is advisable to seal the joints between the plank and frame or slope with sealant.
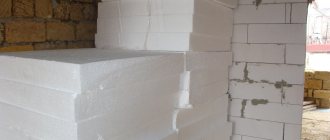
It is better to insulate the area under the window sill with polystyrene foam from the outside, because in a third of cases the most heat flows away through this area.
The final touch of external thermal insulation is updating the paintwork. The old peeling layer of paint can be removed using a spatula and a hair dryer, and fresh paint or varnish can be applied instead.
(7th method) Insulating wooden windows using heat-saving film
An innovation in glass insulation is a special film that allows daylight into the room, but does not release infrared radiation. This film has two sides, which must be taken into account when gluing it to glass. We glue the metallic side to the glass and the transparent side to the inside of the room. When performing work, your hands should be clean, and it is better to use cotton gloves so that there are no greasy stains on the surface of the film.
We cut out the sheet with a margin and overlap it so that it can be easily secured to the window frame with double-sided tape. Such a film, if well glued, does not interfere with the design of the window, and it looks aesthetically pleasing and neat. In order for it to lie evenly and without wrinkles on the surface of the glass, we will do thermal shrinkage with a stream of hot air using a hairdryer.
Insulation of windows from outside
Windows are insulated not only from the inside, but also from the outside. This procedure must be carried out in several successive stages.
Washing
Window cleaning becomes especially important before the onset of winter. According to sanitary standards and regulations, window glass after washing is capable of transmitting up to 89% of infrared rays into the room. Dirty glass transmits less than 70%. With a regular double-glazed window, no more than 50% of the light penetrates into the room.
There are two main reasons why windows need to be washed at least once a season:
- Clean windows have a neat, well-groomed appearance;
- Indoors there is more sunlight with infrared rays that bring warmth into the house.
Window cleaning is an important step in preparing your home for winter.
Insulation of slopes
One of the modern methods of insulating slopes and ebbs from the outside is the use of thermal slopes and thermal corners. The finished foam elements are covered with an outer layer of marble chips. The material is glued using foam glue, the seams are carefully rubbed. There is no need to plaster, paint or additionally treat thermal slopes.
Installation begins with gluing thermal corners:
- Aluminum corners are attached using self-tapping screws. Foam adhesive for foam plastic is applied to the inner surface of the thermal corner. The thermal angle is first applied to the future location.
- Then the thermal angle is removed for 2-3 minutes to saturate the glue layer with air and speed up the hardening process. Remains of adhesive foam are removed using a special remover. Additionally, the site of future fixation is foamed.
- Thermal corners are glued one by one. The structure is checked by level. To allow the glue to harden, the corners are pre-fixed with nails. Similar actions are performed with the remaining thermoelements.
- To install thermal slopes on the horizontal and vertical parts of the window, the slopes are cut to length and the edges are cleaned.
- A chamfer is cut for grouting the seam using a hacksaw and knife.
- Foam adhesive is applied to the thermal slopes, and the product is placed against the future location.
- The lower final elements for insulating the ebbs from the outside are made from the remaining material. Installation is carried out in the same way.
There are many options for insulating window slopes
At the junctions of slopes and corners there is a special chamfer for the grout joint. After the foam adhesive has hardened, it is necessary to apply grout paste into the seam and rub it in with a round spatula.
If there are no ready-made thermal slopes, the work will require polystyrene foam and the following materials:
- Level;
- Buckets for water and solution;
- Square and tape measure for marking;
- A rag for cleaning the window from the solution;
- Stationery knife for small cuts;
- Two spatulas: 10 cm and slightly longer (20–30 cm);
- Wood saw to cut foam.
Before gluing foam plastic onto it, the slope must be cut to a smooth edge. Using a square, touching the window profile, make equal turns. The shortest distance will serve as the starting point for insulating slopes. The opening must be primed.
It is important! To insulate slopes and ebbs from the street, extruded foam, 2 cm thick, is used. Thicker foam (3–5 cm) is not practical to use: a large area of the window profile will be covered. Thick foam is more difficult to work with. The design after installation does not look very attractive.
The sheets are cut according to the width of the slope. The distance from the window frame to the outer plane of the facade wall is measured. Extruded foam has zero water permeability. The material practically does not stick to solutions, and water rolls off. Therefore, it must first be scratched with a sharp object - to create a rough surface, increasing the adhesion of the foam. In addition, you can purchase ready-made sheets.
When using glue, it is important to follow the instructions
The construction market offers a huge amount of foam glue; the products of each company are approximately identical. You can use any glue that a construction or hardware store offers, without going to extremes: without choosing the cheapest glue. It is better to choose the optimal price-quality ratio.
Basic Rules:
- The glue is mixed, and the instructions must be strictly followed.
- The mixed solution is applied with a spatula (10 cm) onto the prepared foam.
- Pasting begins from the top of the window slope, so that the side parts serve as support.
- The foam is pressed tightly, lightly tapped with your hand. In this case, it is necessary to leave a small gap so that, if necessary, it can be installed while maintaining a horizontal level.
- Two lines of the window slope are set according to the level.
A horizontal line is drawn along the part that joins the frame. It should be visually lower than the part of the slab that meets the plane of the wall. There should be a straight angle relative to the window frame. Aesthetically, the window looks beautiful, and much more light enters the room.
It is important! After placing the slab, be sure to remove excess mortar before it hardens. The side slopes are glued in the same way as the top slope. But they must be symmetrical while maintaining a vertical level. At the final stage, the corners are installed, putty is applied, reinforcement is made and the mesh is installed.
Insulation of aerated concrete can be done in the traditional way using plaster mixtures to cover the installation gap filled with foam. Wait until the structure dries. The process is labor-intensive and lengthy. It’s easier to cover the slopes with polystyrene foam. This is the best option for insulating windows from the outside, regardless of the depth of the slopes and ebbs and the design features of the wall. The material will reduce freezing of the frame, foam and, to some extent, the wall. Pasting with polystyrene foam is especially relevant if the walls are made of cold materials (concrete, cinder block, brick).
(8th method) Insulation and modernization of a wooden window
An effective way to insulate a window is its partial reconstruction and modernization. This method will retain heat in the room and limit the passage of cold air through the window perimeter. In this case, the shutters will open freely, and the external design of the window will not be disturbed in any way. The purpose of this method is not only to insulate, but also to reduce the penetration of noise and sounds into the room through the window.
Painstaking work requires time and patience. We remove the window from its hinges and place it on a table or floor. It is necessary to remove the glazing beads along the entire perimeter; if necessary, we replace them. We take the glass out of the frame, carefully clean the grooves on the frame for laying it, then fill the joints with sealant. We install it in its original place, and for greater effect we apply silicone along its entire perimeter. We put glazing beads and nail them in place.
5 questions about choosing a plastic door to the balcony
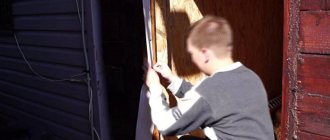
If you have already completed a difficult job - dismantling the frame, then do some minor repairs: remove the old varnish and paint and apply a new paint and varnish coating, replace the fittings, install new locking devices.
It must be remembered that work with polyurethane foam can only be carried out at positive temperatures not lower than +5°.
Is it necessary to insulate wooden windows for the winter?
This question can hardly be answered in the negative. The cold coming from poorly sealed cracks and condensation that collects on the glass will be a reward for all “lazy people”. Often this procedure has to be carried out even in winter, if you are too lazy to do it in the summer. One general rule for all types of insulation is the mandatory cleaning of the frame from dirt, dust, and peeling paint. Then the wood and glass need to be wiped dry.
It is very good to lay sorbent between the frames. This can be regular table salt, soda, activated carbon or glycerin. All these substances (except glycerin) can be placed well between frames in white bags and they will not be very noticeable, but our grandmothers placed beautiful toys or artificial compositions in glass vessels and in this way masked the sorbent. Glycerin is simply rubbed on the inside of the glass or placed in small vessels.
The sorbent is needed to prevent moisture from collecting on the glass and preventing it from freezing in winter. If moisture has not been observed on the glass before, then there is no need to install a sorbent. But if it is available, it is better to put bags of salt. So, virtually all types of insulation can be divided into three:
(9th method) Removing cracks in window frames
Due to various circumstances (exposure to temperature changes, moisture), cracks appear on window frames. To maintain the integrity of the structure and prevent their further expansion, we seal cracks in several ways:
- pour molten paraffin;
- seal with special putty for wood;
- fill the gaps with sealant, you can match the color to the frame.
If necessary, we repaint the window, and the cracks become invisible and the frame has an attractive appearance.