Ceiling insulation with foam plastic: advantages, disadvantages, methods
In the article we will discuss insulating the ceiling with foam plastic with our own hands: how it is done, what are the advantages and disadvantages of choosing this particular material for thermal insulation and are there any alternatives.
Let's figure out how you can use polystyrene foam to insulate ceilings
How are ceilings insulated?
If we discard too exotic options, there will be two main categories of materials for insulating ceilings from the inside:
- Mineral wool in all its forms. An inorganic fiber that does not emit any harmful substances and is very inexpensive. The main disadvantage of mineral wool is its hygroscopicity. Moreover, at high humidity it noticeably reduces its heat-insulating qualities.
- Styrofoam. On the contrary, it does not require careful hydro- and vapor barrier; however, it is flammable and relatively expensive. In addition, it is often accused of releasing harmful substances into the atmosphere. The situation is controversial and unprovable, so we will leave this point without comment.
How to attach polystyrene foam to the wall in difficult cases
Sheathing concrete walls with foam plastic is perhaps the easiest task. But what to do if you need to fix the plates on a metal surface? Oddly enough, you can get by with inexpensive products that you have on hand. For example, PVA glue. If the requirements for strength are not the highest, then this method is perfect. In addition to glue, you will need burlap. It is properly impregnated with PVA composition and attached to the base surface. And only then they glue the slabs onto the burlap, generously lubricated with the same glue.
Its only drawback is that it takes a long time to dry. Therefore, the slabs can slide under their own weight if they are not supported with sheets of plywood or a board of the required size. To avoid having to wait and prop up, you can use liquid nails - this popular adhesive does not react with foam. True, the quality of adhesion will still be lower than in the case of polyurethane glue.
But there is still an option to use the compounds together - liquid nails provide speed of work (no need to wait, no need to make supports), and the polyurethane component will give the structure the necessary strength. But the costs will be significantly higher. Another option is polyurethane foam. Indeed, this popular sealant has excellent adhesive properties - you could probably see this when trying to wipe off the foam stuck to your hands.
In addition, disposable cans do not require the purchase of a special gun for squeezing out foam - such a tool is a must when working with polyurethane glue. Polyurethane foam very often remains unused after installing windows and doors, so if you need to secure polystyrene foam, you can easily use this sealant. Just keep in mind that it should be applied in small quantities in five places. There should not be an excess of foam, otherwise during the hardening process it will expand and deform the slabs.
Advantages
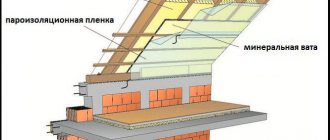
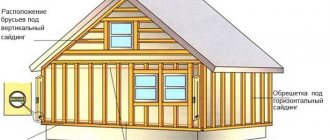
Please note: in a wooden house, you can do without a vapor barrier only if the foam boards are laid without gaps: the seams between them are foamed or taped with adhesive tape. Moisture is harmful to both beams and rafters. However, sealing the seams is also desirable from the point of view of minimal heat loss.
Here, as you can see, the vapor barrier has been completed. And this is quite justified: it will protect the wood of the beams from moisture.
- Polystyrene foam does not cake over time, unlike glass wool. It fully retains its thermal insulation qualities throughout the entire period of operation.
- With the same thickness of the insulation layer, foam plastic is more effective than any mineral wool.
- Polystyrene foam is more expensive than mineral wool. With the same thickness - noticeably more expensive.
- Adjusting it to the size of the finished sheathing is somewhat more difficult. However, if the insulation of the ceiling from the inside with polystyrene foam is done from scratch, it is not a problem to make the sheathing according to the width of the sheet.
- Fire safety has already been mentioned: polystyrene foam is flammable.
Re-installation of ceiling insulation
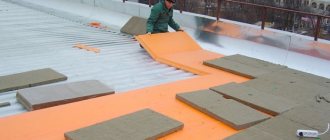
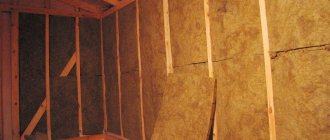
There is also a reverse scheme for laying insulation, when foam blocks are mounted on beams from the inside of the room, followed by filing of boards. In this case, foam plastic slabs are initially installed with staggered seams. The next step is to add a layer of foil foam.
To prevent the canvas from being pressed through the rough ceiling, the material is sewn onto the beams with wooden slats.
A plywood sheathing is mounted on the slats.
Scenario 1
Given: a private house with a cold attic. The ceiling is lined with plywood or OSB from below to wooden beams.
- We lay foam boards on top in the space between the beams with a minimum gap. Of course, after clearing this space of debris first.
Polystyrene foam is placed in the space between the beams
- Carefully foam the seams between the slabs and beams. There should be no gaps. Otherwise, moisture will condense on the roof and cause the rafters to rot; In addition, gaps will mean heat leakage. Don't forget: warm air tends to rise.
- If you plan to use the attic, cover the ceiling with boards or OSB along the beams.
Please note: if OSB with a thickness of 15-18 millimeters is taken, a distance between the logs of 40 centimeters is recommended. If the beams are less frequent, additional sheathing will be needed.
Causes of condensation
If, after insulation with polystyrene foam it drips from the ceiling , the thermal insulation is made poorly: the low surface temperature collides with steam and warm air rising upward, resulting in the formation of droplets of moisture that settle on the coating.
Drops appear when steam cannot escape, and the higher the humidity in the room, the lower the dew point . The formation of condensation leads to the appearance of mold and fungi and deterioration of thermal insulation.
The most common causes of condensation can be:
- ill-conceived ventilation design;
- lack of an insulating layer or its incomplete protection;
- incorrect placement of insulating layers;
- poor-quality insulation, which leads to freezing of the ceiling covering;
- with temperature changes resulting from different insulation in different areas.
Temperature changes can occur especially often:
- in the cellars on the ceiling;
- in detached garages and sheds;
- on balconies and loggias;
- in poorly ventilated areas;
- when insulating roofs with a large slope, where waterproofing or insulation can roll down, forming cold areas.
How to prevent condensation
To prevent condensation, you must:
- think through the ventilation ducts and air gap in the insulation layer correctly;
- when purchasing, do not skimp on the quality of insulation, waterproofing, vapor barrier;
- when purchasing a premises, pay attention to the design of the ventilation system and the consistency of its operation;
- determine the indicator of importance in the room: at levels above 40%, condensation formation is the norm.
If there is condensation, what can you do?
If there are already deficiencies in thermal insulation, the process of eliminating them is quite labor-intensive:
- insulate the finished coating from the cold ceiling: insulate with mineral wool, cover with expanded clay, apply a layer of brick chips, lay foam insulation;
- you should check the condition of the insulation: disassemble the insulation cake and carefully examine whether there are any breaks or damage, as well as whether there is water absorption;
- if moisture has penetrated to the inner layers of the finish, you need to clear the surface up to the main ceiling (concrete surface), dry the ceiling using a hair dryer, then replace the insulation.
In order for condensation to flow down, it is necessary to create an inclined surface . Depending on the location of the slope, a water drain is adjusted to the outside, under which a container is placed to collect water. Near single buildings, grooves are installed through which water flows into the soil.
To install an inclined condensate drain on the ceiling, you will need: polyethylene film material with a size equal to the area of the ceiling, sheets of galvanized iron, and plastic pipes.
Scenario 2
Given: an unplastered reinforced concrete floor without significant unevenness and differences in height. What will insulating the ceiling with penoplex (extruded polystyrene foam) or polystyrene foam look like in this case?
Let's start with the main thing. The ideal option in this case is to insulate the ceiling from above, and not from below. Why?
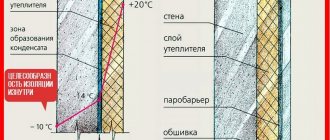
- The dew point (condensation) in the case of insulation from the inside will be on the border between the foam and concrete. If the tightness of the foam layer is broken, the concrete will begin to dampen and collapse (see Foam ceiling slabs - do-it-yourself professional ceiling finishing).
- Reinforced concrete floors are an excellent heat accumulator. Once warmed up, the walls and ceiling can provide a comfortable temperature in the house for several days, even when the heating is not turned on and it is cold outside. By insulating ourselves from the inside, we lose this advantage.
It is better to insulate reinforced concrete floors from above
What to do if, for some reason, insulation from the outside is impossible?
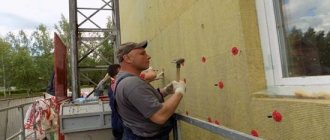
- Foam boards are glued end-to-end directly to the concrete. The choice of glue is wide: a variety of liquid nails, universal synthetic adhesives (Titanium and its analogues), acrylic putty.
If the ceiling is uneven and it is difficult to securely glue the foam, special fasteners are used
- The seams are carefully sealed. For this, both mounting foam and the same acrylic putty can be used.
- A fiberglass reinforcing mesh is glued on the outside. It will additionally bind the foam sheets and become the basis for applying decorative plaster. The mesh strips are glued with a ten-centimeter overlap.
- A layer of any decorative plaster is applied. It can be both smooth and structured - everything is in your hands.
Methods of insulation and fastening
From a scientific point of view, insulating the ceiling with polystyrene foam from the outside is the most correct and effective way of thermal insulation . If there is such a possibility, the external type of installation . But in apartment buildings, where internal insulation is the only possible option, this method is used. Its advantage is also that it simultaneously provides good sound insulation .
Sheets of material can be secured in two ways:
- special adhesives;
- special umbrella nails.
On the attic side there is no need for fixing with glue. The quality of fastening is especially important for internal insulation. The glue is not applied to the entire surface of the foam; you can only cover the perimeter and a cent of this will be enough. When using adhesive mixtures on water, the thickness of the adhesive layer is added to the thickness of the foam.
Important! Since foam plastic is susceptible to destruction by solvents, the first type of fastening you need to inquire about the composition of the mixtures. They should not contain formaldehyde, acetone, alcohol, or harmful resins.
External insulation - work order
Foam boards do not have sufficient moisture resistance , therefore, when laying external insulation, additional layers are required:
- on the outside it is a layer of waterproofing;
- on the inside (from the room side) there is a layer of vapor barrier.
How to insulate a ceiling with foam plastic from the outside:
- Surface preparation: removal of dust, debris, leveling.
- Laying a vapor barrier - it is secured using a stapler.
- For installation using lags, logs are installed; for installation without lags, pouring is done using wire reinforcement.
- Laying foam.
- Installation of the waterproofing layer - it must be laid over the walls.
- Laying the floor and trimming the waterproofing film around the edges. The finished floor is laid on top of the screed only in the case of a residential attic, otherwise a screed is sufficient.
Important! For external insulation, with existing joists, foam boards are easy to lay - you just need to choose their correct dimensions.
The foam is cut so that it fits tightly between the beams, and the gaps between the beams and the insulation must be filled with polyurethane foam. The insulation with the beams must form a common plane. If the thickness of the beams is not enough, it is sharpened with wooden planks. A small gap is left between the insulation and the joists to ensure ventilation.
Technology of internal ceiling insulation with foam plastic
A significant disadvantage of internal thermal insulation for a city apartment is that foam boards and fine finishing take away precious centimeters. Calculating the final ceiling height requires the correct choice of foam thickness and fastening method.
When using material 5 cm and lathing for finishing with clapboard, for example, a total of about 8-10 cm of room height . If suspended models of plasterboard ceilings are used, even more height is hidden.
How to insulate a ceiling with foam plastic from the inside:
- Surface preparation: cleaning from finishing and dust. Check the surface using a level. If there are noticeable differences, the surface is puttied. For very large irregularities, plastering and grouting are required. If there are irregularities less than 0.5 cm, it is enough to just seal them and then sand them with sandpaper.
- Treating the surface with an antiseptic primer.
- Dry the surface.
- Foam boards are specially roughened using scrapers, sandpaper, and a special knife. A layer of adhesive solution is applied evenly over the entire surface of the sheet. Start installing the sheets from the corner, pressing them to the surface and supporting them for 1-2 minutes. Laying is done specifically with each subsequent row offset by half a slab.
- After gluing and drying, holes are drilled in the center and corners of the sheets, umbrella dowels are inserted into them and hammered with metal pins.
- If it is decided to lay polystyrene foam on the frame, after leveling the surface, a sheathing made of wood or an aluminum profile is installed, then laying foam plastic and laying a vapor barrier.
- Installation of a finished ceiling.
When insulating from the inside, waterproofing is not required. If the finished ceiling is mounted on a lathing - these are plastic panels, plasterboard ceilings, lining, no additional foam fastening is required.
Important! Special polymer types of glue are not cheap, so you can save money by using a dry adhesive mixture mixed with water. Mix according to the instructions, stir again after 5-7 minutes, after preparation it should be used within one hour.
In rooms with high air temperatures, additionally foil and foam foil insulation in rolls can be laid on the foam plastic, while the finishing ceiling is made only on the frame .
Scenario 3
What will it look like to insulate the ceiling in a private house with foam plastic if there are reinforced concrete slabs overhead with significant differences in height or distortions? Moreover, insulation from the outside is again impossible for some reason (for example, there is an observation deck overhead)?
For insulation, we use lathing with decorative ceiling lining with PVC wall panels.
- We mark and attach to the ceiling a lathing made of galvanized profiles for plasterboard. The UD profile is attached level to the wall, the CD profile is located perpendicular to the future panels at a distance equal to the width of the foam sheet - 50 centimeters.
A step between hangers of 60-70 centimeters is quite enough: the ceiling will be light.
The sheathing can also be made of wood. But then a layer of vapor barrier is desirable to protect the wood from moisture
- We place a spacer between the foam plate profiles and seal all the seams with polyurethane foam.
- We hem with panels. The method of their installation has been described many times and does not present any problems.
- If uneven walls have left noticeable gaps between the ceiling and the edges of the panels, we cover them with ceiling plinths. The ceiling is ready.
PVC panels allow you to make the ceiling very neat at minimal cost
Based on materials from the site: https://potolokspec.ru
������: ������������� � ������ / ��������� �������� ������ ��������� ������� �����������, ����������� � ���������� ����� ��������������, ��� ����������� �����������, ���������� �������� �����, ������� ������������� � �������� ������� ����������� �������. ���������� ������:��������� ������� ����������� � ��� �������� � ����������� ����������, ������� ������������ ��������� ��������� �������� ��� ��� ����������� ����������� ��������� ������ � ����������. ��-�� ���� ��� ������ ������������� ���������� ����� ����� � �������� ��������������� ����������������, �� ������� ����� ����������� ��������� ��� ��������� ����� ����� ������.��������� � �������� ������������� ��������� �������� � �������� ��������� �������� ��������� �������� �������� ������. �� ������ �������� ������� � ���� �������������� � ��������� �������� ����������������� ��������. ������ ��� ���� �������� ������� �����������. ������ ��������� ��������� ���������� ������� ������� ����������� ���� ������ ��� ��������� ������� ����������, �������� � �������� ����.�� ����� ������������ ��� ������������� � �������� � 20 � ����� ���. ��� ������ ����������� ����� ����� ���������, ������� ��������� �� ����������. ������ ��� �������� � ������������ ������. ��������� ���������� ������� ������� ���������� ������������ ������� ������������� ����.���� �������� ���������� ������� ����������, ������� ��� ������� ��������� ������� �� ���������. ������ ����� ��������� �� ���, ����� �� ������� ������� ���������� �� �����-���� ������� � � ����� ������ �� ����� ���� ������� �����. ��� ���� ������ �����������: ��������� ��������� ������� ��� �������� ����- � ������������������ ����. ��, ���� ����������������� ������ ���������� � ���������� ����, ��� ������������ �� ��������.����� ����, ���� �� �������������, ��� �������� ������� �����������, �� ������ �������, ��� ��� ����� ������������ ��� �����-���� ����� � �����������, �� ���� � ������������ ���������� ���� � �����. � ��� �������, ����� ���������� ����� �������� ����������, ����� ������������ ������������ ������������� ������, � ��� ����������� ������������ ������� ��� ��������� ������.��������� �� ������ ��������� ��������� ����� ������ ����. �� �� ���������� ����� ����� ����, � ������ � ��������� ������ ���� �������� ����������. � ��������� ������ �������� ������� ������ ����� ��������, � �� ����� ���������� � ����� ����������, ������� ���������� �������, � ������ � ��� � ��������� ������ ������� � ������.���� ������, ��� ��������� ����������� ��� ��������. �� ���� ����������� ������������� ������������� ���������������� �������, �� �� �� ����� �������� �����-���� ������� ��� �������� ���������� �������. ������������ ������, �� ������� ����� �������� �������� ���������� ������� ����� � ��� ���������� �������� ������������ � ����� �������������� ���� ����. ������� �������� ������ ���� ������������� ��������� ���������� ������ ��� � ������� ������.� �������� ��������� ������� ����������� ����� ���������� ������������� ������������� ����� � �������� +5-30��. ��� �������� �������������� ��������� ���������� ��������� �������������� � ���������� ��� ���������������� ������������� � �����������.��������� �������� ����� �������� ��� ������ ����������� ����������, ������ ���:
- ��������� ����������������, ������� ��������� � ����������� ������� �������� ��� ������� ������� � �������������;
- ������������ ������������� �������������� ������ � ������ �����������������;
- ������������ ��������� ���� ��� ������������ �������� �������������� ���������;
- ���������� ��������� ������ � �������� �������, ����������� ��������� �������� ������;
- ������� ������������ � �������� ��������� ������������ � �������� �������;
- ������� ����������������� ��������, ������� ��������� ������ ��������� ������������ ���������;
- ������������ � ����������� �������� �������, �������, ������� � ������;
- ��������� �����, �������� � ��������� ������ � ��������� ���������.
��� �������������� ���������� ��������, ��� ��������� ������� ���� ����������� �������� ����� �����������:
- ������� ��������, ��� � �������� ������� ���� ������������� �������� ����� ��������� � ����� ������, ������� ����� ������������ ������ ������������� ��������. �������� �� ��, ��� ��������� �� �����, � ������������� ���� �� ���� �������� ���, ��������� ������� ������� ������� �������.
- ��������� ����� ������������. ������������� ���� �������� ���� �� 10-20 ��� ������, ������ ���� ���������� ���������� ����� ����������� ���������� �������.
- ������������� ������������ ����������. ���� ���� ������ � ���, ��� ��������� ��� �� ���� �� ���������� ������������������, ��� ��������� ����� �������� � ����������� ���������� � ������������ ������������� ����������. �������� ������������� �������������� ���������� ���������� ����.
������������� �������� ����������� �������� � ���� ���������� ���� ��������������� �������, ����� ��� ������ ���������� ������������� ������, ���������� ������������������ ������ � �������� ������ ���������, ��� ������� ������ ������� ����������� ������������� ��������.����� ����������� ������������� � ����� �������������� ��������� ����� ����� ���������� ���������� ������� ���������� ������ ���������. ��� �������� ��������������� ������� ����� ��������� ������ � �����. ���� ��������� ������� ����������� ������ ������ ����� ����������� ���������� ������ �������: ������� �� 2 � �� 10 ��, ������ ������������ ����� ����� � 5 �� � � ����������� ��������� ����� 15-35�.������� ������������� ����� ������� ���������: ��� �� �������, ���������� �������� �������, ��� ��� ������ ������� �����. �� ����� ��������������� � ������� ����� ��������� �������� ���������� ����� ����. ��� ��� ������ ����������, ��� �� ������ ���� ������������ ������ ��� ������������������ ����. ����� ����� �������������� ���� ��� ������������ �������, ���� ��� �������� ������������� ��������� ����. � ���� ������ ���� ����������� ��������� ���������� ����� � ������� ������ ��� ������������� ����.
��� �������� ������� ����, �� �� ������� �� ���� �����������, �� ������� ���������� �������������. ������� ���������� � 10 ��/�2, ���� ����� ����������� �������� �������� � ������������� ������������.
: , , , . . . , . . . : , , , , , , , . : , , , , , , , SD UD , .
�������� ��������! ����� ���� ���������������� ����� ������ ���� ��������� �� ������ ������������� ������� �����������.
����, ��������� ��������� �������� �� ���������� ��������� ����� ������ � ��������� ������:
- ������� ��������������� ������, ������� ��������� ������ �� ��������� � �������. ��� ����� ��������� �� �������������� ������� ��� ���������� �������. ������������ ������� �������������� � ������� �������.
- ����� ���������� ���������� ��������� � ������� ������������ � ��������� �����, ��������� ���� �������� �� ������� �������� ����� �� ��������.
- ��� ������ ����� ����� ��������, ����� ���������� � ���������� ������������� ���������� ��������. ��� �������� �������� �� ���������� �������� 0,5 ����� ���� �� �����. ����������� ����������� ������������ ��� ���� ���������������� �������. ��� ������� �������� ���� � ������� �� ������� �� �������.
- ��� �������� �������� ����������, �� ��� ����� ������ ���� ������� ������, ���� ��������. � � ���, � � ������ ������ ����� � ������ ���������� ���������� ��������� �����, ��� �������� ��������� �����������.
- ������ ���������� � ������� ���������. ���� �� ������������� �� ���������� �������, �� ������ ���������� ���� ������� ���� �������������, ������� ����� �������������� ��� � �������� �������.
- ����� ������������ ������� ������� ��� ��������� ���������, ������������� �� ����. ���� ������ ���� ���������� ����������, ��, ����� ������ ����, ���������� ������������� ������� ������������� ����� �������� �� ������� ���� ��������.
- ����������� ������� �������� ��������� �������� ��������������. ������ ���� ���������� ��������� �������������� � ������� ���� �����. ��� ������ ���� ������� ����� ������, ���������� ����������� �������� ��������.
- ��� �� ��������� �������������� �������� ��������� �� ��� ����� � ���� ���� ������. ��� ����� �� ���������� ������� ����������, ����������������� ����, �������� ������� � ��������� ���������� � ����� �������������� �� 5 ��. ������ ����������� �� ������ �� ������, �� � � ������ ���������� ��������� ������.
- ������� ����� ������� � ��������� �������. �� ����� ��������� ������� ����������, ����� �� ������ ����������� ������� � �������� ����� ��������������. ���� ���� ��� ��������� � ���� �� 1-2 ��, ��� ���� ��������� ������. ����� ������ �� ������� ������ ���������, ������� ����� ����� ���������� ��������� �� �������.
- �� ������ ���������� ����� ��������� ���������� ����. � ���� ����� �� ���� �������������� ������ ����� ����������� ����������� �������. � ���� ���������� ����� ��� �����������, ������������ � �������� � ��� �� ������� ������� ���������.
- ��� ������ ������� ������ � ������ ��������� ��������, ��������� ��������� ���� � ����������� ��� �� ��������.
, , . . , , . UD- . , . , . , CD-. . 40 . , 1 . CD- , . , . CD- UD, . , . , . , . , . . . , , . , . , . . . , . , . , . . , . . . , . , . , , . . , , . , . , , , , . , , . :
��������� ��������� ����, �������� ��������� ����� � ����������� ������ ���� ��� ������������� ���������� �������� ������� ��������������� � ����������������� �������, � ��� ����� � ��� �������� ���������. ������ ��������� ����� ����������, �� ������� ��������� ��������� ������������ ������, ��� ����������� ���������������� ������������ ������.
: TutKnow.ru
������� ����� ���:
������ ���������� ������:
Laying foam insulation on a concrete floor
Insulation of reinforced concrete floors often causes difficulties; the process of laying slabs is simple and is not much different from finishing walls or subfloors. The problem arises with how to secure the foam to the ceiling. Insulation material can be installed in many ways, but in practice only two are used:
- Apply insulation sticker to the prepared surface;
- Attaching foam plastic to the ceiling mechanically.
The use of a specific method depends on the condition of the concrete and the degree of surface moisture. For residential premises with normally dry ceilings, it is possible and necessary to glue insulation material. For buildings in which rooms are heated with a large gap in time, or there are cracks in the ceiling, the best way is to lay the slabs using fungal dowels.
Properties of foam plastic
Foam boards are a mass of low-density foamed polymer.
Foam boards are a mass of low-density foamed polymer. Most of the material is air, enclosed in round granules.
In any building materials store you can find insulation of various sizes and thicknesses. The choice is based on the climatic conditions in the region. Sometimes one 7-8 cm layer is enough, sometimes you have to install two rows of 5 cm sheets.
Advantages of polystyrene foam as insulation for ceilings:
- Ease. The insulation itself will weigh little.
- Ease of installation. The work can be carried out independently; the material is easy to cut and attach.
- Low degree of moisture absorption. In this indicator, foam plastic is much superior to fibrous materials.
- Rigidity. Without loading, the foam retains its shape throughout its entire service life.
Fragility. During installation, the material will crumble and break heavily.
Disadvantages of polystyrene foam as insulation for ceilings:
- Fragility. During installation, the material will crumble and break heavily. If the ceiling is insulated from the attic side, it is worth laying a subfloor on top of the polystyrene foam so as not to damage the thermal insulation when walking
- Flammability. The insulation is highly flammable. The smoke released during combustion causes paralysis of the respiratory system.
- Sensitivity to organic solvents and some chemicals. If the plates are attached with glue, then first check the compatibility of the materials on one of the sheets. You can only use an adhesive composition that will not dissolve the foam.
- A large number of joints. The sheets are not so large that it is possible to cover the entire ceiling with a monolithic layer. You have to fit the insulation tightly and then seal the joints. It can be especially difficult to isolate surfaces of complex shapes and joints of structural elements.
- Fragility. The average service life of polystyrene foam is 10-15 years. If there are mice in the attic, the insulation will have to be replaced in a couple of years: they will simply eat the material.
Despite significant disadvantages, the material is widely used to create thermal barriers. This is largely due to the fact that the population simply does not know about alternative methods.
Types of polystyrene foam for home insulation
To understand what kind of polystyrene foam is needed for specific types of work, it is worth carefully studying the types of material. Classification of heat insulators for walls and floors of a house is carried out according to the following criteria:
- raw materials for manufacturing;
- density;
- sizes.
Depending on the raw materials used, there are such types of foam as polyurethane, polyvinyl chloride (PVC) and polyethylene. The first has high elasticity and is a foam rubber that is actively used in the furniture industry. In construction, polyurethane foam is made from such foam.
Polyethylene foam is produced in the form of sheets and is used for packaging fragile items. The usual construction foam is PVC. Expanded polystyrene of this type is suitable as insulation for a house inside and out.
The density of the foam is an important indicator. The area of use of the material depends on it (whether it can be used in the construction of walls, floors, foundations, etc.). Before buying foam insulation for your home, it is better to familiarize yourself with what it is, depending on the feature in question:
- PSB 50 is a high-density material. It is rarely found in construction due to the desire of customers to reduce financial costs. This material is suitable as insulation from the outside and from the inside. Such material can be laid as part of the floor of premises with constant occupancy of people, furniture and equipment.
- PSB 35 is suitable for insulating the walls of a house from the outside and inside. This type of insulation can also be laid in the attic floor pie, provided there is a strong concrete screed. The density of expanded polystyrene 35 is the most common.
- PSB 25. The density of the material allows it to be used as wall insulation on the room side. When laying, it is necessary to ensure a gap between the heat insulator and the finishing material. It is strongly not recommended to use it for floors and external insulation.
- PSB 15 is the minimum density used in construction. This type is best suited for thermal insulation of temporary structures (for example, cabins), containers and wagons.
Characteristics of polystyrene foam with different densities
The sizes of foam sheets are typical. If necessary, it is easy to cut the required shape from the material. Dimensions are determined depending on the area of the insulated surface, its length and height.
The following sizes are sold on the construction market:
- 2000x1000 mm.
- 1000x1000 mm;
- 1000x500 mm.
Insulation technology
Polystyrene foam can be attached directly to the insulated surface with glue.
A lot has been written about installation technology, so we will not describe this topic in detail here.
Polystyrene foam can be attached directly to the insulated surface with glue. If the work is carried out indoors, then the frame is pre-installed. It is better to measure the sheets in advance so that the frame cells match them in size.
This way the material will fit tightly, and there will be noticeably fewer seams and cracks. As additional fasteners, you can use dowels with wide heads. Narrow nails will not provide proper fixation; they will simply go through the material.
The cracks and joints are thoroughly foamed. It is important not to leave any gaps through which warm, moist air can leak.
Otherwise, condensation will fall on the cold roof and damage the rafter system. The top of the foam can be covered with a vapor-permeable membrane or any other waterproofing material. If the attic is to be used, then a subfloor is required.
Polyurethane foam from Ecotermix has many useful properties, which are discussed in the video below:
How to carry out double insulation
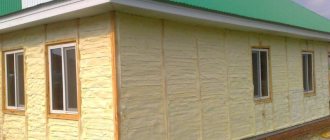
This finishing will ensure maximum comfort inside the finished building.
This technology is mainly used for finishing balconies. With this treatment, a double layer of thermal insulation is used to cover the load-bearing wall and parapet. The floor, ceiling and side walls can be treated with one layer of insulation. For such cladding, penoplex is often used together with penofol.
Although such insulation materials are independent materials, together they can provide a higher quality result. The first step is to fasten the penoplex using one of the previously discussed methods. After this, penofol is laid. Its installation is carried out using staples or an adhesive mixture.