In city apartments, the presence of a balcony means the opportunity to expand the usable area of the entire housing. But without proper repairs, which includes insulating the entire balcony, such an area can only be used as a terrace or a cold storage room. The technology for insulating a balcony includes a set of repair measures aimed at creating a special design that will provide comfort and warmth in the room being repaired.
- Features of loggia insulation
- External insulation
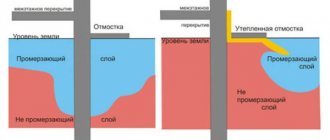
- Glazing
- Internal insulation: necessary materials
- Attaching the insulation
- Features of floor insulation
- Features of wall and ceiling insulation
- Insulation methods
- Standard procedure for insulation work
- Some tips
Features of loggia insulation
On the one hand, do-it-yourself insulation should not present any difficulties. It is enough to purchase material with the required parameters and install it on your balcony. The difficulty is that the appearance of ease of repair leads to further disappointment. This is when, during the cold season, an unpleasant draft, mold, water accumulates and the walls freeze on an insulated and lovingly renovated loggia. The culprit is condensation. When warm air comes into contact with a cold surface, the vapor reaches such a saturated state, scientifically called the “dew point”, where it easily turns into water. This leads to an uncomfortable state inside the balcony, destruction of the thermal insulation system and other unpleasant sanitary and hygienic consequences.
External insulation
The most reliable method of insulation is a multi-layer enclosing structure on the outside. This option promotes the free movement of heat outside the internal walls. This leads to the fact that the junction of different temperatures, or rather the contact of cold and warm air, occurs outside the walls of the interior, which means that such unpleasant phenomena as condensation, steam, mold and dampness do not threaten. The outer layer will prevent the penetration of cold from the street.
The result is an almost ideal atmosphere inside the balcony. The whole difficulty is that it is not always possible to do the external insulation of the walls and roof with your own hands. The only way out is a well-constructed internal insulation structure.
Glazing
Installing a window unit has a double meaning: firstly, protection from precipitation from entering, and secondly, retaining heat in the loggia. But doing glazing yourself is not always a justifiable risk; it is better to invite professionals for this. When installing windows, check how carefully the cracks are sealed, whether the parapet (base) is reliable, what the frame is made of, and whether the height of the expanders corresponds to the thickness of the intended insulation. It is better to clarify all these questions before window work.
Internal insulation: necessary materials
Before starting work, decide on the choice of material for interior decoration. For this purpose, polystyrene foam, mineral wool, penoplex, penofol, etc. are used. To prevent subsequent condensation, vapor barrier materials are chosen for interior work.
You will need:
- polystyrene foam or its equivalent, layer thickness 3-6 cm;
- foil penofol or regular foil, polyethylene film for paraisolation;
- screed materials (dry floor mix or antiseptic boards);
- bars for sheathing;
- moisture-resistant panels for finishing;
- glue, double-sided tape;
- polyurethane foam;
- screws, dowels.
Selecting a thermal insulator
Advantages and disadvantages are inherent to each type of thermal insulation. In order to choose the most suitable insulation, you should compare the main characteristics of heat insulators.
The most common thermal insulator options:
- Extruded polystyrene foam (penoplex);
- Foamed polyethylene (penofol);
- Polyurethane foam (PPU);
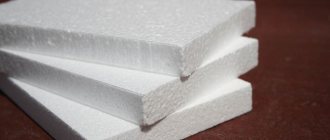
- Styrofoam;
- Mineral wool.
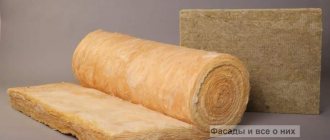
Mineral wool
The thickness of the sheets varies from 2 to 20 cm. Mineral wool is divided into three types, depending on the components of the raw material:
- Stone;
- Slag;
- Glass.
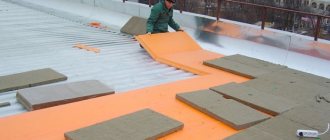
An example of installing mineral wool on a loggia. The material is placed into the prepared structure. The mounting frame can be made of metal profiles or wooden blocks.
Manufacturers produce cotton wool in the form of mats and soft rolls. In some cases, one side is covered with foil. Aluminum foil improves the level of thermal insulation.
When laying mineral wool, the foil side should be directed inside the room. This principle allows heat to be reflected from the aluminum coating and returned to the room.
The main disadvantage is that moisture is destructive; a vapor barrier is required.
Please pay attention to the integrity of the mineral wool packaging before purchasing. Moisture negatively affects the properties of the heat insulator
For high-quality insulation, it is necessary that the loggia space be dry.
Polymer-based insulation
Penoplex, polyurethane foam, foam plastic, foamed polyethylene are polymers treated with foam compounds.
Advantages:
- The presence of gas bubbles provides not only a good level of thermal insulation, but also light weight of the slabs;
- High degree of moisture resistance;
- The materials are durable;
- Antifungal resistance;
- Simplicity and convenience when laying slabs or sheets, as well as rolls (foamed polyethylene);
- An economical repair option, provided you choose polystyrene foam as insulation.
The main disadvantage: they support the spread of flame during a fire and release harmful substances during the combustion process.
When choosing polystyrene foam and other polymer-based materials, it is necessary to correctly select the thickness of the slabs and determine the density
If you plan to use the space in winter, then choose a thickness of 50 mm. The density is determined by further coating - for putty, a value of 25 kg/cube is suitable. m.
1. Foam sheets
Insulator slabs (expanded polystyrene) during installation.
Polystyrene foam is a low-cost method of insulating a loggia, but it is considered a fairly fragile material, so lathing is required for installation. A worthy replacement is extruded polystyrene foam; its installation does not require the creation of a special frame.
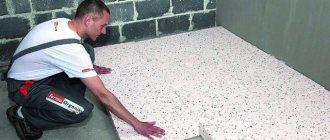
2. Penoplex
Extruded polystyrene foam boards (50 mm thick) are used as insulation. The seams between the elements are sealed with polyurethane foam. Penoplex is attached using special disc-shaped dowels (“fungi”).
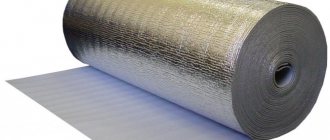
3. Penofol
The material is used as a separate heat insulator; foam polystyrene foam can also be used to provide vapor barrier. Due to the foil side, warm air is reflected and retained in the room.
In order to speed up the insulation of the structure, you can use an alternative method of thermal insulation - spraying polyurethane foam (PPU).
4. Polyurethane foam
PPU is one of the most modern heat insulators. The cost of application services is considered high compared to other analogues, but many have managed to evaluate the performance properties of polyurethane foam. This insulation is characterized by high thermal insulation rates due to its fine-porous structure.
Spraying of polyurethane foam is carried out by specialists; one day is enough for installation work; complete drying also does not require much time.
Attaching the insulation
Insulating a loggia involves thermal insulation of walls, ceilings and floors. Any material, especially walls and ceilings, should be securely fastened. Two methods are used for this: glue or dowels. The peculiarity of the adhesive method is the application technology and the accuracy of the choice of composition. The important point is that the glue must match the insulation material. To apply the glue, use a notched trowel. The first step is to apply an adhesive solution along the perimeter of the heat-insulating material. In order to avoid leakage of glue at the joints, it is laid back a couple of centimeters from the edge. The remaining usable area is evenly covered with glue in the form of dots.
Another method for do-it-yourself repairs involves fastening with the help of “fungi” - special dowels. They are available in different sizes, and when purchasing insulation you should immediately look for fasteners that are suitable in size and properties. For comparison, when attaching insulation 4 cm thick, you will need about 7 dowels with a diameter of 1 cm and a length of 9 cm.
In order to protect yourself from unforeseen embarrassment in the event of unsuccessful fastening with your own hands, it is permissible to use two methods simultaneously: first, glue is applied and the insulation is installed in place, and then the structure lends itself to the doweling process.
Insulation of the ceiling on the loggia
After the subfloor has been completed and the front wall has been insulated, it is necessary to perform heat and waterproofing of the ceiling on the loggia. All joints on the ceiling must be sealed with polyurethane foam or a special sprayed insulation based on polyurethane foam must be selected, which simultaneously works as insulation and waterproofing material. Depending on how the ceiling finish will look, you can choose insulation for the ceiling. To attach insulation or finishing, you may need to install a special sheathing for the ceiling made of beams.
Insulation of walls and ceilings with classical insulation
Traditionally, classic insulation materials are used to insulate a loggia: foam boards or mineral wool rolls.
Traditionally, classic insulation materials are used to insulate a loggia: foam boards or mineral wool rolls. They are light, cheap, do not have an unpleasant odor and are fire resistant. Unfortunately, these insulation materials are resistant to dampness and moisture and immediately fail when wet. But since the price of insulating a loggia with foam plastic or mineral wool materials is very low, they are often used when insulating a loggia with your own hands.
Method of insulating walls with mineral wool or polystyrene foam:
Stage 1 – lathing with wooden beams (beam cross-section 3 x 4 cm)
Stage 2 – laying insulation between the beams (foam sheets are attached to the wall)
Stage 3 – filling all the gaps between the beams and the foam with polyurethane foam
Don't forget about electrical wiring. Lighting cables and for connecting devices must already be laid at the insulation stage.
Stage 4 – finishing cladding of the walls of the loggia
Finishing the walls of the loggia
The decoration of the walls on the loggia depends on whether the loggia is an independent object or has become part and continuation of the room in the apartment.
The decoration of the walls on the loggia depends on whether the loggia is an independent object or has become part and continuation of the room in the apartment. If the loggia is a continuation of the room, then it should be finished in the same style as the living space of the apartment. If the loggia functions and is used as an independent object, then the finishing of the loggia can be done with wooden paneling, plastic panels, plaster, tiles, etc.
Method of insulating the ceiling with mineral wool or polystyrene foam:
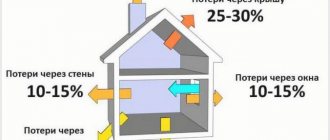
If the ceiling is not insulated correctly, not only will 15% of the heat escape through it, but also the low temperature on the ceiling will cause condensation. The cheapest insulation materials are polystyrene foam and mineral wool. They are lightweight and have low thermal conductivity. But attaching them to the ceiling of the loggia is not at all so easy. It is much more logical to insulate the ceiling of the loggia with sprayed material based on polyurethane foam. But if polystyrene foam is chosen, then you need to proceed as follows:
At the first stage, it is necessary to screw special transverse logs made of timber to the ceiling of the loggia. It is to these lags that the facing material will be attached in the future. The beams must be installed strictly level. Foam or mineral wool is placed between the wooden ceiling joists. Layers of foam plastic or mineral wool are fixed with dowels or screwed with wire. All cracks, joints, and voids are filled with polyurethane foam. The entire working space between the wooden joists must be filled with foam. After the preparatory stage, you can proceed to installing the facing material on the ceiling of the loggia.
Here is a video about how loggias are insulated with polystyrene foam, wooden slats, penofol and moisture-resistant drywall:
https://youtube.com/watch?v=H1se6Fl6Nms
Features of floor insulation
If everything is fine with the floor, then there is no need to repair it. But if you are particularly scrupulous and do everything according to the rules, then insulating the floor will not take much time and will ultimately help you avoid unpleasant surprises. A well-installed floor covering with your own hands will help turn your balcony into a cozy room for living at any time of the year. The first step is to achieve a perfectly even coating. Before installing a thermal insulator with your own hands, give the floor surface a smooth appearance. Mineral wool, foam plastic are used as floor insulation, or a “warm floor” structure is installed.
Balcony insulation and fire safety
If electrical wiring is installed on the balcony, you need to remember safety. Many materials, such as polystyrene foam, are flammable and support combustion. In this case, mineral wool is better suited. It is fireproof and does not burn in an open flame.
Another option is to run the cable in a self-extinguishing corrugation. It can be used to install wiring even with foam insulation.
Features of wall and ceiling insulation
The first layer of insulation is laid in a checkerboard pattern. The first step, as in the case of the floor, is to level the entire surface of the walls and seal holes and cracks. The next step is to seal the joints formed between the insulation and the wall using polyurethane foam.
Insulation methods
Loggia insulation technology suggests two possible ways to create a comfortable, warm environment with your own hands.
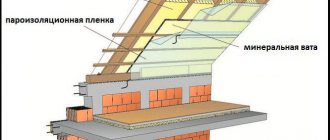
1. Vapor barrier. This method is designed for the property of polyethylene or foil to retain moisture and not allow it to penetrate into the internal layers of the insulation. In this technology, it is quite possible to use mineral wool, because in other cases it is not recommended to use it as a thermal insulation material.
In this case, the design will look like:
- balcony fencing;
- insulation, for example, mineral wool;
- vapor barrier (foil or polyethylene);
- MDF or PVC panels;
- wooden beams or plastic panels.
The entire technology is carried out “dry”, which facilitates construction work. The only drawback can be considered the lack of air permeability. This problem is solved through functional ventilation.
2. Without a vapor barrier. In this option, a protective barrier is not used, and thermal insulation is carried out using materials with low vapor permeability.
In this case, the DIY design will be as follows:
- fencing;
- glue;
- insulation;
- glue;
- reinforcing fiberglass mesh;
- glue;
- finishing layer;
- dowel fastening.
With this method, you can use putty as a finish, followed by wallpaper. The design takes up some of the usable space, is more labor-intensive than the first, but has good breathability with proper heat retention.
Overview of thermal insulation materials
The insulation market is annually replenished with new types of high-quality products with low thermal conductivity, but the new options are mostly improved modifications of traditional materials for thermal insulation.
Technoplex is the best development of the TechnoNIKOL company. This is an already popular general purpose extruded polystyrene foam, improved by including processing additives and a steam generator.
There are universal insulation materials that are equally suitable for cladding floors, ceilings and walls (extruded polystyrene foam boards, for example, Penoplex), and there are materials suitable only for finishing one area of the balcony. Let’s assume that the floor is covered with expanded clay, but it is not used for the walls and ceiling due to its flowability.
Review of modern insulation materials, affordable and safe:
To decide the best and fastest way to insulate a balcony, you need to analyze the installation conditions. Let's assume that on balconies with limited space it is better to use thin materials - penofol, polyethylene.
If space allows or you need to raise the floor to the height of the flooring in the room, then any thick insulation in the sheathing will do - mineral wool, glass wool, polystyrene foam.
Standard procedure for insulation work
Step 1 – laying and fastening the insulation on the floor, front and side walls and ceiling. In this case, all cracks and joints are sealed with polyurethane foam.
Step 2 – vapor barrier. For this purpose, foil or polyethylene is placed on the surface of the insulation and secured with tape or glue. The fastening is completed by mounting the vapor barrier into the joint with metal tape.
3rd step – floor screed. There are different ways to finish the floor with your own hands.
• Bond and thickness. Its height reaches 4 cm. Before pouring the screed, a 1 cm gap of foam foam is laid around the perimeter of the floor near the wall. After the screed has hardened, ceramic tiles are laid using appropriate glue. • Electrically heated screed. This is work for specialists or craftsmen skilled in DIY repairs. • Wood flooring. Wooden rods are laid across the entire area of the loggia, which are fixed using polyurethane foam. Tongue and groove boards are mounted on them to form the flooring.
4th step – lathing. Horizontal and vertical lathing made of wooden beams is laid on the ceiling and walls. For mounting into a concrete wall, self-tapping screws and dowels are used.
Step 5 – final finishing. The decoration of the loggia largely depends on financial capabilities and preferences in external design.
The last final step is finishing with plastic panels, plasterboard or wooden lining. The main thing is to follow the technology of renovation work in the apartment.
How to insulate a balcony with your own hands step by step photo
1. Cleared the balcony of everything unnecessary. Before the technician arrived, we cleaned our balcony of rubbish and debris, a window was already installed and heating radiators were installed.
2. Patching “holes” in stained glass windows using TechnoNIKOL Technoplex insulation boards. This did not affect the appearance of the house in any way, and for us the problem of eternal drafts was solved. The slabs were laid in two layers, all cracks were filled with polyurethane foam.
After taking measurements, cutting the slabs is done using a jigsaw and a hacksaw for metal.
3. Exiting electrical wiring to the balcony. In my workshop it was planned to install three sockets for sewing machines and a laptop; the wires were pulled from the nearest socket in the kitchen.
4. Insulation of the floor using beams and TechnoNIKOL Rocklight insulation (mineral wool). According to our master, he likes to work with this type of insulation most of all. Since when placed between the beams, it expands on its own and does not leave any gaps, which means it does not require the use of polyurethane foam.
Although basalt wool and glass wool are two different things, I still played it safe and carefully closed the door to the balcony while he was laying the floors. And then I vacuumed all the walls for an hour. Our master, of course, laughed for a long time when he saw me walking around in a medical mask and gloves. For me, any mention of glass wool is a fear from childhood, when we ran around a construction site and accidentally touched glass wool, any of us received a burn, after which it itched and burned for a long time.
First, a frame or so-called formwork for the future floor and walls is assembled from wooden blocks. The slats are fastened together with metal corners using dowels and a screwdriver.
If the frame is laid on concrete, then first, using an impact drill, holes are drilled on the concrete floor at the fastening points. Then dowels are inserted into the wooden logs, applied to the fastening points and the screws are driven in with a hammer.
Mineral wool mats can be laid directly on a concrete screed, in a wooden frame between the joists. It does not shrink at all, so it is used even on high-traffic surfaces.
To give the floor additional thermal insulation properties, you can build a second lathing frame on top of the first layer of basalt wool insulation and lay another layer of TechnoNIKOL Rocklight in the same way. In this case, the wooden blocks are attached with a screwdriver to the screws.
Next, an isolar layer is used - this is a metallized substrate that reflects heat and protects from moisture; it is widely used to create a warm balcony (loggia). After laying all the layers of building materials, we reached the same floor level as the room without thresholds or steps.
5. Insulation of the ceiling using TechnoNIKOL Technoplex insulation. We had two wires installed in our ceiling for the ceiling lights. Therefore, before proceeding with the installation of the ceiling, electrical wiring was installed under the wooden beams. I really like this method - it looks neat, without unnecessary wires. Electricians from Bangkok have a lot to learn from Bashkir masters)
6. Insulation of walls using TechnoNIKOL Technoplex insulation.
The main difference between nanographite insulation and basalt wool is that it is not elastic. Therefore, when installing it in the sheathing, gaps remain, which then need to be filled with polyurethane foam.
After all the joints have been processed, a metallized Isolar substrate is applied on top of the insulation. It is attached to the sheathing using a stapler and special adhesive tape (connecting tape) - isospan.
After covering the entire surface with a metallized substrate, sheets of plasterboard are attached to the wooden sheathing using self-tapping screws and a screwdriver.
Some tips
Some subtleties in this matter will help avoid further disappointments. The vapor barrier is placed on the dark side of the insulation, the foil should face the inside of the warm room. The use of mineral wool as insulation is not always justified. If water leaks into it, you will have to change the entire insulation system. When using mineral wool, you need to take care of waterproofing measures. Wooden rods cannot be installed through the thickness of the insulation, since this will create places where cold and water accumulate, the so-called “cold bridge”. To completely improve the repair of the loggia, consider an additional ventilation system that will significantly enhance the climate control of the entire living space.