How to insulate a timber house from the outside: creating a curtain wall
Among the methods of thermal insulation of log buildings, the construction of a ventilated facade is considered the most popular method, the reason for this is the advantages of this method:
- the curtain wall facade is easy to install, the work takes relatively little time; after insulation, the walls can be lined with various decorative materials: lining, porcelain stoneware, siding, boards, slatted profiles, etc.; this method of insulation does not allow the walls to mold and collapse, dew point moves behind the outer wall; resistance to temperature changes, humidity, precipitation, as well as excellent sound insulation are also among the undeniable advantages of a hinged ventilated facade; such a design is durable, its service life reaches 50 years; by insulating the walls, you reduce energy costs for heating.
External insulation of a timber house in a similar way can be described as follows:
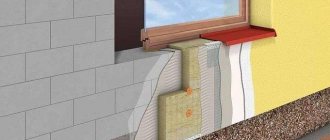
To prevent moisture from accumulating in the wood of the walls, a gap is made between the insulation layer and the decorative finishing material, which is why such a facade is called ventilated. To create an air space, sheathing is installed on the wall.
To make it, marks are first placed on the surface where the beams will subsequently be attached. The width between them should correspond to the width of the sheets of insulating material, and the thickness of the beams is selected depending on the thickness of the mats. Having placed the marks, the logs are attached to the walls using self-tapping screws. The evenness of the sheathing is checked using a building level and plumb line.
It is especially important to ensure that all the beams are located in the same plane - this will help subsequently create beautiful, even and high-quality siding. When the sheathing elements are secured, insulation sheets are laid between them. They are pressed tightly against the walls and fixed with dowels. To provide the necessary air space, wooden planks are nailed over the sheathing and insulation layer
Their thickness should be such that the gap is at least 5 cm. After laying the insulation, the finishing is done with decorative siding.
Installation technology
The arrangement of external insulation can be represented by several options. It is very important to provide the wooden surface of the walls with high-quality protection. For this purpose, waterproofing or vapor barrier film materials are most often used.
Installation of waterproofing
The moisture-conducting rough part of the waterproofing film must be placed on the wall. The glossy side should “look” towards the insulation. Otherwise, condensation will accumulate on the wood, which will cause rapid destruction of the walls.
The waterproofing film must be laid on the surface with an overlap of 10 cm, and then secured with staples. All joints must be taped with construction tape.
In the photo the waterproofing is black, the film is fixed with staples
Arrangement of a suspended ventilated facade
One of the most convenient and effective methods, characterized by the following positive qualities:
- speed and convenience of self-installation;
- optimally suits any cladding option, which can be represented by a slatted profile, wooden lining, siding panels, facade boards, porcelain tiles and other materials;
- high level of heat-insulating and sound-proofing properties;
- long-term operation, usually forty to fifty years;
- a noticeable reduction in the costs of installing and paying for heating systems;
- maximum level of resistance to adverse external factors;
- removal of the “dew point” outside the external walls.
The method consists of fixing the insulation and subsequent finishing with standard decorative materials. The presence of ventilated air space prevents wood from rotting and increases the thermal efficiency of the structure being built.
Wooden sheathing diagram
Step 1. We mark out areas for installation of sheathing made of bars, and treat the material for sheathing with antiseptics.
Important! The standard distance between the sheathing elements should be equal to the width of the insulation, and the section of the beam is selected in accordance with the thickness of the insulation.
Step 2. We fasten the sheathing bars according to the markings to the surface of the facade using galvanized self-tapping screws.
Installed sheathing
Photo of a wooden sheathing, fixation was carried out with brackets
Important! You need to control the location of the bars using a building level and a plumb line. It is necessary to install the lathing with the utmost quality and levelness, which will allow for a durable and attractive finish.
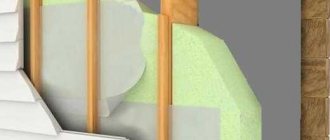
Step 3. Place insulation into the cells of the installed sheathing and fix it to the wall surface with special mushroom dowels.
Mineral wool laid between the posts
Mineral wool slabs are fixed with dowels
Step 4. We attach a sheet of waterproof and windproof membrane film over the insulation.
Attaching wind protection sheets
Important! The waterproof surface should be placed outward, and the overlap should be approximately 8-10 cm. The material is secured with staples. The joints must be taped with construction tape.
Step 5. Installation of sheathing to create an air gap and ensure natural ventilation.
Counter-lattice
Important! It is necessary to use bars 50 mm thick. Galvanized wood screws are used for fixation.
Features of installing sheathing around windows
If there are no problems with the installation of wooden sheathing and insulation around the openings, then such work when using metal profiles must take into account some design features. A prerequisite is the installation of hangers taking into account the installation of slopes and ebbs. Knowing the dimensions of such elements, you need to leave an allowance for their installation.
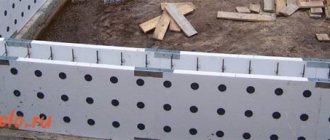
Arrangement of metal sheathing
Thermal insulation diagram
It is not always advisable to build ventilated facades on the surfaces of timber houses based on brackets and metal structures, which is due to excessive costs for materials and consumables.
However, it is this kind of lathing that is often used when insulating a house under siding. In this case, it is necessary to purchase U-shaped hangers, as well as a metal profile and special fasteners. It is most convenient to carry out installation with galvanized self-tapping screws equipped with press washers with a diameter of 4.2 mm.
Step 1. We install the waterproofing film and make markings for installing hangers for the metal sheathing.
Important! The optimal distance is 50-60 cm, but if the building is located in a windy area, the distance between the elements of the metal structure must be halved.
Step 2. We install metal hangers on opposite sides of the wall.
Important! Using a level you need to control the accuracy of the installation. Fixation to the surface is carried out with dowels or self-tapping screws with a press washer.
Step 3. Attach metal profiles to the U-shaped hangers in the vertical direction. This design is the initial or guide, so it must be made as smoothly and efficiently as possible.
Step 4. Pull the strong twine fairly tightly at the top and bottom of the guides, which are located on opposite sides of the wall.
Step 5. We install hangers and profiles on the surface of the entire wall in accordance with the markings and stretched string.
Installation of metal sheathing
An example of fastening a sheathing post
In the photo, the profiles rest against the overhangs, but it is desirable that the frame posts are spaced a quarter of a meter from the overhangs
Fixing the profile post on the outer corner
Important! The upper part of the profiles should retreat from the overhang by a quarter of a meter, and the lower part should rest against the foundation of the building.
At the final stage, insulation is installed and a counter-lattice is mounted for installation of cladding in the form of siding panels.
Insulation laid between the studs
Vapor barrier and counter-lattice
Decorative finishing of a house made of timber with siding
Features of the procedure
Many users choose houses made of timber. The popularity of such buildings is explained by their attractive and natural appearance, the use of natural materials in construction, as well as the comfortable microclimate that is maintained in such environments. The timber itself is a warm material, so houses made from it are considered cozy and hospitable. They are not cold in winter, but not hot in summer either. However, such buildings still need to be additionally insulated, otherwise during the frosty seasons they will not be so comfortable.
Insulation is primarily required for timber houses in which the building material is not of sufficient thickness. If the section is incorrect, complete freezing can occur inside a wooden house. This fact suggests that the floors in such a structure are unable to retain heat efficiently and it is impossible to do without insulation. If the beam in the house has a cross-section of 150x150 mm, then it is not necessary to provide additional finishing, especially if the building is located in areas with a warm and temperate climate. Timber with a section of 180x180 mm is also popular - very warm and reliable houses are built from it, for which additional finishing is also optional. However, it is worth considering that if the cross-section of the beam of the house is correct, the building material will still dry out over time, and this will also cause significant heat loss.
If you decide to insulate a log house, then you should note that this can be done both outside and inside. The following features are typical for insulating a house from the inside:
The following features are typical for insulating a house from the inside:
- with such work, a certain part of the useful living space will inevitably be lost due to the installation of a frame structure under the insulation;
- a layer of thermal insulation material hides wooden floors underneath, which affects the design of the rooms in the house;
- Due to the inevitable winter cooling of wooden walls, the dew point moves directly into the internal insulation. After this, condensation and mold appear. It is worth considering that monitoring the condition of the timber in such circumstances is not an easy task.
Insulation of a log house from the outside is considered more common. It includes the following features:
- with such insulation, the useful area of the living space does not undergo major changes and does not become smaller;
- external work is good because it does not in any way affect the internal routine of the household;
- with this method of insulation, the facade of a wooden house is reliably protected from destructive temperature fluctuations, and this significantly extends the service life of the building;
- if you correctly select suitable and high-quality insulation, then the comfortable microclimate in the interior of the house will not be disturbed;
- most owners turn to this method of insulation to make the house cozy and “breathe”;
- with external insulation, you can update the facade if it naturally darkens;
- Using external insulation materials, you can protect the timber from damage.
At the moment, there are several main options for insulating walls in a house made of timber. A curtained ventilated façade is a technology developed as an additional decoration for the façade of a building.
It is worth considering in more detail what advantages are typical for this option for insulating a log house:
- ventilated facades have a long service life, which can reach 50 years;
- This insulation option is characterized by excellent heat and sound insulation, which is noted by many users;
- installation of a suspended ventilated facade is considered simple and affordable;
- This method of insulation allows the use of a variety of facing materials;
- with such insulation, the dew point moves outward, which avoids the accumulation of condensation in the material.
The technology for insulating a timber house under siding largely replicates a hinged ventilated façade. In this case, the insulation is also installed from the outside, and is supplemented with a decorative coating on top. Polyurethane technology will be clear to every craftsman who has at least once encountered work involving polyurethane foam. The main difference between this method lies only in the volume of materials required to form a thermal insulation cushion, because much more is needed. That is why, when choosing this technology, it is necessary to stock up on a high-quality spray gun.
Materials
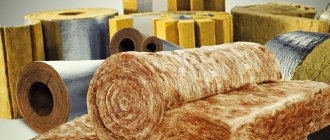
There are many different materials for thermal insulation, but not all are suitable for insulating houses made of timber. Some can only be used under certain conditions. Most often, the following materials are used for insulation:
- mineral wool;
- glass wool;
- slag;
- Styrofoam;
- extruded polystyrene foam;
- penofol;
- warm plaster;
- thermal insulation paint.
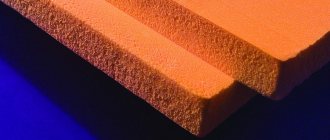
Mineral, glass wool and slag wool are very similar materials and differ only in the type of feedstock. These materials have been used for a very long time, and when insulating a facade or ceiling, you can safely choose them as the most economical and reliable insulation option. They are produced in the form of slabs and rolled mats. Plates are usually used for insulating walls, and rolls are used for insulating ceilings and roofs in houses made of timber.
Polystyrene foam is produced in a factory from plastics. To do this, the mass is melted and then foamed. As a result, a material with a huge number of closed pores is formed.
Note! Polystyrene foam is water- and vapor-proof, so insulating a timber or log house with it from the outside is unacceptable.
It is recommended to use it only indoors. However, when burned, this material releases a lot of toxic substances. Another unpleasant property of polystyrene foam is that rodents love it very much. They not only make holes in them, but also happily eat the material itself.
Extruded polystyrene foam is a foamed polymer composition into which carbon dioxide is added during the process of pressing (extrusion) through a special mold. This material has very low thermal conductivity, high resistance to deformation, and can operate at temperatures from -50 to +75 °C. It is very durable. Due to the fact that polystyrene foam has a low coefficient of vapor permeability, it is also not recommended to be used for insulating a log house from the outside.
Penofol is a thin foamed mass of polyethylene. Its thermal conductivity is so low that it is possible to successfully use plates and rolls with a thickness of only 1 cm. To give this material reflective properties, aluminum foil is glued to one or both surfaces. In some cases, penofol is produced, foil-coated on one side, and on the other side it has an adhesive layer that facilitates the installation of such a heat insulator. Penofol is water- and vapor-proof, inedible for rodents.
New materials for insulating timber houses are heat-insulating plasters and paints, which contain substances that are activated upon application and create a porous coating with a very low thermal conductivity coefficient. They are used like ordinary plaster or paint, covering the surfaces in several layers.
Preparatory stage
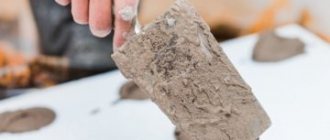
You need to start by assessing the condition of the walls and the quality of the previously completed work on insulating the log house. It is necessary to carefully examine all the joints, corners and joints of the beams, and evaluate the compaction of the entire surface of the log house walls. If any defects are detected (for example, thinning of the caulk layer), they must be eliminated in advance.
Caulking walls
Any timber structure is distinguished by a large number of seams. After the building shrinks and the moisture content of the wood equalizes, voids may form in the grooves and seams, which reduce the ability of the entire structure to retain heat. That is why caulking is so important, allowing you to completely isolate the inter-crown joints.
Carrying out such work requires compliance with several rules:
the caulking must be carried out from below and processed one crown from all sides at the same time, otherwise the building may warp; It is important to choose the right tool, because the chisel should not damage the wood; Taking into account the formation of a narrow groove between the timber, it must be processed “stretched”.
This type of caulking is carried out by stretching fibers of tow, moss, jute or their analogues along the seam. Part of the material is left out and after processing the groove, it is rolled into a roller and pushed in, completely covering the space between the rims.
How to insulate a house using the ventilated facade method: step-by-step instructions
Tested on stone buildings, the technology of ventilated facades has recently begun to be used for insulating timber buildings. The technology ensures proper steam exchange.
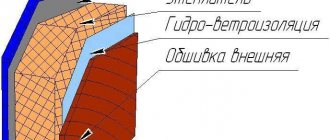
In general terms, the design of a ventilated facade is:
- load-bearing structure
- insulation layer
- steam and wind protective membrane
- mandatory ventilation gap
- exterior decoration
The frame is a lattice structure - lathing. For houses made of timber, it should be made of wood so as not to interfere with breathability.
Step-by-step instructions will help you consider in detail the sequence of actions when arranging a ventilated facade:
You need to insulate the walls of your house in this order:
- Installation of vapor barrier.
- Installation of the sheathing frame.
- Laying insulation.
- Install another layer of vapor barrier.
- Finishing work
All steps must be completed in order.
Vapor barrier
If the material for thermal insulation is a material without a film, then after the preparatory work you can begin installing a vapor barrier. The main purpose of vapor barrier is to prevent moisture condensation on the walls during large temperature changes.
The most common material for vapor barrier is vapor barrier film. It provides the desired effect at a low price.
If a high-quality vapor barrier is installed, excess moisture will be eliminated. Fungus and mold will not spread. The lifespan of the entire wall structure will increase significantly, and a normal microclimate will be established in the house.
How is the vapor barrier installed?
First you need to cover every part of the walls with a vapor barrier. The film must be distributed along the entire perimeter of the walls and attached with a stapler. The overlap should be more than 10 centimeters. If ecowool or penofol was used as the main insulation, then there is no need for a vapor barrier. They themselves perfectly isolate excess steam.
Installation of the sheathing frame
Before laying the sheathing, you need to get rid of all protruding corners. This is necessary for even distribution of the insulation insulation. Next, you need to make the racks in the shape of the letter G. Their production proceeds as follows:
- Measuring the height of the walls.
- Trimming timber with a section of 50x100 millimeters. They are cut to the same length as the height of the wall.
- Trimming timber with a section of 50x50 millimeters. They are cut to the same length as the width of the wall. We attach small beams to large ones, using the letter G. To connect them, it is best to use self-tapping screws. They are mounted on the wall in the corners of the walls.
- From them comes the distribution of the main sheathing using self-tapping screws. The main battens use small timber (50x50 mm). The distance between the bars should be no more than 65 centimeters.
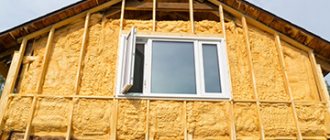
Laying insulation
The material selected for insulation is placed on the sheathing. The tools you will need during the work depend on the material chosen. For example, pollock is attached using special anchors, polystyrene is attached with good water-repellent glue.
The material must be placed tightly. In case of remaining voids and gaps, they must be covered with small cut-outs of the same material. If the holes are very small, then it is better to use polyurethane foam.
If ecowool is used as insulation, it must be attached directly on top of the sheathing. It is rolled out over it and the joints are secured with special tape. To use ecowool, it is inflated with special equipment. But this can also be done at home. To do this, it is fluffed with a construction mixer or a drill (a special attachment is required). After it fluffs up, it should increase three times in size.
Installing a second layer of vapor barrier
A second layer of vapor barrier is used to enhance the effect and strength of the structure. By installing a second layer, you will be able to reduce moisture condensation and increase the service life of the insulation.
Finishing work
After installing the second layer of vapor barrier, finishing work is necessary for the aesthetic appearance of the walls of the room. The material for finishing work is selected according to personal taste and the desired design of the room.
The most economical option would be to use gypsum board () as a finishing material. Then use plaster and regular wallpaper.
It is worth remembering that if good waterproofing is necessary, it is better to use gypsum fiber sheet (gypsum fiber sheet). It has excellent resistance to moisture. As a final touch to gypsum plasterboard, you can use ceramic tiles. Ceramic tiles will not stick to gypsum boards.
The importance of insulation
Due to the fact that construction technologies for houses made of timber came to us from Western countries, where, as we know, winters are much milder, houses made from this material turn out to be quite cold for our conditions. Although 150x150 timber is an inexpensive material, and this explains its popularity, but, on the other hand, if you live in such a house without high-quality insulation, then in frosty winters you can “compensate” for this savings with huge electricity bills and go broke on heating.
Therefore, insulating houses made of 150x150 timber is a necessity. But after the work has been done, you will be able to enjoy a beautiful, warm home for many years, and get by with short-term (and therefore profitable) heating of the room, even in cold winter. But this information will help you understand how the facade of a house is insulated with modern materials.
No. 1 - Hinged ventilated facade
Insulation using this method is one of the best options, because it has a number of advantages:
- fairly quick installation;
- various choice of materials for cladding, including slatted profiles, lining, siding, wooden facade boards, porcelain stoneware and so on.
- excellent heat and sound insulation;
- service life is approaching 50 years;
- finishing materials can have a variety of colors;
- significant reduction in heating costs;
- the façade is resistant to weather conditions;
- the “dew point” is shifted beyond the outer wall.
Scheme of a suspended ventilated facade
A layer of insulation is attached to the outer walls, after which it is covered with decorative finishing.
- To ensure ventilation of the walls, an air space is provided between the insulation layer and the decorative finish, which will provide conditions for preserving the timber and will not allow it to rot, become damp and freeze.
- First of all, markings are made for the beams that will make up the horizontal sheathing; their pitch should be equal to the width of the insulation mats. The cross-section of the timber should be selected according to the thickness of the mat.
Then the timber is attached to the facade using self-tapping screws. To control its position, use a level with a plumb line. It is extremely important to ensure the evenness of the plane of the mounted sheathing so that the installation of siding at the final stage is of high quality. It is necessary to lay insulation mats into the installed sheathing; to do this, they are pressed tightly against the bars and the wall. After this, the insulation is secured using special dowels.
Laying a layer of insulation
You should also remember to leave an air gap to allow natural ventilation. It will provide conditions under which the wood of the sheathing will not become damp and subsequently rot. The gap, which should be at least 5 cm, is formed by installing bars on the sheathing.
We cover the insulation with waterproofing
Recommendations for laying insulation:
- When installing the external insulation of a house made of timber, it should be taken into account that insulation boards are not allowed to be stored outside, because if they get wet, they can significantly lose their thermal insulation qualities.
Insulation scheme: 1 - insulation, 2 - diffusion membrane, 3 - siding
If the horizontal pitch of the sheathing beams is 15 mm smaller than the size of the insulating mats, then in this case you can do without the use of fastening materials - this will make it possible to lay them sideways. When working with insulation, you must remember that you should use personal protective equipment (respirator, goggles, gloves).
Attention! If mineral wool is used as insulation, a diffusion membrane should be used to protect it from moisture. It is a perforated film that is capable of allowing evaporation to pass out, but does not allow atmospheric moisture to be absorbed into the insulation.
If fiberglass or polystyrene is used, then they will not need protection from moisture.
Insulation of a house made of 150x150 timber from the outside
The reason for the high heat loss of wooden houses usually lies directly in the design of such a house, as well as in the thickness of its ceilings. The size of the timber used to build a wooden house is usually 150x150 mm. We began to build such houses using imported technologies, and where they came from usually has a milder climate and warm winters.
As a result of this design, we can observe the following:
- on the one hand, the construction of such a building is extremely cheap;
- on the other hand, there are huge heat losses, and, as a consequence, huge consumption of electricity and gas.
However, these shortcomings can be removed very easily, the main thing is to have desire, skillful hands and knowledge. The most optimal solution is to insulate a house using 150x150 timber from the outside. We will describe in detail how to insulate a house made of timber in this article.
External insulation of a house made of such timber must be carried out in several stages:
- decide on insulation;
- calculate the exact amount of materials;
- install a thermal insulation layer;
- finish the façade.
Choosing insulation
For external insulation of a wooden house made of 150x150 timber, two materials are perfect:
- expanded polystyrene (foam plastic) in the form of sheets;
- mineral wool.
Insulating a log house with polystyrene foam is perhaps the most popular method of external heating. However, its use is not entirely rational, and we will explain why.
Polystyrene foam has a thermal conductivity coefficient of about 0.082 W/m2. At the same time, for mineral wool it is 0.036 W/m2. It conducts much more heat, so it is significantly inferior to mineral wool. This drawback can be eliminated by using a thicker layer of foam, but this is not the only problem. This material is excellent for thermal insulation of brick or stone houses, but not wooden ones. The main reason is ventilation rates. Mineral wool has excellent air permeability and at the same time perfectly insulates the room.
Polystyrene foam cannot boast of such properties. It perfectly protects from the cold, but does not allow air to circulate freely, and the main feature of wooden houses made of timber is precisely the need to “breathe”. After insulation with polystyrene foam, after some time the wooden walls will begin to become covered with fungus and mold, rot and collapse. After all, the formation of condensation in cold winter is simply inevitable.
Therefore, mineral wool remains the best choice for a wooden house.
We calculate materials
The thickness of mineral wool is quite easy to calculate. It is sold in the form:
- slabs;
- special rolls.
The most suitable form for insulating a house made of timber is the form of a slab. This is explained by:
- slabs are more convenient for walls;
- they are more economical;
- sticks better on vertical surfaces.
Rolled mineral wool is usually used on uneven surfaces. The thickness of one slab is usually 5cm. To correctly calculate the insulation layer, there are many special formulas, but here is the simplest method:
- if the walls are thicker than 20 cm and the temperature in winter does not fall below -20°C, then one layer of mineral wool can be used;
- if it falls below -22-25°C, then you need to use two, in rare cases - three layers.
In addition to mineral wool, additional wooden slats will be required based on:
- for single-layer insulation - 5x5 cm;
- for multilayer – 5×10 cm.
You also need to buy waterproofing polyethylene film, anchors, screws and an antifungal agent. You will also need a special stapler with staples to attach the film.
Advice: It is better to choose a complex anti-fungal agent that is fire-bioprotective and also provides protection from fire. For example, SENEZH Firebio, Guardian or others.
We install thermal insulation
Installation of the thermal insulation layer is carried out in the following order:
- prepare the surface;
- install the first layer of waterproofing;
- install the sheathing;
- install insulation;
- We install the second layer of waterproofing.
At the preparatory stage, the wood should be treated with the specified means.
Important! Here you need to approach this issue especially seriously, because then there will be no access to the surface.
After this, you need to wait for it to dry completely, so it is better to carry out this work only in the warm season.
The waterproofing layer is a special polyethylene film or diffuse membrane. When using membranes, you need to place it on the correct side, because it tends to allow air to pass through only in one direction. It is fastened using a construction stapler and must be placed with an overlap of about 10-12 cm. The joints are insulated using special tape.
Next, a wooden sheathing is installed, based on the size of the purchased mineral wool slabs.
Advice: it is better to subtract 2 cm from the length of the slab, and then install the sheathing. This will ensure that the slabs are slightly spring-loaded and held more securely.
After this, mineral wool slabs are installed. They are very easy to process - they are cut and can be given any shape. To secure them more securely, special anchors made of metal or plastic are used. It is best to use an anchor with a wide head.
And the last stage - thermal insulation - the surface layer of waterproofing film.
Finishing
After the work has been completed, a wooden sheathing is attached to the wall, which will serve as the basis for the future facade. You can use a variety of materials to decorate your home:
- lining;
- boards;
- siding;
- planken and much more.
After external insulation, you also need to take care of internal heating, then your house will become as warm as possible in winter and cool in hot summer! Now you know how to insulate a house made of timber.
Practical tips and videos on insulating a house made of timber
Andrey B.
The year before last I decided to insulate myself. The house was built as a summer option. But over the years, we fell in love with our country house and live in it almost all year round. Our village was supplied with gas and, having installed autonomous heating, spent two winters overwintering. The first one was more temporary, and the second one we lived permanently. But I can’t say anything, the bills for the gas consumed were impressive. Therefore, having studied the issue, I began insulation. On the advice of knowledgeable people, I purchased Thermo Plate mineral wool from the manufacturer Knauf, 100mm thick.
Using self-tapping screws, I screwed a 100x50 strip vertically onto the wall of the house, then I made a template to fit the width of the mineral wool slab and screwed the rest of the strips according to this dimension. This is not at all difficult to do. Using a screwdriver, pre-drill holes for the thickness of the self-tapping screw in the 100x50 timber, and then easily fix it on the wall of the house. Next I laid the mineral wool. The thickness of 100 mm made it possible to lay the insulation in one layer, which significantly reduced the work time. Then I attached the diffuse membrane with a construction stapler. From 50x50 timber I made a sheathing for attaching the siding. Attached the siding.
Last year the winter was not the warmest, but the number of cubic meters of gas consumed decreased noticeably. This winter we live in a country house almost without traveling. The house fully satisfies our need for warmth.
Vladimir U.
I was planning to insulate the house. I found specialists who advised making insulation from polystyrene foam. I don’t know what they were guided by and what I was thinking, but I agreed. I purchased the material, did not skimp, took a very durable and expensive one. The team got to work, and within a week my house stood like a thermos. This is exactly what happened; at that time I did not understand that in two years the facade would have to be changed. So, after the specified time, out of necessity, I looked under the insulation and saw that the wood of the house was covered with black mold. I invited professionals who told me that due to the fact that polystyrene foam does not absorb moisture that leaves the house, condensation has formed, which has caused mold. I had to dismantle the polystyrene facade and use mineral wool as insulation. Which definitely cost me a pretty penny.
Kostya Z.
The godfather was going to insulate the house. We have the same ones, made of 150x150 timber. We bought plots together and built together. So he comes and says that he has found people who will spray us with polyurethane. He says that if there are two houses, they give a good discount.
I myself have been thinking for a long time that it would be nice to insulate it, then I can live in winter too. Without hesitation he agreed. And I don't regret it. Environmentally friendly, does not rot, spider bugs do not grow in it, durable. I covered it with siding and everything is beautiful.
Video on insulating a house made of timber:
https://youtu.be/5eBgKZWcdpc
We also recommend:
No. 3 - Polyurethane foam spraying method
This method has the following advantages:
- insulation does not support the combustion process;
- such insulation is not susceptible to the harmful effects of bacteria and also does not rot;
- it has a fairly long service life, during which the thermal insulation qualities are not lost;
fairly high noise insulating properties; there is no need to use additional fasteners; environmental friendliness; A fairly simple method of applying thermal insulation.
This method is used for thermal insulation of the foundation, walls and basement of a house. It is quite popular when insulating the external walls of houses made of timber.
Preparing the walls of the house
At the stage of preparation for external insulation of a wooden building, it is necessary to resolve several issues:
- which insulation is better;
- how to lay it correctly;
- how to prepare the walls of a house.
Regardless of which thermal insulation material is chosen, walls made of 150x150 timber need to be prepared. First of all, it is necessary to conduct a visual inspection and make sure that there are no signs of wood rotting, insects harmful to wood, or the need for additional fastening of timber and finishing elements of window and door openings.
The photo shows a house made of timber before insulation.
At the same time they decide whether the walls need caulking. If empty cracks are noticed, then they need to be filled with appropriate material before laying the insulation. Caulking walls is a simple, but labor-intensive process. Knowing the rules and tricks of this matter will greatly simplify its implementation.
What is wall caulking?
To eliminate gaps between beams, three materials are traditionally used:
- tow;
- jute;
- flax wool, etc.
Overview of materials for caulking
In the process of work, craftsmen use special wooden devices in the form of spatulas with a thin blade. But to perform the task yourself, an ordinary narrow spatula will do.
Tool for caulking a log house
Next you need to choose the most suitable caulking method. There are two of them:
- laying stretched insulation;
- laying insulation into the set.
The first is optimal if the gaps are not wide, the second is suitable for deep and long gaps. When caulking, the stretched tow fibers are distributed along the crack in an even thin layer, while driving it into the gap with a spatula. The work must be done slowly and carefully, trying to seal the insulation as efficiently as possible. The tow is driven in layer by layer until the gap is filled.
Laying in a set is done as follows: bunches or balls of tow are formed from the tow, corresponding to the size of the gap, and driven into it using a spatula and a hammer. Regardless of the chosen caulking method, work begins from the bottom of the wall.
Methods for caulking a wooden house
Video - How to caulk a house made of timber
Video - Caulking a house made of timber
Finish wall cladding
Covering a log house with plastic siding
To sheathe the outside of a timber house, it is advisable to use wooden boards, the thickness of which will be at least 25 mm. Also, they should be made of larch, pine or oak. In this case, an important parameter will be fulfilled, in which both the cladding and the walls will breathe better.
Finishing with wooden boards allows the walls to breathe
Important! During installation of the cladding, special slots for ventilation should be created on the lower and upper edges of the facade. To prevent rain or snow from getting into the cracks behind the façade, you can install special canopies
In the next article we will look at the technology of insulating a frame house - which insulation is best suited for this type?
How to insulate a brick house from the outside and inside: methods and materials How to insulate the ceiling in a wooden house: only effective methods Insulating the foundation from the outside and inside: materials for insulation Various ways to insulate a frame house with your own hands
Subtleties of insulating timber walls
Insulating a log house from the outside under siding cannot be started whenever you want - before this, the following conditions must be met:
- Work on installing insulation can begin only after the log frame has completely shrunk - often this period can be one and a half to two years.
- It is prohibited to carry out work if the façade has not been treated with an antiseptic. Ignoring this rule will lead to the appearance of fungus and rot.
- Before insulating a house made of timber from the outside, it is necessary to prepare the facade: seal not only wide cracks, but also small cracks. To do this, you can use putty, polyurethane foam or similar materials.
- Good thermal insulation of a log house requires careful selection of material and calculation of its quantity. It is necessary to consider how the thermal insulation material will be combined with the wood of the timber itself.
- To choose the right insulation, you need to take into account the size of the building, the quality of the frame and seams.
Some insulation is installed without lathing Source obustroen.ru
What to plant in January 2021 for seedlings
bell pepper
Mid-ripening and late-ripening varieties of bell pepper have a growing season of 110-140 days. To grow such varieties, seedlings begin to be sown from mid-January to mid-February.
Pepper requires special conditions regarding heat. Bell pepper is a heat-loving plant that needs 25C, no less. It is necessary to keep the daylight hours to about 12 hours.
Bell pepper seeds for seedlings are first planted in a small container. Plant two seeds at once, in case one does not sprout. If both have sprouted, then one must be removed. When 4 leaves appear, the sprout should be transplanted into a larger container.
Tomatoes
In January, it is important to plant early-ripening and late-ripening tomato varieties. It should be taken into account that tomatoes are transplanted into open ground or a greenhouse no later than 60 days after the sprouts appear, otherwise the seedlings will become overgrown. Therefore, tomatoes are sown as seedlings at the end of January and February.
Like peppers, the seeds are planted in a small glass or other container, 2-3 seeds each. In the end, only one is left. Tomatoes require about 12 hours of daylight. When 4 leaves appear, the tomatoes are transplanted into a large container. After 60 days, transplant into open ground or a greenhouse.
Eggplant
Eggplants are late-ripening, heat-loving and light-loving plants. In fact, eggplants cannot grow under natural conditions in the middle and northern zone. A person helps this cultivated plant to ripen with the help of early seedlings.
The format for sowing eggplants is not much different from previous types of cultivated plants. It is recommended to first plant 2 seeds in a small container, maintain a temperature of 25 degrees and 12 hours of daylight. When 2-4 leaves appear, transplant into a large container.
Celery
The growing season of celery is quite long - 160-200 days. Naturally, it can only be grown in the southern regions in the usual way. For seedling soil, use a mixture of sand and earth. The seedlings are transplanted into a large container 30 days after the sprouts appear.
Proper insulation of log walls
This gives it the properties of a thermos - it retains heat at low temperatures, and coolness at high temperatures. To perform wall insulation correctly and efficiently, the following factors should be taken into account:
- Depending on the type of building and climate, choose the type of insulation.
- Take into account the required thickness of the thermal insulation layer.
- Exact adherence to the technology of laying and assembling timber.
The following types of materials are used for installation as a thermal insulation layer:
Insulation scheme using a ventilated curtain façade.
- Styrofoam;
- stone wool;
- fiberglass;
- mineral insulation;
- polyurethane spray.
The most common way of arranging a warm exterior facade of a wooden house is to create a ventilated curtain wall. It is easy and quick to install; when finishing it, you can use almost any material - from plastic siding to wooden lining and ceramic tiles. Increasing the thickness of the wall shifts the dew point to the outer wall, and this ensures the safety of the wood from rot and dampness.
Insulation process
- The first and most important step is to create a continuous and airtight vapor barrier layer. For this, the following are used: roofing felt, vapor barrier membrane or film, foil. The material is laid with a slight overlap, and the edges are glued with double-sided aluminum tape or bitumen tape.
- Next comes the creation of a wooden or metal sheathing. The distance between the guides should be slightly less than the width of the insulation. This measure is necessary to avoid cold bridges. The thickness of the lathing should correspond to the thickness of the heat-insulating material.
During the installation process, you should be guided by a horizontal level or plumb line, otherwise the plane may be distorted, and not only the appearance of the building will suffer, but also the quality of the insulation installation. The guides are attached to self-tapping screws.
- The insulation is installed using special umbrella-shaped dowels. Their consumption is 4-5 pcs/m².
- If the work is carried out with mineral or stone wool, then waterproofing of the slabs should also be installed, because damp and wet insulation has much less thermal insulation properties than dry insulation. The operation scheme of such a waterproofing system is as follows: its perforated base serves to remove excess moisture from the insulation, but prevents it from entering the slabs from the outside.
- After tensioning the waterproofing, a vertical sheathing is constructed. It is needed to create the necessary gap for ventilation of the external walls of the house.
Options for insulating a wooden house: a. roll insulation; b. interframe in one layer; V. interframe in two layers; 1. Lathing. 2. Roll insulation. 3. vertical frame. 4. Slab insulation. 5. Umbrella-shaped dowel. 6. Short slats.
Once the vertical sheathing is completed, you can begin insulating the outside of the house with various finishing materials.
When choosing polyurethane spraying, there is no need to carry out such labor-intensive work as constructing several frames, fastening slabs and waterproofing. Spraying is carried out directly on the walls of the house from the outside; it can be applied to the base of the foundation or basement from the inside. The applied layer not only serves as a thermal insulation layer, but also creates a certain sound insulation in the room. After complete drying, the guide rails for the outer skin should be secured. For this, the most suitable option would be: larch, pine or oak.
To prevent moisture from getting inside the sheathing, you can close the top gap with a decorative visor, and leave a gap at the bottom for ventilation. To prevent small rodents and pests from entering, you can cover the gap with a fine decorative mesh.
Choice of insulation
Let’s consider which thermal insulation material to choose in this case.
Construction specialists advise choosing one of the following types of material for external insulation of houses made of 150x150 timber:
- Styrofoam;
- mineral wool;
- penoplex.
But how the foundation base is insulated from the outside, and which insulation is the best, can be found in this article.
Each of these insulation materials has its own characteristics, pros and cons. Let's look at this in more detail.
Styrofoam
One of the most convenient and at the same time inexpensive insulation options. But it also has disadvantages, the main one of which is the low thermal conductivity coefficient. Therefore, polystyrene foam will not be able to make the house very warm indeed. You can, of course, lay the foam in a thick layer, however, this will not significantly save the situation. The thing is that this insulation is more suitable for houses made of brick or stone, but it is not very good for wooden buildings.
Foam plastic for insulating a wooden house
Polystyrene foam does not allow air to pass through - this is its main problem. A wooden house must “breathe”, even if it is built from timber. Otherwise, the walls of the building will begin to mold, rot, and deteriorate. As you understand, after years the walls of the house will be significantly damaged. After all, the formation of winter condensation under a layer of insulation is inevitable, and this moisture will not be able to escape outside. But what is the procedure for insulating the foundation with penoplex, and what you should pay attention to, is outlined here.
Mineral wool
Unlike polystyrene foam, this soft material remarkably retains heat in a wooden house, therefore it is the optimal choice for insulating buildings made of 150x150 timber. In addition, mineral wool also provides excellent breathability, thanks to which a wooden house “breathes”.
Mineral wool for insulating a wooden house
And thanks to this, a healthy microclimate is ensured inside the building. It will also be useful to learn how to insulate the foundation with polystyrene foam with your own hands.
Penoplex
A modern material created on the basis of foam plastic, but without the disadvantages of the latter. The correct name for penoplex is extruded polystyrene foam. It is made by foaming the original raw materials. As a result of processing, a light, porous material is obtained, completely permeated with air bubbles. Penoplex allows the house to breathe, so it is excellent for insulating buildings made of 150x150 timber.
Penoplex for insulation of a wooden house
This material is quite expensive, however, its technical characteristics are so high that more and more people are choosing penoplex to insulate their homes. But you can read here how to insulate a bathroom from the inside in a brick house, and what materials are best used.
General arrangement of external insulation of a wooden house
Two-story wooden house
From the point of view of ensuring high-quality thermal insulation and preventing the appearance of dampness/condensation on the wall and in the insulation, the most preferable way to protect a house from the cold is to install a ventilated facade. Regardless of the material used, the design is a “layer cake” consisting of the following elements:
- load-bearing wall of a house made of timber or logs;
- frame for insulation, created from timber or metal profiles;
- a layer of thermal insulation material and fasteners for it;
- windproof membrane film or windproof board;
- lathing for external finishing;
- exterior decoration of the house.
At the same time, a ventilation gap is formed between the insulation and the external finishing of the wooden house due to the sheathing, which ensures effective drainage and reduces the risk of condensation and dampness.
Insulation of a wall made of wooden beams. In the figure you can see all the elements of the ventilated facade - insulation, frame for it, windproof membrane, lathing for finishing and the cladding itself, represented by clapboard
Scheme for insulating a wooden house using a vapor barrier film. You may notice that there is a small gap between it and the wall.
Various methods of attaching insulation to a log wall: a) – roll insulation, fixed using slats; b) – single-layer thermal insulation, fixed to a frame made of timber; c) two-layer thermal insulation fixed on a double sheathing; d) two-layer thermal insulation, fixed to the frame with brackets
Fastening thermal insulation to metal brackets and disc dowels
Prices for dowels for insulation
Dowel umbrella
You can familiarize yourself with the materials used to insulate a wooden house from the outside from the table below and in subsequent sections of the article.
Table. Insulation of a wooden house from the outside - basic materials.
| Material name | Short description |
| Mineral wool | Rolls and slabs of thin fibers of basalt and other minerals. |
| Isoplat | A soft fiberboard made from milled wood. Does not contain glue or chemical binders. It has high density and vapor permeability. |
| Styrofoam | Round porous cells of expanded polystyrene bonded into slabs. |
| Extruded polystyrene foam | A type of polystyrene foam made using a slightly different technology. It is distinguished by greater density and better thermal insulation qualities. |
| Ecowool | Paper and fabric processed into cellulose with additives that prevent caking, rotting and rodents. |
Peculiarities
Let's figure out why external insulation of houses made of timber is a logical and correct approach.
Insulation from the outside helps to transform the facade of the building, since, willy-nilly, the house will have to be covered with finishing material. This way the building becomes presentable and looks decent.
Without a doubt, the house itself becomes much warmer. As a result of high-quality external insulation, you will save on coolants and electricity, and you will be able to enjoy the comfort of home all year round.
The double layer of waterproofing provided in the external insulation technology reliably protects the house from external precipitation and moisture. As a result, the building is better preserved and does not rot.
External insulation is also good because, unlike internal insulation, it allows you to keep the internal square meters of living space intact. The rooms will not become smaller or cramped. But this article will help you understand what features exist when properly insulating the facade of a house made of aerated concrete.
The video shows the insulation of a house made of 150x150 timber from the outside:
Insulation of a wooden house with Isoplat
It is very easy to insulate a wooden house with Isoplat. The plate is a dense, but at the same time elastic material. It is enough to simply press it against the wall and nail it with nails with a wide flat head. Isoplat fits securely to the base and prevents the appearance of “cold bridges”. A ventilated facade is installed on top of the slab. In addition, Izoplat slabs of 25 mm or more can be covered with plaster. Insulation in this way can be done independently without the involvement of specialists. This is the fastest, easiest and most reliable option for insulating a wooden house.
It is very simple to insulate a wooden house with Izoplat slabs
Ready-made insulation materials
It is no secret that recently you can find a lot of ready-made insulation materials on the market for effective thermal insulation of walls made of laminated veneer lumber. They are manufactured taking into account advanced standards and high technologies. The most popular of them is the famous Penoplex, which is produced by a Russian company. The material is offered in the form of soft and high-quality thermal insulation boards, which are an effective type of extruded polystyrene foam created using a special technology.
Such panels are famous for their high resistance to external influences, durability and long service life. They are able to prevent the penetration of moisture, dampness, bacteria, mold and other microorganisms into the room, providing the correct microclimate and comfortable living conditions. Now “Penoplex” is a new word in the world of domestically produced thermal insulation structures.
How to insulate a house made of timber from the outside. Useful tips and tricks
If you follow some instructions, study photos and videos with detailed instructions on insulation, the upcoming procedure will be completed much faster and more productively than expected
Experienced experts advise paying attention to the following subtleties:
- When installing insulation, you cannot leave this material outside in the open air. If it is exposed to rain, its thermal performance will likely be greatly reduced. Therefore, store the insulation in a warm, well-ventilated and dry place;
- by laying the horizontal sheathing bars in increments that are 15 millimeters smaller than the width of the insulation, you can refuse to use fasteners;
- When laying insulation, be sure to follow safety rules and use personal protective equipment. These include a respirator, gloves, and goggles.
Correct installation of insulation in houses made of laminated veneer lumber involves the use of three main methods:
- arrangement of a suspended ventilated facade;
- using polystyrene foam as insulation;
- spraying walls with polyurethane, which requires the use of special equipment.
According to experts, it is most advisable to use the suspended ventilated facade method, since it has many advantages, including:
- high installation speed;
- a wide variety of cladding materials. Today on the market you can find a lot of interesting offers for finishing houses made of laminated veneer lumber. Particularly popular are different types of siding, lining, wooden facade board, composite, brick and many others;
- excellent thermal insulation and protection from external noise;
- long service life, which often reaches 50 years of productive operation;
- reduction in insulation costs. High-quality insulation reduces basic costs by 30 percent;
- effective protection of the building from external atmospheric influences, including moisture;
- The “dew point” is located outside the load-bearing walls.
Work progress
To ensure complete thermal insulation, one caulk is not enough. It is necessary to insulate the walls of the entire structure. The modern market offers a wide selection of various thermal insulation materials, the most affordable of which are mineral and stone wools; it is quite possible to install them yourself.
Lathing
To attach soft or lightweight hard insulation with your own hands, you must first equip the frame. To do this, a vertical or horizontal sheathing is placed on the wall surface, in which the guides are placed at a distance of 40 - 50 cm.
Depending on the thickness of the insulation layer, the geometry of the bar or board for the frame ribs is also selected. So, to lay a layer of 50 mm, it is best to make a frame that protrudes from the wall by 70 mm, which ensures the formation of a ventilation gap.
First, the corner elements of the sheathing are created. A 50x50 mm timber strip is attached to the rib at an angle of 90°. Such elements are placed in all corners of the room and, after checking the location according to the level, they are attached to the walls. The remaining space is marked for the selected number of sheathing ribs. It is advisable to treat all frame elements with antiseptics to prevent rotting.
Moisture protection
Before installation, the entire frame is covered with waterproofing film, which is attached with the smooth side to the wall. The film is laid horizontally and the seams between the cuts are insulated with special adhesive tape.
Then insulation is placed in the frame and a vapor barrier is applied on top of it to protect against internal moisture. Before installing any type of waterproofing, you must carefully study the instructions, since an error in the location can lead to the insulation getting wet and losing its properties.
The gap left will facilitate natural ventilation and evaporation of condensate. Next, the entire frame is covered with any finishing material.
Laying insulation
After creating the frame, the heat-insulating material is cut into strips or sections 2–3 cm wide greater than the distance between the guides and placed between the frame elements. Sometimes additional fastening of the insulation with special polymer anchors is used. This technique ensures a tight fit of the material to the frame and reduces its subsidence.
general information
If you are going to carry out measures to insulate a house made of 150x150 timber from the outside, you need to go through certain stages of work.
Let's list them in order.
- The first step is to choose insulation.
- Depending on the selected material, make calculations and find out how much insulation you need to purchase.
- Install thermal insulation. This is the main stage of work; we will dwell on it in more detail below.
- Carry out the final façade finishing, covering the insulation with siding, clapboard, or other finishing material.
It may also be useful for you to learn about how aluminum facade glazing is insulated.