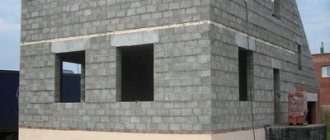
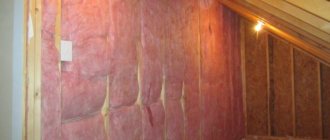
Insulating walls with foam plastic from the inside is considered one of the most common ways of arranging premises for various purposes. Interior decoration with this material causes a lot of controversy, but, analyzing all the pros and cons, most people decide positively the question of whether polystyrene foam can be used in an apartment. This method of insulation is widely popular due to its high thermal insulation properties and manufacturability.
The essence of the problem
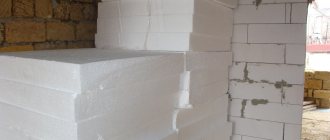
In order to finally decide whether polystyrene foam can be used indoors where people live or work, it is necessary to understand what this material is. In general, polystyrene foam is a whole class of foamed, gas-filled polymers. Most of its volume is the gas component, which provides low specific gravity, high thermal insulation properties and noise protection. These properties of the material make it attractive for cladding walls, floors and ceilings.
Modern foam plastics are available in the form of slabs of different thicknesses and sizes, as well as in the form of roll material.
It can be made on the basis of almost any common polymer substance. The most widely used are polyurethane, polyvinyl chloride, phenol-formaldehyde, urea-formaldehyde and polystyrene foams.
Depending on the base, the basic properties of the material differ: mechanical strength, specific gravity (density), chemical resistance and other characteristics. At home, polystyrene foam is usually associated with expanded polystyrene - the most used insulation.
What makes you doubt the possibility of using polystyrene foam when decorating your house or apartment from the inside? The following negative aspects are noted:
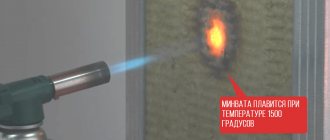
- When burned, almost all foam plastics emit very toxic gases, which are extremely dangerous to human health. Moreover, this effect is also observed when the material is overheated, which limits its use in steam rooms, near heating devices and chimneys.
- Polystyrene foam has low resistance to a number of solvents (acetone, benzene, etc.) and their vapors, which must be taken into account when using paints and varnishes.
- The polymer itself is not susceptible to rotting and the influence of various microorganisms that form mold, but it has a rough surface in the recesses of which they can accumulate.
- When cutting foam plastic with a heated string, the harmfulness of production increases, and the lack of protective measures can affect human health.
- Low vapor permeability creates a risk of condensation accumulation on the surface of the insulation.
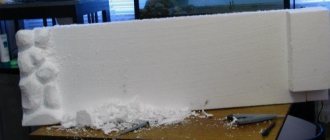
- Low mechanical strength for bending and impact, and the ability to crumble require the adoption of measures to protect against mechanical impact and complicate the installation of thermal insulation.
Despite the listed disadvantages and the risk of harmful effects, do-it-yourself wall insulation with polystyrene foam has become widespread. This is facilitated by the availability of material and the improved quality of modern products. All negative aspects must be taken into account, but they can be circumvented if the work is carried out correctly.
Types of foam
The choice of material for insulating walls inside depends on several factors:
- room area and interior decoration;
- required level of thermal insulation;
- cost of building materials.
Let's look at the most popular types of insulation.
Penoplex
This is a modern material that belongs to the group of extruded polystyrenes. Penoplex is most effective as insulation for walls, as it has certain characteristics:
- low thermal conductivity, which allows the installation of slabs of minimal thickness;
- resistant to moisture and temperature changes;
- fireproof;
- environmentally friendly material;
- Microorganisms such as fungi and mold do not multiply on it;
- easy to install;
- service life is 50 years.
Penoplex has virtually no disadvantages. The only thing worth considering is the need for additional vapor barrier, since the material does not allow steam to pass through.
Polyurethane foam (PPU)
Despite the fact that the PU foam insulation technology is quite new, it has managed to establish itself as the most effective. Among the advantages of polyurethane foam, the following features are worth noting:
- seamless application of a layer of insulation;
- low thermal conductivity;
- absence of cracks and air cavities inside the coating;
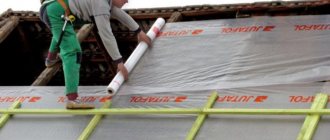
- polyurethane foam can be applied directly to walls without additional vapor and waterproofing;
- environmentally and biologically safe.
Application of polyurethane foam is a rather complex process that requires additional skills and special equipment.
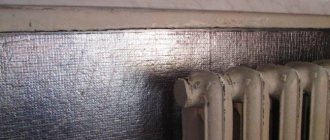
Penofol
Penofol is a new generation of insulation. The material is foamed polyethylene covered with aluminum foil. It has many advantages:
- simultaneously serves as heat, hydro, sound and vapor barrier;
- environmentally friendly;
- does not emit substances harmful to the human body;
- low thermal conductivity;
- Due to its small thickness, it does not hide the space of the room.
Insulation of walls from the inside with penofol occurs only in combination with penoplex. Thanks to this, maximum thermal insulation is achieved with a minimum thickness of the insulation layer. The process of laying penofol does not take much time and effort.
How to choose material
Before you insulate a wall from the inside with polystyrene foam, you need to choose the right material. Polystyrene foam or simply polystyrene foam is most often used as wall insulation. It is produced in 2 main types: pressed (PS brand) and unpressed (PSB), and PSB has the best thermal insulation properties.
The choice of material is made according to brands that differ in density. As is known, an increase in the density of a foamed polymer leads to an increase in mechanical strength, but a decrease in thermal insulation characteristics, and vice versa. The product brand indicates this parameter and some special properties. For example, the fairly common unpressed polystyrene foam PSB-S-15 has a density of 15 kg/m³, and the letter “C” means that the material is self-extinguishing (does not support combustion).
The question of how to insulate walls with foam plastic from the inside can be safely solved using the specified brand, since it has excellent thermal insulation properties, and the reduced mechanical parameters are compensated by the external coating (chipboard, plasterboard, plywood, etc.).
It is necessary to insulate the walls from the outside with a material with increased strength, for which polystyrene foam of the PSB-S-35 brand is more suitable. In rooms where significant loads may occur (basements, garages), you should consider using PSB-S-50 polymer.
When choosing a material, it is recommended to take into account the following nuances:
- First of all, you need to pay attention to the color of the product: it should be perfectly white. Yellowness or other shades indicate its improper storage, which can cause deterioration in thermal insulation and strength characteristics.
- It is advisable to check the weight of the goods. Thus, after basic calculations, you can determine the density of the material declared in the brand.
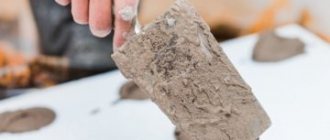
- Quality can also be assessed by touch. A good foam plastic for wall insulation should be soft but elastic.
- Storing polystyrene foam may indicate its deterioration. If the material has been lying in an open area for a long time under the influence of precipitation and direct sunlight, then it is better not to purchase it.
- The appearance is also assessed by the type of polymer granules. They should be approximately the same size, regular, spherical in shape and have an even distribution over the entire area.
- Variation in sizes. It is recommended to lay out the sheets and measure the length, width and thickness. It is especially important that the last indicator does not have a significant scatter both on one and on different sheets.
- It is worth paying attention to smells. Any foreign aromas or mold smell are excluded.
- The presence of markings and the name of the manufacturer is a prerequisite for a quality product.
Preparatory stage
Internal wall insulation with foam plastic involves several stages of work. The video clearly demonstrates the entire process. The following technological stages can be distinguished:
- Preparatory work. Before applying insulation to the walls inside the house, they must be thoroughly cleaned. Old plaster, paint layers and other coatings are removed from the surface. It is necessary to remove contamination, paying special attention to the presence of oil stains and paint and varnish materials. The fact is that if the above solvents are present in their composition, they can have a detrimental effect on the foam. The presence of traces of mold and fungi is also unacceptable. A complete audit of the surface quality is carried out, and, if necessary, repairs and elimination of major defects are provided.
- Leveling the plane. Walls can only be insulated with foam boards on a flat surface. If the walls are made of brickwork, then for leveling you need a full layer of plaster, applied according to all the rules for interior finishing of brick surfaces. Concrete walls do not require plastering. Fine leveling is done as follows. First, an acrylic-type primer is applied using a paint roller. After it dries for 22-25 hours, as a rule, a layer of putty is applied, which allows you to completely eliminate all significant defects. Finally, a finishing primer is applied to ensure a perfectly flat surface and improve the adhesion of the adhesive to the wall plane. In addition, antifungal components are introduced into special primer mixtures.
Pros and cons of insulation from the inside
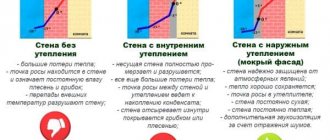
Before doing the work yourself, you need to study all the nuances. Thermal insulation of indoor walls is not the right solution from the point of view of such a science as heating engineering. This method becomes only acceptable if it is impossible to use another. The disadvantages of insulating the walls of a house from the inside are as follows:
- reduction of usable area of internal premises;
- the measures taken do not prevent the walls from freezing, and therefore do not protect them from destruction;
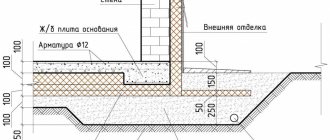
- the point of dew (condensation) appears inside the load-bearing wall of the house (there is a high probability of moisture accumulation).
The dew point is at the junction of the wall and the foam, so to avoid condensation it is extremely important to apply a vapor barrier
Insulation with foam plastic from the inside can only be done if there is a serious need for it. Most often, DIY work should be done in the following cases:
- Thermal insulation of premises in a multi-storey building. To insulate an apartment with polystyrene foam from the outside, you will need to hire industrial climbers. Such services are expensive, so an alternative option is to use protection from the inside.
- Insulation of house walls with new cladding. When doing work with your own hands in a private house, it is necessary to take into account the condition of the facade finishing. If the external work was completed relatively recently, dismantling the cladding is not practical from an economic point of view. In this case, it is also possible to fix the thermal insulation from the inside of the walls.
Technological insulation
Foam insulation indoors is done by gluing polymer boards. The sequence of work is shown in the video.
To attach foam plastic, a special adhesive composition is used, designed specifically for this material. It is purchased dry and prepared by mixing with water according to the instructions. The consistency should be optimal in thickness.
The application of the adhesive mass is ensured by two methods: applying it to the wall surface or spreading it in the form of cakes at the corners of the insulation board. A possible option for additional fastening is the use of umbrella-type dowels, which are installed after the glue has completely dried.
Laying foam sheets begins from the bottom corner of the wall. Before attaching them, the slabs are pressed against a dry wall for marking. Cutting the foam into slabs of the required size is carried out using a heated string or a hacksaw with fine teeth. First, the first row of insulation is completely glued. The second one is applied so that the joint between the lower plates falls in the middle of the top sheet, i.e. the seam should have a T-shape.
Do-it-yourself technology for insulating external walls with polystyrene foam
A craftsman familiar with the basics of finishing work can insulate walls.
Let us consider in detail the insulation method called “wet facade”.
Tools
For work you will need hand and power tools:
- level, plumb line, hammer, tape measure, pencil, hacksaw (knife), trowel and spatula;
- bucket for stirring glue and plaster;
- hammer drill or impact drill with bits or drills for concrete;
- whisk attachments for drills for preparing solutions.
From consumables purchase:
- glue for polystyrene on a cement or synthetic basis;
- dowels with a rod length 4-5 cm greater than the thickness of the foam;
- mounting foam or adhesive foam;
- foam gun.
Work progress step by step
Wall insulation begins with preparatory work:
- calculating the amount of insulation and its purchase;
- preparing and checking instruments;
- purchases of consumables;
- installation of scaffolding (if necessary).
The work is carried out in the following sequence:
- The surface of the walls is prepared and cleaned of dust and dirt.
- The voids in the seams (if any) are sealed with cement mortar or foam.
- Level the surface with plaster so that unevenness does not exceed 1.5 - 2 cm. This will make it easier to fit the sheets and reduce the amount of expensive glue during further finishing.
- At a level of 50 cm from the ground, a support bar is attached strictly horizontally, if the foam is not placed to the ground, but finishing is provided with another material.
- Using a level and plumb line, markings are made.
- Apply a sheet according to the markings and through it (to avoid mistakes) drill a hole in the wall for the dowel.
- Starting from the central hole, fix the sheet to the wall.
- The second and subsequent sheets are placed offset (in a checkerboard pattern).
- The seams are sealed with polyurethane foam. Remove excess sealant after complete hardening, usually after 12 hours and up to 24 hours.
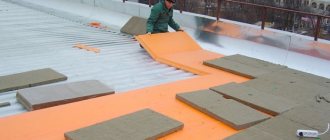
- Using a special toothed roller or other available means, punctures up to 0.5 - 1 cm deep are made on the surface of the foam for better adhesion to the layer of adhesive plaster.
- A 1-2 mm layer of specialized polystyrene foam adhesive is applied to the foam plastic, which is leveled with a spatula.
- A fiberglass mesh is applied to the glue and “sunk in.” The joints are overlapped, overlapping by 10 cm. The seams between the sheets and the edges of the mesh should not coincide.
- Level the glue with a spatula. By adding portions of glue in the right places, the final leveling of the surface is carried out, working as if using putty.
Finishing
After the composition has dried, prime the surface with products for external use.
The final finishing is carried out with facade paint or bark beetle plaster. The latter option is preferable, as it hides inaccuracies and irregularities, which are especially visible in side lighting.
There are no tricks when it comes to frame insulation. The foam is secured with wide-headed dowels between the frame slats. The remaining voids are filled with polyurethane foam or adhesive foam. Then, without fail, a waterproofing membrane is nailed to the frame. It is convenient to do this with counter-lattice bars, the thickness of which is 1-1.5 cm. After installing the siding or other material, there will be a gap between it and the foam, which will reduce the likelihood of dampening of the materials - the facade will become “ventilated”.