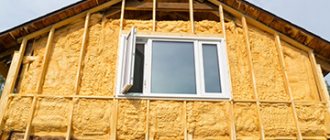
Construction technologies are constantly being improved - quality improves, new methods are developed, and working times are reduced. In our country, foam plastic formwork has been used relatively recently, while in European countries they have known about it for more than 50 years. Thanks to such formwork, the sound insulation properties of the building are improved and the efficiency of the heating system is increased. In essence, this is a structure that consists of a large number of foam blocks connected through special jumpers. Among the main advantages of formwork is a reduction in time and labor costs.
Foam formwork
- 1 Foam formwork - design diagram
- 2 Classification of permanent formwork 2.1 Video - Fixed polystyrene foam formwork
- 4.1 Dimensions of permanent foam formwork
- 5.1 Video - How to build foam formwork
Foam formwork - design diagram
This is a hollow structure into which reinforcement is installed and concrete is poured. The formwork is made of polystyrene foam blocks connected by jumpers. This technology, as already noted, significantly simplifies the construction process, since additional arrangement of both thermal and noise insulation is not required in this case.
Polyfoam itself as a building material is quite durable, moisture resistant, not chemically active and safe for health. It weighs little, so the formwork blocks can be manipulated even without the use of special equipment. And this, in turn, significantly reduces the cost of construction.
During the production of the described products, a fire retardant is used, which increases the fire safety of the finished building significantly. Such formwork (also called permanent formwork) is characterized by simplicity of design, and even those who do not have much experience in building houses can handle its installation. All that is required in the work is accuracy and utmost attention.
Penoplex as foundation insulation
How to insulate a foundation using penoplex, see detailed instructions here
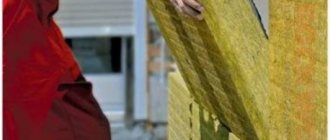
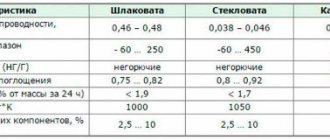
Features of penoplex
The operational and technical characteristics of penoplex allow us to call it the most effective insulation material available on the market today.
It is essentially an advanced foam made by extruding polystyrene. During the production process, polystyrene granules with the addition of foam are placed in a high-temperature chamber. The mixture melts and foams due to the fact that the blowing agents, when heated, release a large amount of gases - carbon dioxide, nitrogen and others. Through molding nozzles, a mass resembling whipped cream is squeezed onto a conveyor, hardens and cut into panels.
The result is a porous material. But, unlike polystyrene foam, it has a single fine-cellular structure that does not break down into granules. Each cell is gas-filled and fully insulated, providing high thermal insulation performance. Penoplex is characterized by a higher density and greater strength than polystyrene foam.
EPS insulation is lightweight, cuts well and does not crumble. The sheets have a tongue-and-groove joint, which prevents even the slightest cold from leaking in. It is convenient to use for independent insulation of any building elements.
Several types of penoplex are available. For thermal insulation of blind areas and basements, grades 35, 45 and “Foundation” are suitable.
Dense fine-cell structure of penoplex
Classification of permanent formwork
Depending on the purpose, formworks are divided into two large categories.
- Construction - perform the function of a kind of frame in monolithic structures. The cavities in the blocks are filled with concrete during construction. As soon as the mixture hardens, the walls are sheathed with fire-resistant material of at least 3 mm thickness (this can be either plasterboard or ordinary plaster).
- Decorative - made of blocks with reinforcement and insulating material inside. They are assembled directly on the walls using lintels (no sealants or solutions are used). Walls made in this way do not need cladding.
Note! In addition to polystyrene foam, there are a number of other materials that can be used in the construction of permanent formwork.
- Expanded clay concrete structures are the first options for permanent formwork. Externally they resemble ordinary cinder blocks. They are not very popular because they are expensive and require additional insulation.
- Glass-magnesite structures weigh little and are used mainly for internal partitions, because their load-bearing capacity is low.
- Arbolite structures are constructed from wood chips and cement. They have excellent thermal insulation properties, but are quite expensive.
Note! In light of everything said above, it becomes obvious that foam formwork is the best option, because other materials have many disadvantages. By the way, about the advantages and disadvantages.
Video - Fixed polystyrene foam formwork
Advantages of expanded polystyrene formwork
As we just found out, it is better to use foam plastic for formwork. After all, this is an environmentally friendly material, in the production of which no toxic substances are used. Other advantages of this material include:
- ease of installation, allowing you to save a lot of time and money;
- long service life;
- the ability to dig a not too deep trench during installation;
- efficiency;
- For waterproofing protection of the base, drainage is quite sufficient;
- foam boards do not attract rodents as much as other materials, and, moreover, do not rot;
- high thermal insulation properties, allowing significant savings on insulation;
- installation channels in blocks designed for laying various types of communications.
Flaws
Of course, the designs also have weaknesses, even if they are few. These include:
- impossibility of construction in winter;
- mandatory grounding of a house under construction;
- The humidity in such walls will be very high, and therefore it will be necessary to install forced ventilation.
Insulating the foundation with polystyrene foam is nothing simpler!
We advise you to read our article on how to insulate a foundation using polystyrene foam, see more details here
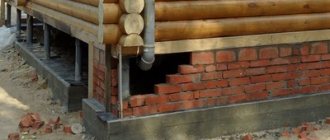
Thermal insulation of a columnar foundation with polystyrene foam
Before you insulate a columnar foundation with your own hands, you will need to purchase a heat insulator and suitable glue for it. Then you should perform all the following types of operations in turn:
- Dig the foundation to its depth, making a trench around it.
- Cover the foundation with EPS at least to the depth of freezing of the soil.
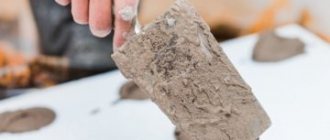
- Clean the foundation, removing all crumbling or chipping concrete particles.
- Cover the surface of the foundation with a penetrating primer (2 layers) and let it dry until it is completely absorbed into the concrete.
- Waterproof the foundation with bitumen mastic.
- Apply glue onto the slab in spots.
The polystyrene foam is attached to the foundation 1 minute after applying the glue. If the size of the polystyrene board is 120x60 cm, you need to apply more than 8 strips of glue 1 cm wide. For this, a comb spatula is used. You need to start from the bottom, rising in rows.
If the polystyrene foam insulation does not have special locks, then after 3 days polyurethane foam is injected into the seams between its plates for sealing. Dowels can be used for fastening, so holes for them are drilled along the edges of the slabs and in the center of each of them.
When insulating a columnar foundation with your own hands, coating waterproofing can be used if protection from capillary water is required. The level of hydrostatic pressure can reach up to 0.1 MPa.
The technique of coating waterproofing is quite simple. It is performed using bitumen or polymer mastics that cover the surface of the foundation with a film with waterproof properties. The use of coating technologies is typical for vertical waterproofing of foundations.
When carrying out horizontal coating waterproofing, it is necessary to take into account the fact that due to their low strength they are used only as auxiliary waterproofing layers. After treating each hole with a small amount of foam, dowel nails are driven into them. Then waterproofing is applied to the heat insulator with polymer mastic, and after it dries, the trench is covered with earth.
How to calculate the cost of construction?
To become more familiar with the savings achieved by using foam formwork, we will calculate the approximate cost of constructing walls. Calculations are made based on the current cost of the material (more on this at the end of the article) and the size of the building itself. An approximate calculation of the required materials will look like this:
- concrete - about 125 liters per 1 sq. m. (price depends on the cost of the required materials);
- foam formwork - 3.3 pieces per 1 sq. m. (about 500 rubles);
- fittings - about 10 kilograms per 1 sq. m. (specific cost depends on current prices).
And if we proceed from prices in Moscow, then approximate calculations for the construction of one floor will look like this (the cost of the work itself is not included):
- total area (various types of openings are not included) - about 180 sq. m.;
- concrete solution for a given area - about 27 cubic meters, that is, 81 thousand rubles;
- the price of the formwork itself is about 88.2 thousand rubles;
- fittings - 1800 kilograms or 37.8 thousand rubles.
It turns out that the total cost of all consumables for one floor will average 207 thousand rubles.
Dimensions of permanent foam formwork
| Name | Dimensions | Thermal insulation thickness | |
| internal | external | ||
| Series 25 (one-piece) | |||
| Main wall block | 1250x250x250 | 50 | 50 |
| Wall end block | 1250?250?250 | 50 | 50 |
| Corner wall block (right/left) | 700?250?250 | 50 | 50 |
| 500?250?250 | |||
| Series 30 (one-piece) | |||
| Main wall block | 1250?300?250 | 50 | 100 |
| Wall end block | 1250?300?250 | 50 | 100 |
| Corner wall block (right/left) | 1250?300?250 | 50 | 100 |
| 500x300x250 | |||
| Series 35 (detachable) | |||
| Wall block | 1200?300?250 | 50 | 100 |
| Series 50 (one-piece) | |||
| Main wall block | 1250?300?500 | 50 | 100 |
| Wall end block | 1250?300?500 | 50 | 100 |
| Corner wall block (left/right) | 450?300?500 | 50 | 100 |
| 650?300?500 | |||
How is foam formwork made?
We recommend that you read the step-by-step instructions below.
Stage one. Let’s immediately say that there is nothing complicated in making polystyrene foam formwork, but only on condition that you strictly follow our instructions. So, first mark the area and prepare all the materials necessary for the work. Draw up a construction plan for the future building, and then mark the area for the foundation in accordance with it.
It is important that each of the corners is aligned with utmost clarity using a mounting level. Moreover, you need to carefully level the entire area of the construction site, since only under such circumstances will you be able to apply the required markings with a minimum error.
Stage two. Next, arrange a trench for the future foundation. The depth of this trench should be 0.5 meters and the width should be only 0.4 meters. When working, pay special attention to the horizontalness of the bottom of the pit. The fact is that the formwork will not be removable, therefore, it will no longer be possible to level the surface for the walls.
Stage three. Then proceed to make a drainage pad. Such a pillow should be laid exclusively on a leveled surface (the mounting level will help you!). Use a sand-gravel mixture as a cushion - pour it onto the bottom of the trench in a 15-centimeter layer and level it. This way, the future load from the building will be distributed as evenly as possible.
The pillow will also have another function - a thermal insulator and a drainage system. Insert reinforcing rods into the cushion - in the future they will take part in connecting the formwork blocks.
Stage four. Pour a thin layer of concrete mortar over the pillow - it will serve as a kind of “sole” for the base. Thanks to this “sole” the surface will be as smooth as possible, which is very important when constructing formwork with your own hands.
Stage five. After the concrete solution has hardened, place the foam blocks on the reinforcing rods installed in the previous steps. Install jumpers between the blocks, with the help of which they will be connected to each other. It is typical that the blocks must be connected according to the tongue and groove principle, which will minimize the number of additional assembly seams. For corners, use special corner joints - this way you will protect yourself from labor-intensive fastening of elements in the corners.
Note! In some cases, additional reinforcement is installed in special grooves (the said grooves must be in blocks). Although much here depends on the specific project for which the object is being built.
Stage six. Having installed a row of blocks No. 3, align them vertically. Make sure that the side surfaces always coincide with one another.
Stage seven. As soon as all the voids inside the polystyrene foam plates are filled, you can begin to actually pour the concrete solution. To compact it, experts recommend using special deep vibrators. Having finished compacting the surface, take a trowel and carefully level the upper “mirror”. It is worth adding that foam formwork involves adding coarse crushed stone to the concrete (it is important that the size of its fractions exceeds 0.8 centimeters).
Note! This kind of formwork has recently become increasingly popular, since it does not need to be dismantled after the solution has hardened, but on the contrary, it will also serve as an additional thermal insulation layer in the future.
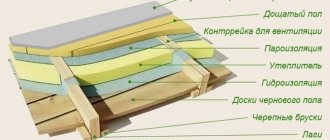
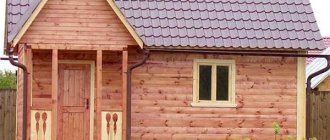
Stage eight. This completes the construction of the formwork. As a result, you will get walls that will look like a “sandwich” in cross-section: two rows of foam plastic, between which there is a heavy-duty concrete monolith. It is typical, but the inner layer will be thinner than the outer one, due to which the insulating properties of the material will be excellent.
Video - How to build foam formwork
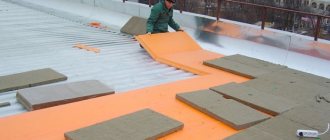
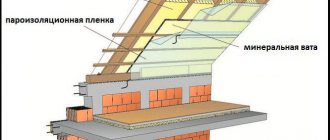
Scheme and procedure for insulation with penoplex
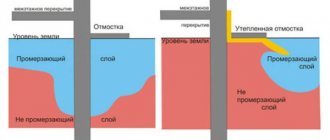
The main task of insulation is to prevent freezing and swelling of the soil.
By following the order and installation rules, everyone will be able to insulate the blind area around the house, even if they are doing it for the first time. First of all, you need to take care of the necessary materials. Need to purchase:
- foam sheets;
- cement, sand and crushed stone;
- slats and polyethylene;
- bitumen and bitumen mastics;
- polyurethane foam;
- metal pipes;
- boards for formwork;
- shovel and plaster trowels.
Stages of the thermal insulation process for the blind area:
- Preparing the area. Space is freed up, trenches are dug and the top fertile layer of soil is removed. The trench should be close to the house. The depth of the trenches is approximately 30 cm. And its width is usually selected taking into account the width of the expanded polystyrene sheet, which is approximately 100 cm. This approach significantly reduces the amount of material waste. It is also necessary to remove all remnants of roots, since the root system easily extracts moisture and, when germinating, can destroy the foundation.
- 15 cm of sand is placed on the cleaned area as a layer. Then the sand layer is compacted and slightly moistened with water.
- The next layer is crushed stone 10 cm thick, which must be thoroughly compacted.
- At the next stage, sheets of insulating material are evenly distributed onto the prepared base of sand and crushed stone. If necessary, a reinforcing mesh is installed on top of it.
- The gaps between the wall and the sheets will be filled with polyurethane foam.
- Along the edge of the trench, I make formwork from boards 10 cm high above the ground level.
- Lay a mixture of concrete or asphalt. It is taken into account that there should be a slope of 10 degrees from the wall. When pouring concrete, through gaps (slots) must be left every 2 m. This is done using thin slats that are inserted into the concrete. After the concrete has hardened, the slats are removed. Then the resulting seam is treated with hot bitumen. If the slats are left in concrete, then they must be lubricated with bitumen mastic.
- Afterwards, along the edge of the blind area you need to make a drainage system. This is done in one of two ways:
First way. Asbestos-cement pipes are laid on the covered sand layer.
Second way. Install a concrete trench on the sandy base of the foundation, which can be given the desired shape using a piece of metal pipe or log.
Brief instructions for insulating the foundation:
- Prepare the foundation: remove construction debris, grease, dust and rust. If there are cracks or holes on the surface of the foundation, then they must be leveled with cement mortar and a level;
- An important step is to waterproof the surface. This is done using water or bitumen mastic. Solvents should not be used; they may destroy polystyrene foam;
- Using penoplex glue, the sheets are attached to the foundation. It is best to arrange them in a checkerboard pattern. Thickness - up to 10 cm.
Owners of strip foundations need to pay attention to the differences in the instructions for installing insulation. First, slabs are laid on the concrete base
Then a durable polyethylene film is glued, which is secured at the joints of the foundation with construction tape. The formwork is prepared and, after reinforcement, it is poured with concrete. After removing the formwork, the foundation needs to be insulated again, so polystyrene foam is again applied to the side walls.
The re-insulated blind area is filled with concrete solution and leveled. Sometimes, in order to give it a beautiful and well-groomed look, the top is decorated with decorative stone.