Is it possible to lay a water floor under tiles?
Not only is it possible, but even necessary.
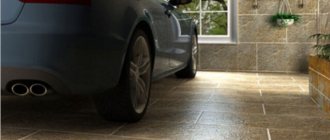
Indeed, if there is a heater in the floor structure, the main disadvantage of ceramic or stone tiles - high thermal conductivity - turns into an advantage.
Remember: under normal conditions, tiles are always cold to the touch, which makes walking on them barefoot extremely uncomfortable.
This effect is explained precisely by its high thermal conductivity - the material actively absorbs heat from the skin and it feels cold.
If heating is installed inside the floor, then heat, thanks to the same high thermal conductivity, will flow freely into the room.
Thus, the “warm floor” (HF) system will work with maximum efficiency. In this regard, tiles cannot be compared with any other floor covering.
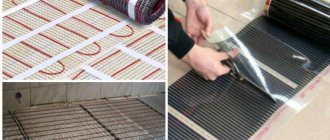
There is a cable heated floor under tiles, the design of which involves the use of a metal grid or mats made of another material. Read about a homemade method for laying heated floors under tiles here.
For other methods of installing a water floor, see here.
Features of a water heated floor with screed
When choosing this installation method, it is worth remembering that the weight of 1 m² of multi-layer cake can reach a quarter of a ton. Therefore, a water heated floor with a screed is installed only if there is a strong foundation.
First of all, the rough base is prepared - it is cleaned of the old screed and leveled. If there are significant defects, the depressions and cracks are sealed with repair mortar. You can ignore minor roughnesses. The main thing is to level the surface exactly when installing a heated water floor under the tiles.
It is also immediately recommended to install a manifold cabinet in which the distribution unit will be located. This system is responsible for distributing the coolant throughout the circuits, and also allows you to regulate its supply and temperature.
If possible, the cabinet with the collector can be buried in the wall, making a niche 20-25 cm deep for it.
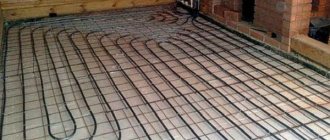
Laying the pie
The first layer must be waterproofing, designed not only to protect the cake from moisture penetration from the base, but also to prevent possible leaks in the event of an accident in the heating system. Usually the most practical and inexpensive material is used - dense polyethylene film with a thickness of 0.2-0.5 mm. Lay it overlapping with a spacing of 10-15 cm, in stripes along the longest wall. The joints of the material are taped with tape. They also grab the lower part of the wall, where the film is secured using a construction stapler.
In addition, it is necessary to lay a damper tape around the perimeter of the room, which will compensate for the expansion of the screed when it heats up.
The next stage is laying thermal insulation material, which can be used:
- Expanded polystyrene boards. They have good strength and high thermal insulation properties. They are used if the room is located above the ground or in an unheated basement.
- Foil backings. They are used when the lower room is warm.
In most cases, polystyrene foam boards are chosen for the thermal insulation layer. They are easier to install and have a longer service life. In addition, today we offer mats with specially made bosses that securely fix the circuit pipes without the use of additional fasteners.
Laying heating circuits
The pipeline is laid in accordance with the chosen scheme, starting with the coldest parts of the room. At the same time, carefully ensure that the pipes do not twist or break. In parallel with installation, the contour is fixed. At the same time, you should not fix the pipes too tightly and over-tighten the fasteners - this can lead to damage to the pipeline.
After installing all heating circuits, the system must be checked for leaks. To do this, all pipes are connected to a distribution unit, filled with water and left for a day. It is also worth conducting a kind of thermal test by running hot water at a temperature of 80-85°C along the circuit for 30 minutes.
Filling the screed
The technology for pouring concrete screed when installing heated floors under tiles is practically no different from the standard procedure for laying cement mortar. The main difference in such coatings is the formation of an expansion joint that compensates for the thermal expansion of concrete. This is done using an elastic gasket (for example, the same damper tape), installed before laying the solution.
To make a screed, you can use almost any composition, the characteristics of which, if necessary, are improved with the help of plasticizers or special additives.
Important
! The thickness of the screed layer must be at least 4 cm. The tiles can be laid no earlier than the solution has completely dried. For a cement screed, the time for complete drying of such a layer is about 28 days; for self-leveling compounds, the period is indicated on the packaging.
How to lay a water-heated floor under tiles?
This operation does not require high qualifications, so even a beginner can do it.
You just need to carefully follow the recommendations below.
It will be easier to do this if you have an understanding of the structure of a heated floor and the role of each of its layers.
Let's pay a little attention to this.
Pouring the base: with what and how?
Before pouring the floor, you need to do the following:
- Knock down the old flooring, getting to the very base. Please note that the thickness of the water heated floor structure is 10 - 12 cm.
- Level the surface of the base, knocking down the bumps. If the case is too complex, a leveling screed is laid with preliminary waterproofing.
- Lay insulation. Of the durable, load-bearing materials, the most effective thermal insulator is extruded polystyrene foam (EPS). Granulated polystyrene foam (what we commonly call polystyrene foam) will not work, as it is too soft. You can offer other options - expanded clay, foam glass or mortar screed with the addition of foam chips. But they are much inferior to EPS in thermal insulation qualities.
- Lay down the IR reflective layer. Metal foil, even aluminum, will not withstand the alkaline environment of the screed. In such conditions, only metallized film made of lavsan or polypropylene can work.
Now you can start filling the TP itself:
- All walls at the level of the future screed must be covered with damper tape. It will allow the screed to expand freely when heated, which will eliminate the appearance of internal stresses with subsequent deformation and destruction.
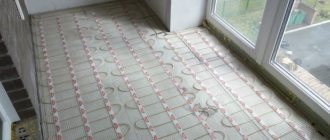
- On plastic bosses 20–40 mm high, we place a wire mesh on top of the heat insulator, which will act as reinforcement.
- We lay the heating circuit pipes on top of the mesh. They need to be attached to the wire using plastic clamps.
- We connect the circuit to the heating system and perform pressure testing: we pump water or air into the system under pressure 25% higher than the working one. The system is kept in this form for several hours, monitoring the pressure gauge on the pressure tester. If the arrow does not budge, then there are no leaks and the pipes can be filled with screed.
- We lay a screed 5–7 cm thick, so that the pipes are at a depth of 2–3 cm.
- After waiting for it to ripen (25 days), we glue the tiles (to reduce construction time, you can use a quick-drying mixture - it will be ready in 7 days). After a day, we rub the seams.
After 2 - 3 days from the moment of laying the tiles, we very smoothly put the TP into operation (the temperature increases gradually).
Installation and technology
Installation of a water heated floor is carried out in several ways:
- pipes are installed on a polystyrene base;
- The pipes are installed on a concrete base.
With any installation method, the principle of operation of the system is almost identical.
The water floor is installed in the following sequence:
- Preparation of the main floor , which is cleared of debris and dust, after which a layer of thermal insulation material is laid on it (it must be at least 35 mm thick, with a density of 30 kg/m3). For example, extruded polystyrene foam is possible.
- around the perimeter of the room , which allows the screed to compensate for possible thermal expansion.
- At a further stage, work is carried out on laying dense polyethylene film.
- Then you can lay the reinforcing mesh, which is required to secure the system. A network of expansion joints is provided for the pipeline; they are additionally protected with corrugation. Also, to give the structure better rigidity, in some cases the mesh is laid on top of the pipes in another layer.
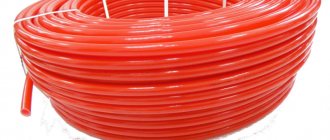
- Afterwards, the water floor itself is laid using a snake pipe, taking into account 5 meters of pipe per 1 square meter. m. area. The larger the area in the room, the greater the number of outlet loops required.
- Then crimping is performed . The system is checked taking into account possible operational flaws that need to be corrected. One day is enough to check the operation of the system.
- After crimping, the next step is pouring the screed (screed thickness is at least 5 cm), this eliminates cracking of the floors and guarantees optimal heating.
- At the last stage, the finishing coating (tiles) is laid.
Laying features
It is important to know that when gluing tiles over TP, you should use special elastic adhesives designed to work under such conditions (the packaging is marked “for heated floors”).
The thickness of the adhesive layer should be in the range of 5 – 8 mm, no more.
The screed used to fill the pipes must also be prepared according to a special recipe: it must contain plasticizer additives that will prevent cracking from cyclic temperature changes.
It is advisable to observe the same rule in relation to the rough screed, although it is separated from the heating circuit by a layer of heat insulator.
Preparing for installation of heated floors
Despite the variety of types of electric flooring systems under tiles, general requirements always remain.
Thermal insulation
The underfloor heating system is insulated for the following purposes:
- To reduce heat loss from the room through the floor. In ordinary housing they reach 20% of the total volume. It is irrational to heat the floors, especially when there is a room below without heating. Even if there are warm rooms on the lower floor, a thin layer of thermal insulation is required.
- Achieving more uniform heating over the area of the room, since heat transfer to structures located below is reduced.
- Energy saving.
- Creating sound insulation. Here it is possible to create a “floating floor” if you choose a material with good soundproofing properties.
- Moisture does not penetrate into the house from below through the ceilings.
Laying thermal insulation under a heated floor
Leveling the base
Might be interesting
Thermal insulation
How to insulate a roof from the inside and not make mistakes?
Thermal insulation
Roofing and drainage: heating rules
Thermal insulation
Insulated Swedish stove: pros and cons
Thermal insulation
Penoizol: self-production
Ceramic tiles require a level base. The surface under the heated floor must be smooth and complete. If there are differences in heights, unevenness, cracks and crevices, it is necessary to repair the base and fill it with a leveling screed.
Long-term operation of a heated floor requires reinforcement of the screed. It is necessary to install a damper tape around the perimeter to compensate for temperature deformations. A foamed polymer tape between the wall and the screed dampens expansion and closes the gaps between them.
It is most convenient to install an electric heated floor under tiles in an apartment where fairly even floor slabs are located. Leveling is necessary in an individual house if there is soil below. First, a depression is made in it and a layer of sand is added. A rough screed 5-6 cm thick is poured onto it.
A waterproofing film and insulation with a thickness of 5 cm or more are laid on top. A budget option is polystyrene foam. The next layer of screed will lie on it, which should be leveled under the warm floor and tiles.
The screed is reinforced if a warm water floor is used. The pipes create uneven pressure, which can cause cracking of the bottom screed. Reliable reinforcement is achieved using a mesh with a diameter of 5-6 mm. For an electric heated floor, a mesh with a wire diameter of 2-3 mm is sufficient. The metal also serves to equalize the temperature over the surface of the screed.
Network connection
Electric underfloor heating elements are connected to the network through a dedicated line with its own circuit breaker and RCD when the system power is 2 kW or more. Protection devices are located in the apartment's distribution board.
Connecting an electric heated floor
The power of the power cable that supplies power to the heated floor must correspond to the power consumption. Wiring in the bathroom is usually designed for lighting, and the wire cross-section for it does not exceed 1.5 mm2. The cable for underfloor heating consists of three cores of at least 2.5 mm2 (red - phase, blue - neutral, brown - ground). For it, you will have to lay grooves in the walls from the thermostat located outside the bathroom.
In the diagram above, the protective shutdown is intended for the entire apartment. If you install a separate RCD for a heated floor, it will be connected after the machine. Usually a 100 mA fire protection RCD is installed for the entire apartment, and 15-30 mA for individual lines to protect people from current leaks.
The grounding loop is connected to the terminals of the equipment, to the shielding wire of the heating cable and to the reinforcing mesh of the screed (if any).
Thermostat
A thermostat with a temperature sensor can be included in the heated floor kit, or they can be purchased separately. In the latter case, you can choose your own regulation option. It can be cheap, with manual adjustment (Fig. a below), touch control or programmable (Fig. b).
Regulators "Rexau"
The simplest thermostat contains a switch and a control wheel with a scale on which the temperature is set. The operating mode is maintained approximately based on sensations or the readings of a room thermometer.
The electronic thermostat can also be adjusted manually, but by pressing buttons or sensors on the screen. The indicators are displayed digitally on the display. The accuracy of the device is achieved higher.
The programmable device provides the setting of different operating modes for a long time. Due to this, electricity is saved when the heated floor is automatically turned off at night or in the absence of the owners. The device is used for private houses where large areas are heated. Here the savings are more noticeable, and an expensive device pays for itself faster.
The main parameter of the thermostat is power, which does not exceed 3 kW. If it needs to be increased, contactors that switch high currents are used. They should be installed in a control cabinet. The thermostat also works, but its contacts switch the power to the contactor coil.
When choosing a device, you should pay attention to the length of the cable for the temperature sensor. The heated floor thermostat for the bathroom is installed in another room, and the sensor must be moved a greater distance than usual. There are devices with two sensors, where the second monitors the room temperature.
Tools
Installation of electric heated floors under ceramic tiles is carried out using the following hand tools:
- pliers;
- side cutters;
- level;
- sets of flat and Phillips screwdrivers;
- chisel;
- roulette;
- construction tools for laying tiles.
The power tools you will need are:
- hammer drill or grinder;
- drill;
- construction hairdryer
Installing a water heated floor under tiles - main mistakes
Most often, beginners commit the following violations:
- Sufficient time intervals required for the screed and tile adhesive to mature are not maintained.
- Pipes are laid with excessively large spacing.
Due to the large distance between the lashes, the uneven heating of the floor becomes noticeable to users (“thermal zebra”).
There is also an electric heated floor under tiles, which is distinguished by the use of heating elements instead of water-based plastic structures. What type of design should you choose? What technologies are there? Read useful information about this in our article.
Choosing tiles for heated floors
When choosing tiles, you should consider two circumstances:
- The thickness should be moderate (thermal resistance depends on this).
- Materials such as marble and porcelain stoneware have reduced thermal conductivity.
If you want to install porcelain stoneware at any cost, increase the diameter of the pipes to ensure increased heat transfer.
The easiest to install is PVC tiles, which have an adhesive layer on the bottom.