What and in what case is it better to choose
After considering the options, you can decide which heated floor is best to choose for tiles, based on your living conditions:
- For owners of country houses, you can choose any option, but the most economical, as the main source of heat in the house, will be water floors. Electrical systems are suitable for individual small rooms (bathroom, toilet);
- Residents of city apartments should opt for electrical systems, but it should be borne in mind that it is unreasonable to make electrically heated floors the only source of heat in the apartment - the cost of paying for electricity will be too high.
Popular manufacturers of heated floors
In the ranking of popular manufacturers of heated floors you can find foreign and domestic companies:
- Valtec . A Russian-Italian joint venture engaged in the production of water systems. At a low price per set, the company guarantees 10 years of uninterrupted operation;
- REHAU . The German manufacturer of water systems claims that its products will last at least 50 years;
- HENCO . A Belgian company that produces warm water floors based on multilayer aluminum pipes coated with special polyethylene;
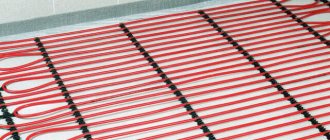
- THERMO . It is considered one of the best companies producing cable heated floors, which can be installed not only inside the building, but also outside (as heated steps, for example);
- TEPLOLUX . It produces domestic electric heated floors of high quality and reliability, designed for installation in any type of premises. Product service life is up to 50 years.
Installation of heated floors under tiles
As mentioned above, the strength and durability of ceramic tiles largely depends on the quality of the screed. We need to look at this operation in more detail, which will allow us to avoid many mistakes. For example, consider the option with water heated floors covered with ceramic tiles.
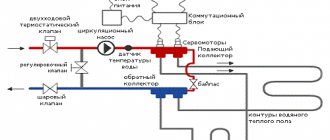
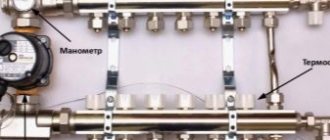
Installation of a heated floor is carried out in three stages: first, the base is leveled (usually using a rough screed), then a water circuit is laid, connected to the collector and the system is checked, and completed by pouring a screed under the finishing coating - tiles.
Installation of the water circuit
If the system is working normally, you can start pouring the screed under the tiles. This must be done very carefully so as not to damage the pipes.
Step 1. Install beacons. You can make them yourself from mass or use special metal strips. The second option is preferable; the work is much simpler and faster. Beacons can be reused and removed from solution or left there permanently. Professionals use the second option - profiles cost a penny, and it is not advisable to waste time getting them out and leveling the grooves.
For the screed you need to install guides from the profile
Practical advice. The thickness of the screed above the water heating system is approximately 5 cm; to speed up the placement of beacons, use pads approximately 4 cm high.
For linings, you can use pieces of paving slabs, bricks or other concrete-based building materials. The upper surfaces of the pipes must be covered with a screed at least three centimeters thick, otherwise a so-called zebra pattern may appear - uneven heating of the floor, alternating warm and cold areas.
Pieces of paving slabs are used as linings for beacons
Step 2. Prepare a special sand solution for placing beacons. It should be thick and with an increased percentage of cement; it is recommended to use a ratio of 1 (cement): 3 (sand). Level the pads on the cement bases and attach a metal strip to them. This can be done using the existing solution or hardware. If the second option is chosen, then you must first drill holes in the linings and insert the plastic elements of the dowels.
The linings are leveled using a solution, the beacons are secured with self-tapping screws
If there are doors installed in the room, then the height of the beacons must be coordinated with their position. The screed should be a centimeter below the threshold: 0.5 cm is needed for the thickness of the glue and 0.5 cm for the thickness of the tile. The distance between the beacons and the walls is approximately 10 cm; gaps are required for the free passage of the rule during mass leveling. The pitch of the beacons is approximately 15–20 cm less than the length of the rule. To check horizontality, you can use an ordinary bubble level or a modern laser device.
The location of the beacons must be controlled by level
Install all the beacons in the room in the same way; the number depends on the size of the floor.
What materials are floor screeds made from?
Manufacturers of heating systems recommend making screeds for ceramic tiles from concrete grade M-300 with a strength class of at least B-22.5. Concrete can withstand compression loads of up to 295 kg/cm2, weight 2300–2500 kg/m3. As mentioned above, all elements of a heated floor are constantly subject to internal loads due to cyclic changes in linear dimensions. To compensate for such negative phenomena, crushed stone up to 2 cm in size is added to the concrete, this is the so-called internal reinforcement. Large crushed stone significantly reduces stress and minimizes the likelihood of cracking and swelling.
Concrete M-300 contains fine crushed stone, which prevents cracking of the screed
You can prepare concrete yourself or use factory-made concrete. If the volume is small, then it is economically feasible to make the mass directly at the construction site manually or using a concrete mixer. It is more profitable to order significant volumes of solution from specialized companies. What are the advantages of industrially produced concrete?
- Proportions are strictly observed. The quantity of ingredients is measured by automatic units, the tolerance margins are minimal. One more thing. If on a large volume of solution the proportions are off in one direction or another by several kilograms, then in percentage terms this is an insignificant error. At production, a sample is taken from each batch, the values of physical strength are checked, all actions are documented in appropriate acts with the signatures of responsible persons. They bear full responsibility for the quality of their products.
- Only recommended crushed stone and only the required fractions are added to concrete. For this purpose, enterprises have stocks of ingredients of various technical characteristics.
- If necessary and in agreement with the customer, plasticizers, accelerators, water repellents, plastic reinforcement and other additives are introduced into the concrete to improve the quality of the material.
In production, concrete is made with precise proportions.
There is only one main drawback – the rather high cost. In addition, concrete is brought in large volumes; it is necessary to have a sufficient number of workers and special units to quickly lay it. Before making a decision, builders must carefully consider the economic consequences of their actions.
Homemade concrete is much cheaper than imported concrete, it can be prepared only in the required volumes - the amount of waste is significantly reduced. Another advantage is that builders have the opportunity to adjust the composition of concrete as work progresses; such actions allow them to correct mistakes in a timely manner and at minimal cost.
When making a solution yourself, it is not always possible to obtain high-quality concrete
Important. When installing heated floors, it is not recommended to use cement-sand screeds; they will certainly crack, with all the negative consequences.
According to the quality of solutions for heated floors, the materials are arranged as follows.
- Factory-mixed concrete M-300. The undisputed leader in all physical indicators. The disadvantage is purely economic, but very significant.
- Homemade concrete. It takes second place, but only under one condition - during its production, proportions are observed and high-quality ingredients are used.
- Sand concrete M-300. An acceptable option for rooms with a small load on the subfloor.
- Cement-sand screed. The least successful choice, it is recommended to use only as a last resort and only on surfaces with low loads.
Comparison of different types of screed mortar for heated floors
If concrete is prepared independently, then to improve its quality it is better to use plasticizers. They do not greatly increase the cost of production, but make it possible to eliminate technological errors. Plasticizers have the following effects on concrete:
- increase the mobility of the solution. Concrete spreads well and assumes a horizontal plane position. The amount of manual leveling work is minimal; it is possible to fill hard-to-reach places;
- the rate of moisture evaporation decreases, water is used for polymerization. This creates optimal conditions for gaining maximum strength; the screed is not afraid of significant dynamic and static loads;
- the mass becomes homogeneous, the formation of air pockets is eliminated. Heating of the floor surface is uniform, minimizing the risks of thermal displacements due to critical internal stresses.
When making homemade concrete, it is recommended to add a plasticizer to the solution.
Experienced builders know that for high-grade concrete, the ratio of cement to water should be in the range of 0.4–0.6. Why is attention paid to this parameter? The amount of all other fillers automatically depends on it. It is even theoretically impossible to add very much sand or crushed stone to a small volume of water, and the amount of water and cement is added at the initial stages of concrete preparation. Always control this ratio; for 10 liters of water, give approximately 6 kg of cement. The screed will fully meet the requirements for heated floors if it is prepared in the ratio 1 (cement): 2 (sand): 4 (crushed stone).
Proportions for making a solution of the desired brand
Required materials and tools
To assemble a heated bathroom floor under tiles yourself, you will need the following materials:
- a set of heating mats with a thermostat and temperature sensors;
- mastic for waterproofing;
- insulation with foil coating;
- adhesive mixture;
- tile;
- terminals with heat shrink;
- silicone glue.
You will need the following tools:
- impact drill or hammer drill;
- angle grinder;
- construction knife;
- screwdriver;
- tester;
- construction hairdryer.
Installation methods
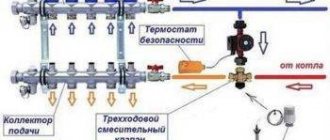
There are several ways to install a water heated floor under liquid heated tiles, but the general principle remains the same: there is a pipe that is located in the thickness of the screed. Depending on the design, there are at least 2 heating technologies. They differ in the type of substrate and the method of attaching the pipes:
- Using special plates with grooves for laying pipes.
- Installation of the pipeline on a steel mesh or reinforcement.
When applying this or that method, it is important to use high-quality materials and strictly follow the technology so as not to deteriorate the quality of the heating system.
Preparatory work
When preparing the surface for installing heated floors, you must adhere to the following rules:
- heated floor elements are laid directly on the floor slab, without a leveling screed;
- the base must be covered with waterproofing;
- foil insulation is placed under the system to reflect the heat wave;
- to strengthen the screed poured over the heating system, it is reinforced;
- when differences in height exceed 10 mm, the screed is leveled with a self-leveling mixture.
Step-by-step plan for preparing the premises:
- Furniture and other items are removed from the room.
- The old screed is being dismantled.
- If necessary, the foundation is repaired.
- The finished base is coated with a primer.
- A layer of waterproofing is applied.
- Foil insulation is installed.
The nuances of laying tiles on a heated floor
The technology of installing tiles on a heated base has its own characteristics:
- To lay tiles on a heated base, choose a special adhesive designed to function in conditions with sharp temperature changes. The manufacturer writes this information on the packaging;
- the thickness of the adhesive layer should not exceed 10 mm. At higher altitudes, heat distribution will be uneven;
- Before laying the tiles, you should take a photo or sketch a diagram of the already installed heated floor. This information may subsequently be required when repairing individual fragments;
- You cannot turn on the electricity when installing a cable heated floor until the tile adhesive has completely dried. The process of gaining strength must occur without temperature changes;
- heating elements must be firmly fixed to the base.
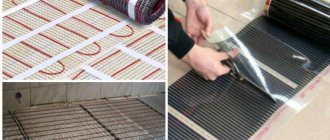
Features of laying infrared heated floors
When installing an infrared floor under the tiles, it is recommended to use additional material - plasterboard or glass-magnesite sheets.
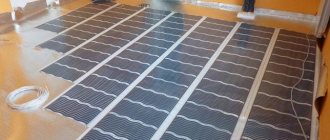
Figure 2. Ease and short installation time are the main advantage of heating mats.
Laying an infrared floor under tiles consists of the following steps (see Fig. 3):
- cleaning the base and laying heat-insulating material with metallized lavsan (for example, Infraflex or Poliform);
- laying thermal film, which should be cut into the longest possible strips in order to minimize the number of connection points;
- insulation of all copper strip outputs;
- fixing the film panels with masking adhesive tape without overlaps;
- connecting the thermostat in a convenient place;
- supply and connection of connecting wires to the thermostat;
- connecting a temperature sensor located under the tile;
- insulation of all connections using a thermosilicone gun;
- connecting the thermostat to the electrical network;
- checking the performance of the heated floor;
- laying polyethylene film;
- laying plasterboard or glass-magnesite sheets;
- laying floor tiles.
Do not use foil as a heat insulator and do not lay a metal mesh when laying tiles. For floor heating to be effective, you need to place infrared film on at least 80% of its surface.