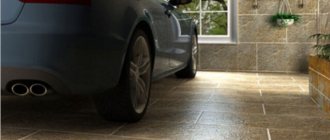
Do you need waterproofing in a bathroom under tiles?
Ceramic, tiles, porcelain stoneware - all these materials do not absorb water. The question naturally arises: if this coating itself does not allow water to pass through, is waterproofing underneath it necessary? The fact is that the seams between the tiles are not airtight and water can seep through them, so they prefer to do waterproofing.
Waterproofing in the bathroom is necessary if you don’t want to make repairs
There are, of course, grouts with water-repellent properties, but even this composition is not a guarantee. Even if the grout is polymer, which by definition does not allow water to pass through, it does not provide the required degree of reliability - the seams can crack, split, etc. In general, waterproofing under the tiles is recommended to prevent leaks in damp areas. These costs are not that big. Repairs will cost more for the neighbors below (and perhaps more than one). For reliability, some prefer double-layer protection, as well as systems for automatically turning off the water supply in the event of an accident. So waterproofing the bathroom is necessary.
Floor waterproofing technology
In general, waterproofing a bathroom under tiles takes place in four stages, but preparing the base can consist of a whole range of works. It all depends on what condition you have it in. After all, the tiles must be laid on a flat and clean surface. Under ceramic tiles, a flat base is 0.5-1 cm per 2 meters of length. But the less curved the base, the less tile adhesive consumption. And a good composition is oh so expensive. So, here is the technology for waterproofing a bathroom floor:
- Preparing the base. The tiles are laid on a flat, clean base.
- Application of waterproofing. The most convenient is painting; it is usually applied in two layers with additional gluing of the joint between the floor and the wall with special tape.
Materials may vary. Reliability is important
- Laying tiles using tile adhesive with hydrophobic additives.
- Grouting joints. Grout is used with water-repellent properties.
This set of measures is sufficient to prevent spilled moisture. But if you need to make a floor in a shower stall without a tray, more serious technologies are used.
Floors on reinforced concrete floors
Let's look at what kind of floors there are in modern houses with slab floors.
Screed floors
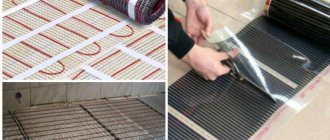
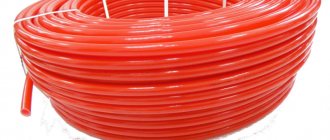
The screed is an intermediate layer with a thickness of at least 30 mm, which is laid on a concrete floor or on one of the heat and sound insulating layers. The purpose of the screed is to level out uneven floors; creating a strong and rigid base for the floor covering; thermal insulation, waterproofing and sound insulation of the room; stabilization of the indoor microclimate. In addition, in floors with built-in heating (“warm floors”), the screed participates in the distribution of heat. It is worth noting here that in apartment buildings it is allowed to install only electrically heated heated floors; installation of a water floor is prohibited, since it affects the operation of the general building heating and water supply system.
For other prohibitions related to repairs and redevelopment, read the link
As mentioned above, screeds can be solid (monolithic) or prefabricated. Solid screeds are usually made from cement-sand or expanded clay-concrete mortar. Gypsum and anhydrite are also used as materials for creating screeds. Cement screed serves as an excellent base for any modern floor covering.
Prefabricated screeds are assembled from large-sized sheets and slabs, which are fastened together during installation. To create prefabricated screeds, materials such as plywood, chipboard or fiberboard, and gypsum fiber sheets (GFP) are used. When installing a prefabricated screed, a small gap remains between the wall and the screed sheets, which must be sealed. If sealing has not been done, plywood, chipboard or fiberboard may rot over time.
Depending on what part of the apartment we are talking about, certain adjustments are made to the design of the floors in the apartment.
"Pies" of floors under tiles
So, in the wet area of the apartment (kitchen, bathroom, toilet or combined bathroom) isolation from water leaks is necessary. Therefore, under the ceramic tiles and screed made of cement-sand mortar, waterproofing material is laid there. Under the waterproofing layer there is a leveling screed, which, in turn, is laid on the soundproofing layer, and it is laid on the reinforced concrete floor slab.
Construction of floors for laminate, parquet.
The design of the floor under the laminate has its differences. A leveling screed is laid on the floor slab, and a soundproofing layer is spread over it. Another screed is built on it, on which the substrate under the coating is laid, and on it - the laminate itself. The parquet floor structure is created in a similar way.
Floors with joists
Lags are wooden blocks laid perpendicular to the facing floor boards. As a rule, sheets of roofing felt or fiberboard are laid between the joists and the floor slab. In some houses, the logs are laid on a layer of sand. Rigid fastening of joists to floors using bolts is unacceptable, since in this case the floor will transmit impact noise.
Floors with joists have a number of advantages over screeds: the level of sound insulation and noise insulation of such a floor is significantly higher. The disadvantage of floor joists is the likelihood that after some time it may rot or begin to creak. It often happens that when laying the logs there was a gross violation of technology, when carpenters aligned the logs horizontally using pieces of bricks or wooden wedges. Over time, the wedges wear out or dry out, and the wood of the joist becomes crushed by the harder brick. As a result, the lag becomes movable, and the floor, even with perfectly laid floorboards, begins to creak.
On the first floors of buildings, a layer of insulation (usually mineral wool) is laid between the floors and joists. A vapor barrier glassine carpet is laid on the joists.
One of the types of floors with joists are “black” floors . The flooring in them is made not from tongue-and-groove floor slats, but from ordinary edged and unedged boards. Sometimes subfloors were made not from boards, but from chipboard or plywood laid over joists. This kind of flooring is suitable for any floor covering - various types of parquet, linoleum, carpet and tiles - that require floor screeds. The advantage of a subfloor over a screed is its low cost: instead of making a screed 15-20 mm thick, it is easier and less expensive to lay subfloors over joists on brick posts or over wooden floor beams.
Like a regular floor with joists, a subfloor can rot if the sealing is insufficient or squeak - especially if the technology was violated during construction. However, if the subfloor is in good condition, it can serve as an excellent base for any modern flooring.
Waterproofing a bathroom floor under tiles
Whatever the floor level in the bathroom, it is very desirable that it be slightly below the floor level in the rest of the apartment or house. This will guarantee that water will not spill in the event of an accident. If the floor in the bathroom is higher or at the same level, you can make a threshold. In any case, it is better if the water is locked in one room. After all, the waterproofing of a bathroom is many times better than in the same corridor, for example.
It is better for the bathroom floor to be a little lower in level
Bathroom floor on concrete slab
It is very difficult to call a concrete floor in its “pure” form even. If the surface is generally uneven, the corners may be blocked, or there may be a tilt to one side. To eliminate all these shortcomings, a leveling screed is poured. If the screed is being made in a shower room, then it makes sense to use concrete with increased water resistance. There are hydrophobic additives for this purpose. In a regular bathroom this is not necessary.
Waterproofing can be laid under the screed
Regular scheme
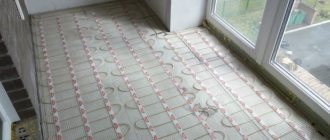
If the bathroom floor is a smooth screed, waterproofing under the tiles is very simple. First, we coat and glue the joints of the floor with the walls with a special tape or a piece of rolled waterproofing. Then we apply the material to the floor, extending it onto the walls by 15-20 cm. The number of layers depends on the type of material and how important it is for you that moisture does not seep down. The best thing is to read the description and recommendations for application and installation. It will take 5-10 minutes, and the problems will disappear by themselves.
Waterproofing is simply applied to a flat screed according to the manufacturer’s recommendations. True, the joints with the wall need additional protection, as well as the places where communications enter.
If at the same time you are doing waterproofing on the walls, then it is mandatory in the so-called “wet areas”. This is where water can get on the walls - the area above the bathtub and 60 cm around it, the same piece near the sink - 50 cm in both directions and up and down to the floor level.
Areas at high risk of water ingress
The sealing of the bathroom walls in these areas is the same as on the floor. The application is similar, usually using the same materials. It is also worth paying attention to the corners - they are additionally glued.
Double layer
As already mentioned, the unevenness of the concrete slab is leveled with a screed. But it is not necessary to put waterproofing under the leveling screed in the bathroom in all cases. Double waterproofing of a bathroom under tiles is needed:
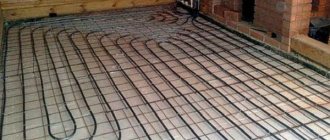
Important point. In the diagram below, extruded polystyrene foam is used as thermal insulation. It absorbs very little moisture, so it itself is a barrier to the access of water to the lower layers. But its joints are not airtight, which is why a layer of waterproofing under the insulation is needed. If the insulation is made of mineral wool (this material itself needs protection from moisture), another layer will be added - waterproofing on top of the insulation. But in order not to damage it when laying heated floor pipes, a protective screed is poured over it. That is, in a scheme with a water-heated floor and mineral wool insulation, a layer of waterproofing and a layer of reinforced screed will be added on top of it, and on them pipes and tiles with glue.
Note! Vapor barrier does not allow moisture to pass through in any form - neither in the form of liquid nor in the form of vapor. Not all waterproofing materials are vapor barriers.
If there is a heated room under your floor, under the floor tiles in the bathroom, using all technologies, waterproofing material is laid only on top of the leveling screed. But if you prefer to play it safe, you can also make a protective layer between the slab and the leveling screed. As in the diagram above. It won't get any worse. It will take more time, but the waterproofing will be more reliable.
Preparing a wooden floor
Laying tiles on a wooden floor has its own characteristics and is a separate big topic. Let's briefly say that you can either fill the screed or level the wood floor with sheet material - plywood, OSB, glass magnesite, even asbestos-cement sheets are used.
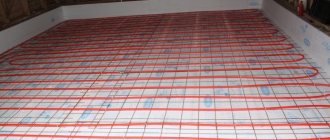
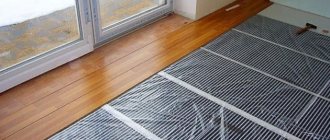
Two waterproofing options for wooden floors
Actually, in any case, to avoid problems, the wooden floor below must be ventilated. There should be very good waterproofing underneath the tiles. Two coats are usually recommended. Moreover, the material must be selected and laid taking into account the fact that the base is movable. That is, there must be either elasticity after drying (for coating waterproofing) or high tensile strength (for rolled materials). So let’s say right away that roofing felt is not the best choice. If you want guarantees, polyester-based roll waterproofing is better. Very good, high-quality material, but the price is even higher than that of expensive coating materials. It can be replaced with waterproofing based on fiberglass. Less strength, but quite sufficient for normal seasonal expansions.
Changing floor designs of residential buildings
If it is necessary to repair floors or even replace the floor covering with a different type (for example, when laying parquet instead of linoleum), it is often necessary to completely change the entire layer-by-layer structure of the floor.
In addition, if you purchased an apartment in a new building without finishing, and the floor is an uncovered concrete floor slab, you will have to form a “pie” of floors in the premises from scratch. The various layers of which it consists provide heat, sound and waterproofing, level the floor and give it strength.
In this article we will talk about the design of floors in an apartment. With all the variety of standard floor designs in modern apartment buildings, there are two main options for their construction: reinforced concrete slab floors and wooden floors.
Types of materials
In general, many methods of protection against water penetration have been developed. In private housing construction, three types of waterproofing materials are usually used:
Main types of waterproofing materials
- Rolled, built-up.
- Painting agents (mastics or primers).
- Penetrating.
Each group has different materials that differ not only in price. The price is usually not “just like that”. There are some properties that justify it. The cheapest roll ones, and not all of them. And those that have the lowest reliability/strength. In addition, the coating is obtained with seams - this increases the risk of leakage. Moreover, it is difficult to apply. Therefore, liquid formulations are increasingly used. They are available on different bases, with different properties. One thing distinguishes them is ease of application and the absence of seams.
Use of roll welded materials
Roll waterproofing is known to everyone. But it is inconvenient in the bathroom: try to turn around, and the presence of seams does not inspire confidence. There are the following types of roll waterproofing:
- Bitumen. They are laid during processing with a flame from a burner. It’s very uncomfortable in a small room, and there’s still the same smell in the apartment or house when it’s melted. Their advantage is their low price. No more than $1.5 per kilogram.
- Bitumen-polymer. They can stick and do not rot. Can only be laid at temperatures above +5°C. The price is also low - up to $1.3 per kilogram of weight.
You also need to know how to handle rolled materials. Everything is in the recommendations for each material. You just need to read it carefully
In general, recently, materials based on bitumen resins have been losing popularity. They remain the cheapest, but the characteristic odor and environmental friendliness lead to a decrease in demand. New materials are more expensive, but they have better characteristics.
Waterproofing using fused materials
Waterproofing a bathroom with materials of this group requires careful preparation of the surface - a difference of no more than 2 mm per 2 meters, a dry base without dust and dirt. Pre-treatment with bitumen impregnation is also required. When laying, place the material on the walls 15-20 cm and glue it there. It is better to first prime the joint between the wall and the floor and weld a cut strip of at least 30 cm wide onto it, so that 15 cm are on the walls and on the floor. And stick strips of material on top, extending onto the walls.
Painting waterproofing
Some of the easiest waterproofing materials to use are paintable ones. Some are based on bitumen, some are based on polymers (based on cement and synthetic latex). Applied with a brush or roller, they fill small cracks and form a waterproof (some types also vapor-proof) film several millimeters thick. Apply in several layers - from two to six.
Probably the most convenient option
Painted waterproofing under tiles can be:
- Cement based. It is universal, has a low price, and is vapor permeable. Requires surface preparation (there should be no cracks - they must be sealed first), it is not necessary to dry. The price is low - $2.5-3 per kilogram.
- Bitumen mastic. It can be applied to any substrate, but is flammable and does not tolerate freezing. The cost is about $3 per kg.
There are also rubber-bitumen and rubber-resin ones. But, firstly, they are available only in specialized large companies. Secondly, they have the same set of characteristics, but cost more.
Penetrating or impregnating
Penetrating waterproofing materials are used on cement screed, concrete, asbestos cement. For wood and wood fiber materials, wood chips, etc. they don't fit. These compositions are based on special types of cement with polymer additives. The composition penetrates into concrete, upon contact with water, new salts are formed, which block the capillaries through which water penetrates. The peculiarity of these materials is that materials that have not reacted do not lose their properties. When moisture appears, they react, filling new pores and cracks. So the composition can “heal” concrete.
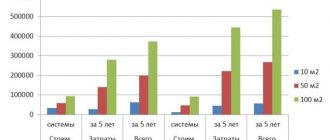
Penetrating waterproofing - comparison of prices and declared consumption
Impregnating waterproofing penetrates concrete to a depth of 60 cm. After treatment, a film 1-3 mm thick remains on the surface. It consists of cement residues, fine sand and polymers. Consumption is at least 0.8 kilograms per meter, and the prices are considerable. But the advantage of these materials is that they can and should be applied to a damp surface. That is, there is no need to wait until the screed dries. Bathroom under-tile penetrating waterproofing can be applied immediately after the screed can be walked on. That is, in 48 hours maximum.
Source