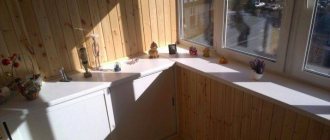
A small part of the apartment, located outside the load-bearing walls (balcony, loggia), can become another living room. But this requires a lot of effort: glazing and then insulating the balcony or loggia. However, reliable double-glazed windows and insulated walls do not provide the expected comfort without heating. As a last resort, such a room can be used in the summer and turned into a storage room in the winter. As a result: the efforts made do not correspond to the results obtained. You need a warm balcony that can be turned into a study, relaxation area or dining room.
It will not be possible to install balcony heating using central heating: there is a ban on moving the central heating system (radiators with pipes) outside the apartment. Therefore, there is only one option left: installing a “warm floor”.
For reference: the Housing Code of the Russian Federation states that in order to remove central heating pipes from a residential premises to a non-residential one, you first need to obtain the consent of all (namely all, not just one family member) residents of the apartments through which the riser passes, order a project and submit all documents to the BTI for permission. The chance of getting the go-ahead is less than 1%. It usually ends with the residents.
There are many nuances here: which of the available heating systems to choose, how to calculate its power and install it yourself. All this will be discussed below.
Purpose
Soviet-era apartment layouts provided space for installing a radiator. Today, most modern buildings with furnished apartments are built without them. Both in old premises and in new ones, the owners want to preserve maximum free space.
Central heating radiators take up a lot of space and are difficult to fit into the interior unnoticed. If this succeeds, the structure will take up at least 50 cm of area under the window sill. And if the room is large, then the lost territory adds up to tens of square meters.
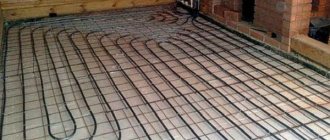
Heating the floor on the loggia and directly in the apartment is an excellent alternative to central heating. The heat is distributed evenly over the area and the meters remain free for any fantasies of the apartment owners. The air in the apartment is heated from bottom to top, thereby creating a pleasant atmosphere in the room.
The most popular type of heated design is connected to a central heating system. The innovative type is called infrared and is powered by electrical power.
Operational benefits
In cold weather, the flooring evenly heats the air and prevents the apartment residents from freezing. The air temperature in the lower part of the room will always be warmer than in the upper part. The heated surface conducts and releases heated air well. This ability is determined by the correct operation of the structure.
Another advantage is the surface area, which is much wider than the radiator area. The system itself was invented in ancient Rome. Since then, it has undergone major changes and been modified to suit modern realities.
The heating design does an excellent job of heating loggias and balconies. The area of these premises is small, and so is the consumption of materials. And the comfort from having a heated floor is immediately noticeable.
Main advantages:
- A modified heating system does its job much better than a standard one. More heat is released into the atmosphere, making living in an apartment more comfortable.
- Considering the amount of heat that is released into the room, the temperature of the heating element is low.
- The design looks stylish and invisible to the eye, saving valuable square meters of living space. It also does not require special care; all elements are hidden under the cladding.
- The heat is regulated by the apartment residents independently. This happens using an automated control panel. It allows you to keep the air in the apartment in optimal condition for a person, regardless of weather changes.
- The flooring has a long service life; immediate replacement is not required; the structure can serve for decades.
- You can install a heating system yourself, even if you have never done this before. No special equipment is required for installation.
- One of the most pleasant feelings is coming home from the cold and standing on a warm floor with cold feet.
But the heating design also has its unpleasant sides.
Insulation of balconies and loggias (without combining them with a room)
If you do not combine a balcony with a room or kitchen, you do not have to dismantle the door, therefore, this option saves time and money.
There are four types of underfloor heating systems available for insulating a loggia or balcony. The choice depends on the type of flooring and installation method.
Heating cable in a screed IQWATT from RUB 4,590.
Thin mats for THERMO tiles from RUB 5,597.
Warm floors for laminate CALEO Platinum from RUB 3,542.
Warm floors for laminate KEEPLY Optimal from RUB 2,609.
Heating cable is a classic system of electric underfloor heating, reliable and durable. Suitable for any type of floor covering. At the same time, this is the most labor-intensive option, since its installation requires pouring a sand-cement screed 3-5 cm thick. We talked in more detail about the installation of cable heated floors here.
THERMO heating cable from RUB 4,502.
DEVI heating cable from RUB 3,810.
IQWATT heating cable from RUB 4,590.
WARMSTAD heating cable from RUB 1,624.
To select the kit that is right for you, you can contact our online consultant or request a call back.
By submitting this form, I accept the terms of processing and use of personal data.
| THERMO heating mats from RUB 5,597. |
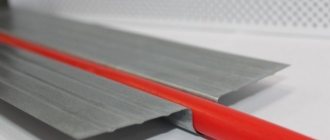
The heating mat is the same cable, but of a smaller diameter, already attached to the mounting grid. Such a warm floor is installed in a layer of tile adhesive under the tiles (1-1.5 cm) or porcelain stoneware. Due to the fact that the balcony is still an artificially insulated room, heating it requires a mat of greater power. That's why we recommend Thermomat 180, with which the temperature in your new room will definitely be comfortable. We also have a separate article on the method of laying a heating mat.
Film flooring is designed specifically for dry-installed coatings - laminate, parquet boards, carpet. In addition, the warm film floor can be turned on immediately after installation. The combination of these two characteristics is the advantage of infrared heated floors. We have provided more detailed information about installing film flooring in this article. It is worth mentioning that it is possible to additionally insulate the walls and ceiling of the loggia with infrared film.
Ready-made set CALEO Line from RUB 1,664.
Ready-made set CALEO Platinum from RUB 3,542.
Ready-made KEEPLY Basic kit from RUB 2,036.
Cut-to-length IR film VIOLET from RUB 410.
| Rod heated floor UNIMAT Boost from RUB 3,158. |
Rod floor also applies to infrared heating systems. It is mounted in two ways: in a layer of tile adhesive (for tiles or porcelain stoneware) and in a layer of thin screed in the form of a leveler (for laminate, carpet, parquet). If you have chosen this floor heating system, then pay special attention to insulating the walls and ceiling to avoid heat loss. For cold rooms, such as loggias and balconies, the UNIMAT Boost infrared floor is designed. Installation of Unimat underfloor heating is shown in our article.
Also, for each of the heated floor options you will need a thermostat (thermostat). This device is designed to turn the floor heating system on and off, and also allows you to regulate the temperature and use electricity economically. Only rooms with the most similar microclimate can be connected to one thermostat. This is important to know if you decide to combine a balcony with a room in which a heated floor is already installed: in this case you will not need a second thermostat. If your loggia remains an independent room, a separate thermostat is required for it.
THERMO from RUB 3,190
DEVI from RUB 3,203
CALEO UNIMAT from RUB 2,892
KEEPLY from RUB 2,915
IQWATT from RUB 2,230
Our specialists will answer all your questions related to the choice and purchase of heated floors for balconies and loggias. You can consult them:
- through an online consultant on the website (drop-down chat on the left to the “manager”);
- by telephone toll-free for Russia8;
- by calling our company stores in your city.
Flaws
This system still has some disadvantages, which, in essence, pale in comparison to all the positive qualitative characteristics:
- Price. The standard option for heating an apartment is much lower in cost than installing heated floors. But here, too, the new design has an advantage: an electric heater on the balcony “consumes” much more electricity than it does. If a heater doubles the amount of the receipt, then a heated flooring will add 150-200 rubles to the bill, which is not so significant.
- Difficult installation. You can install the system yourself, but this will require attentiveness, accuracy and skillful hands. It takes more than one day to create the flooring, but it is worth it. And not everyone wants to overpay for something they can do themselves.
To decide how to make a warm floor on the balcony, you need to choose the heating system that will be used.
Cable heated floor for balcony
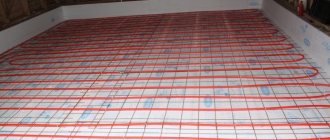
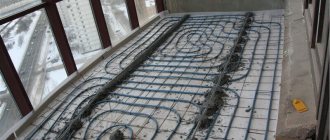
Cable flooring is usually spread over the balcony like a snake
The heating element here is an electrical cable connected to the mains. Placed in a concrete screed, it first warms up the screed, and then it releases heat into the air.
Concrete screed is a prerequisite for the use of cable heated floors. The flooring can be laminate, tile, linoleum.
Advantages of cable floors on the balcony
- The air is heated without drafts, evenly. At floor level the temperature reaches +24°C, in the body area +22°C, in the head area +18°C.
- The screed is capable of accumulating heat according to the principle of a Russian stove, which prevents heat loss.
- Compared to heating with radiators and convectors, cable floors consume 20–50% less electric current.
Disadvantages of cable floors when used on a loggia
- Heating occurs slowly (up to +27 in 30 minutes), because the cable must first warm up the screed.
- The cable creates an electromagnetic field. True, it is not so significant as to seriously fear for your health. Radiation from a mobile phone is an order of magnitude higher.
- When installing an electric heated floor on a balcony, it is necessary to make a concrete screed.
- Large furniture cannot be placed on electric floors. Otherwise, dark spots from overheating will remain on the floor in these places.
To save energy, you need to additionally buy a thermostat. It maintains a given temperature – usually +27°C. And automatically turns off the floor when the temperature reaches this value.
Do you have old aluminum wiring in your home? For fire safety, install a copper cable (with a cross-section of at least 2.5 mm) to the heated floor. It is led directly to a separate electric meter machine.
Cable floors can be single-core or double-core.
Twin-core ones began to be produced relatively recently, and they have a number of advantages. Two conductive wires balance electromagnetic radiation, so the electromagnetic background is practically zero. Installing a two-core cable is a little easier. True, single-core cable is 20% cheaper.
For a single-core cable floor, 2 mounting ends are connected to the thermostat
A two-core cable has only one mounting end
What types of heated floors are there?
The heating structure consists of many elements. These are cables and pipes that will generate heat and transfer it into the air. The operating principle of the system is based on the use of three resources: water, electricity and infrared radiation.
They all have common features, but each individually has its own advantages, for the sake of which the choice is made. The first similar point is that the structure is installed on concrete pre-coated with thermal insulation. Next, it is covered with a layer of screed. And only after that the heated floor is installed.
Water floor
Its installation system is the most complex. The supply of water to the pipes can be arranged from an autonomous source or from a central heating system.
IMPORTANT: water heated floors are not used on the balcony. Its weight is about 400 kilograms. For safety reasons, the balcony itself cannot support a load of more than 600 kilograms. Considering that in addition to it there are cabinets on the surface and people walking around, the rules for operating the facility will be violated.
Water heated floor in section
Such a system is also not installed in high-rise buildings. There is a high probability of blocking further heat flow through the central heating pipes into the apartments that are located above the one where the installation was carried out. The advantages of this type of flooring on the balcony are high quality air heating. It is enough for a room that is larger than itself.
Electric
This option is suitable for high-rise buildings and apartments with small balconies. The cable will need a short length, which will significantly save your budget. The layer thickness is only 4.5 cm. There is no air inside the structure, so it is not able to overheat.
Electric heated floor
To create an electric heating system you will need an electrical cable. It is laid out in a zigzag pattern, with the loops covering the entire width of the balcony area. For the cable, a substrate is pre-installed, where the sections for which it is attached are located. Sand is poured over the heating element and cement is placed, this is called a screed. The installation of the cable “snake” is completed by laying out the tiles.
You can start using electric floor heating only 1 month after installation. It is heated using electricity; for this there must be access to the network via a thermostat.
Film
The principle of infrared radiation is applied here. The heating element is a thin film. It has a coating of graphite strips and conductors. The thermostat conducts current to the conductors. This method is the easiest for self-installation.
Refers to energy-saving room heating systems. The only negative is the high cost of film coating. Therefore, it is recommended to use it for small rooms, that is, just on a balcony or loggia.
Infrared film floor
Warm floors on the balcony successfully completely replace other types of heating. It does not waste a lot of resources, is invisible to the eye and retains its performance characteristics for a long time. Water-heated floors are used in dachas and for heating terraces or loggias in one-story houses. But this method of heating the room completely depends on the utility companies, who turn on the central station according to the schedule.
There is no such problem with cable and infrared flooring. They can be controlled autonomously, independently, directly from the apartment. Electrical methods are used wherever it is impossible to install a water option. They successfully replace radiators and heaters and are absolutely harmless to others. Infrared flooring is considered an environmentally friendly heating system.
Major insulation of the loggia floor
Many of us love to spend time on the balcony with a cup of tea and reading a book. True, this is in the summer, but in winter the uninsulated loggia is always empty and before going there, we throw something warm over our shoulders. The only way out of this situation is to insulate your floor before the cold weather sets in.
Before installing the type of insulation, you should decide on the most convenient one for your room, whether it will be water heating or electric. But in our case, we will start with electric heating, since it is more convenient to install and is powered from the mains.
Cable type of floor insulation
An insulated electrical type floor (cable) can be divided into two components:
- Cable.
- Regulating device.
The heating element is a wire, which is completely filled with a cement screed, and a device for regulating the temperature remains outside.
This type of floor insulation is quite easy to install with your own hands:
- We prepare the floor surface for installation.
- We align as much as possible and eliminate all unnecessary things.
- We lay a thermal insulation layer.
- We attach mounting tape on top of the thermal insulation layer.
- Carefully lay out the conductive cord onto the mounting tape.
- We install a thermostatic device on the wall.
Upon completion of the first stage of high-quality installation of electrical insulation, we immediately move on to the final part of the installation and decoration of the insulated surface:
- The resulting thermal insulation structure is filled with cement screed.
- We cover the floor with ceramic tiles.
If desired, the surface can be covered with parquet or hidden under laminate, but from an economic point of view this is more expensive, and from a practical point of view - the tiles are better combined with cable electric insulation of the loggia, as it has high thermal conductivity, thanks to which the floor heats up within 10-15 minutes .
Infrared type of floor insulation
Do-it-yourself infrared or film heating of a loggia is considered the most practical, economical and easy-to-install type of floor insulation.
Film heating can be installed without affecting the screed, while we lighten the load on the floors. Infrared insulation is carried out using a special thin layer of thermal film, penoplex and is hidden under laminate, carpet or linoleum.
This type of floor insulation has high thermal conductivity and low financial costs, ensures the preservation of the warmth of the apartment and the comfort of the loggia, and helps withstand low temperatures.
Water-based floor insulation
An uninsulated loggia is a fairly large area of utility room, which is comfortable in the warm season, but due to frost it is often idle. You can heat it in different ways, for example, by installing a radiator, but in reality this is not the best solution. Although high-quality floor insulation requires a lot of effort and resources, it is done once and significantly increases the comfort of the room, allowing you to spend time comfortably even in persistent frosts. In addition, it eliminates the eternal torment with the radiator.
Now let's move on to water insulation of floors with our own hands.
Note: if there is central heating next to the loggia, then installing a heated floor is greatly simplified.
Installation of water-based floor insulation is carried out in several stages:
Preliminary preparation for installation.
Before proceeding with high-quality installation, you need to carefully inspect the balcony slab for damage or collapses. The structure can be strengthened using metal reinforcement with cement mortar; you can also add tile adhesive.
Level the surface of the slab.
The most important point that should not be missed is the uniformity of the completed insulated floor structure with the level of the living room. Therefore, we level the slab using a screed, not forgetting about the insulation measurements, taking into account the top flooring (it is not recommended to hide the structure under a soft surface, especially under laminate).
If the floor surface is not uniformly connected to the floor in the living room, then in this case the main thing is that the floor remains level. Do not forget that the screed on the floor must dry completely, this will take at least a week.
What to look for when choosing
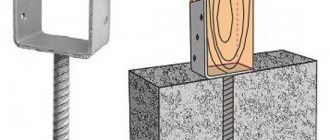
The rules for choosing heated floors for a loggia or balcony are based on their characteristics. A balcony is essentially a reinforced concrete slab that is attached to the outside of the building. When installing the structure according to the rules, the balcony will be attached to the facade firmly and securely. A standard balcony occupies 3 square meters of area. A load of no more than 200 kg is allowed per 1 sq.m.
Therefore, it is prohibited to install a water version here. It is much more economical and safer to install electric or infrared.
These rules do not apply to the loggia. Any heating system is suitable here, since the loggia is part of the room, and not a separate stove. Its base is a single territory with an adjacent room. Experts give preference to infrared heated floors as the easiest to assemble and economical coating.
Installation of film (infrared) heated floor
In terms of ease of installation, infrared heated floors hold the lead among all systems, since they do not require screeding. Step-by-step progress of work:
- Lay out the heat-reflecting pad;
- We lay out and install infrared films into the system, including a warm baseboard;
- Install the regulator and temperature sensor;
- Lay the substrate;
- We carry out finishing coating and install skirting boards.
Film heated floors are quickly installed, used immediately after installation, and are characterized by uniform heating of the floor surface. For covering in this system, it is best to use laminate and other wood materials: boards, parquet, and carpet.
Film heated floors are characterized by low energy consumption and a service life of up to 50 years.
If one of the sections fails, the system will continue to operate, and repairs will not be difficult. The higher cost of materials is offset by low operating costs.
Actions that are necessary before installing heated floors on the balcony
There are a few key points to consider before materials are purchased and installation begins. You can carry out the preparation and all subsequent work with the help of a specialist or yourself. The last option will save a lot of money.
Preparation stages:
- Locate the thermostat. It must be given enough space and an electrical network connected. Access to it is not blocked by furniture or decoration.
- Clean the surface from the old coating. The floor is cleared down to the concrete slab. The debris must be removed and the surface must be left dry and completely ready for the installation of new material. Unevenness should be eliminated, for example, with a self-leveling floor or a rough screed.
- Install thermal insulation. It is important to remember that it is advisable to do the floor before finishing the walls of the room. On the balcony, it is recommended to install thermal insulation along the entire perimeter, including the walls (if you plan to use it as an additional room where people will be). For these purposes, it is recommended to buy foam plastic 5 cm thick (density 25 kg/m3).
- It is advisable to cover the floor with a vapor barrier material. The joints between the floor, walls, and ceiling are sealed with protective material. For example, metallic tape.
So the balcony and the adjacent wall will turn into a room isolated from the external environment, completely ready for the installation of a heated floor. On the loggia, the preparation technology is carried out in exactly the same way.
Electric flooring
Another type of flooring that can be used on balconies is electric flooring. Usually, specialists are hired to install it, since it has its own specifics.
Thanks to differences between rooms and balconies of 10-12 cm, a large thermal insulation layer can be made. The main heat source of an electric deck is the wire, which transforms electricity into heat.
The heating cable is reinforced with glass fiber, sometimes consisting of two wires that conduct current, a copper conductor, a polyester film, an aluminum screen and a PVC layer.
Installation of an electric floor is carried out in several stages. First, the space is insulated to enhance the heating effect. Then a suitable thermal insulation section is selected and each layer of cable laying is reinforced with mounting tape. A temperature sensor is placed in a corrugation between the turns of the wire. The cold end of the heating section, together with the wire from the temperature sensor, is connected to the thermostat. Such a device must be installed by an experienced specialist. Then a screed (3-5 cm) is poured over the cable and connected, waiting for the surface to harden naturally.
Typical installation scheme for a warm cable floor.
You can easily do without a screed by installing a warm floor on top of a wooden, well-insulated subfloor. Video below.
Such a heating system is considered quite complex and somewhat labor-intensive to install, but if you make these floors on the balcony, you can get a large and uniform level of heating around the entire perimeter of the room. In addition, such flooring can protect against drafts on the balcony, since warm air will create a temperature barrier.
Related article: How to insulate a balcony to room temperature
How to install a heating structure
The process of installing a water floor is more complicated than others, since it will require checking the pipes before laying them and covering them with screed. The other options are simpler in this regard, but they heat up less than a water floor.
Installation of a water system
Purely technically, installation is carried out according to the same scheme as for electric floors. Installation is carried out on a concrete screed or between wooden joists. Concrete is considered stronger, plus it serves as an excellent heat conductor and retains it for a long time.
Water heated floor
The floor on which work will be carried out must be perfectly level. It is important to take this nuance into account, since during construction, external structures are made at a slight slope so that water does not linger on the roof, but flows calmly down. For a water structure, an additional layer of waterproofing is required.
The material that provides protection from water should extend beyond the floor and be slightly higher than the final coating.
For the flooring itself, a flexible metal-plastic pipe is used. It is fixed to the thermal insulation with small clamps. A rubber corrugation is installed at the place where the clamp covers the pipe. This protects the folds from sudden refraction.
Important: before installing the final screed, the pipe must be tested. To do this, water is run through it under strong pressure and observed for 2 days.
The pipe is laid in coils or snails. The distance between the pipes is 10-15 cm. They should be no closer than 5 cm to the wall. Intersections are not allowed.
A polyethylene tape is laid along the perimeter of the wall so that there is a damping gap when the screed shrinks. The screed is made from a self-leveling material or from a mixture of cement and sand using beacons. Afterwards, wait for the composition to dry completely (7 days) and lay the final cladding (after 1 month).
Dry installation is done on wooden logs. It is not necessary to level the surface for them; just insert the wedges. Logs are placed every 30 cm. The height of the structure is about 7 cm (the width of the insulation and pipe is taken into account).
Polyethylene is placed on the thermal insulation, and lathing is placed on it. The insulation is laid between the joists, securing the free space with polyurethane foam. In order for the pipe to pass through all the joists, grooves must be made at the joints. A layer of plywood is laid before the facing covering.
Cable system installation
The method of laying the cable is the same as for the water pipe. For convenience and ease of installation, you can use special electric mats. This is a thin cable that is supported by fiberglass film. They are easier to attach to thermal insulation.
Connection diagram for cable heated floor
A layer of metal reinforcing mesh is laid in front of the mats. There is no need to secure the mats. The tile covering can be laid directly on them using special glue.
The cable is installed similarly to a water pipe. At the bend points it is intercepted with clamps, which are fixed into thermal protection. A screed is poured on top and tiles are laid.
Water flooring
Water heated floor is the name of the heating system, which consists of a pipeline and a coolant mixing unit. The heat source is water that circulates through a specially designed flexible pipe.
This flooring is suitable only for those houses and apartments that have an individual type of heating. It is prohibited to install water flooring on a balcony using central heating.
This is explained by the fact that this heating design causes increased heat transfer and hydraulic resistance of the overall system, and this can lead to serious consequences.
In order not to bite your elbows later, before you start creating a water floor yourself or not be left in the fool by ordering installation by craftsmen, you need to familiarize yourself with the general principles of the system’s operation. Video below.
The water floor is laid in the shape of a “snail” or “snake”. The first option is great for spacious balconies, and the second - for small rooms. To make a water floor, different types of pipes are used: metal-plastic, copper, polypropylene and polyethylene. Practitioners advise giving preference to a metal-plastic pipe.
Types of pipe laying.
In addition, it is necessary to select a collector system - a stainless steel rake. These devices are considered the source of water floors, they are mechanical and electronic. The water collector is installed in a special cabinet or in a niche prepared in the wall.
General diagram of the collector.
Before constructing a water heated floor on the balcony with your own hands, it is necessary to carry out a number of preliminary works. First, they determine the installation drawing and make a list of tools and materials. Be sure to check the condition of the balcony slab to understand whether it can withstand the load. Typically, a water heated floor is installed after preliminary screeding of the balcony area. As soon as the solution hardens, a thermal insulation layer is laid, and for this purpose penoplex is used. Then a damper tape is glued along the walls and a reinforcing mesh is placed, which will prevent the metal-plastic elements from moving.
After this, the pipes are laid, starting from the collector, which was previously installed. Then the ends of the elements that fit the collector are corrugated and connected to the main device. Within 24 hours, you need to check the functioning of the heating system under a water pressure of 5-6 bar. This is done to identify possible leaks. Then everything is turned off, and the pipes filled with water are filled with a mixture about 3 cm high. This type of flooring can be covered with laminate or tiles.
How to lay a lightweight water floor on a balcony on a wooden subfloor - also lightweight, without overloading the balcony, we will see in the video below.
Water floors have a number of advantages:
- create uniform heating over the entire surface of the balcony;
- maintain the necessary humidity on the balcony and prevent the formation of mold;
- will last long and safely.
If you make heated floors on the balcony, you can get a fully heated room. Such a balcony will be a wonderful embodiment of the most daring design solutions.